1. GENERAL BACKGROUND
1.0 What is topography?
|
| Topography is the science of measuring
the earth and its features, and of making maps, charts and plans
to show them. These features may be natural, such as
plains, hills, mountains, lakes, streams, rocks or forests. They
may also be man-made, such as paths, roads, buildings,
villages or fish ponds. A topographical map can also show the slope
of the ground. It can show not only which places are high and which
are low, but also how steep the land is between high and low points.
Sometimes topography is also called surveying. A
person whose profession is making topographical measurements and
recording them on maps, charts and plans is called a surveyor.
1.1 Purpose of this manual
In this manual, you will learn what you need to know about topography
to help you choose a good site for your freshwater fish-farm,
and to design and build fish ponds, reservoirs for storing water,
and small dams. You will also learn how to draw your own topographical
maps and how to use topographical maps that are already available.
To do all this you will learn:
- How to measure distances, angles, slopes, and height differences,
- How to set out straight lines, perpendiculars, and parallels
in the field;
- How to determine horizontal and vertical lines;
- How to survey an area of land to find its size and its high
or low, flat or sloping features (called the relief);
- How to make simple surveys that will help you when you are
ready to build your fish-farm;
- How to prepare and how to use topographical plans and maps;
- How to calculate areas and volumes.
|
|
|
You will learn some of the technical language that land surveyors and
civil engineers use. This way, you will be able to discuss your plans
and projects with them more easily, and you will better understand books
on topography, engineering and surveying.
1.2 Why do you need to know about
topography?
Choosing a site
1. In other books in this series, Simple Methods for Aquaculture,
FAO Training Series (4 and 6), you learned how to study water
and soil on a site before deciding to build a reservoir for storing
water and a fish-farm on it. Topography is also very important when
you are choosing a site. Good fish-farm construction is possible only
with the right topography.
2. After you choose a possible
area of land for your fish-farm, you will need to measure:
- its size;
- the slope of its ground surface;
- its elevation (height) in
relation to the source of water you want to use.
You will also need to find out:
- the distance between the source
of water and the location of the ponds;
- the best way to supply water to
the ponds;
- the easiest way of draining the
ponds.
3. You will need to measure distances in different ways. You may have to
measure very long distances; to do this, you must know how to measure distances along a
straight line, and how to keep this line straight. In addition, when you measure on a
slope, you will need to find the horizontal distance rather than the distance on the
ground.
4. When you are looking for a site for a small dam, you will find that the best choice is a
narrowing valley where the stream slope is not too great and the valley walls are steep.
You can use an existing topographical map to help you find such a valley, or you can
measure a valley yourself to see if it is a good dam site.
5. When you have chosen the best site for your fish-farm, topographical
methods will help you to decide whether you can do all the work
that is needed on it.
Surveying a site
6. After you choose a possible
site for your fish-farm, you will need to survey the site, keeping in mind your plan for the farm. For this survey you will
measure distances, directions, areas, slopes and height differences in more detail.
7. To do this, you will have to
draw a detailed
topographical plan. This
plan will show the position of boundaries, the different heights of land forms such as
hills, and the location of existing physical features such as paths, roads, streams,
springs, forests, rocks and buildings. Such a plan is very important because it gives you
the basic horizontal and vertical elements of the area, which will guide you in your
design of the farm. It shows you the direction the water will have to take, from higher to
lower points. It guides you in choosing where the water-supply canal, the ponds and the
drainage ditches will go. It becomes the basis for estimating how much earth you will have
to move as you build, and how much all the work will cost.
8. All the physical features of your fish-farm depend
directly on the topography of the site. These features include the type,
number, size and shape of the fish-ponds, and how they are placed in
relation to each other. The supply of water and the type of drainage
also depend on the topography of the site.
Fish farm

|
|
Plan
|
Making a construction survey
9. Once you have made a detailed
survey of the site you have chosen, and designed the fish-farm or dam (see next volumes in
this series), you will use topographical methods to help guide you as you build.
10. You will need to make sure
that your fish-ponds regularly get the right amount of water. To do this, you must build a
water supply canal with the right size and bottom slope. First, you will need to stake out
the water supply canal, along its centre-line. You will
then need to tell the workers helping you exactly how wide, deep and long the canal must
be, and how much earth they must remove at each point of the canal.
11. You will need to stake out the bottom area of each pond
and tell the workers how much earth to remove and where to transport
it. This will allow you to drain all the water out of the ponds in a
natural way. It will then be easy to harvest your fish and to manage
your pond.
Canal

|
|
Pond
|
12. You will need to stake out the dikes of each pond and show the workers where to remove soil
and where to add soil. You will also need to mark the location, height and width of each
dike, as well as the slopes of their walls. Usually, you will need to set out perpendicular*(crossing) and parallel* (side-by-side) lines to do this.
13.You will need to follow the exact plan of your fish-farm as you
work. To do this, you will have to be sure where each structure should
be built, and you will have to check these locations during construction.
You will need to measure differences in height between the different
parts of the farm to make sure that the water will flow naturally in
the right direction. The water will have to flow, for example, from
the water source to the ponds, from the pond inlets to the outlets and
from the outlets into a drainage ditch, which carries the water away
from the farm site.
Plan

|
|
Working from the plan

|
Studying your water supply
14. In Water for Freshwater Fish Culture, FAO Training Series (4),
you learned how to use simple topographical methods:
Measuring the volume of a pond

|
|
Choosing a site for a reservoir

|
Studying your soils
|
|
15. In Section 1.3 of Soil and Freshwater Fish Culture,
FAO Training Series (6), you learned that the qualities
of soils vary depending on the topography of the area. Shallow
soil is found on sloping land and deep soil is found on flatter
land, for example. You learned that alluvial soil, which is found
in sedimentation plains, often contains large amounts of clay.
The clay in this soil helps it to retain water, and makes it a
good material for building dams.
16. You will need to use topographical methods to draw a map
showing the different kinds of soil present in an area of land.
In Soil and Freshwater Fish Culture, Sections 2.4
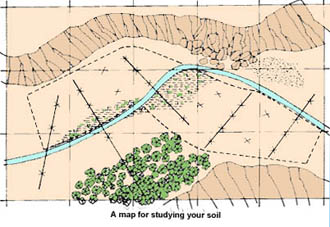
and 2.5, you learned how to use two of these methods: reconnaissance
surveys and detailed soil surveys.
|
|
A map for studying your soil
|
1.4 How to plot lines in the field
1. Lines of measurement are always plotted on the ground
either as one straight line or as many connected
straight lines. The markers that show where the line goes can
be pegs, small concrete pillars, simple wooden stakes or ranging poles
(see next Section).
2. Lines of sight* are always straight lines. The object
or point you look toward, called the point of reference,
is marked either by a ranging pole or a levelling
staff (see Section 5.0).
3.Vertical lines of measurement can be formed with the
help of a plumb-line (see Section 4.8).
Some field markers

|
|
A ranging pole

|
|
A plumb-line

|
1.5 How to make and use markers to plot your line
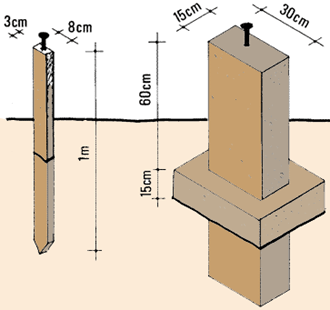
1. You can make wooden pegs to use when you plot your
line. Get straight pieces of wood 3 to 8 cm in diameter and 0.1 to 1
m long. With a knife, shape the pieces at one end to make sharp points
so that they can be easily driven into the ground. Your pegs will last
longer if you make them out of hard wood and coat them with used engine
oil to prevent rotting.
2. You can use iron pegs, made of cut pieces of iron rod or tube
about 1.3 to 2 cm in diameter. You can also use long wire nails. Iron pegs last longer
than wooden pegs, but they cost more and they are heavier and more difficult to carry when
you are working in the field.
3. When you have a point on the
ground that you will need to refer to for a long time, you can mark it with a small, upright pillar made of concrete. Such pillars should be
from 15 to 30 cm square, and 10 to 60 cm high. You can build them on the site, placed on a
small concrete base.
Note: to make your measurements in the field more accurate,
you will often need to mark a point on your peg or pillar.
This will show exactly where you must take the measurement, or place
a measuring instrument. To do this, you can drive a nail into the flat
top of the wooden peg, or you can set a nail into the top of the concrete
pillar.
The nail shows the exact point
|
|
|
| 4. Ranging poles are the most commonly
used markers in topographical surveys. Ranging poles are
long, thin poles. You can use them to mark a point on the ground
that you need to see from a distance. You can easily make
your own ranging pole. Get a straight wooden pole, 2 to 3
m long and 3 to 4 cm thick. Shape the lower end into a point to
make it easier to push into the ground. At the other end of the
pole, cut a slit 5 cm deep into the top side. Then, starting from
the top end, paint one 40 cm long section red; paint the next 40
cm section white. Continue painting the pole in alternating red
and white sections until you reach the end.
5. Sometimes you will need to sight a ranging pole from
a long distance. To make the pole easier to see, fasten
two small flags of different colours, one above the other, near
the top of the pole. Or you can place a 15 x 25 cm piece of white
cardboard in the slit at the top of the pole.
|
|
Ranging pole

|
White card for sighting
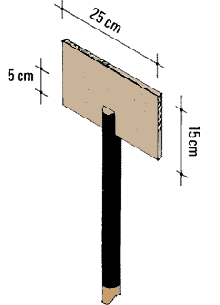
Colourful flags for sighting

|
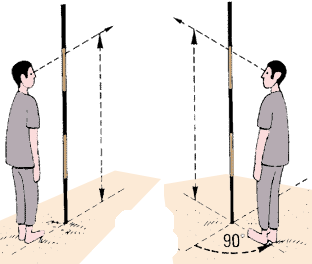
6. You must always drive ranging poles vertically into the ground. To check that your pole
is vertical, take a few steps back and look at it. If it seems straight, walk one-quarter
of the way around the pole, and check that it also looks straight from the side. Adjust it
if necessary until the front and side views are both vertical.
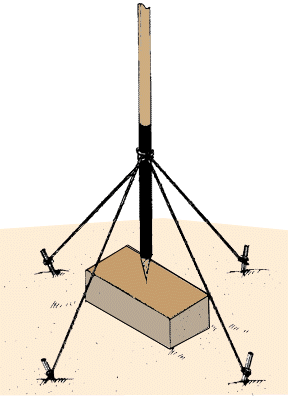
7. At times you will have to centre a ranging pole over a marker
and leave it in position for some time. To do this, you can use a series
of guys. These are ropes or wires which you will tie around
the pole, and fasten to pegs in the ground. You can also use guys with
the pole on hard ground, whenever you cannot drive the
pole deep enough into the ground to keep it in a vertical position.
Check from both sides that the ranging
pole is vertical
|
|
A guy to hold the ranging pole steady
|
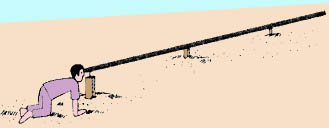
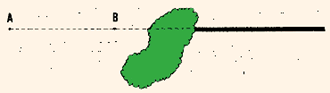
1.6 How to set out a straight line between two points
|
|
1. When you carry out a simple survey, you will often need to
set out straight lines between two given points,
called A and B, which are more than 50 m apart. To do this, you
will "range" line AB. This means that you
will plot intermediate points along line AB at intervals
preferably shorter than 30 m.
2. When you range a line, you will face one of two possible situations:
- you can see point A from point B and vice versa;
- you cannot see point A from point B. In this case, an obstacle
(a forest, river, lake, etc.) is in the way.
|
|
|
Setting out a straight line between two points
visible from each other
|
|
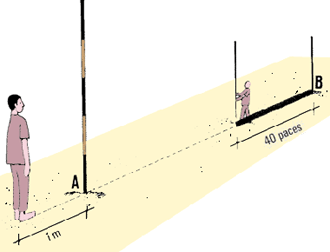
3. You want to set out line AB. Mark the beginning of the line,
point A, with a ranging pole. Then mark the end of the line, point
B, with another ranging pole. You will now need an assistant to
help you.
4. Stand about 1 m behind ranging pole A and look at ranging
pole B. Your assistant should stand at ranging pole B. Ask him
to walk, carrying another ranging pole, about 40 paces from B
towards A, and stop.
5. Ask your assistant to move slowly sideways while he holds
the ranging pole vertically in one hand between his thumb and
forefinger. When the ranging pole he is holding hides ranging
pole B,ask him to stop and to drive his pole vertically
into the ground. This is intermediate point C.
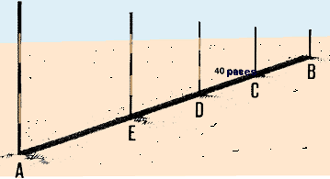
6. Ask your assistant to walk 40 paces toward you, from C toward
A. Then repeat the same procedure as above with a fourth ranging
pole. Mark the new intermediate point D.
|
|
Setting out line AB with ranging poles
|
7. If the distance from D to A is greater than 50 m, you should repeat
the same procedure and mark the next intermediate points E, F, G
Note: always make sure that the ranging poles are vertical.
|
|
Make sure the ranging poles line up exactly
|
Setting out a straight line
between two points when you cannot see one from the other
|
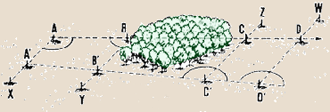
|
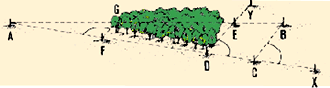
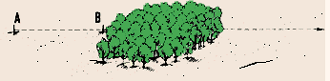
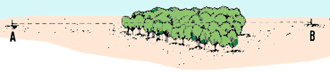
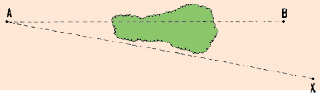
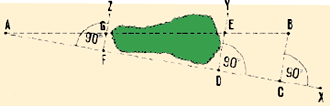
8. You have to set out line AB, which runs through a forest.
Mark points A and B with ranging poles. Choose a point X, which
is beyond point B, and which you can see clearly from point A.
Mark point X with a ranging pole or a marking peg. Then set out
a line as above from point A to point X, avoiding the forest.
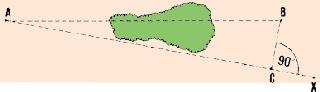
9. Look at Section 3.6 of this manual, and learn how
to drop a perpendicular. Then, from point B, how
to drop a perpendicular. Then, from point B, drop perpendicular
BC onto line AX. The lines will cross at point C.
|
|

|
| |
|
| |
 Set out line AX
 |
| |
|
| |
 Drop perpendicular BC
 |
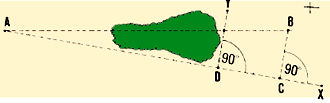
| 10. Choose a point D on line AX, close to the forest,
and set out perpendicular DY. Point Y must be on the
other side of line AB.
11. Measure horizontal distances
horizontal distances AD, AC, and
CB, using one of the methods described in Chapter 2.
12. Intermediate point E will be the place where line DY intersects
line AB. To find its exact location, you must calculate horizontal
distance DE using the formula:
13. To mark point E, you must measure this distance
DE horizontally. Starting from D, pace off the distance DE along
line DY. Mark intermediate point E with a ranging pole.
14. Walk along line AX to the other side of the forest. Set out a perpendicular FZ close to the
forest, using one of the methods described in Section 3.6. Point
F is on line AX; point Z is beyond line AB.
15. Measure horizontal distance
AF (see Chapter 2).
16. Point G will be the intersection of lines AB and FZ. To find
it you must first calculate horizontal distance FG as:
17. Measure this distance FG horizontally. From F, measure
along line FZ to determine point G. That is, the
intersection of line FZ and line AB. Mark intermediate point
G with a ranging pole.
18. You have now clearly laid out and marked line AB in the
field as line AGEB
|
|
 Set out perpendicular DY
 |
| |
|
| |
 Set out perpendicular FZ
 |
| |
|
| |
 Connect the points you have found to form line AGEB
|
| |
|
| |
|
1.7 How to prolong a line you have marked in the field
|
|
1. You will often need to make a straight line you have marked
longer; this is called prolonging a line. As in the
previous section, you will have to consider two different situations:
- prolonging a line where there is no obstacle;
- prolonging a line behind an obstacle.
Prolonging a line where
there is no obstacle
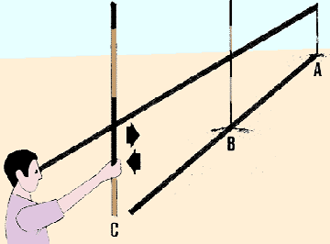
2. Mark a straight line AB in the field with a ranging pole
at each end. If you are working alone, take a ranging
pole and walk away from point B, following the direction of line
AB as closely as you can. After you have walked about 40 paces,
stop and turn around to face ranging poles B and A.
3. Hold your ranging pole vertically in front of you between
your thumb and forefinger. Then move slightly sideways, if necessary,
until your pole seems to hide ranging poles B and A
from your view. Drive your pole into the ground in a vertical
position.
4. Step back 1 to 2 m along the line and check to
see if ranging poles B and A are still hidden behind your ranging
pole. If they are not, move your pole a little to the left or
right, and step back and check again. Repeat this procedure until
your pole is in the right position. This then marks point C, which
prolongs line AB.
5. If you are working with an assistant, stand 1
to 2 m behind ranging pole A to determine a line of sight
AB. Your assistant should stand by ranging pole B.
6. Ask your assistant to walk, carrying a ranging pole, about
40 paces from ranging pole B in the direction away from you. He
should then stop and turn around to face you.
7. While your assistant holds his ranging pole vertically, ask
him to move to the left or right until ranging poles A and B hide
his ranging pole. At that point, direct your assistant to drive
his ranging pole vertically into the ground. This marks point
C, which prolongs line AB.
|
|
 Line up all the ranging poles alone
 |
| |
|
| |
 ... or with an assistant
 |
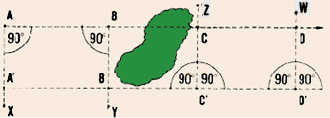
Prolonging a line behind an obstacle
|
|
|
|
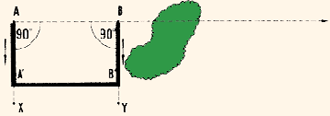
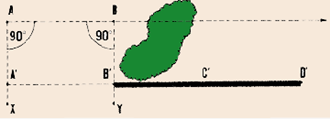
8. You want to prolong line AB to a point behind a forest. Set out perpendiculars AX
and BY from points A and B respectively, using one of the
methods described in Section 3.6.
9. On these two perpendiculars, measure
equal horizontal distances AA' = BB' You must make
sure that this distance is far enough along the perpendiculars
so that the line joining points A' and B', when prolonged, will
just clear the obstacle.
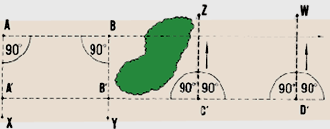
10. Prolong line A'B' through C' and D',well past the obstacle,
using the method described above in steps 2-7.
11. At points C' and D' set out perpendicular
lines C' Z and D'W (see Section 3.6).
12. On these two perpendiculars, measure horizontal distances
equal to AA' (see step 9 above) and determine points C
and D. Mark these points with ranging poles. You have now prolonged
line AB with line CD.
|
|
|
| |
|
| |
You must prolong line AB through the forest
|
| |
|
| |
 Set out perpendiculars AX and BY, then find points
A' and B' and join them with a line |
| |
|
| |
 Prolong line A'B' to points C' and D'
 |
| |
|
| |
 Set out perpendiculars C'Z and D'W
 |
| |
|
| |
Find points C and D and join them to prolong
AB
|
| |
|
| |
|
| |
|
|