11. TOPOGRAPHY AND FRESHWATER FISH CULTURE
11.0 What you have learned
|
|
1. In the previous chapters of this manual you have learned:
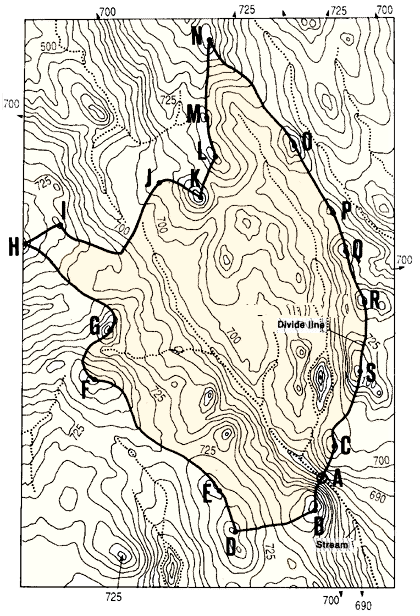
- how to measure the various parameters, or fixed values, which describe
the topography of a tract of land, such as distances, horizontal and
vertical angles, and differences in elevations;
- how to make a topographical plan survey;
- how to survey the local relief by direct levelling;
- how to determine contours in the field;
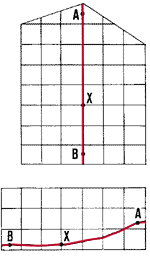
- how to prepare topographical plans and maps and
- how to measure areas, both in the field and from plans or maps.
2. On the basis of this new knowledge, you should now be able to:
- choose a suitable site for the construction of a small
reservoir or freshwater fish-ponds;
- design your fish-farm and plan its construction.
3. You will learn more about site selectionand about
fish-farm design and construction in the next volumes of Simple
Methods for Aquaculture. In the following sections,
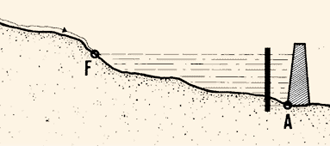
some of this information will be briefly discussed to give you a better
idea of how you can use topographical surveys to design and build your
fish-farm. You should also refer to some of the examples presented in
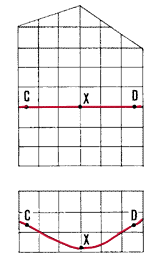
each of the previous chapters. You can use them as guidelines or suggestions
for your own fish-farm project.
|
|
|
11.1 How to make preliminary studies from topographical
maps
|
|
1. Before you begin a field survey, you will usually need to study
available topographical maps to get information for various
projects that you want to do, and to compare these projects and the
advantages and disadvantages of each. You can then more easily choose
the order in which you will make the reconnaissance field surveys.
2. Some of the most useful things you can learn from a topographical
map are the size of a drainage area, the size
of a flooded area, the characteristics of selected ground
profiles and the distribution of slope categories in
a given area.
|
|
Stream network
|
Finding the size of the drainage area and the availability
of water for fish culture
3. You have learned (in Volume 4, Water) that the catchment
basin of a stream is the total land area which feeds water to that particular
stream.
4. At a particular point A on a stream, the total water
available is usually provided by a series of individual catchment basins.
These define the drainage area for point A. This area is
bounded by the divide line, which is a line drawn along the ridges
surrounding a drainage area.
5. If you have a topographical map of the region, you can draw the divide
line and define the drainage area for each point you choose
along a stream (dotted lines). You may want to obtain the water supply for
your fish-farm, which will be built downstream, at point A. Starting from
point A, draw a line perpendicular to the contour lines on either
side of the stream bed, until you reach the points B and C with the highest
altitude. Then join B to D, using the same method, and continue from
E, F, ...I, etc. until you reach point C on the other bank of the stream.
The area you have enclosed by the divide line ABD ... SCA is the drainage
area for point A on the stream.
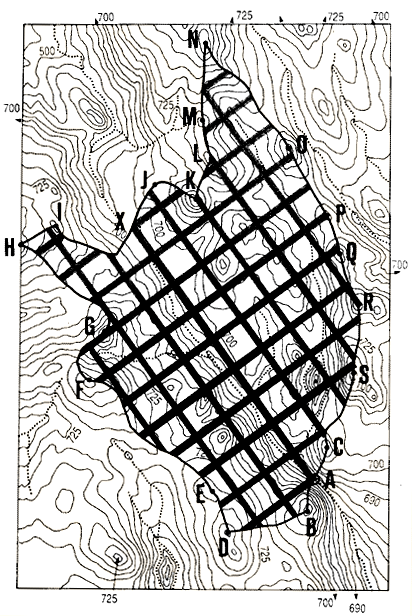
6. Using the square-grid method, preferably (see Section 10.3),
find the area of the region enclosed by the divide line to find the
size of the drainage areafor stream point A.
7. You can estimate the quantity of water available
at point A from the size of the drainage area, the most common vegetation there,
the general relief and the amount of rainfall in the area. To do this, you need
to obtain the values of the local runoff coefficients from
a government office, such as the hydrological service.
Example
Water availability per square kilometre of drainage area in the Bouak�
region, Cote d'Ivoire, Western Africa
|
Annual rainfall (mm)
|
Runoff coefficient (percent)
|
Runoff1 (mm)
|
Water availability2 (m3/km2)
|
|
800
|
0.9
|
7
|
7000
|
|
900
|
2.8
|
25
|
25000
|
|
1000
|
4.7
|
47
|
47000
|
|
1100
|
6.6
|
72
|
72000
|
|
1150
|
7.5
|
87
|
87000
|
|
1200
|
8.5
|
101
|
101000
|
|
1300
|
10.4
|
135
|
135000
|
|
1400
|
12.3
|
172
|
172000
|
|
1500
|
14.2
|
212
|
212000
|
|
1600
|
16.1
|
257
|
257000
|
|
1700
|
18.0
|
305
|
305000
|
1 Runoff (mm) = annual rainfall (mm) x (runoff coefficient
� 100)
2 Water availability (m3/km2) = runoff (mm)
x 1000
As the average annual rainfall in this region amounts to 1 150 mm,
you can estimate the average water availabilityto be about 87000
m3/km2 of drainage area for this particular region of
the country. If the calculated drainage area upstream from point A is 2.72 km2,
the average water availability at point A can be estimated as 87000 m3/km2
x 2.72 km2 = 236640 m3 per year.
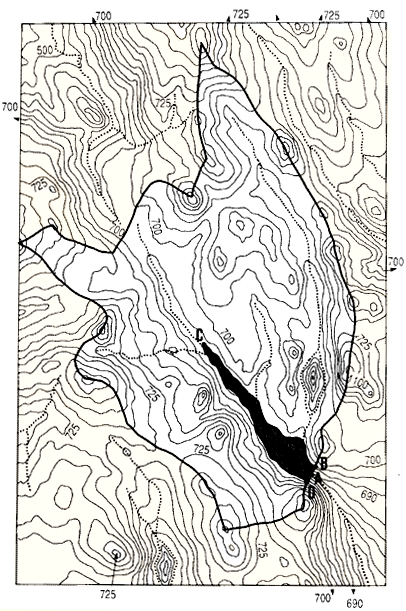
Finding the size of the area to be flooded
8. If you need to build a dam at point A to create a water reservoir, you can
fairly easily determine the size of the area to be flooded
upstream from point A, if you know the elevation of the water surface
in the reservoir.
9. At the dam site, identify the contour line on the topographical
map which, on one side of the stream, corresponds to the elevation of the reservoir's
water surface. Follow this contour line first upstream, then across the stream,
and finally downstream, back to the dam site. The area enclosed within this
contour line will be the flooded area for that particular reservoir
water level.
Example
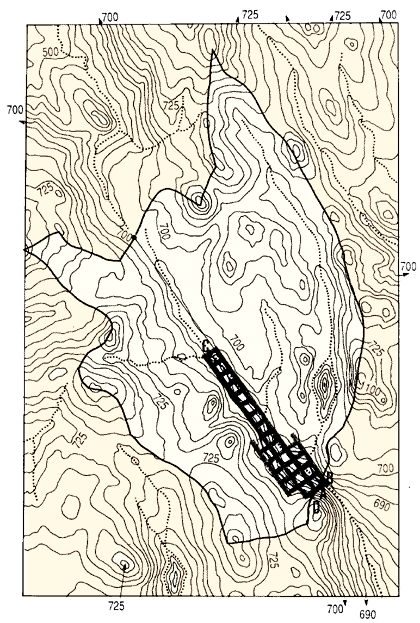
Elevation of reservoir water surface level: 690 m. Follow the 690 m contour
line from point B at the dam site, on the left bank, up to point C (stream crossing)
and back down to point D at the dam site, on the right bank. The flooded area
at the 690 m water level will be BCDB.
10. Using the square-grid method, preferably (see Section
10.3), find the area of the zone within the selected contour line to obtain
the size of the flooded area. If you know the average depth of the
reservoir, you can then calculate the volume of water which is stored in it.
Obtaining ground profiles from topographical maps
11. From a topographical map, you can find the profile of the ground
along any selected straight line AB. Draw line AB on the map. Place one edge
of a straight strip of white paper along this line, and mark on it the position
of the main contour lines 775 m, 750 m ... 675 m which line AB intersects.
Next to these marks, note their elevations.
12. Transfer these marks onto square-ruled millimetric paper, using a horizontal
distance scaleidentical to the map scale.
13. Make a vertical scale for elevations 10 to 30 times larger than
the horizontal scale, and mark this scale according to the contour lines present
along the profile.
14. Indicate the elevation of each distance mark by a point along a perpendicular
line.
15. Join these points to obtain the ground profile along line AB.
Profile along line AB
|
Finding differences in elevation along a stream
|
| 16. You may need to choose a site on a stream to build a dike
which will create a water storage reservoir, or you may want to use an existing
stream to supply a fish-farm with water. In these cases, you should study
the longitudinal profile of the stream and determine its slope
between two selected points. If you are choosing a dam site, you should
study the slope from the dam site to the highest elevation (upper reach)
of the future reservoir. This study will give you an idea of the volume
of water that can be stored in the reservoir. If you want to divert
a stream to supply water, you will measure the slope from the water-intake
point on the fish-farm to its water outlet. This study will give you
the difference in elevation available for you to build a fish-farm on the
site which lies between these two points. |
|
|
| |
|
|
| |
|
Pond site
|
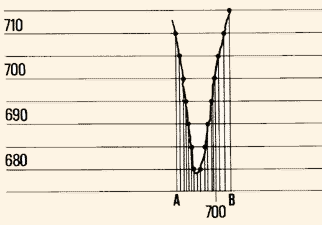
17. To determine the slope of the stream between A and B, for example, first
clearly mark on the map the two extreme points A and B of the profile you want
to study. Then mark points C, D, E and F, at which contour lines cross
the stream bed. For later reference, you may also mark
points of particular interest along the stream, such as a tributary or branch
of the stream (G, H), or a road bridge.
18. Starting at point A, measure to the millimetre, the
distancesAG, GC, CD ... FB between these various marked
points, closely following the stream bed as you do so. Enter these measurements
in a table as shown in the example.
19. Using the map scale, transform these map measurements
into ground distances (in metres), and calculate the
cumulative distances from point A, as shown in the table in the example.
20. From the contour lines of the map, determine the elevations
of points A, G, C, D, H, E, F and B, and enter these figures in the table. As
you are working downstream, these altitudes should steadily decrease by a
constant value equal to the contour interval of the map.
|
Example
Longitudinal profile of stream section AB
|
Stream
point
|
Map distance
(cm)
|
Ground1 distance
(m)
|
Cumulative distance
(m)
|
Elevation2
(m)
|
|
A
G
C
D
H
E
F
B
|
2.9
0.7
1.1
0.4
2.1
0.5
1.1
|
580
140
220
80
420
100
220
|
0
580
720
940
1020
1440
1540
1760
|
690
(tributary)
685
680
(tributary)
675
670
665
|
1 Ground distance (m) = map distance (cm) x map scale
(m/cm).
2 From contour lines with contour interval = 5 m.
|
|
Longitudinal profile AB
|
21. Draw the longitudinal profile of the AB stream
section as explained earlier (see Section 9.5), using the information you have
gathered. To its horizontal scale, add the positions of the additional points
of interest so that you can refer to them later.
22. From this longitudinal profile, you can now easily determine the difference
in elevation existing between any two points X and Y of the stream within this
section AB.
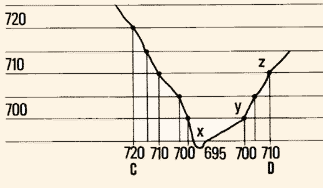
Determining the shape of stream valleys
23. Using a method similar to the one described in steps 11-15, you can also
determine the general shape of a stream valley. To do this, you will draw cross-section
profiles perpendicular to the stream bed, at points of interest to you.
These points will depend on the purpose of your survey. If you are planning
to build a small dam, you will draw cross-section AB. If you are
looking for a suitable fish-farm site, you will draw cross-
section CD.
24. Get a strip of paper and align one of its edges with the cross-section
line. Mark on the strip the positions of the various contour lines,
together with a few elevations for reference.
25. Transfer these marks onto the horizontal scale of a cross-section
profile (see Section 9.5). This scale will be the same as the map scale.
26. Select a vertical scale for the elevations 10 to 30 times
larger than the horizontal scale. Transfer the elevations of each mark vertically
onto the graph. The line joining the points represents the cross-section
profile of the valley along line AB.
27. If you repeat this procedure for line CD, you will draw the valley
cross-section profile CD. When comparing it to cross-section AB, you can
see that the two profiles are different. Profile AB has a true V-shape, but
profile CD has a V-shape deformed on one side.
Cross section AB
|
|
Cross section CD
|
28. In the context of fish culture, cross-section valley profiles may be classified
into four types, according to their shape. When you know
the shape of the valley in the area where you want to build your fish-farm,
you will be able to:
- decide which type of pond to
build;
- design your fish-farm better.
This information will be explained to you in the next volume in this series.
You will learn, for example, that site AB above would be a good place to build
a dam at minimum cost, but it would not be suitable for fish-ponds. At site
CD, however, the XYZ side of the valley shows a lateral slope (1.25 to 2.17
percent) suitable for the construction of fish-ponds (see step 27, above).
Making a slope map from a topographical map
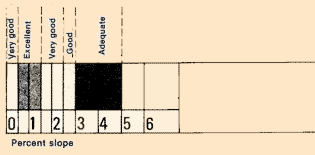
29. Ground slope is one of the most important elements in
the selection of a suitable site for fish-pond construction. The best slope
conditions for a fish-pond are on land with a slope averaging 0.5 to
1.5 percent, but conditions on near-to-horizontal ground
and on ground with slopes from 1.5 to 3 percent are still fairly good. As the
slope increases, the cost of construction increases also, particularly above
5 percent slope.
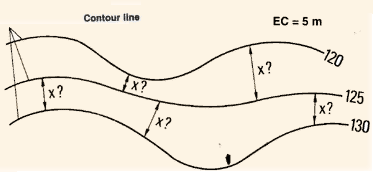
30. When you study a topographical map, you may find it useful
to determine a series of slope categorieson it.
In this way, you will have made a slope map.
Example
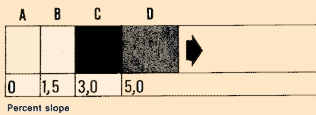
Ground slope categories useful in fish culture
A - ground slope smaller than or equal to 1.5 percent
B- ground slope between 1.5 and 3 percent
C - ground slope between 3 and 5 percent
D - ground slope greater than 5 percent
31. To prepare a slope map, you must first make contour line-spacing
guides for each of the slope categories and for the particular topographical
map you are using. If this topographical map has:
- a distance reduction scale where
1 cm = n (m)
- a contour interval Cl(m)
the interval X (in cm) between the lines of
your spacing guide is calculated as:
S being the greatest slope in percent characterizing each of the
slope categories you want to map.
Usefulness of slopes
|
|
Categories for slope map
|
|
Example
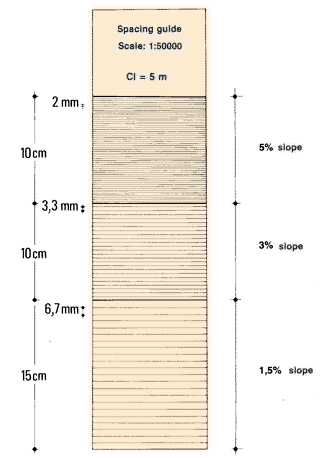
You have a topographical map on which you want to map the above
four slope categories (A, B, C, D). You first need to make three spacing
guides for 1.5, 3 and 5 percent slopes, respectively. The topographical
map scale is 1 :50000 (1 cm = 500 m) and the contour interval is 5 m.
Calculate the intervals X between the lines of your spacing guides as
follows:
- 1.5 percent slope: X = (100 x 5) � (500 x 1.5) = 500
� 750 = 0.67 cm or 6.7 mm
- 3 percent slope: X = (100 x 5) � (500 x 3) = 500 �
1500 = 0.33 cm or 3.3 mm
- 5 percent slope: X = (100 x 5) � (500 x 5) = 500 �
2 500 = 0.2 cm or 2 mm
32. Get several sheets of squared-ruled millimetric paper and prepare
your spacing guides as follows:
- using a sharp pencil with a hard lead, draw a line across the sheet
of paper close to the bottom;
- for a vertical distance of about 15 cm, draw a series of lines parallel
to this bottom line, at a distance equal to the interval X (calculated
as explained above), for example, 6.7 mm for the 1.5 percent slope.
1.5 percent is your spacing guide;
- up to a further vertical distance of about 10 cm, draw a second series
of lines parallel to the first series, at a distance equal to the interval
X calculated for the second slope value, for example, 3.3 mm for the
3 percent slope. 3 percent is your spacing guide;
- repeat the procedure to obtain the 5 percent spacing guide.
|
|
|
| |
|
|
|
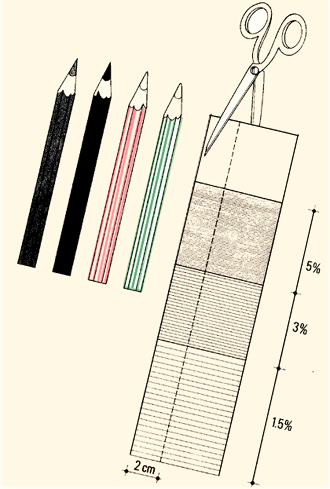
33. You are now ready to make your slope map, identifying,
for example, the four slope categories on the topographical map. Proceed
in the following way:
(a) Get several differently coloured crayons or coloured pencils. Select
one colour to represent each slope category. The lightest colour
can represent the least sloping ground (0 to 1.5 percent), while the darkest
colour can be for the most sloping ground (more than 5 percent).
(b) Cut a 2 cm strip off your contour-line spacing guide (see step 32)
which gives the minimum interval between contour lines on your
topographical map for the "1.5 to 3 percent" category, the "3
to 5 percent" category, and the "greater than 5 percent"
category. Cut the strip perpendicular to the spacing lines so that all
three categories are shown on it.
|
|
|
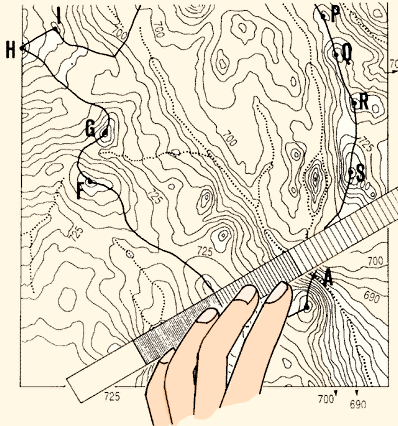
(c) Place this strip on the map. Then, going through them one by one, determine
which sections have intervals between the contour lines smaller than
or equal to the interval on the strip section that corresponds to
the 5 percent spacing guide. Since such sections have slopes
equal to or greater than 5 percent, you should colour them with the darkest
colour.
Note: you should compare the interval of the strip
with the intervals between contour lines along a line perpendicular
to the contour lines, which is the direction of maximum
slope.
(d) Repeat the same procedure with the section of the strip corresponding to
the 3 percent spacing guide. Determine which uncoloured
sections of the map have intervals between contour lines smaller
than or equal to the strip interval. Such sections have slopes from
3 to 5 percent, and you should colour them with the next lightest colour.
(e) Repeat this procedure with the section of the strip that corresponds to
the 1.5 percent spacing guide, and determine the
uncoloured sections of the map which have slopes from 1.5 to 3 percent.
Colour them with the next lightest colour.
(f) Finally, using the same procedure, check that the uncoloured sections
of the map have intervals between the contour lines greater than the interval
on the 1.5 percent section of the strip. Colour these sections
with slopes less than 1.5 percent with the lightest colour of all.
11.2 How to make a reconnaissance survey of a possible
site
1. After you have made preliminary studies from available topographical
maps, you can choose the best potential site(s) for the construction
of fish-ponds (see the next volume in this series).
2. You should now organize a reconnaissance survey of the selected
site(s) in the field in order to obtain more detailed topographical information.
This survey should include, at least, a longitudinal profile of the stream
valley and/or the selected site(s), as well as cross-section profiles
of the site(s). If you are planning the construction of a reservoir, you
can survey its maximum area by contouring and find its maximum water level by
levelling. Then, you can calculate both the surface area and the water volume
of the reservoir.
Making cross-section profiles of the potential site
|
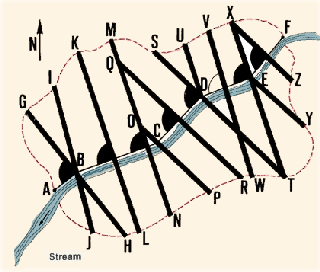
| 5. You survey a series of cross-section profiles GH,
IJ, ...,based on the above longitudinal profile, across a valley at intervals
of 20 to 50 m, covering the entire area of the potential site (see Section
8.2). Plot the profiles on graph paper. This makes it possible to calculate
the ground slopes and, on this basis, design the fish-farm. |
|
|
| |
|
|
Contour-mapping of the potential site
|
|
6. From the results of the above survey, you can also prepare a
plan of the potential site, and plot
the contours on it (see Section 9.4, step 10).
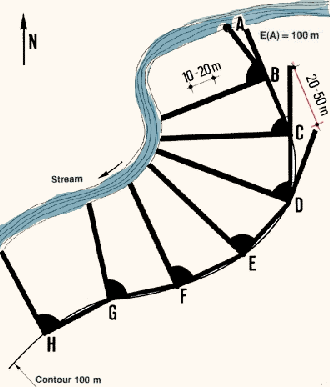
7. In another contour mapping method, you first choose a reference
pointon the potential site, such as the water intake point A at
the stream. Point A will then be used as a
bench-mark with a given elevation E(A) = 100 m, for example: from
point A, you will identify the E(A) contour
ABC ... H in the potential site, by contouring (see Section 8.3).
8. At intervals of 20 to 50 m on this E(A) contour, you will survey perpendicular
cross-section profiles from the contour to the stream. From
the results of this survey you can identify other contours and prepare
a contour map.
|
|
|
| |
|
|
Finding the maximum area of a
reservoir
|
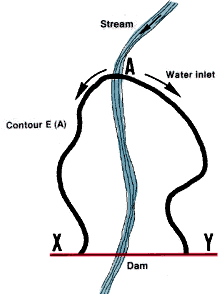
| 9. When you have fixed the positions of both the water inlet
A and the dam centre-line XY of a proposed reservoir, you can easily determine,
on the ground, the maximum area of this future reservoir.
From the water inlet A, find the position of contour E(A) by contouring
from A on both stream banks to line XY. |
|
|
11.3 How to make a feasibility study of a potential site
1. From the data obtained during the reconnaissance surveys, you can draw a
topographical plan to scale, showing the various distances and elevations.
You can study the design of the fish-farm or, if you need to build a dam, you
can obtain additional information on the characteristics of the water reservoir
that will result from the dam. Fish-farm design will be discussed further in
the next volume in this series, and you will learn more about the characteristics
of reservoirs there. In this section you will learn how to estimate the volume
of a dike built from earth, and how to calculate height differences for pumping
stations.
Estimating the volume of the future
reservoir
|
|
3. In Water for Freshwater Fish Culture (Volume 4, Section
4.2), you learned simple methods for determining the volume of a
future reservoir. Now, you will learn a fairly accurate,
rapid field method based on topographical surveys.
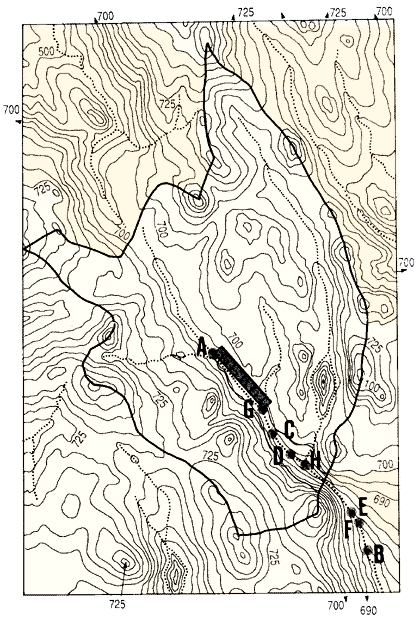
4. Every 20 to 50 m along the longitudinal axis AZ of the future reservoir,
mark perpendicular lines BC, DE ... QR within the area enclosed
by contour E(A). Use wooden pegs at 25 m intervals along the perpendiculars,
and mark them on each side of the axis AZ.
5. Start from end-point B of line BC, on contour E(A) where
the maximum water level will line up with the ground elevation. Using
a target levelling staff and a sighting level, transfer elevation
E(A) to the top of the pegs a, b and c. Drive
them into the ground until they are at the correct elevation. Pegs
a, b and c now clearly show the maximum depth of water which
will be present at each of these points when the reservoir is full.
6. Repeat this procedure for each transversal line DE, FG
... QR successively; similarly, stake out XY, the centre line of the proposed
dike.
|
|
|
| |
|
|
|
7. In a simple table, measure and record the height of
each peg above ground level for each transversal line, including
line XY, as shown in the example.
Example
|
Line
|
Peg height, m
|
|
a
|
b
|
c
|
d
|
e
|
| BC |
0.45
|
0.87
|
0.38
|
-
|
-
|
| DE |
0.85
|
1.42
|
0.73
|
-
|
-
|
| FG |
0.22
|
0.87
|
1.63
|
0.79
|
-
|
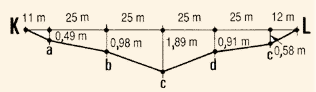
| KL |
0.49
|
0.98
|
1.89
|
0.91
|
0.58
|
| ... |
...
|
...
|
...
|
...
|
...
|
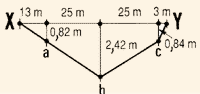
| XY |
0.82
|
2.42
|
0.84
|
-
|
-
|
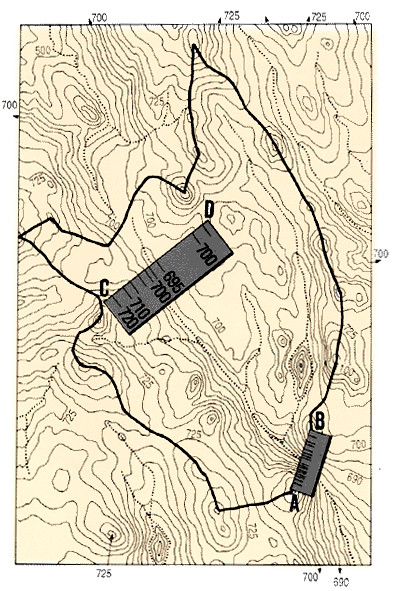
8. Using the correct scale, draw the cross-sections BC, DE ... QR,
and XY of the completely filled reservoiron square-ruled millimetric
paper. Use a vertical scale 10 times larger, for example, than the horizontal
distance scale. Remember that the end-points of each cross-section have,
by definition, a zero depth of water.
|
|
|
| |
|
|
| |
|
|
| |
|
|
| |
|
|
9. Calculate the area of each cross-section, adding the partial
areas of triangles and trapeziums as necessary (see mathematical formulas in
Annex 1).
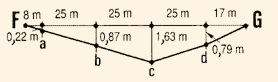
Area BC
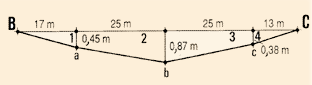
|
Example
Area BC = triangle 1 + trapezium 2 + trapezium 3 + triangle 4
- Triangle 1 = (17 m x 0.45 m) � 2
|
= 3.825 m2 |
- Trapezium 2 = [(0.45 m + 0.87 m) � 2] x 25 m
|
= 16.500 m2 |
- Trapezium 3 = [(0.87 m + 0.38 m) � 2] x 25 m
|
= 15.625 m2 |
- Triangle 4 = (13 m x 0.38 m) � 2
|
= 2.470 m2 |
|
Area BC
|
= 38.420 m2 |
10. Add the areas of cross-sections BC, DE ... QR, and multiply
this sum by the fixed interval between cross- sections
(in this case, 25 m) to obtain an estimate of the volume of the
reservoir upstream from the last cross- section QR.
Example
Volume of reservoir from point A to line QR = (area BC + area DE + ...
+ area QR) x 25 m
11. Estimate the volume of the last section of the reservoir,
between cross-section QR and the dike's centre-line XY. Multiply the area of
cross-section XY (see step 9) by half the distance between previous
cross-sections.
Example
Volume section QR/Z = (area XY) x (25 m � 2)
12. Calculate the volume of the entire reservoir by adding:
- the volume A/QR obtained in step
10; and
- the volume of QR/Z obtained in
step 11.
Example
Volume A/Z = volume A/QR + volume QR/Z
Estimating the volume of an earth dam
|
|
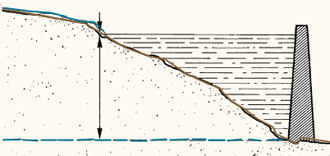
13. To rapidly estimate the volume of an earth dike XYto be
built across a given valley, use the following method. It will provide
a volume estimate about 10 percent smaller than the actual
volume. But this level of accuracy is good enough for the initial estimate.
14. Using the information from the table in step 7, calculate the
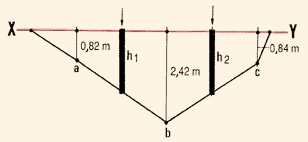
heights h of the dam XY at mid-points between consecutive pegs.
Example
For the dam XY there are only two mid-points to consider: one between
pegs a and b, and one between pegs b and c.
- Dike height a/b = (0.82 m + 2.42 m) � 2 = 1.62 m
- Dike height b/c = (2.42 m + 0.84 m) � 2 = 1.63 m
|
|
Mid-points to calculate the volume of dam XY
|
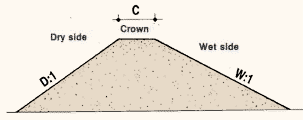
15. Using the correct scale, draw the
transversal section of the type of dike you plan to build (see Constructions,
20 in this series). There are three measurements, in particular, which you must
determine:
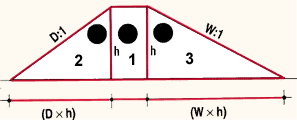
- the width C of the highest point, or crown, of
the dike;
- the dry-side slope of the wall outside the reservoir,
D: 1;
- the wet-side slope of the wall inside the reservoir, W:
1.
16. If you know these characteristics of the dike, you can calculate the
area of any transversal section of this dike by adding:
- rectangle 1 area = C x h;
- triangle 2 area = (D x h) x (h �
2);
- triangle 3 area = (W x h) x (h �
2).
Therefore, the area A of any transversal section of the
dike equals:
|
A = (Ch) + (Dh2 � 2) + (Wh2
� 2)
|
where C is the crown width of the dike, h the height,
Dthe dry slope, and W the wet slope.
17. Apply the above formula to successively calculate the section area
of the dike at each of the XY mid-points, using the h-values
obtained in step 14.
Example
It the dike characteristics are fixed as follows: C = 4 m;
dry slope = 1.5: 1; wet slope = 2: 1;
the dike's transversal section areas are:
- At mid-point a/b where h1 = 1.62 m
A1= (4 m x 1.62 m) + (1.5 x 1.622 m) � 2 + (2 x 1.622
m) � 2 = 6.48 m2 + 1.97 m2 + 2.62 m2 = 11.07
m2
- At mid-point b/c where h2 = 1.63 m
A2 = (4 m x 1.63 m) + (1.5 x 1.632 m) � 2 + (2 x 1.632
m) � 2 = 6.52 m2 + 1.99 m2 + 2.66 m2 = 11.17
m2
18. Calculate the partial volumes of each portion of the dike marked
by pegs a, b, c, etc. To do this, multiply each corresponding mid-point section
area by the length of the dam portion.
Example
Partial volumes of the dike with pegs a, b and c at 25 m intervals:
- For portion a/b V1 = A1 x 25 m = 11.07 m2
x 25 m = 276.75 m3
- For portion b/c V2 = A2 x 25 m = 11. 17 m2
x 25 m = 279.25 m3
19. Obtain the estimate of the total volume of the dikeby adding
these partial volumes.
Example
Total volume of dike XY = 276.75 m3 + 279.25 m3
= 556 m3
Using what you know about topography to install a
pumping station
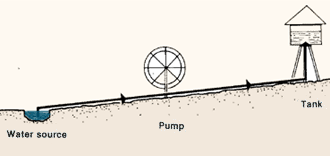
20. You may be planning to pump
water for your reservoir either from a well or from an existing body of water. If so, the
kind of pump you choose will greatly depend on the difference in elevation between the two
extremities of your water pipeline and the pump. Usually, you will site the pump at an
intermediate elevation, where it can bring the water up by suction from a lower elevation
(the source of water) and force it on to a higher elevation (a reservoir tank, for
example).
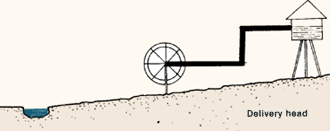
21. When you are choosing a site
for your pumping station, two differences in elevation are particularly important:
- From the water-source surface to the pump, the suction head(in
metres);
- From the pump to the reservoir, the delivery head (in metres).
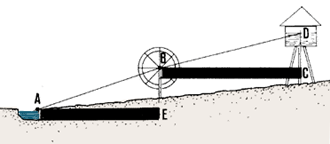
22. To obtain these differences in elevation, you may use direct levelling
from the water source A to the pumping station B, and to the site C of the reservoir
tower. Then, knowing the ground elevations at these points and the
various vertical distances (for example, water source/pump axis and pump axis/tank
water), you can easily calculate the suction head and the delivery head.
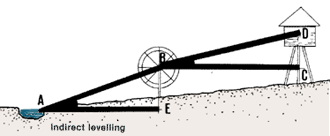
23. You can instead use an indirect method to find the differences
in elevation:
- measure the vertical angles made with the horizontal plane by successively
sighting lines AB and BD (see Chapter 4);
- measure horizontal distances AE and BC (see Chapter 2);
- calculate the differences in elevation, as follows:
- EB = AE tan BAE
- CD = BC tan DBC,
- obtaining the tangent values from Annex II.
Direct levelling
 |
|
Measure angles BAE and DBC...
 |
| |
|
|
| |
|
...then measure horizontal distances AE and BC and
calculate the differences in elevation
|
11.4 How to make levelling surveys for fish-farm construction
1. You have already learned that
you need to know how to use the right topographical methods during the construction of
your fish-farm. Now you will learn about two additional topographical methods, one for the
construction of a water-supply canal and one for the construction of a pond.
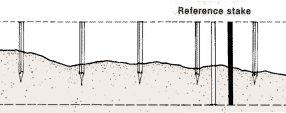
Staking out a water supply canal for construction
2. You learned, in earlier chapters, how to first survey
the centre-line of a water-supply canal (see Sections 7.1 and 8.2), then
how to draw its longitudinal profile (see Section
9.5) and its cross-section profile (see Section
9.6). You have also learned how you can contour (see Section 8.3) to rapidly
identify the route a canal can take between the water intake point
and the fish-farm water inlets.
3. Once the route of the water-supply canal has been carefully defined and
identified in the field, you need to stake it out before you can begin building
it. To do this, you will first have to clear a 1 to 2 m stretch of land along
the canal centre-line. Then you will set out a series of short pegs
along this centre-line. The summits of the pegs must correspond to
a horizontal reference level, that is, the tops must all
be at the same height.
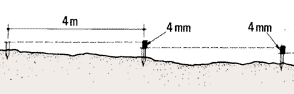
4. The distance between these
reference pegs depends on the levelling method you are using. Usually, the simplest method
to use is to proceed from the starting point A with a 4 m straight edge and a mason's
level (see Section
6.6). But you could also use a clisimeter (see Section 4.5) and a target levelling staff. In this
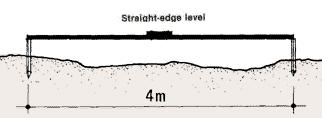
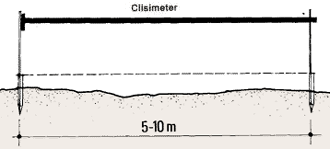
case, the pegs are placed at 5 to 10 m intervals.
5. Then, define the cross-section profile
of the canal. (see Constructions, 20, in this series) Add pegs as you need
them, to direct the workers in their digging.
|
|
|
|
| |
|
|
|
|
Cross section

|
6. If you are building a canal without a bottom
slope, you can show the workers the fixed distance
to which they must dig by giving them a wooden stake the same length
as the top level of the centre-line pegs.
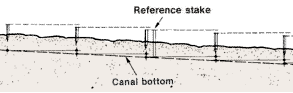
7. If you are building a canal with a bottom slope,
the simplest method you can use is to give a similar slope to the horizontal
reference level which joins the top of the centre-line pegs. To do
this, proceed in the following way:
(a) From the value of the slope and the distance between consecutive
stakes, calculate how much difference in elevation should
exist from one peg to the next one.
Example
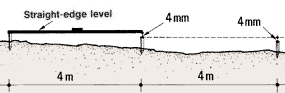
Using a straight-edge and mason's level for levelling, place your pegs
at 4 m intervals. If the slope of the canal bottom is to be, for example, 0.1
percent, the difference in elevation between one peg and the next equals (0.1
m x 4 m) � 100 m = 0.004 m = 4 mm.
Canal bottom, no slope
|
|
Setting slope
|
(b) Cut a small piece of wood of the same thickness as this
difference in elevation.
(c) Put this piece of wood on top of the second peg, and drive this
peg deeper into the ground until the top of the first peg and the
top of this second one are again horizontal. Use a straight-edge and mason's
level, for example, to guide you in doing this.
(d) Move to the third peg, put the piece of wood on top of it, and drive
the peg into the ground until the wood is horizontal again, between
the top of the second peg and the top of this one.
(e) Repeat this procedure until
you reach the end of the canal centre-line.
(f) The line joining the top of the centre-line pegs now has a slope equal
to the required slope of the canal bottom. You can dig the canal as in step
6, using a constant reference length from the top of each peg.
Staking out a pond bottom before construction
|
|
8. You have already learned how to survey the periphery, or boundary
line, of your ponds by setting out a
series of rectangular areas and the centre-lines of the dikes you
need to build (see Section 3.7) or by contouring
at the maximum water level (see Section 11.2).
9. When you have found the area of your ponds, but before you start building
them, you will usually need to know how much earth you will have to remove
at the various points of the pond. You will also need to indicate this
clearly on the site so that the workers can proceed with the pond construction
correctly. To do this, you will need to stake out the bottom of each pond.
|
|
|
| |
|
|
|
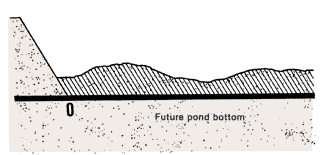
10. One simple way of staking out a pond bottom is
to make a survey by radiation from the lowest point of the
future pond, its water outlet. Proceed in the following way.
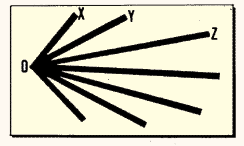
(a) From point 0 (the lowest point of the future pond), mark
a series of lines radiating over the major part of the pond
bottom area, using pegs.
|
|
|
| |
|
|
|
(b) Starting with line OX, for example, place a series of pegs along
it at fixed intervals. The size of these intervals will
vary according to the levelling method you use. For example, it will be
4 m for the straight- edge/mason's level method, and 5 to 10 m when you
use a sighting level.
|
|
|
| |
|
|
|
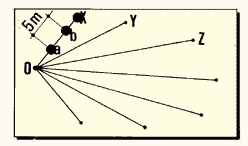
(c) Starting from point 0, survey line OX and put the top of all
of the pegsat a horizontal reference level.
|
|
|
| |
|
|
|
(d) Repeat the same procedure for all the marked radiating lines;
in this way, you will obtain a series of pegs whose tops are all at the
same reference level, and which are dispersed all over the pond bottom
area.
|
|
|
| |
|
|
|
(e) On each peg you must now clearly indicate the vertical distance
from the top of the peg to the bottom of the pond.
|
|
|
| |
|
|
|
(f) From the slope which the pond bottom will have (see Constructions,
20, in this series) and from the distance between consecutive
pegs on each radiating line, calculate the difference in elevation
necessary from one peg to the next one in each line.
|
|
Calculate the difference in elevation for the desired
slope

|
| |
|
|
|
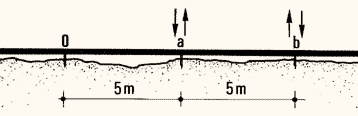
Example
- Slope of pond bottom is to be 1 percent.
- Distance between stakes is 5 m.
- Difference in elevation should be (1 m x 5 m) � 100 m = 0.05
m = 5 cm.
|
|
|
|
(g) From the fixed elevation to be given to point 0 at the pond
outlet (see the next volume in this series), and from the surveyed
elevation of the top of the peg set out at that point, calculate
the difference in elevation required at 0 from the top of the
peg. Mark this difference clearly on stake 0.
Example
- Elevation to be given according to construction plans to point
0 = 102.53 m.
- Actual elevation of the top of peg 0 obtained by levelling from
bench-mark = 103.43 m.
- Difference in elevation required at 0 = 103.43 m - 102.53 m =
0.90 m = 90 cm.
|
|
|
| |
|
|
| (h) Starting with line OX at point 0, calculate the difference
in elevation between the peg top and the pond bottom for each successive
peg. Subtract the difference obtained above in (f) each time.
Repeat the same procedure for all the other radiating lines. To make your
measurements clearer, you can use a simple table as shown in
the example. Clearly mark these values on the pegs. When the workers dig
the pond, they will use the values as a reference guide. |
|
Line OZ

|
| |
|
|
|
Example
Difference in elevation between peg tops and pond bottom, in centimetres
|
Line
|
Peg
|
|
01
|
a
|
b
|
c
|
d
|
e
|
f
|
|
OX
|
90
|
85
|
80
|
-
|
-
|
-
|
-
|
|
OY
|
90
|
85
|
80
|
75
|
-
|
-
|
-
|
|
OZ
|
90
|
85
|
80
|
75
|
70
|
65
|
60
|
|
...
|
...
|
...
|
...
|
...
|
...
|
...
|
...
|
1At point 0, the difference in elevation
is 90 cm from plans. The fixed difference to be subtracted is 5 cm, see
above.
|
|
|
|
ANNEX I
Some useful mathematical formulae for regular
geometrical figures
PERIMETER LENGTH AND SURFACE AREA
|
Figure
|
Perimeter (P)
|
Area (A)
|
| Square a |
P = 4a
|
A = a2
|
| Rectangle ab |
P = 2a + 2b
|
A = ab
|
| Right-angle triangle abc |
P = a + b + c
|
A = ab � 2
|
Trapezium abcdh
(a parallel to c) |
P = a + b + c + d
|
A = (a + b) (h � 2)
|
| Circle rd |
P = 6.28r
P = 3.14d
|
A = 3.14r2
A = 3.14d2 � 4
|
SIDE LENGTH OF RIGHT-ANGLE TRIANGLE
ABC abc
c = a cos ABC
b = a sin ABC
c = �(a2-b2)
b = c tan ABC
|
Note: tan - see Annex
II; cos - see Annex III; sin - see
Table 14
|
ANNEX
II
Tangents and values of angles
(Tan = angles expressed in degrees d and minutes m)
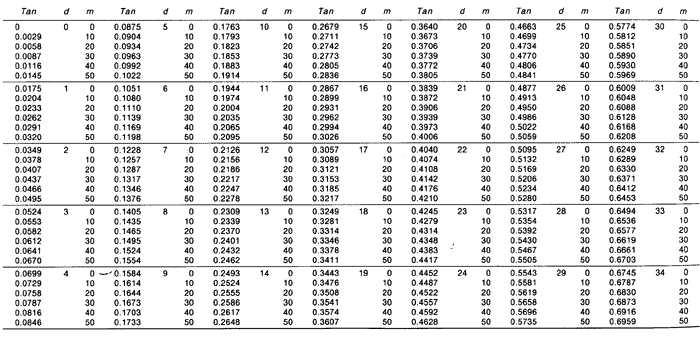
|
|
ANNEX Ill
Cosine values of angles
(d = degrees, m = minutes, cos =
cosine, x = difference)
MAIN TABLE
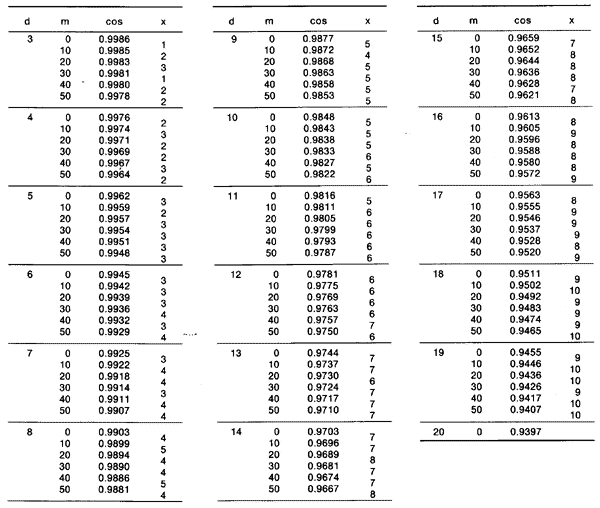 |
|
TABLE OF PROPORTIONAL PARTS, P
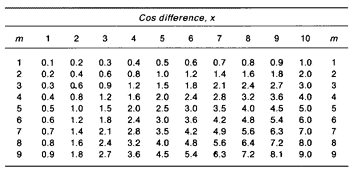 |
Example
To calculate intermediate cosine values using the proportional parts,
for cos 7�38' for example, proceed as follows:
- from the Main Table, calculate cos 7�30' = 0.9914;
- obtain the difference between this value and the next, x = 3;
- find column 3 in Table of Proportional Parts, P;
- move down this column to line m = 8, to find P = 2.4;
- subtract P from the last number (4) of the value read from the Main
Table, 0.9914 - 0.00024 = 0.99116. This is cos 7�38'.