First remove vegetation ...

... then remove surface soil to the outside limits
of pond dikes

of pond dikes
1. The construction site is usually prepared in two steps: first the vegetation is cleared, and then the surface soil layer is removed. These operations can be done either by hand or by machine. In both cases, special pieces of equipment such as ropes, cables and chains may be required. You will learn about these first, to be able to make the best and safest use of them.
|
First remove vegetation ...
|
... then remove surface soil to the outside limits
of pond dikes |
1. Ropes, cables, chains, pulley blocks and fittings are normally used for pulling down and clearing heavier trees, brush, etc., for pulling out rocks or other obstructions, and for moving heavy equipment around the site. The important factors are the pulling or traction load and the strength of the different components. The load can be applied either by hand, using animal power, or by machine. Table 21 shows typical attainable pulling loads. If a pulley or block is being used (see section 5.4, paragr. 10-12), these loads may also be multiplied several times.
|
Rope
|
Cable
|
|
|
Chain
 |
Pulley blocks
 |
|
|
Fittings
|
||
  |
  |
|
2. Ropes can be made of either vegetal fibres or synthetic fibres, and their characteristics vary accordingly. In particular, the strength (expressed in kg as the breaking load) is greater for synthetic ropes. The breaking load also increases as the rope becomes thicker.
3. To determine which rope you should use, consult:
4. Then find the breaking load (BL) for a particular diameter. To find the safe working load (SWL), divide BL by the given safety factor (SF), thus
|
SWL = BL � SF |
Example
(a) A sisal rope of standard quality has
a 24-mm diameter. Using Table 22, such a rope has a breaking
load BL = 2 720 kg.
The safety factor SF = 20.
Then the safe working load SWL = 2 720 kg � 20 = 136 kg.
(b) A polyester synthetic rope with a 24-mm
diameter has a breaking load BL = 9 140 kg (Table 23).
The safety factor SF = 20.
Then the safe working load SWL = 9 140 kg � 20 = 457 kg.
5. Vegetal fibre ropes may rot or lose strength if old and poorly stored. If in doubt about the quality of the rope, you should increase the safety factor or, ideally, test the rope in safe conditions with a load at least two to three times the expected load.
6. Similarly if any of the rope has been overloaded, i.e. near or up to its breaking load, it will be weakened for subsequent use, by 50 percent or more in some cases. Knots, splices, sharp bends, etc. will also weaken the rope.
7. Another important factor is the elasticity of the rope. While a springy, elastic rope may be useful for giving a quick pull, if the rope springs back excessively when the load is reduced (e.g. a stump being pulled out of the ground or the rope breaking), the whiplash effect could be dangerous.
|
TABLE 22 * For dry ropes in
good condition |
|
TABLE 23 * In some countries the thickness of ropes is expressed by their perimeter length in inches; you can quickly calculate the approximate equivalent rope diameter (in mm) by multiplying the perimeter in inches by 8 |
8. A cable is a wire rope made up of three parts:
9. A cable is designated by its number of strands (not including the core) and by the number of wires in each strand. It is also important to know the size of the cable and the grade of steel wire used.
Example
A widely used cable is the 6 x 19 type: it has six strands and each strand has 19 wires. These wires can be arranged, for example, in three layers:
|
Examples of wire cable and how it is made up
 |
 |
|
|
Cross sections of six-strand cables |
|
11. To determine which six-strand cable to use, find from Table 24 the cable size required to resist the working load you plan to apply to the cable.
Example
You are using a three-tonne hand winch. From Table 24, you will require an 18-mm diameter 6 x 19 cable, type 12 + 6 + 1 with fibre core (column 2) or type 9 + 9 + 1 with steel core, to have a SWL of at least 3 000 kg.
|
TABLE 24 Remember: W = weight of cable; BL = breaking load; SWL = safe working
load with safety factor 5 |
12. Cables should be fitted on to other components using proper eyes or clamps and should not be knotted. A properly fitted eye will reduce the overall breaking load by 10 to 15 percent (see paragraph 20).
13. Cables should be kept well oiled or greased, laid or hung straight (short lengths) or properly coiled. Be very careful in using a cable which is kinked, flattened, rusted or has broken strands. If you must use it, reduce working loads by at least 50 percent, and avoid using it where it may stick or jam (e.g. with pulley blocks). You should at all times keep clear of the cable when it is under load.
Note: to measure the diameter of a cable correctly, use calipers if possible.
|
Measuring the diameter of a cable using calipers
 |
 |
|
|
You can also use spring calipers
 |
14. Chains consist of a series of interlocked links made of steel such as forged steel or high resistance steel. The thicker the diameter of the steel in the links, the greater the strength of the chain. To a lesser extent, the strength is also affected by the size and shape of the links: short links are stronger but more inclined to kink.
|
Steel chains
 |
 |
16. To determine which steel chain to use, find the link thickness required for your kind of work (using Table 25) based on the steel grade.
Example
You require SWL = 3 tonnes = 3 000 kg and you plan to buy
the cheaper, forged steel chains. From Table 25, you can see
that you require a link thickness of at least 14 mm. If you use a 10 m chain
with 14 mm thick links, it will weigh
440 kg x (10 m � 100 m) = 440 kg x 0.10 = 44 kg.
17. Chain is preferred to cable in work where the traction line is subject to scraping, kinking or twisting. Chain is not damaged as cable is by sharp bending. It is resistant to abrasion and can be easily attached, detached, lengthened or shortened. It is also easier to repair. Note though that if chain is corroded, badly kinked or worn (e.g. through use as a boat mooring), its strength will be reduced. As a rough guide, you should measure the thinnest part of the chain (after any rust has been knocked off) and estimate its strength accordingly.
18. In general, traction lines require some sort of fitting on the ends to enable them to be attached to the power source or to the object to be moved.
19. Cable clamps are usually standard drop forged clips, which consist of a U-bolt, a saddle and two nuts. The cable is doubled over on itself, and the two thicknesses are squeezed between the U-bolt and the saddle by tightening the two nuts equally. You should use at least two clips per cable and increase their number as the cable size increases.
|
Drop forged clip
 |
Double end of cable and attach clips
 |
Note: always use the grooved lower surface of the saddle on the working end of the cable.
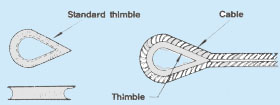
20. A metal thimble or eye is usually attached at the end of cables to keep them from being damaged. The size of the thimble and the size of its groove should be well matched to the cable size. Cable clamps are used to secure the thimble tightly inside the cable loop.
|
Metal thimble for loop of cable
 |
| 21. Hooks and rings are the most popular
chain fastenings. Some common types and their uses are listed:
(a) Slip (round) hook to form a choker that will tighten under pull. (b) Grab hook to form a chain loop that will not tighten; for example to shorten the chain by lengthening the loop or by blocking the chain so that it will not slide through an opening. |
Slip hook
 |
Grab hook
 |
|
|
Using chains with hooks and rings
 |
|||
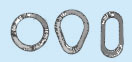
| (c) Rings, used in the same manner as round hooks, should always be thicker than the chain. They are stronger than hooks. When using two rings on the same chain, one should be narrow enough to slide through the other. |
Rings
 |
||
|
Shortening a chain with a grab hook
 |
Chain choker
 |
||
|
(d) C-links are special types of ring, each having a small notched gap through which another C-link can be attached. They are designed for ease of clipping together but can only be separated by the user aligning the gaps correctly. They will not unclip by accident. Using a C-link |
(e) Quick links are special rings with screw cylinders which can be opened and closed to connect lengths of chain. Using a quick link |
|
Standard shackles
 |
Note: when using a screw shackle, close it with the correct pin and screw the pin completely. Then unscrew the pin by half a turn to prevent it from jamming. Make sure the shackle screw is well greased.
|
Using a shackle
 |
 |
|
TABLE 26
* Safety factor greater than 6 |
23. A pulley block is an assembly of one or more pulley wheels, set on an axle that is held in a steel or wooden case. The block can be attached to one or two traction lines, preferably with a swivel hook. Latched blocks are similar but are much easier to use, as the cable can be inserted or removed from the side of the block.
|
Pulley blocks Single
 |
Double
 |
Triple
 |
Latched
 |
24. It is important to select the groove of a pulley to match the particular size of the cable to be used. Remember that the groove width should always be a little larger than the cable diameter, never narrower.
|
25. The use of pulleys is described later (see Section 5.4, paragraph 10 and following). Pulley blocks should be kept well greased, and pulleys should run free. Flattened or twisted pulleys should be replaced.
Remember: when you are putting together an assembly (such as rope, chain, cable, fittings) the pulling strength will be limited to the weakest component of the assembly.
5.2 Clearing the site |
||
| 1. The site should be cleared of all obstructions such as: | ||
|
|
|
|
||
|
||
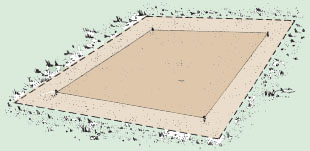
2. Define carefully the exact area to be cleared before you begin. Determine the outer corners of the pond area, which should include the entire area to be covered by the dikes. You could mark the area using wooden stakes and cord or poles. When this is done, mark out an additional area beyond the dikes to serve as a work space and a walkway around the site. Then you are ready to proceed.
(a) Clear the area within the limit of the pond dikes of all vegetation, shrubs, trees (including woody roots and tree stumps) and all large stones.
(b) Clear the work space and walkway around the dikes.
(c) Clear all trees and shrubs within 10 m of dikes and pond structures and any access, water supply or drainage area.
|
Preparing for a pond
 |
 |
Note: for the construction of a barrage pond, clear all vegetation above ground level on the site of the pond. Then, clear all vegetation including roots from the intended dike area and for a radius of 10 m around the intended drain structure.
|
Preparing for a barrage pond in a valley |
3. The clearing method to be used largely depends on the type of vegetation on the site. In open savannah country, it is a relatively easy task that can be done manually with limited special equipment. In heavier forested areas on the contrary, clearing generally requires either a large work force and/or the use of machines. If an area is too heavily forested, it might be best not to select it as a construction site, unless no other alternative exists.
4. There are two basic ways to clear the woody vegetation from a site:
|
Fell whole trees with roots
 |
Cut trees and then remove stumps
 |
5. You will learn more about these methods in Sections 5.3 to 5.5.
6. The clearing of the site should be completed by gathering all cut vegetation, stumps, roots and large stones. All these should be removed from the work area. When conditions are dry enough, the clearing can be completed by starting a fire, which should be carefully kept under control.
|
Gather cut vegetation and burn it Note: you can often sell the wood cleared from the site or make charcoal and sell it at a good price. |
Collect large stones and carry them away
 |
1. Tree cutting is a very dangerous job. It requires much skill and experience to avoid accidents. If you have never cut trees before, you should subcontract this specialized work to people known for their practical experience. You should however learn about a few basic points that will help you to plan this clearing operation better.
2. High stumps are more easily removed than low ones. This is particularly true if you remove the stumps using either a winch or low-powered machinery. Remember that if the wood is valuable, you will get less money from shorter trees.
|
High stumps are easier to remove,
but give less usable timber  |
Low stumps are harder to remove,
but give more usable timber  |
3. Before starting to cut the trees, you should first clear out the undergrowth. This will reduce danger to people by cutting down on tangles with fallen trees.
|
Remove shrubs and undergrowth
 |
Ready to cut
 |
4. There are two steps when cutting trees.
|
(a) Making the undercut: cut a pie-shaped piece out of the tree on the side facing the direction in which the tree is supposed to fall. The depth of the cut should be one-fifth to one-quarter of the diameter of the tree. (b) Making the backcut: 3 to 5 cm above the base of the undercut and at right angles to the failing direction, cut horizontally nearly all the wood that remains on the back of the tree. |
 |
|
| 5. If at the end of the backcut, the tree does not fall by
itself, hammer a wedge into the backcut to push the tree over in the desired
direction. If pulling or guide cables are to be used, they should be attached
before the cutting is started.
Note: felling large trees may be dangerous. For trees with a diameter over 60 cm at the stump, special techniques have to be used. |
  |
| 6. Small trees can be chopped with an axe or they can be sawed. A handsaw requires two operators and the use of a wedge in the backcut. | Power saws operated by one person only are increasingly popular. (If you plan to use one, you should refer to Chainsaws in tropical forests, FAO Training Series, 2.) | |
|
Felling by hand
 |
Chainsaws
|
1. Standard ways of removing tree stumps from the ground are either to dig them out or to pull them out. Small stumps can easily be dug out by hand. Larger stumps may require the use of machine power. Stump pulling is done by placing a rope, cable or chain around the trunk and pulling as follows:
2. In the next sections, you will learn about the most appropriate methods.
|
Dig small stumps by hand
 |
Pull large stumps with animals, machine power
or winch using pulley blocks as needed  |
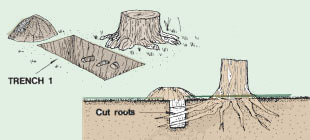
3. To make work easier, dig trenches around the stump in the following sequence, cutting any roots encountered.
|
(a) Dig trench 1. |
(b) Dig trench 2.
|
|
|
(c) Dig trench 3.
|
4. Pull the top of the stump as shown. If it fails to be dislodged, dig trench 4 and cut remaining roots. Try again to dislodge the stump.
|
If you cannot pull it out ...
 |
... dig trench 4.
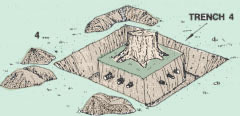 |
... then, pull again
 |
| 5. Lift the stump out of the ground. If it is a small stump, put a rope or chain around the foot of the stump. If it is a large stump, first attach a rope or chain around one of the strong stump roots. |
Small high stump
 |
6. Lead the line over a notched pole, a stumping trestle
or shearlegs, which you can easily make yourself. While pulling the
line with one group of people, have other people push the stump up with crow
bars to free it from the ground.
|
Large low stump
 |
Push with crowbar
 |
7. A hand winch consists of a metal casing in which a double set of claws grips a steel cable. A hook is secured to the back of the casing. As the handle of the winch is cranked, the claws move horizontally and pull the cable inside the winch casing. Excess cable comes out through the back. The cable is equipped with a hook at its end. There are various models of hand winches available, their traction force varying from 0.5 to 10 tonnes. A very useful one is the more common three-tonne hand winch.
|
Hand winches
 |
 |
(a) Use a robust standing tree or stump, a rock or a heavy vehicle not too far away from the stump to be removed. The distance between the two should not be longer than the length of the winch cable.
(b) Tie a sling (a steel cable with two thimbles) around the base of the standing tree or other object which will be used as an anchor. With a vehicle, attach the hook or cable directly to the towbar or chassis fixing point.
(c) Attach the hand winch to this sling, using the hook at the back of the casing.
 |
Wrap sling around tree |
|
|
Other ways to attach a winch
|
||
|
To a vehicle
 |
To a staked log
 |
|
|
To an anchored steel plate
 |
||
|
(d) Tie either a sling or a chain around the stump to be removed:
|
Attach winch to sling Note: if the stump is too far from a possible anchor, enlarge the sling around the anchor with a chain or a cable and connect the latter to the winch hook. |
|
| Note: using the winch cable as a choker around
the stump will damage it and greatly reduce its strength. Never do
it.
(e) Attach the hook of the winch cable to this sling or chain. |
   |
|
| Note: using a winch can be dangerous. Check that each piece of equipment used is strong enough to withstand the traction force applied by the winch. Check regularly for wear and tear. Keep people away from lines under tension. |
 |
Using the monkey winch |
||
| 9.Another simple, reliable and heavy-duty winch is the monkey winch. It can be very effectively used in the same way as the hand winch. |
 |
|
Increasing pulling force |
||
|
10. You can easily improve your pulling efficiency for stump removal in the following way. (a) Apply a lifting action to the stump by using a
notched pole, shearlegs or a stumping trestle and attaching the line
to one of the strong roots (see paragraph 6 above). |
 |
|
| (c) Use pulley blocks to increase the strength of your winch. Remember that this also increases the loading of the equipment such as slings, shackles and pulley blocks, which should be strong enough to withstand the extra loading (see examples below). |
Using pulley blocks to increase the pull
 |
11. To double the strength of the winch, you can use one pulley
block, and one (or better two) anchor(s) as follows:
(a) Attach the winch to its anchor (see paragraph 8).
(b) Run the winch cable in the block over the pulley and run it back to the
anchor.
(c) Attach the winch cable to this anchor (see paragraph 8).
(d) Using a cable or a chain, attach the hook of the pulley block to the stump
to be removed.
(e) Dig a trench around the stump and cut all major roots that can be reached
close to the stump.
(f) Crank the winch carefully.
Example
If you are using a small one-tonne winch, you can now pull the stump out with a two-tonne traction force as follows:
Note: if a second anchor is available, you may use it to attach the end of the winch cable; this will reduce the traction force by half on each of the two anchors, as shown below.
|
Using one pulley block |
12. To treble the strength of the winch, you can use two
pulley blocks and two anchors, as follows:
(a) Attach the winch to anchor 1.
(b) Run the winch cable in the
first pulley block and run it back toward the second block.
(c) Run the winch cable in this
second pulley block, run it back toward the first block, and attach the cable to it.
(d) Attach the second block to
strong anchor 2.
(e) Attach the first block to the
stump.
(f) Crank the winch carefully,
checking anchor 2 especially.
Example
If you are using a small one-tonne winch, you can now pull the stump out with a three-tonne traction force as follows:
|
Using two pulley blocks |
13. When clearing a site with many trees, you should progress
systematically from the centre of the site to its margins, so
that:
|
 |
14. For large sites, it is also useful to clear several access areas through which trees can be moved out of the site.
|
|
Removing stumps with a bulldozer |
||
|
Crawler tractor with dozer blade
 |
||
15. If a tractor equipped with a front-mounted dozer blade is available, it can considerably speed up the removal of stumps. This is particularly important for a forested site. For best efficiency, proceed as follows:
| (a) Raise the dozer blade and place it against the trunk part of the stump. |
 |
|
| (b) As you push against the stump, raise the blade further to apply a lifting action to the stump; it will also increase the grip of the tractor on the ground. |
 |
|
| (c) Tilt the trunk forward until the roots in front of the tractor are slightly out of the ground. |
 |
|
| (d) Back the tractor and lower the blade. |
 |
|
| (e) Insert the blade under the roots. |
 |
|
| (f) Push while lifting with the blade to break the stump out of the ground. |
 |
5.5 Uprooting whole trees |
||
|
1. A common method of removing smaller trees and their roots from a construction site is to uproot whole trees. This can be relatively easy because of the greater leverage obtained when pushing or pulling a tree at a point high up its trunk. But to be safe, this method should be used only if:
|
Using a hand winch to uproot a whole tree
 |
|
| Note: the pulling angle with the horizontal should not exceed 30�; if space is restricted or a greater angle of pull is required, use a pulley block to change the pulling direction. |
 |
|
Uprooting a whole tree using a winch |
||
|
2. If you only have a hand winch or a monkey winch to work with, you can proceed as follows: (a) Position the winch at a distance at least twice the height of the tree and as close as possible to a robust tree that can be used as the anchor. (b) Attach the back of the winch to a sling/chain tied around the base this anchor tree. (c) Climb up the tree to be uprooted and attach the winch cable high up the tree trunk to a sling/chain tied around it. |
Using one anchor tree
 |
|
| d) Dig a trench around the base of the tree to
reduce the resistance of the stump against pulling.
(e) Place a log against the base of the tree facing the winch to assist in the extraction of a maximum amount of roots and aid in removal of the soil. (f) Crank the winch carefully. Note: you can also use two anchor trees, for example to change the direction in which the uprooted trees will fall. Note: always attach the cable to the tree to be pulled as high as possible and the sling to the anchor tree as low as possible |
Using two anchor trees
 |
|
3. It will be much easier using a winch to uproot a tree if you increase the strength of the winch by using two pulley blocks for example. This will treble the pulling force of your winch (see Section 5.4).
4. Remember that in this particular case, you will need a particularly strong anchor tree.
5. If a bulldozer is available, it can be used to uproot trees, in a way similar to the one described for the removal of stumps (see Section 5.4) The major difference is that the dozer blade should be placed against the trunk as high as possible while pushing. The bulldozer can then also greatly assist to remove the cleared vegetation from the site either by pushing loose stones and branches toward a collection point, or by towing large trunks or bundles of smaller pieces. To clear 1 hectare medium to heavy forest, an 80 horsepower bulldozer will take about 10 hours. Using manual labour only, it will take about 1000 hours. Additional work outputs of bulldozers for bush clearing and tree felling are given in Table 19.
|
Using a bulldozer
 |
 |
|
 |
 |
|
| 6. A track-loader can also be very effective for uprooting live trees, mostly because of its combination of tractive force, high reach of the bucket arms and hydraulic force. It should be used in the same way as bulldozer. An excavator can also be used for smaller trees and can be useful for cutting around roots. You can also use it for lifting bundles of cleared wood. |
Track-loader with backhoe and bucket
 |
5.6 Surface soil removal |
||
|
1. Surface soil has the highest concentration of roots and decaying organic materials (see Section 1.4, Soil, 6). This soil is unstable as a construction material and cannot be used for the foundations of any dike or structure. Therefore the surface soil should be removed from the areas where:
Example:
|
 |
|
| 2. Soil may also be required outside the site to supply
topsoil for newly constructed areas such as dikes.
3. The depth of the surface soil varies from region to region. It may be totally absent or more than 1m thick. Usually the surface soil is from 5 to 30 cm deep. Once your site has been cleared, find out how thick the surface soil is. On this basis plan the construction method for your dikes and the removal and storage of the surface soil. |
 |
|
Example:
The surface soil thickness averages a few centimetres only: you do not have to remove it, but you will have to plough the area well where the dikes will be built.
The thickness of the surface soil averages 20 cm over a site of 20 metres square (400 m2): you will have to remove, transport and store 20 m x 20 m x 0.20 m = 80 m3 of soil.
|
4. Stake out clearly the areas of the site from where the surface soil should be removed, as was done earlier before the clearing started (see Section 5.2). Stake out site as a guide for soil suface removal
|
5. Excavate to the desired depth and transport the surface soil away from the construction site (see Chapter 4). |
|
| 6. To be able to dig out this surface soil without too much effort, it might be necessary to loosen it by ploughing. In exceptional cases, you may have to rip the soil with a tractor first, before starting excavation. Use as many shanks as possible, at low speed and maximum soil penetration, to reach best efficiency. For small areas, the soil may be loosened using a pick. |
Loosen the soil Using a pick |
|
|
Using a tractor
 |
7. Store this surface soil in a suitable location, as close as possible to the site. You will use this fertile organic soil later for several purposes such as:
|
|
|
|
|
Note: larger sites may present considerable variation in surface soil depth. It is useful to measure this and plan the excavation and movement of the soil accordingly. |
|
![]()