![]()
![]()
![]()
The fertilized egg soon starts to develop. The process of development is a complicated sequence of events. To ensure proper development and better survival, the eggs are subjected to incubation, wherein they are kept under conditions favourable to normal development. The eggs complete their embryonic development within the egg shell during incubation, and hatch out as larvae by breaking through the egg shell.
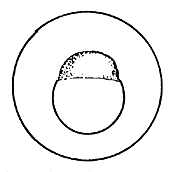
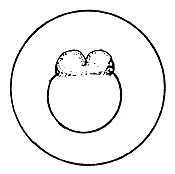
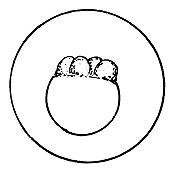
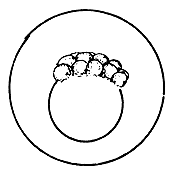
4.3.5.1 Development of fish eggs in general. By the time the swelling of the egg is completed, the two parts of the egg kernel have become well formed and are easily distinguishable, not only by form but also by colour. The animal pole rises as a small hillock on the yolk mass and develops a dark yellow colour. After a short time, the duration of which depends on the temperature of the water, the cleavage of the animal pole starts and the one-cell “hillock”, successively becomes 2, 4, 8, 16, and 32 celled. At this stage it looks like a mulberry (morus in Latin) and is, hence, termed the morula stage (Figure 27). Further successive subdivision of these cells yields a many-celled “blastoderm”, which to start with has only one layer of cells. It gradually acquires several layers of cells. Each of these cells is termed the “blastomere”. As the number of blastomeres increases, their size becomes progressively smaller. At the morula stage the developing embryo is very sensitive to shaking and the cells may become torn off from the surface, resulting in the death of the embryo. A space, termed the segmentation cavity, appears later on between the yolk and the cell mass. At this stage, the embryo is called the blastula.
The cells of the blastoderm initially arrange themselves on top of the yolk in the form of a cup. As cell division progresses, the cells start covering the yolk resulting finally in enclosing the yolk mass completely, leaving at one end only a small opening, the blastopore. Later, this also completely closes. This is the transition point to the embryonic development stage from the initial germ development stage.
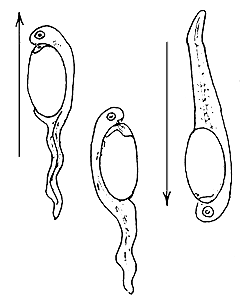
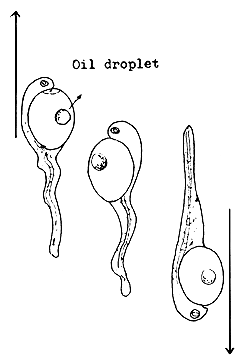
The cell mass becomes thickened in the form of a half ring opposite the blastopore and the head and tail buds appear at the two ends. Shortly thereafter, the head and tail ends become clearly definable and the first segments of the body become visible. The eyes develop as “optic vesicles” on the head, while the tail bud starts to grow longitudinally (Figure 28). Half way through the course of development the heart develops and starts to beat. At the same time, a capillary system or one strong blood vessel develops on the surface of the yolk mass. The embryo gradually starts to twitch its tail occasionally, followed later on by the twitching movements of the entire body. Still later, it begins to revolve in the perivitelline space. The revolving and other movements become very vigorous before hatching.
The metabolites of the embryo contain certain enzymes, which act on the shell and dissolve it from inside, thereby rendering it weak and enabling the embryo to break it easily and hatch.
The time taken by the eggs to develop generally varies in different fishes (Table 3). The time also depends on the temperature during incubation and the oxygen supply at the beginning. A poor oxygen supply during the later half of embryonic development will not slow down the rate of development, but it may kill the embryo.
In colder waters, the development of the embryo and action of the egg shell dissolving enzymes are considerably slowed, with the result that the embryo can be retained within the egg shell over a long period - up to as much as several days in some cases. However, since the development of the embryo does not cease, more developed larvae will hatch out. On the other hand, higher temperatures cause premature hatching of unripe embryos, which are mostly incapable of surviving. Therefore, it is advisable to maintain optimal temperature in the incubators throughout the entire period of embryonic development.
Table 3
Time Required for the Development of Eggs of Different Species
| Name of fish | Optimal temperature of incubation, °C | Number of days or hours | Day-grade |
| Common carp (Cyprinus carpio) | 20–22 | 3.5–4 days | 60–70 |
| Pike-perch (Stizostedion lucioperca) | 10–15 | 7–11 days | 100–110 |
| Pike (Esox lucius) | 8–15 | 8–12 days | 120 |
| European catfish (Silurus glanis) | 22–25 | 2.5–3 days | 50–60 |
| Tench (Tinca tinca) | 22–25 | 3 days | 60–70 |
| Grass carp (Ctenopharyngodon idella) | 22–25 | 1–1.5 days | 24–30 |
| Silver carp (Hypophthalmichthys molitrix) | 22–25 | 1–1.5 days | 24–30 |
| Bighead carp (Aristichthys nobilis) | 23–26 | 1–1.5 days | 26–30 |
| Rohu (Labeo rohita) | 24–30 | 14–20 hours | 20–22 |
| Catla (Catla catla) | 24–30 | 14–20 hours | 20–22 |
| Asian catfish (Pangasius sutchi) | 28–29 | 23–25 hours | ? |
| Clarias macrocephalus | 26–30 | 18–20 hours | ? |
| Giant gourami (Osphronemus goramy) | 28 | 44–48 hours | ? |
| Channel catfish (Ictalurus punctatus) | 24–30 | 14–20 hours | 20–22 |
| Grey mullet (Mugil cephalus) | 20–22 | 50–60 hours | ? |
| Coporo (Prochilodus mariae) | 25–26 | 17–18 hours | 18–20 |
| Sapoara falsa (Curimata sp.) | 25–26 | 15–16 hours | 16–18 |
| Cachama (Colossoma oculus) | 25–26 | 18–19 hours | ? |
It is also necessary to guard against the enemies of developing eggs, such as bacteria and fungus (Saprolegnia). Bacterial and fungal attacks weaken the egg shell, which then loses its stiffness and becomes wrinkled, resulting finally in premature hatching (Figure 29). This can be prevented by treating the eggs with a tannin solution (5–8 g in 10 litres water) during the later half of their development (Figure 30). This may, however, lead to late hatching, since tannin denatures the proteins in the egg surface, as a result of which the egg shell dissolving enzyme is unable to act. This treatment is also made use of for preventing early hatching or retaining the embryo within the shell. The embryos, however, can be easily made to hatch when required by breaking the egg shells mechanically through vigorous stirring. The hatching of eggs treated with tannin shortly before the closing of the blastopore will not be delayed, since during their further development in the incubator the tannin denatured layer of the egg shell is expected to be worn out.
4.3.5.2 Technology of fish egg incubation. Since egg development is a fast process, especially in the case of tropical and subtropical fishes, it is difficult to identify as many developing stages as are found in trout and salmon. The main distinguishable stages are swelling, germ development, and the embryonic development stages. To ensure healthy survival it is necessary to take proper care of the eggs during these stages by putting them in suitable incubators.
Requirements of the developing fish egg. The developing egg needs oxygen continuously in high concentration. The oxygen consumption of eggs is negligible in the initial stages, but increases very considerably as development progresses.
For normal healthy development, the egg needs an adequate temperature to which the fish is adapted in nature. Lower or higher temperatures adversely affect the development process and frustrate the best efforts. Therefore, extreme care is exercised in maintaining optimal water temperature during incubation period.
Clean and plankton-free water is another basic requirement in hatcheries. Polluted water is bound to cause considerable trouble. Likewise, the planktonic animals, especially the Cyclopid copepods, may destroy the eggs and larvae en masse (see Figure 29).
During their development, the eggs excrete certain harmful materials, such as CO2 and NH3 which, if allowed to accumulate, may poison the eggs. They must, therefore, be removed continuously as they are produced by maintaining a constant flow of water.
Eggs of most species of fishes are very sensitive to disturbances caused by shaking or other mechanical means. This sensitivity is particularly very high during the early cell cleavage and morula stages. A sudden strong flow of water current through the incubator may destroy all the eggs within a short period.
The eggs of some species are extremely sensitive to ultra-violet light and to the rays of the visible spectrum. Therefore, in most cases it is essential to incubate the eggs in a well shaded place.
4.3.5.3 Incubation devices for fish eggs. Human ingenuity has made it possible to devise several types of incubators to meet the diverse requirements of developing eggs of different species. The type of incubator or device used at any place depends on the nature of the eggs to be incubated and the types of incubators readily available at that place. Even the most commonly used devices are not readily available in most countries, and their cost would be prohibitively high if ordered from abroad. Quite often there is no way other than to make incubators out of locally available materials. These may serve quite well and are, in any case, decidedly less expensive than the factory-made devices.
It is preferable to use clean gravity-flow water in all the incubation devices, since such a system is unlikely to fail.
The various types of incubators in common practice are described in the sections to follow.
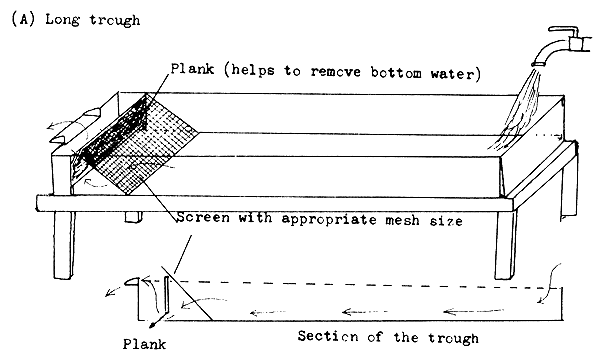
Trough-type incubators. The troughs are the most primitive type of incubators and are used for hatching trout eggs. The water is let in at one end, while the superfluous water flows out at the other (Figure 31). The length of the trough may be 1–3 m. The troughs are adequate to incubate heavy eggs, such as those of the salmonids. They can also be used to incubate eggs attached to nests.
The incubation box is a better device than the trough. It consists of two boxes, one inside the other (Figure 31). The inner box has a perforated or sieve cloth bottom. The water penetrates from below and washes the non-moving eggs. This incubator is more effective than the trough for incubation of salmonid eggs and the eggs attached to nest materials.
Hatching troughs are used for the hatching of channel catfish eggs. They can also be used for eggs adhering to nest material or adhering in a mass to each other.
The hatching troughs used for channel catfish eggs are 50 cm wide, 25 cm deep, and 2.5 m long and are made of aluminium or iron sheet (Figure 32). Partitions may be placed in the trough to allow eggs of different ages to be separated. Each section must have a drain and a separate water supply.
A pipe or rod 2.5 cm in diameter extends over the entire length of the trough in the centre. This pipe or rod functions as a revolving shaft, to which paddles are attached. It is mounted on bearings located at each end of the trough and possibly at the partition. The paddles are made of sheet metal and are spaced between the wire mesh baskets which carry the egg mass.
The shaft is made to turn at a speed of 30 revolutions per minute by an electric motor using a series of pulleys. A ¼ hp motor (1 750 rpm), with a combination of a 3–4 cm pulley belted to a 25 cm pulley and a 3–4 cm pulley belted to a 30 cm pulley, will turn the shaft at about 30 rpm.
The baskets carrying the eggs are suspended by hooks from the sides of the trough. These baskets are 7.5–8.0 cm deep and are partitioned into two or four compartments. They are made of 5–6 mm mesh hardware cloth.
The paddles on the shaft should be long enough to extend beneath the level of the bottom of the baskets, so that their rotations would bring about water movements on the eggs similar to those made by the male fish when the eggs are hatched naturally. Fresh oxygenated water should continuously flow into the trough.
The most effective modernized trough is used for the incubation of channel catfish eggs. The egg mass adhering together in a clump in the hatching trough is agitated with paddles driven by an electric motor or water wheel. The agitation should be just sufficient to move the entire egg mass. If it exceeds that limit, the eggs may be thrown out of the holding baskets. The water used must be well oxygenated and the wastes must be promptly removed.
Funnel type incubators. Funnel type incubators, as their name implies, are more or less funnel shaped (Figure 33). The original form is the Zoug jar incubator made of glass. Water flows in at the bottom through a short conical funnel and flows out over the upper edge of the incubator. The flowing water keeps the egg mass suspended and in continuous motion through the entire water column. To avoid the splashing of water, an outflow tube is fixed in the plastic or metal cap of the incubator, or into a hole which is made on an automobile rubber tyre-tube fitted to the upper end of the incubator. The funnel type incubators can also be made of clay, plastic, linen, and sieve cloth combination. The shape of the funnel is maintained by stretching it on a frame or by at least two metal or bamboo rings. To avoid a strong current of the inflowing water which may damage the eggs, either a shower-head or one or two plastic kitchen funnels are fixed at the bottom (Figures 34 and 35).
The Zoug jars (named after Zoug Lake in Switzerland where it was first used) are made of glass and range in capacity from 6 to 16 litres. Today, such jars are made of fibreglass, with their capacities varying from 40–80 litres to as much as 200 litres. Large-sized funnel-type incubators made of metal are also used, but it is necessary to paint their inside with a neutral paint. Metal incubators coated with plastic sheet can also be used. The funnel type incubators (Figure 36) made of plastic sheet have a fluid capacity of about 6–8 litres, if they are not to be dipped in water. The plastic linen and seive cloth combination incubator, which is kept immersed in water may have a capacity ranging from 15 litres to 100 litres (Figure 35).
The MacDonald glass is a high cylindrical vessel with a spherical bottom (see Figure 33). The water flows in through a tube fixed into the cylinder and reaching right down to the bottom. The inflowing water moves and mixes the egg mass continuously.
In the funnel type incubators (including the MacDonald glass), the eggs separated from each other are kept moving, revolving, and mixing continuously while the inflowing water provides enough oxygen and removes the waste matter. It is important to regulate the inflowing water to avoid damage to the eggs.
The funnel-type incubators are the most commonly used incubation devices. They are used for nonsticky eggs of different specific weights and for eggs from which the sticky layer has been removed. They can also be used for the eggs adhering to nest material. The water requirement of such incubators is 0.2 l/min at the beginning of egg development and 0.5–1 l/min after the closing up of the blastopore for about 10 l of incubator volume. The slowly revolving eggs serve to indicate the adequacy of water supply.
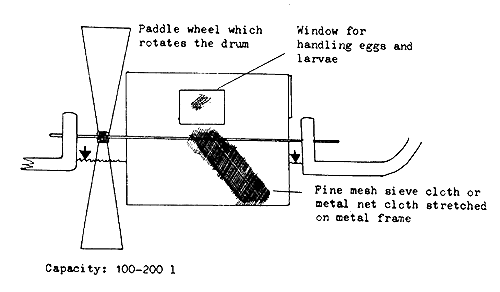
Revolving barrel or drum incubators. Barrel or drum-shaped devices used for incubation are made of sieve cloth stretched on a suitable metal frame (Figure 37). The bottom and top of the drum are made of wood or metal, with one window or door for introducing the eggs and removing the hatched larvae. The drum has an axis, around which it revolves when placed in a river, or is revolved by a water wheel or electric motor. Heavy rolling eggs, such as those of the sturgeons and mahseers, can be incubated in this device.
The revolving barrels or drums can be made easily in any workshop. The advantage with this device is the facility to incubate a large number of eggs, but some difficulty will be experienced in handling the eggs and removing the hatched larvae.
Incubation in aerated tanks. In the absence of water current, floating eggs can be incubated in large containers, in which continuous movement and oxygenation can be achieved by pumping air into the container. The air bubbles move the water, cause the eggs to float, and provide oxygen as well. Approximately 300–400 eggs are placed per litre of water into such a container. This would mean that about 400 000 eggs can be incubated in 1 m3 of the incubator. This type of incubator is used for hatching the eggs of the grey mullet (Mugil cephalus), maintaining a salinity of 32 percent, a temperature of 20°C, and about 7.0 ppm of oxygen.
Incubation in hatching hapas. The hatching hapa, which generally measures 2×1×1 m, consists of two chambers made of sieve cloth, one inside the other (Figure 38). The eggs are spread on the bottom of the inner hapa, which has a mesh of 2–2.5 mm. The outer hapa is made of a still finer mesh to retain the larvae, which on hatching fall through the larger meshes of the inner hapa into the outer hapa. The egg shells and the dead eggs, however, remain in the inner hapa. The hapas are generally fixed in open water bodies, where the moving waters provide the required oxygen.
Incubation in flat platters producing water movement by dripping. Eggs incubate well if kept spread on a flat, shallow tray containing 1 or 2 cm of water and if a steady drip from a height of 20–30 cm is maintained. The drip should be good enough to maintain adequate supply of oxygen and to remove waste products. Depending on the size of the eggs, 5–10 can be incubated on 1 cm2 of tray surface. Heavy eggs and those that stick together can be incubated by this method. It is, however, only good for experimental incubations and is not suitable for mass propagation.
Incubation in spray chamber (aspersion chamber). Eggs sticking to nests and having a very narrow perivitelline space and sufficiently tough shell can be incubated in a spray chamber (Figure 39). In this method, the eggs absorb oxygen from the air, which contains about 20 times more oxygen than the oxygen-saturated water. If a thin layer of water is maintained on the egg surface or it is just kept moist, the oxygen in the air can enter the egg by diffusion. To keep the egg surface continuously moist, a fine spray of water, forced through nozzles, is directed to the eggs. By maintaining the spray pressure at between 0.5 and 4.5 atmospheres, the eggs are kept moist. Pike-perch eggs, which stick together in thick clumps on the nests, are incubated by this method. Even the eggs located deep under other eggs can get sufficient oxygen. On the other hand, if these nests are kept submerged in water, many of the eggs will perish because of the paucity of oxygen supply to the inner eggs. In addition, Saprolegnia infection can be avoided in the spray chamber, since Saprolegnia and other fungi cannot bear constant air movement. Only when the eggs are ready to hatch is the nest placed in the water.
Household pressure containers for water supply can be used for this purpose, provided that clean water and electricity are available.
4.3.5.4 Chinese technique of propagation of local carps. The Chinese technique for mass production of local carps, as practised by the farmers themselves, is a unique one, using only local equipment and tools. It is a simple technique that does not require any special knowledge, skill, or precision. However, it requires certain facilities such as separate spawning and incubation pools which are located close to the broodstock ponds.
Spawning pools. These are usually circular cement tanks, 8–9 m in diameter and 1.2–1.5 m deep, with a water holding capacity of 50–60 m3 (Figure 40). The bottom of the pool slopes toward the centre, where there is an outlet pipe leading to the egg collection chamber. The water inlet pipes are installed in a diagonal position through the wall of the tank to create a circular water flow during the spawning time. The continuous water flow helps to induce the spawning of these river spawners.
Each spawning pool is provided with an egg-collection chamber where the eggs are gathered automatically. The eggs are removed, the quantity of eggs is estimated, and then they are transferred into the incubation pools or devices. The outlet pipe from the spawning pond is fitted with a net, large enough to facilitate the collection of eggs. The collecting device is a 45 cm diameter “pipe” made of mosquito netting (2–2.5 mm mesh), which leads diagonally upward and ends in a collecting box made of the same net material. The collecting box measures about 60×40×30 cm. The water current flowing out from the spawning pool transports the already floating eggs into the collecting box, from where they will be removed from time to time. The large spawning pool needs flowing water, up to as much as 200–400 litres per second.
Incubation and hatching pools. These are also circular in shape (3.5–4.0 m in diameter and 1 m deep) and contain one or more incubation chambers (Figure 41). There is an inner ring made partly of sieve cloth; this prevents the eggs and larvae from being driven toward the outflow pipe.
In the case of a multi-chamber incubation pool, the chambers are placed concentrically and separated from each other by cement walls, which are provided with “windows” across which fine mesh sieve cloth is tightly spread. The water circulation is very important here. For this purpose there are several diagonally installed pipes at the bottom of the pool. Paddle wheels are also used where there is inadequate running water supply, the required velocity to circulate the eggs in the pool being 0.2–0.3 m/sec. This velocity is enough to keep the eggs rolling in the water and for stimulating the riverine conditions under which natural incubation and hatching take place.
The newly hatched larvae are then transferred to net boxes, installed in a nearby pond, until the egg yolk is absorbed and the swim bladder is filled with air. They are then transferred to well prepared nursery ponds for growing, or are sent to other fish farms.
The Chinese also use funnel-type incubation devices, some of which are portable (Figure 42).
Induction of spawning. To induce spawning of Chinese major carps, the Chinese use human chorionic gonadotropin (HCG) at the rate of 800–1 000 IU per kg of female body weight. The hormone injection is given in two doses, at an interval of eight hours. The first dose is 10–15 percent larger than the second (i.e., 60 percent first and 40 percent eight hours later). The males are injected once at the time the females are given their second dose.
To keep the spawning pool clean, the brood fish are kept in net boxes to enable them to empty their gut prior to hormone treatment. The human chorionic gonadotropin together with artificial water flow induce spawning.
4.3.5.5 Causes of egg mortality during incubation. The fertilized eggs usually develop normally if the preconditions mentioned earlier (oxygen, temperature, removal of the wastes, etc.) are provided. In actual practice, however, it often happens that some eggs die after a brief period of development, either during the morula stage or before the closing of the blastopore.
Oxygen deficiency could be one of the reasons for mortality in certain parts of the incubator devices where the exchange of water is poor or nil. Unsuitable temperature also kills the eggs, usually during embryo development.
At the beginning, all the eggs appear to be healthy and well developed. Later, some become white or opaque due to injuries sustained during stripping or artificial fertilization. Loss of a few such eggs is quite unavoidable in commercial hatcheries.
The unfertilized eggs are not distinguishable from the fertilized ones at the beginning They swell in the same way and polarization also proceeds likewise. But they lag behind with the first cleavage, and the normally hillock-shaped animal pole takes an unusual form. It becomes elongated and pointed. The first cleavage proceeds abnormally in that the resultant two blastomeres have different form and size. This is also the case with subsequent cleavages as well. After the 16 or 32 cell stage, some cells start to separate off from the cell mass Such cells are clearly visible in the perivitelline space.
The fertilized eggs also may have cells that have been freed into the perivitelline space; i.e., if they have been subjected to mechanical disturbances, such as friction, shaking, etc. These eggs will not survive.
The healthy developing eggs are transparent or shining and their contents are clear. They can be clearly distinguished from the bad eggs, which are white, opaque, and have turbid contents.
When the healthy eggs reach the blastopore closing stage, the good and bad eggs are clearly distinguishable. This is the stage when the fertilization rate can be determined.
At the blastopore closing stage, or later, the fertilization rate is estimated as follows: A 30 cm long glass tube, the diameter of which is about 30–50 percent greater than the diameter of the egg in question, is required for this purpose. If the egg diameter is 2.2–2.5 mm (e.g., common carp), a glass tube of 3.0–3.5 mm diameter is required. Likewise, if the eggs are 3.5–4.5 mm in diameter (e.g., Chinese carp and Indian carp), a tube of 5.0–5.5 mm diameter is used. The selected tube is dipped into the egg mass keeping the upper end closed with the thumb. When the thumb is lifted, the tube is filled with eggs. The fertilization rate can now be calculated by counting the good and bad eggs in the tube. Reliable data in this regard can be obtained by taking samples from the bottom, middle, and surface of the egg mass.
The egg shell normally protects the developing germ and embryo. However, embryo mortality can occur due to attacks by bacteria, fungus (Saprolegnia), and carnivorous crustaceans (Cyclops), or due to predation by insect larvae or other animals (see Figure 29). All these organisms attack the eggs from outside and destroy the egg shell. If the hatching water is dirty with much dissolved organic matter, the bacteria actively proliferate among the eggs. With the help of their enzymes they attack the proteinaceous egg shell, which loses its stiffness and the embryo finally either die or hatch prematurely. The microscopic spores of the water fungi, such as Saprolegnia, occur everywhere. They settle on the bad or already dead eggs and develop quickly. They then attack the healthy eggs, which get entangled in the bushy threads of the fungi. The infected eggs adhere to each other and eventually die.
The cyclopids hurt the egg shell by scraping it with their thorny feet, while the insect larvae, such as chironomids, bite into the shell with their mandible and thereby destroy the eggs.
4.3.5.6 Treatment of eggs during incubation. The crustaceans and insect larvae can be filtered out or controlled by treatment with 1 ppm organic phosphoric acid ester insecticides.
The bacterial attack can be avoided by only using clean water in the hatchery.
The spoiled eggs are an excellent culture medium for fungi, especially Saprolegnia. Malachite green is commonly used against fungus infection. The infected eggs are treated with it once every day. In cases of limited infection, the treatment is carried out directly in the incubator (jar, funnel, or trough) with a 5 ppm solution of malachite green for 30–60 minutes.
On the other hand, for large-scale treatment, malachite green is added in small quantities to a common tank to make a solution of only 0.1–0.2 ppm, which then flows into all the incubators connected to the common tank. It is, however, difficult to control the solution's concentration by this method. It is only with considerable practice that one can usually determine the adequate level of concentration by the colour (light blue) of the water. Extreme care should be taken with regard to the concentration of the solution since it is toxic to fish larvae at higher concentrations.
Treatment with formalin is also used against fungal infection, but the method requires high precision and care.
A single treatment with tannin has proved very effective against fungal attack under tropical and subtropical conditions. A freshly made solution of 5–8 g tannin in 10 litres of water is used in this treatment. One or two litres of such freshly made solution is used for each incubator of about 30–50 litres capacity. The solution is poured on to the eggs through the water supply tube, or by a kitchen funnel with an elongated tube extending to the bottom of the incubator, after first stopping the water inflow (see Figure 30). The poured tannin solution is gently stirred for about 10–20 seconds, after which the water inflow is again resumed. The inflowing water will wash off the tannin solution.
Fish eggs of a brief incubation period are not so prone to fungal attack, since they develop faster than the fungi.
 |  |  |
| The swollen fertilized egg | First cleavage | 4-cell stage |
 |  |  |
| Morula (early stage) | Morula (later stage) | Blastula |
 |  |  |
| Gastrula | Closing of the blastopore | |
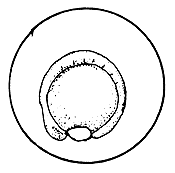
Figure 27 Development of the fertilized egg
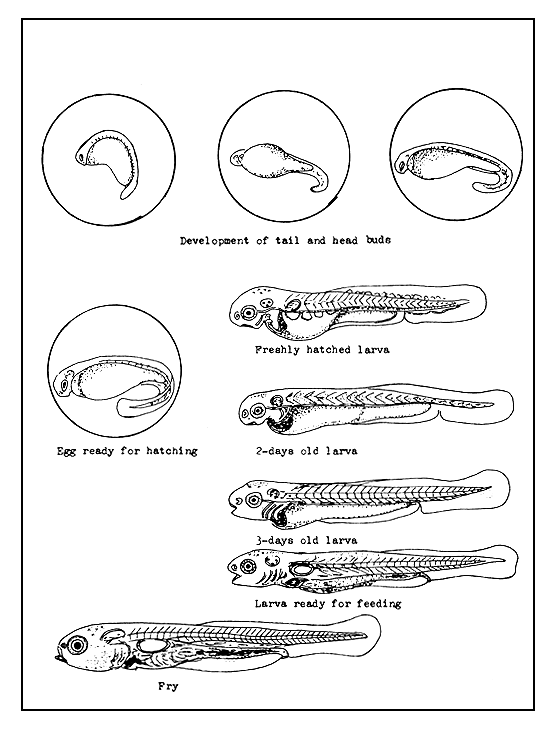
Figure 28 Embryonic and larval development
| (A) The embryos attacked by bacteria | |
 | |
 | (B) Egg and embryo attacked by fungus (Saprolegnia) |
| (C) Egg attacked by Cyclops | 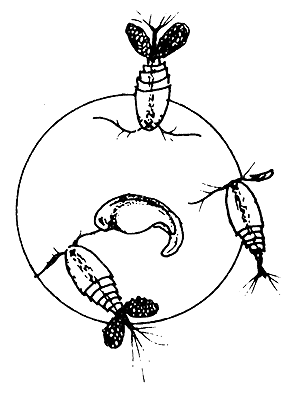 |
Figure 29 Enemies of developing eggs
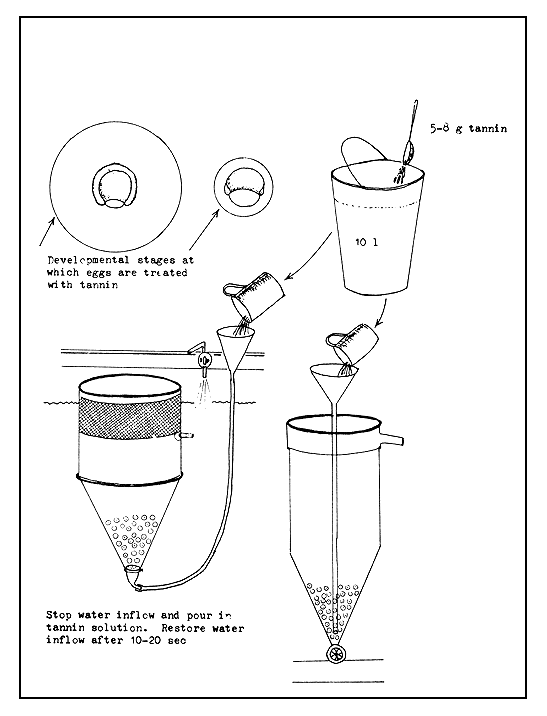
Figure 30 Treatment of fish eggs with tannin against fungal and bacterial attacks
 |
 |
Figure 31 Long trough and box for incubation of heavy eggs and for rearing larvae
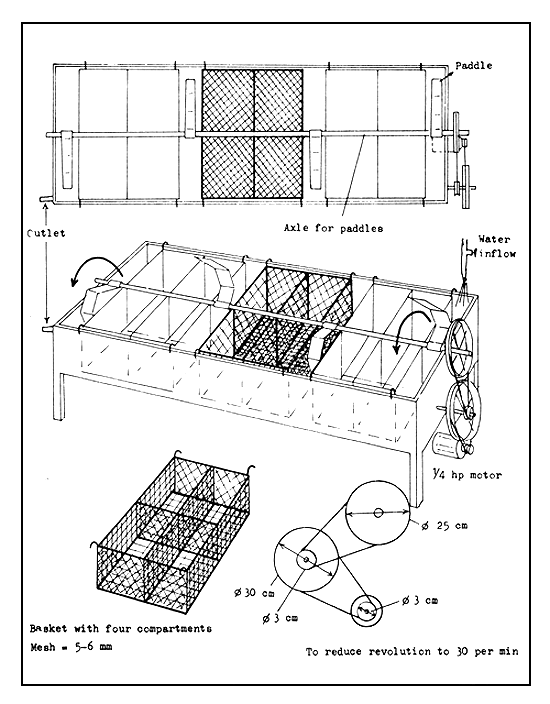
Figure 32 Hatching trough for incubation of channel catfish eggs or other fish with sticky eggs

Figure 33 Funnel-type incubator devices
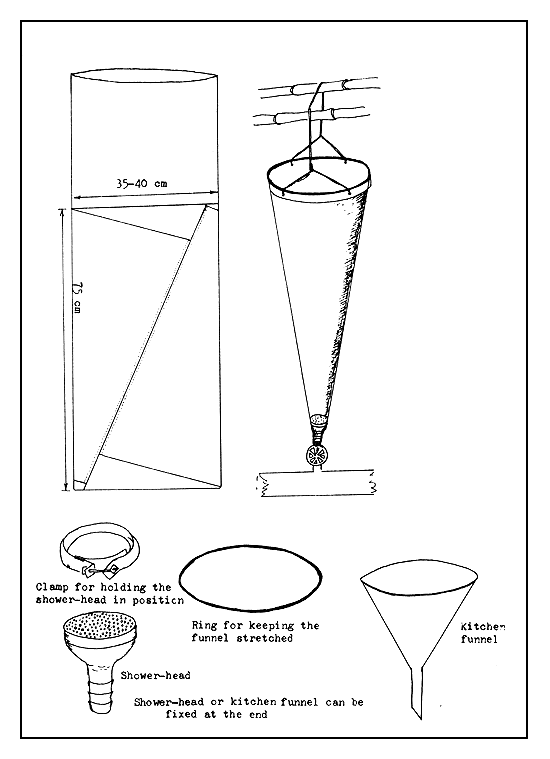
Figure 34 Plastic funnel for incubation of common carp eggs
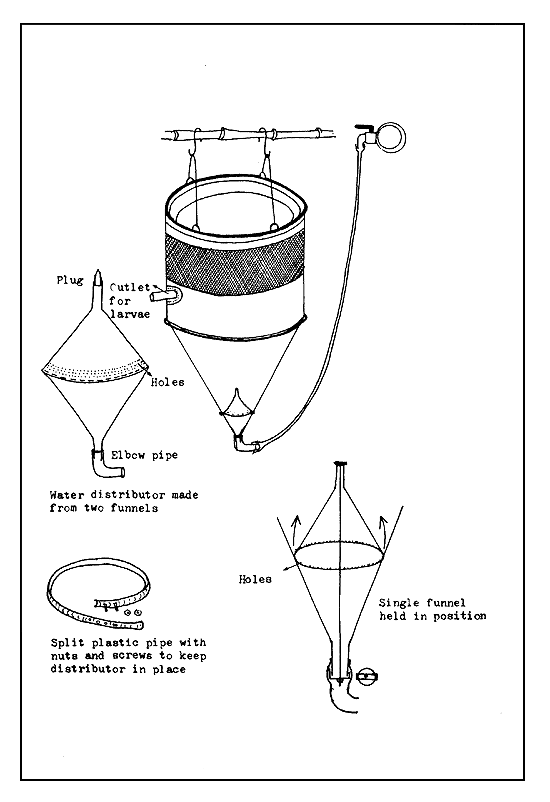
Figure 35 Incubation of very delicate eggs - floating type
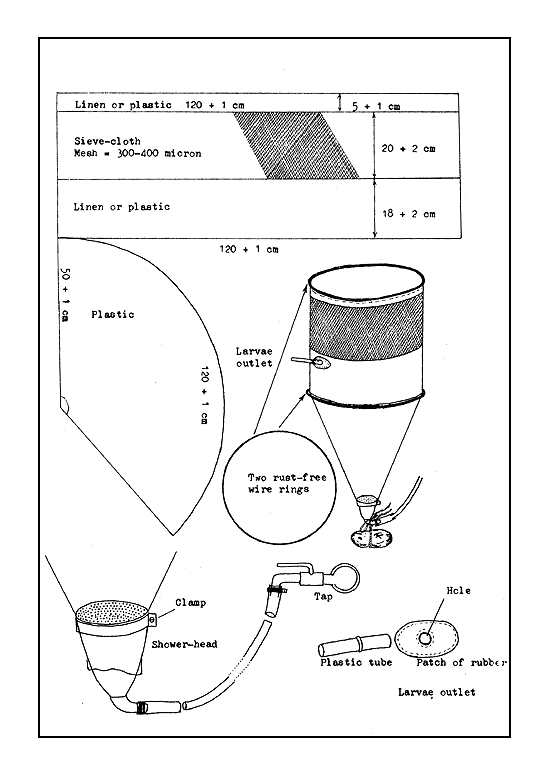
Figure 36 Fabrication of a sieve-cloth and plastic incubator (funnel type) for floating eggs
 |
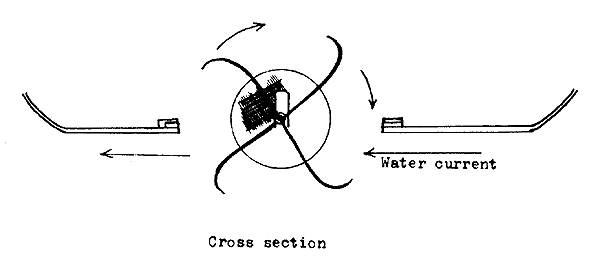 |
Figure 37 Revolving barrel or drum incubator
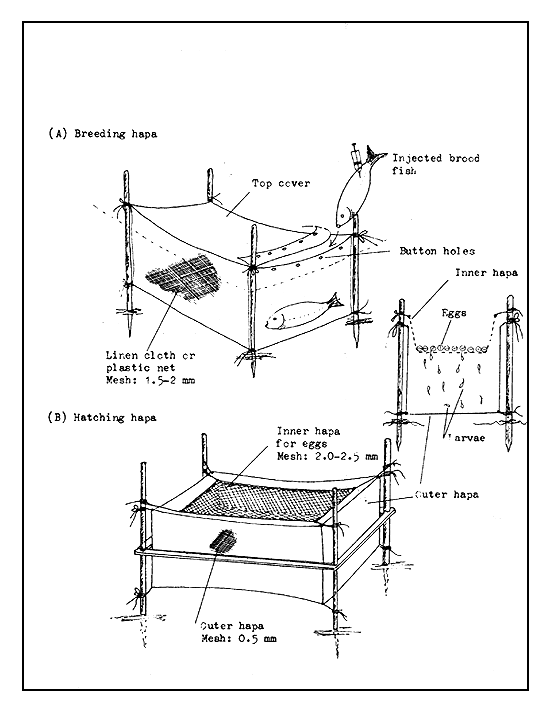
Figure 38 Breeding hapa and hatching hapa used in India
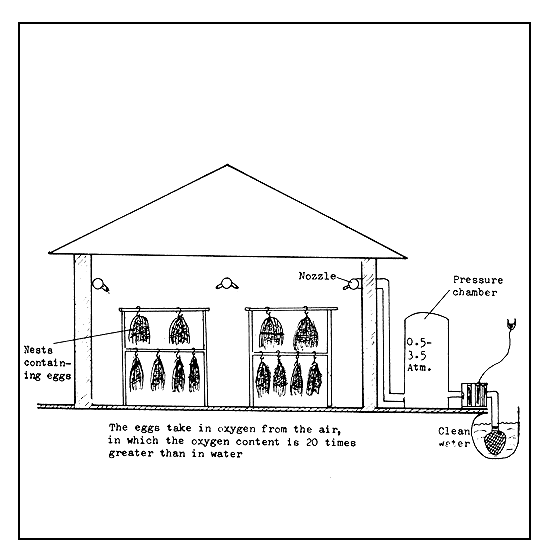
Figure 39 Spray chamber for incubation of hard eggs sticking to nests
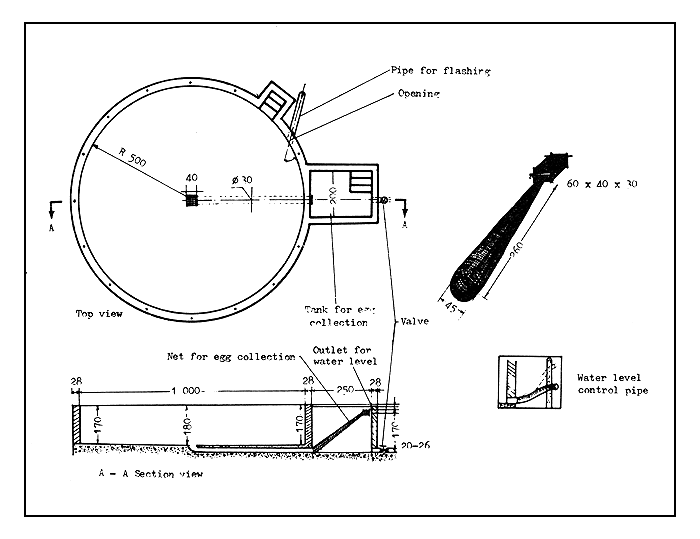
Figure 40 Design of a Chinese-type spawning pool (dimensions in centimetres)
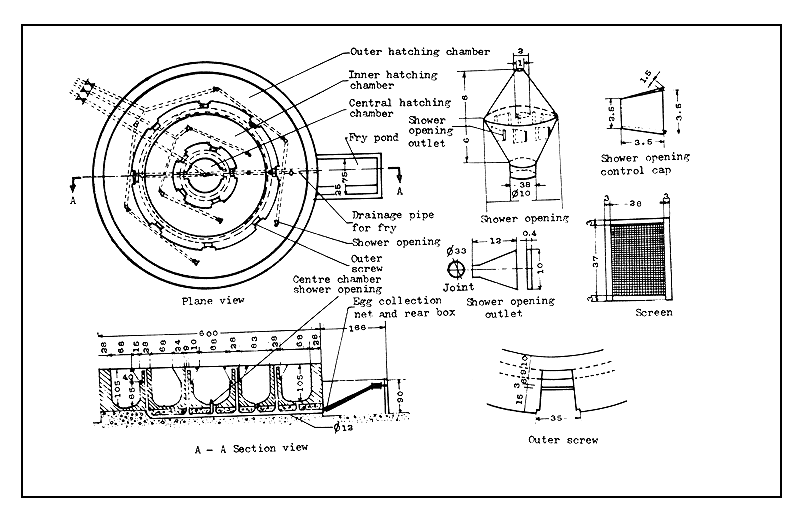
Figure 41 Design of a three-chambered hatching pool (dimensions in centimetres)

Figure 42 Design of a portable hatching jar used in China (dimensions in centimetres)
4.3.6.1 Natural hatching of fish eggs. When the embryo inside an egg develops into a larva, it hatches by breaking out of the egg shell. Though breaking of the egg shell is a mechanical process, it is assisted by the weakening of the egg shell from inside by the enzymes produced. Hatching is not an event of predetermined time. It can be accelerated or retarded considerably. The temperature of the incubator water influences the development and hatching of the eggs. Both the development and hatching are faster in warm water, because of the accelerated metabolism and faster production of shell material dissolving enzyme. If the incubator water is too warm, the unsynchronized development and enzyme production may cause premature hatching of weak larvae.
Cold water retards development, as well as enzyme production. But the rate of retardation is more pronounced in the case of enzyme production. In waters which are too cold, even if the embryo may tolerate it, the “ripe for hatching embryo” cannot hatch because of retarded enzyme production. Larval development, however, proceeds within the egg shell and only after the return of suitable temperature will a more developed larva hatch. The hatching of the larvae of pike, pike-perch, common carp, and several other fishes too can be retarded by placing the nearly developed eggs in water with lower temperature.
4.3.6.2 Technique to accelerate hatching. Quick hatching of eggs can be achieved by applying an alkaline protease enzyme, which is used in the washing industry for biological cleaning of organic dirt from textile materials. This enzyme acts on the egg shell and dissolves it. To accomplish this, 0.4–0.5 g of the enzyme is dissolved in 200–500 cc of water for every litre, by volume, of eggs. The running water supply to the incubator is cut off and after drawing out some water the prepared solution is poured into the incubator and its contents mixed thoroughly by hand. The egg shells will start to disappear in about 3–5 minutes, when the running water supply is renewed to wash out the remains of the dissolved egg shells and the spoiled eggs. The larvae can then be siphoned cut from the incubator or allowed to swim out into the larva-rearing device (Figure 43a). It is to be mentioned that even at 10 times the above concentration, this enzyme is harmless to the larvae.
4.3.6.3 Separation of larvae from egg shells, dead eggs, and other debris. Actively swimming larvae can be separated out by the “swimming out” technique (Figure 43b). The freshly hatched larvae swim vertically toward the surface of the hatching device and if there is an cutlet pipe through which the surplus water overflows, the larvae will be swept away by the current and accumulate in the larva-rearing device directly or in a collector vessel from where they can be transferred to the rearing devices. This technique works well in practice, even though when the water current is strong some of the floating shells and bad eggs will also be carried out with the living larvae.
Inactive larvae, like those of the common carp, can be separated from their discarded shells and dead eggs chemically, by using alkaline protease enzyme to dissolve the egg shells and spoiled eggs, as already described in an earlier section.
Larvae which do not swim but beat about with their tails continuously will sooner or later accumulate in a corner of the incubation device (box or trough-type incubators), from where they can be siphoned cut.
In the case of heavy larvae, the lighter egg shells and dead eggs accumulate separately in the incubator, and the larvae can, therefore, be siphoned out easily.
In the hatching hapa the separation takes place automatically. Only the larvae escape into the outer hapa leaving behind the egg shells and dead eggs in the inner hapa. The inner hapa is then promptly removed as soon as the hatching is complete.
Even though the separation of living larvae from organic debris is often a tedious job, it must be done to prevent bacterial and fungal infection.
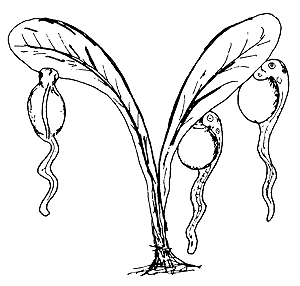
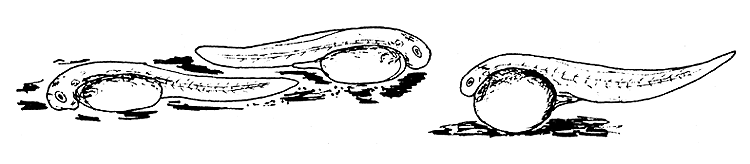
4.3.6.4 Behaviour patterns of the freshly hatched larvae. The behaviour of freshly hatched larvae may differ with different species (Figure 44). Some larvae swim vertically toward the surface and then fall toward the bottom. This is the most common behaviour displayed by the larvae of several fishes, such as the Chinese carp, Indian carp, the river spawners of South America, pike-perch, mullets, coregonids, etc.
After swimming for a short while some larvae attach themselves to objects by a sticky material secreted by a gland at their head end. To this group belong the larvae of bream, tench, Aspius, pike, and some cyprinids such as the common carp.
Another group of “hanging” or attached larvae keep their tails moving continuously. The larvae of the European catfish belong to this group.
Yet another group of larvae lie down at the bottom, either on their side or in a “belly downward” position. Some of them may move occasionally or continuously. To this group belong the larvae of salmonids, cichlids, etc.
The behaviour of the larvae may change during their larval development. Some of the vertical swimmers may lie down on the bottom without moving, while others may start to move vigorously or jump about. The larva-rearing technique has to take into consideration the behaviour patterns of the various types of fish larvae.
4.3.6.5 Larval development process. The newly hatched fish larva is very different from the adult fish. It has no mouth, gut, vent, gills, and air bladder, to mention only the most important organs. The yolk sac provides the material and energy for growth and development. The yolk is a high quality reserve food “donated” by the mother fish.
The size of the yolk sac and the quantity of reserve foodstuff very from fish to fish. This is indicative of the extent of passive parental care. The larvae with larger yolk sacs can survive longer without external food.
The mouth and gut develop during larval life, during which time the size of the yolk sac progressively decreases. The time taken by the larvae to start utilizing external food varies with different species, depending on the size of their yolk sac. It may be only one day in the case of some and three to four days, or longer, in the case of others. The latter have a better chance of survival, since they get a longer period to look for external food and are sustained in the meanwhile on the reserve food available in the yolk sac.
The fish larva has no gills, except in some which have primitive tube-like external gills, as in Misgurnus fossilis, Cobitis taenia, etc. The enlarged ductus cuvieri or a capillary system of the skin which covers the yolk sac serves as the respiratory organ. The process of respiration, wherein dissolved oxygen from the water is absorbed into the larval body, takes place by the process of diffusion. If the oxygen concentration of water drops to a low level because of the lack of water exchange or concentration of numerous larvae within a small area, the oxygen supply to the larva becomes insufficient and the larva becomes weaker and weaker. It cannot recover even when the oxygen level improves. Most of the larval mortalities in the hatchery are due to local oxygen deficiency. Local oxygen deficiency can occur in the corners of the larva-rearing box, in spite of continuous water inflow.
To prevent oxygen deficiency and the resultant larval mortality, the rearing boxes are not used for larvae which lie down or exhibit only limited movements. Large funnel-type rearing devices are best for such larvae. The incoming water current does not allow the larvae to lie down. They are brought together in large clumps and are moved constantly thus ensuring enough oxygen for all. The larval survival with this device is as much as 95–100 percent.
The gills start to form during larval development and gradually take over the respiratory function.
In its initial stages, the larva has no specific weight-regulating organ as the air bladder and, therefore, it cannot swim as do adult fish. At the end of the first stage of larval development when the mouth, gut, and air bladder have developed, the larva swims frequently to the surface for air. It then fills its air bladder and, with that, a fully hydrostatic adjustment is obtained. Now it can swim as do the adult fish.
The fish larva does not have paired fins, but has an extra fin around the hind part of its body. The larvae also may have some larval organ, such as the glanc-secreting glutinous material on the head (e.g., common carp, European catfish, pike, etc.).
Most of the fish larvae have no, or very sparse, pigmentation, as a result of which they do not have protection against the ultra-violet rays of the sun. Larval mortality due to solar radiation has been observed in the case of pike-perch (Stizostedion lucioperca) and cachama (Colossoma occulus). It must be harmful to other pigment-free larvae as well.
The filling-up of the air bladder with air marks the turning point in the life of a fish larva. Shortly after this the larva goes in for external food, even though it still has about 20–30 percent of its yolk sac. The presence of yolk at this stage serves to ensure survival, since it is difficult for the larva to find suitable external food for some time.
Up to the time of air intake by the air bladder, the larva is known as an “early larva”, while beyond this stage it is termed a “feeding larva”. However, many fish culturists abandon the term “larva” after the air intake stage and refer to the feeding larva as “early fry”.
4.3.6.6 Requirements of the developing fish larva. The larval development up to the air intake stage has its own requirements, which are essentially different from those of the developing eggs.
The fish larva needs an oxygen-rich (preferably oxygen-saturated) environment. This is particularly important for the passive larvae. Many fish larvae which swim vigorously in their first few days after hatching lie down on the bottom and become passive when their main organs (mouth, eyes, gut, air bladder, vent, gills, etc.) are developing. Active larvae which swim continuously or beat unceasingly with their tails, force the water around their bodies to move. If the water supply is sufficient, there will be no oxygen deficiency around them. Such larvae can be reared easily in floating boxes or rearing boxes.
The larva, like the egg, needs a suitable temperature for proper development. Any rapid change of temperature may harm the larva, even though the results of experiments in this regard are rather contradictory. It is better to avoid shock due to major temperature fluctuation during the larval stage. Drastic changes in temperature will definitely kill the larvae. Continuous change of water ensures the automatic removal of waste materials produced by the larvae. It is necessary to separate the freshly hatched larvae from the egg shells and spoiled eggs, which would otherwise produce a condition most conducive to the proliferation of bacteria and fungi.
4.3.6.7 Larva-rearing techniques. Three types of larva-rearing devices are employed in modern commercial larva-rearing practice, viz., the funnel type, the box type, and the standing water type (Figure 45). While the first two are provided with continuous water flow, the third is without it but may or may not have provision for aeration. All of these devices should be kept in the shade to avoid direct exposure to solar rays.
Funnel-type devices. Different sizes and types of funnel devices are successfully used for rearing larvae. If the filtering of overflowing water is too rapid in the device, many larvae will be pressed against the sieve cloth filter and die. Therefore, the filtering surface area of the funnel-type rearing device must be large enough so that the water can easily pass through without causing injury to the larvae. The best and easiest device is the dipped-in or immersed funnel (Figure 45) which is large enough to receive several hundred thousand larvae. The method of fabricating a device of this type is shown in Figure 46.
The fibre-glass rearing container (see Figure 45) functions well if the filtering sieve cloth is large enough and properly made (usually pasted with water-resistant glue). In all cases, the mesh of the sieve cloth filtering surface must be appropriate to the size of the larva. If its mesh is too small, it will clog easily with debris and not function well. If it is too large the drifting larvae may be injured or even escape.
Generally, a 300–400 micron mesh sieve cloth is used for the larvae of common carp, European cyprinids, Chinese and Indian carps, the Orinoco, and the Amazon river spawners.
It is advisable to use these devices for larvae of “lying down” type. The water requirement for such devices is about 0.5–1.0 l/min for every 10 l of funnel volume.
Box type devices. In earlier times, these were the only devices used for rearing larvae. They were of different sizes and types. There were sieve cloth boxes of suitable mesh (300–600 micron) according to the size of the larvae, fixed on a wooden or iron frame placed in a tank. There were also floating boxes made entirely from sieve cloth of similar mesh, and boxes or drums (floating or fixed) with sides made of plastic or linen and the bottom of sieve cloth (Figure 45).
Each box is individually supplied with running water. The water supply for the rearing boxes must be considerably higher than for the funnel-type devices. Five to eight litres of water per minute are required for a 60×40×30 cm sized box. Larger boxes are not used, since they are difficult to handle. These devices are now used only for the actively swimming larvae of catfish, pike, etc.
Standing water devices. These are large barrel or drum-like devices. Since there is no running water supply to these devices, oxygen supply is ensured through aeration (Figure 45). Only a few larvae (10–50 per litre) can be put into such a device, which is generally used for rearing the grey mullet larvae.
Another standing water device is the outer hatching hapa after the removal of the inner hapa. This often is fixed in ponds and has no aeration facility. It often yields only poor results, because of high mortality caused by oxygen deficiency and/or fungal and bacterial disease.
4.3.6.8 Enemies of fish larvae. Substantial harm is caused to the larvae by micro and macro predators. Micro predators are the carnivorous cyclopids which ride on the larva, scraping its fine skin or fin with its thorny feet and injuring it fatally. A few Cyclops can kill hundreds of larvae within a brief period.
Macro predators are all those animals which chew or swallow the whole larva, such as insects, insect larvae, worms, fishes (even young ones), etc. They all must be kept away from the larva-rearing devices, or better still, from the fish hatchery itself.
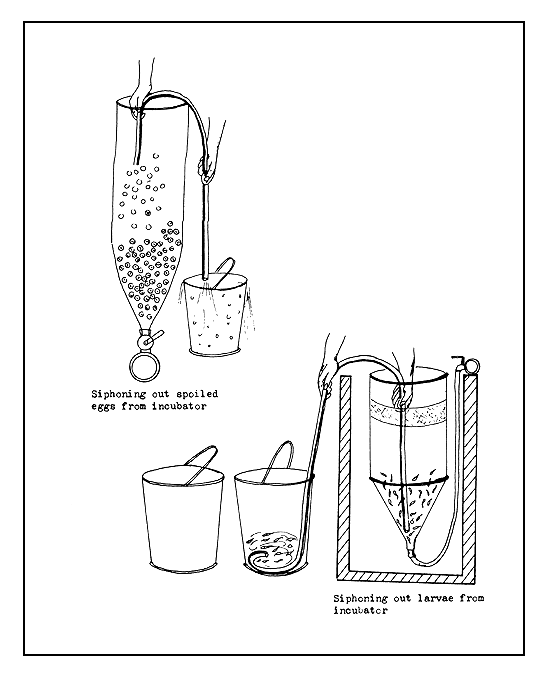
Figure 43a Siphoning larvae and spoiled eggs

Figure 43b Separation of freshly hatched larvae by “swimming out” technique
 |  |
| (A) Slow vertical swimming | Vigorous vertical swimming |
 |  |
| (B) Clinging to objects without moving | (C) Clinging to objects, moving tail continuously |
 | |
| (D) Lying on the bottom | |
Figure 44 Behaviour patterns of newly hatched fish larvae
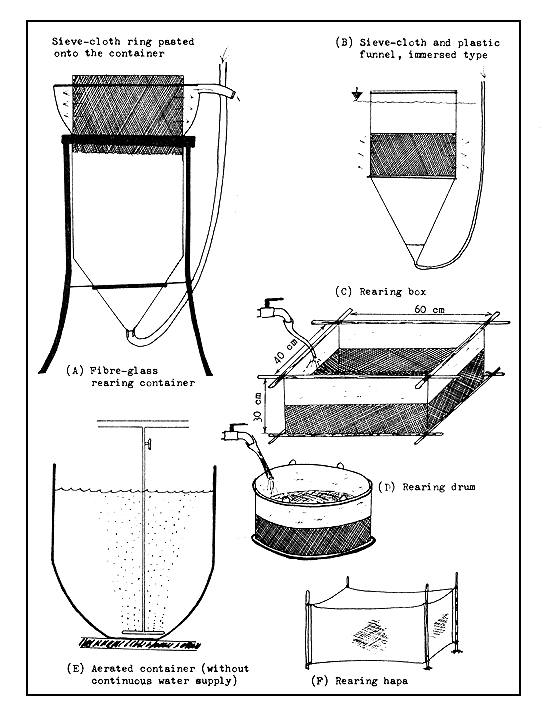
Figure 45 Larva rearing devices
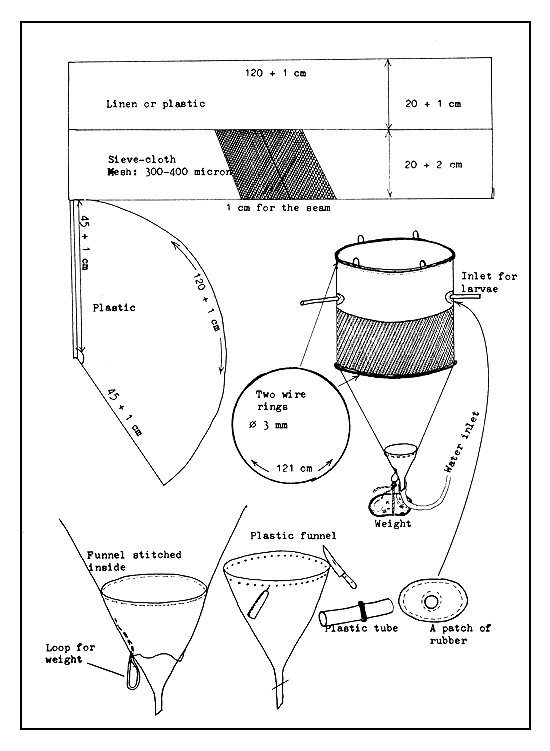
Figure 46 Fabrication of larval collector and rearing funnel, immersed type
4.3.7.1 Difference between fish larva and fry. A major turning point in fish life is when the larva becomes a feeding fry. The larval stage ends when the larva fills up its air bladder with air, begins swimming in a fish-like manner, and starts to eat external food. It is from this point that the fry stage begins. In addition to needing all the essential requirements of the larva, such as adequate oxygen, suitable temperature, removal of waste matter, and control of enemies, the fry also require external food, which should be adequate both qualitatively and quantitatively. The early fry still have a part of the yolk left and can draw on it for sustenance from one to four days, depending on the species. This gives the fry time to learn how to find its own food. Once the yolk is fully consumed, the fry must find adequate food, failing which it weakens beyond recovery.
As compared to the larvae, the fry require a more precise and careful nursing to ensure their survival and proper growth. It is believed that lack of suitable food is the main cause of fry mortality.
4.3.7.2 Suitable “first food” of the fish fry. The earlier conception about the first food of the fry has changed drastically after the commencement of controlled propagation of warm water fish. It was believed that phytoplankton formed the “first food” of fish fry. This was later narrowed down to zooplankton. But there were many instances of poor survival of fry in ponds rich in zooplankton. This was because either the mouth of the fry was too small or the zooplanktons were too large and the fry were unable to feed on their prey. The taste organs of the fry are not yet properly developed and, therefore, the fry must detect its food only with the help of its eyes. Hence, fry require properly illuminated surroundings, neither too dark nor too bright. It is also necessary for the food organisms to be nearby so that the fry are able to detect them.
Considering all the above factors, it is now believed that the best natural first food for small-sized fry (about 1 cm in total length) are the rotifers (Figure 47). Rotifers do not jump away but circle about slowly, giving ample opportunity to the fry if the first attempt at snapping them fails. The larger protozoans, such as Paramecium, also are suitable first food for the fish fry.
Apart from its desirable quality, the food must be available in adequate quantities as well, to ensure that the fry have ample opportunities to take in sufficient food to achieve rapid growth.
The fry stage can be divided into two phases: early and advanced fry. The distinction is based on their food and feeding habits and other behaviour. During the first phase, the fry require special care and nursing. As they mature to the second phase, they learn to feed actively and develop dexterity in hunting for food (with the help of their well-developed sensory organs). Because of their considerably increased size, the advanced fry are able to swallow larger organisms than before, such as cladocerans and copepods (Figure 48). Being strong and swift enough, they are now able to avoid their predators. They can even detect and eat artificial food. With sufficient care they can be netted and handled without undue harm. Fry become advanced fry in about 10 days after the commencement of feeding. They then measure about 1.5–1.8 cm in total length.
4.3.7.3 Practical aspects of fry nursing. Being a very delicate and sensitive creature, the fry needs very conscientious care, particularly in regard to food. Hence, the process of bringing up the fry is referred to as “nursing”, rather than rearing.
Early fry can be nursed to advanced fry in any of the following: (1) “nursing” pot, aquarium, or trough; (2) cement-concrete tank; (3) special nursing tank; (4) small earthen pond; or (5) bigger fish pond (Figure 49). It is important that fry of the same age and the same species only are nursed in a pond, since fry of different species, when mixed together, tend to cause nursing problems.
Fry nursing in pot, trough, and aquarium. In these containers, the fry are concentrated in a relatively small area and it is therefore necessary to make provision for a continuous supply of oxygen and for the efficient removal of waste matter. Food supply is another equally important requirement. Food supplies can be satisfied by providing living food items, such as nauplii of Artemia (brine shrimp) and rotifers (for the smaller fry) and chopped worms (Tubifex) for larger fry of fishes such as pike, catfish, etc.
Oxygen supply and removal of waste matters can be ensured by providing running water, but care should be taken to see that the fry do not escape with the outgoing water and are not pressed against the filtering surface. Where living food is given, it is necessary to ensure that the food does not get washed off with the outgoing water. This is achieved by installing a filtering drum or cylinder, which consists of fine mesh sieve cloth (100–200 micron) stretched on a rust-free metal frame. The outlet pipe starts from inside this filtering structure. The meshes of the filtering surface become easily clogged and hence daily cleaning with a fine brush is required.
The problem with this method is the requirement for enormous quantities of food for nursing the fry of normal size (7–10 mm) on a commercial scale. Consider, for example, that 100 000 common carp fry, whose size is considered to be average among the fry of warm water fishes, consume 3–4 litres of freshly hatched brine shrimp nauplii in their first seven days. This would work out to be very expensive, unless there is an inexpensive source of brine shrimp eggs.
Brine shrimp (Artemia salina) live in pools and shallow lakes with high dissolved salt concentrations. Its first larval stage (nauplius) is small enough to be a suitable first food for the just feeding fry of many fish species. Brine shrimp eggs can be collected in large quantities in salty waters, especially in the so-called salines or salt-pans, where salt is produced through the evaporation of sea water. The dried eggs are normally available in the market as feed for ornamental fishes.
These eggs must be hatched and the resulting nauplii are used in feeding. Hatching them is a fairly simple process. A concentrated common salt solution is prepared by dissolving 35–50 g of common salt in 1 litre of water. The eggs are then put in this solution, the temperature of which is maintained at about 26°–28°C. To ensure good hatching rate, the solution is vigorously aerated. The aeration should be strong enough to keep the eggs continuously suspended in the solution. The eggs hatch out within 24 hours. The freshly hatched larvae should be fed to the fry without delay, as otherwise they may either die or grow too big to be of any use as “first food”.
The mass culture of rotifers can be accomplished in ditches, tanks, cement-concrete basins, etc. using highly manured water. The best manures for this purpose are cow dung, poultry droppings, and sewage from piggeries and duck pens. The development of crustaceans or aquatic insects in this water can be prevented by treating it with organic phosphoric acid ester (mild insecticide), which is normally available in nurseries. The rotifer fauna develops rapidly if the temperature is about 25°–28°C. To start with, some water with living rotifers must be added to the culture water. When the rotifer population has built up, it must be cropped daily with a suitable net, as otherwise the culture becomes “old” and less productive. The rotifers should be fed to the fry inconcentrated form with very little of its culture water, as otherwise the organic matter in the culture water may cause oxygen depletion and mortality in fry nursing tanks.
In the aquarium or other nursing vessel, roughly one fry can be nursed for each cubic centimetre of water, provided there is a continuous supply of oxygen. The fry are fed every one half to one hour and the tank and filter are cleaned daily.
The small container technique for fry nursing, which can be called the “battery” nursing technique, has not yet been introduced commercially, although it is likely to gain greater importance in the future.
In small containers, the fry can be nursed for 7–10 days, after which they are to be transferred to ponds or larger nursing devices such as the nursing troughs. The nursing trough has sloping sides and a screen bottom, through which the waste matter can pass. A nursing trough contains about 100 litres of water, in which 30 000–50 000 advanced fry can be reared. The trough should have a running water facility and the fry must be fed every two hours. They can be fed on finely powdered (100–200 μ) and sieved artificial food made for trout and salmon as starter feed. Daily cleaning of the trough is also essential.
Nursing in cement concrete tanks. Tanks of fairly large size, measuring 5–20 m2, are used for this purpose. Good results are achieved in this method, especially in sub-tropical and tropical areas. The technology employed is as follows:
The day the fertilized fish eggs are expected, the bottom of the tank is covered with hay, and water is added to a level of 10–15 cm. A rich Paramecium and rotifer fauna develop on the hay very soon. When the larvae have developed to the fry stage, 90 percent of the hay is removed from the tank and Cyclops-free water is let into the tank up to a level of about 15–20 cm. After that, the fry are stocked in the tank. The rotifers and Paramecium provide the first food for the young fry. It is not necessary to provide running water, but the water level of the tank must be increased by 3–5 cm every day during the late afternoon to provide enough oxygen during the night. From the 3rd or 4th day onwards, carefully filtered mesoplankton, preferably Moina and other cladocerans (of 150–250 micron size), can be given as feed 2–3 times a day. From the 6th or 7th day, finely milled and sieved starter food also can be fed to the fry.
After about 10–14 days, the advanced fry have to be removed from the tank, since there may be the danger of oxygen deficiency during the night due to the growth of unwanted algal blooms. By this time the advanced fry may have grown to 1.5–2.0 cm total length, depending on the availability of suitable food.
About 1 000–2 000 fry per m2 of surface area can be stocked in these tanks. This would provide 5–10 cm2 of space for each fry. It is advisable to aerate the tank during the night with compressed air when the tank is heavily stocked.
If the tanks are larger (over 100 m2), the fry can be nursed there up to the small fingerling stage (3–4 weeks old; 2.5–3.0 cm in length).
Nursing in specially constructed tanks. The advanced fry can be stocked in specially prepared nursing tanks for further raising under controlled conditions (see Figure 49). The fry nursing tank has about 60–80 percent of its total surface area under shallow water (not deeper than 25–50 cm) and 20–40 percent under deeper water (75–100 cm). The shallow water is where the fry feed and live, while the deep water is the place to where they escape and live during bad weather. These tanks normally have an elongated shape, 20–40 m long and 5–6 m wide. They can be constructed in series with brick or cement dividing walls, especially if the land is limited. In the centre of each tank is a deep ditch, which gradually slopes to the draining structure. It is advisable to construct the ditch out of cement or brick. The floor of the tank should have smooth surfaces in order that plant growth be avoided. This can be paved with bricks or concrete slabs with spaces, leaving only 40–50 percent of the tank floor uncovered. By constructing 10–20 such tanks in a series, a substantial cost savings can be realized. The tanks must be constructed with a drainage structure and automatic fry collectors. The fry collector enables cropping of the tanks without netting.
The technique of fry nursing in this type of tanks is as follows (Figure 50):
On the day the fertilized eggs are expected, the tank ditch is filled with water and some hay placed in it. When the larvae become fry in the incubators, the tank is filled so that the shallow part is covered with water to a depth of about 5 cm. The already rotten hay from the ditch is then spread evenly in the areas nearer the wall. The fry are then stocked in the tank. From the 3rd or 4th day, the water is manured during the early morning hours, at the rate of 1 kg crude fresh manure (cow dung) for every 10–15 m2 of surface area. A running water facility is not required, but the water level must be raised daily by 2–3 cm. Artificial starter food can be fed to the fry after the 7th day.
The growth of the fry must be observed daily. In case growth stops, some of the fry will have to be removed or the food supply increased. About 1 000–2 000 fry per m2 can be stocked in these tanks. The mature fry can be cropped after about 10–15 days.
Nursing in small earthen ponds. The size of these ponds varies from 100 to 2 000 m2. The fry and advanced fry are nursed here for about a month up to the early fingerling stage. The technique described below, and depicted in Figure 51, has been found to be quite rewarding.
(a) Preparation of the pond
The small pond has to be prepared on the day the fertilized eggs are expected to be obtained. The pond is filled with water and is immediately treated with organic phosphoric acid ester (insecticide), such as Ditrifon, Masoten, Flibol, etc. This chemical kills all the crustaceans (cladocerans and copepods) and aquatic insects and, thereby, enables the rotifers to multiply in the absence of predators. The dosage of application of this chemical is 0.5 ppm of 100 percent effective substance or 1 ppm of 40–50 percent effective substance (i.e., 1 g in 1 m3 of water). If necessary, 4–5 ppm can be safely used. To establish a good standing crop of rotifers, chemical fertilizers are applied to the pond at the rate of 1 kg superphosphate, 1.5 kg ammonium nitrate, and 1.5 kg carbamide per 100 m2 of pond surface. In addition to this, organic manure is also added to the pond at the rate of 50–70 kg per 100 m2 of pond surface.
The organic phosphoric acid ester serves to kill all the arthropods (crustaceans and insects), but not the fish larvae, for which the toxic level of concentration is above 50 ppm.
The time required for the growth of a good standing crop of rotifers is mainly a function of temperature. The rotifer population can be considered good if the quantity of rotifers obtained by straining 100 litres of pond water through a plankton net (having a 60–80 μ mesh) is about 1–3 cm3 (wet volume).
Before stocking the fry, it is advisable to check the density of rotifer population and to make certain that cyclopid copepods are absent. Even 100 Cyclops per litre of pond water can kill 90–95 percent of the stocked fry within a short period.
(b) Preparation of the fry
The fry have two sources of food during the initial stage; viz., the yolk and external food. This ensures better survival. It has been observed that if the fry start taking in external food at the beginning, their chances of survival are greatly enhanced. Therefore, they are given hard boiled egg cut into small bits with an electric mixer. Although this food is not well digested by the fry, it expands the gut and facilitates easy passage of other food later on. The egg feeding is repeated again after 3 hours, after which the fry are stocked in the prepared pond at the rate of 400–600 per m2. About 35–50 percent of these can be harvested later on as fingerlings.
It is desirable to use only a monooulture of the young fry. Mixing different age groups of the same species also should be avoided. Some small cladocerans (preferably Moina and Daphnia) should be introduced into the pond on the day it is stocked with fry. The propagation of the cladocerans takes time and by the time they become abundant the fry will be large enough to feed on them.
Since rapid fry growth is always desired, fish culturists usually start giving them artificial feed immediately after stocking. The most commonly provided is the finely ground and sieved (through 100–150 μ mesh) starter food which consists of yeast (40 percent), blood powder (25 percent), fermented and predigested soya (20 percent), fine quality fish meal (10 percent) and soyoil (5 percent). The rate of feeding is 0.5–1.0 kg of food per 100 000 fry per day, given in two separate feedings. The food is usually spread over the shallow part of the pond. After ten days, the size of the feed particles is increased to 400–500 μ, but the contents remain the same. Cutting the grass growing on the dikes and throwing it around the shallow part of pond helps to increase natural food production in the pond.
After about one month, the young fingerlings have to be removed from the small nursing pond and stocked in a larger pond.
Fry nursing in larger ponds. A pond of over 2 000–5 000 m2 area is considered large in tropical areas, while those measuring over 1–2 ha are really large by any standard. The nursing technology in these ponds is quite the same as in small ponds, except for the method of preparation of the pond.
The large ponds must be prepared about ten days prior to the date of stocking the fry. If the temperature is below 15°C, the preparation should start 15 days earlier. One ppm of effective substance of organic phosphoric acid ester is used to kill the arthropods. The method of fertilization with chemical fertilizers and organic manure is the same as in the case of small ponds. The stocking rate is, however, different: generally about 150–300 fry per m2.
Artificial feeding is not as important in the case of large ponds during the first month; however, it assumes importance thereafter. Since the fingerlings can be raised here over a longer period, it is necessary to thin out the stock in order to provide sufficient space and food to the fast growing fingerlings.
Sometimes a small part of the pond (about 100–500 m2) is dammed off as a “baby chamber”. Here, the young fry are nursed for up to 10 days. In that case, only the baby chamber is treated with the insecticide, but the fertilizing and manuring are carried out over the entire pond. After 10 days, the fry are released into the entire area of the pond.
The growth of fry to the fingerling stage and beyond is a continuous process in these ponds, and the only changes are the increased requirements of oxygen, food and space.
The fry of all fish of approximately the same size have very similar food and feeding habits. There is very little difference in this respect between the fry of carnivorous and non-carnivorous species. The starting size of the fry and the size of the mouth determine the difference in the size of the food.
When the fry are about 3–4 weeks old, they change their food and feeding habits and become fingerlings. The fingerling gradually changes over to the food and feeding habits of the adult.
4.3.7.4 Enemies of the young fish. The enemies of the young fish change with the age of the fish. They can be differentiated into (1) enemies of fry, (2) enemies of advanced fry, and (3) enemies of fingerlings.
Enemies of the fry. The most important enemies at the fry stage are the carnivorous cyclopids, the presence of which in a nursing pond spells doom to the young fry. Insects and insect larvae (notonectids, dragon fly, etc.) may also cause large-scale predation of the fry. The cyclopids are normally responsible for the highest mortality of the fry, next only to that caused by hunger.
Enemies of the advanced fry. The advanced fry is less prone to predation by Cyclops, since it is more agile and its skin is thicker and stronger. The insects and insect larvae may pose greater danger at this stage and also does hunger in the event of acute food shortage. Oxygen deficiency may kill the advanced fry in heavily manured ponds. Abrupt changes in temperature and extreme cold may also completely exterminate the entire fry population.
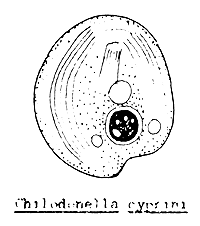
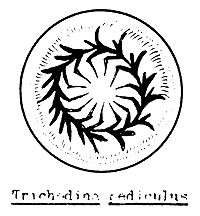
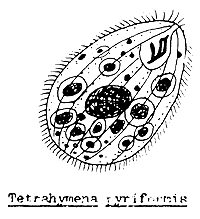
White spot disease caused by Ichthyophthirius (Figure 52) and Trichodina infection could occur towards the end of the fry stage. If the fry have had contact with the infected adult fish or water from other infected ponds, the developing stages of harmful one-celled animals, such as Ichthyophthirius, Trichodina, Chilodonella, Tetrahymena, etc. (Figure 53) could have access to the nursery pond.
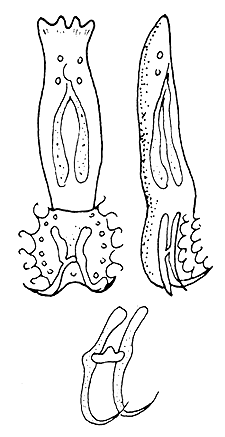
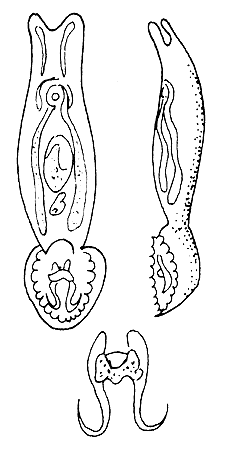
Enemies of the fingerlings. Besides hunger, oxygen deficiency and drastic changes in temperature, Ichthyophthirius, Trichodina and gill worm (Figure 54) infections could exterminate the entire stock within a brief period in fingerling ponds.
4.3.7.5 Prevention and control of parasitic infections. The best way to prevent parasitic infection is to feed the fry adequate amount of both natural and balanced artificial food. Healthy fry cannot be seriously harmed by parasites while, on the other hand, the weak and undernourished fry cannot resist parasitic infection.
Another important preventive measure is to ensure that the young stock do not come in contact with adult fishes which may be harbouring parasites. Water flowing off ponds in which fish are reared is usually infected with parasites, which would find a favourable environment in any crowded fry nursing pond. It is, therefore, advisable that water from a fish pond not be used for nursing fry in a fry pond.
The third preventive measure is to keep the fry nursing and fingerling ponds dry when not in use for nursing or rearing purposes. To use the same pond for other purposes (such as holding market fish) during off season is not advisable. It is necessary to keep the nursery and fingerling rearing ponds dry for at least 1–2 months, in order to control the harmful parasites.
Treatment with disinfecting substances (quicklime, chloride of lime, malachite green, or formalin) before or shortly after inundating the pond can help in controlling various parasites.
The quicklime treatment is generally used in the case of small earthen ponds. It has been found to be effective when scattered evenly on the wet bottom of the pond at a rate of 100–200 kg/ha.
The cement tanks can be effectively disinfected with formalin, combined with mechanical cleaning (scrubbing with a strong brush). For this purpose, concentrated industrial formalin is diluted with water at a ratio of 1:4. Sometimes a strong solution of malachite green (1 g in 10–25 litres of water) is used instead of formalin.
Infection of a pond with any one-celled organism can be diagnosed through certain indicative signs such as: (1) the swimming of fry or fingerlings in large schools near the surface, (2) their accumulation below the water inlet, (3) the occurrence of dark specimens, or (4) the sporadic occurrence of dead fish on the surface. It should be pointed out that fish that die because of parasitic infection only float on the surface, while those that die due to dietary factors remain at the bottom. Spotting the infection only at its initial stages will help in its effective control.
4.3.7.6 Methods of treatment of parasitic infections of young fish.
Malachite green treatment. This is used particularly against the white spot disease (ich disease or Ichthyophthiriasis). Normally only 0.1–0.2 ppm of malachite green is used in tanks or ponds, but 2 ppm can also be used for baths in concrete tanks if the water can be changed within 10–15 minutes. It is also used for curing fungus (Saprolegnia) infection of eggs. The dosage usually used is 5 ppm for 30 to 60 minutes.
Formalin treatment - Formalin at a concentration of 200–400 ppm is employed for the treatment of Costia infection in small tanks, over a period of 15–40 minutes. Common gill worm infection can also be treated by formalin baths at 250–500 ppm for 30 minutes for fry and at 1 000 ppm for 15–30 minutes for breeders.
Copper sulphate treatment - A dose of 500 ppm is used to treat fish infected by the fungus Saprolegnia. The infected fish are kept in the solution until they show signs of distress. It is also used in the treatment of gill-rot or branchiomycosis, which is caused by the fungi of the genus Branchyomyces. The recommended dosage is 100 ppm from 10 to 30 minutes.
Copper oxychlorine treatment (CaCl2×CuO) - A dose of 5 ppm of copper oxychlorine is effective against Chilodonella, Costia, and Trichodina. Since the lethal dose for fish is as high as 100 ppm, the 5-ppm dose can be used for all sizes of fish.
Organic phosphoric acid ester treatment - This insecticide is available in the market under different commercial names; e.g., Dipterex, Dylox, Masoten, Flibol, etc. It can be used against common gill worms (Dactylogyrus, Gyrodactylus) and parasitic copepods (Lernaea). The recommended dosage is 0.25–1.0 ppm of active ingredient. It breaks down rapidly in water of high pH and at high temperatures.
Potassium permanganate treatment. Potassium permanganate is used at a dosage of 6–10 ppm to control external parasites, such as Saprolegnia. The infected fish are kept in the solution for between 60 to 90 minutes. The same dose can be used for general disinfection of hatchery tanks.
Antibiotic treatment. Wide spectrum antibiotics are employed for the treatment of diseases caused by bacteria, such as Myxobacterium, Aeromonas, and Pseudomonas. They are either administered externally or mixed in the food. The dosage of antibictics (oxytetra-cycline, chloramphenicol, furasolidon, etc.) for external treatment (bathing) in tanks or basins is 50 ppm (50 mg per litre of water). When mixed in food, they are incorporated at the rate of 200–1 000 ppm and can be used both for curing and the prevention of bacterial infection.
4.3.7.7 Treatment of young fish before transporting or restocking in other ponds. It is a common practice to bathe young fish in a 2 percent common salt solution for 2–3 minutes to free them of parasites before they are transported or restocked in other ponds.
It is desirable to subject even the breeders to this type of treatment at the time of handling them during breeding activities. They may be held in a scoop net and dipped in a 5 percent common salt solution for 2–3 minutes.
4.3.7.8 Method of testing chemicals to determine lethal doses and tolerance limits. Before a chemical is used in the treatment of small fish, it is necessary to test it to determine its lethal dosage for fish and fish parasites; it should also be tested to determine the time of tolerance. For this purpose, a 100 ppm “basic solution” of the chemical to be tested is first prepared by dissolving 1 g of the chemical in 10 litres of water (Figure 55). The common bucket serves as an ideal container for this since its capacity is approximately 10 litres. Five more similar buckets are taken and numbered 1–5 with a marker. Then, 25 ml, 50 ml, 0.1 l, 0.2 l and 0.4 l of the basic solution are poured into buckets 1 through 5, respectively. After this, each bucket is filled with clean oxygen-rich water to the 10-litre mark. The solution in these buckets will then have concentrations of 0.25, 0.5, 1, 2, and 4 ppm, respectively. Into each of these buckets 5–10 fish are placed whose tolerances to this chemical are to be tested. The behaviour of the fish in the various buckets is then closely observed to determine at what time and in which concentration they show distress and begin to die. By following this procedure, the lethal dose of any chemical to any fish and the time of tolerance can be determined. It is, however, necessary to measure the temperature at the time of test, since it is known that the tolerance of fishes to chemicals varies with temperature. The same test can be applied to the fish parasites as well to determine the dosage which kills the parasite without harming the fish.
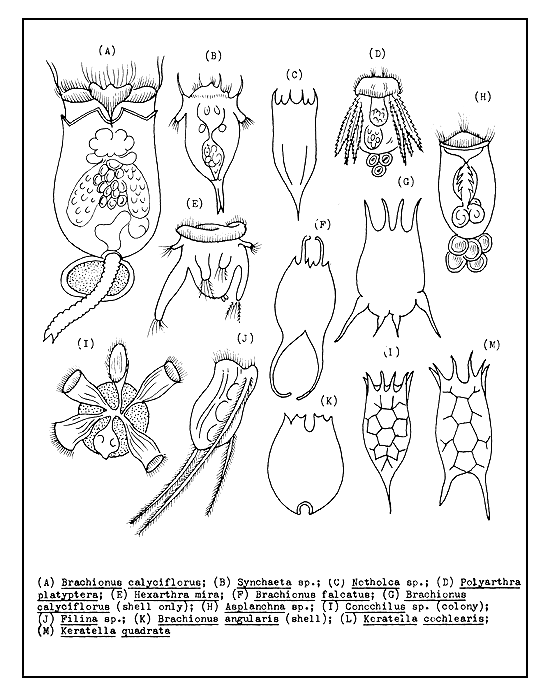
Figure 47 Common rotifers, the most important natural food of the fry
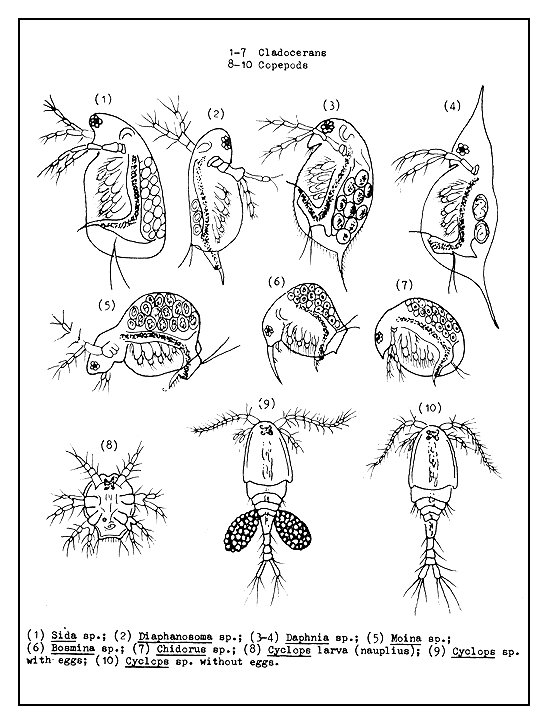
Figure 48 Common planktonic crustaceans
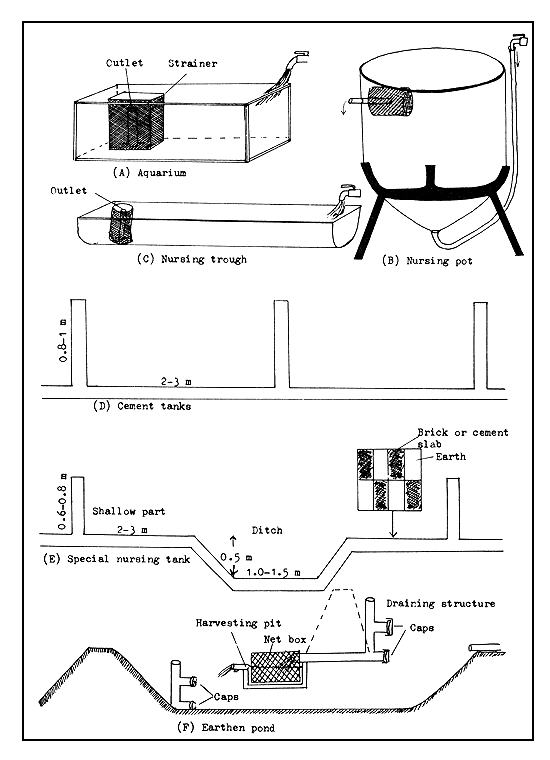
Figure 49 Fry nursing devices and places
| On the day the decisive injection is given to obtain fertilized eggs, the ditch in the tank is filled with hay and water |
 |
| During incubation and larval rearing, the hay is spread evenly and covered with water |
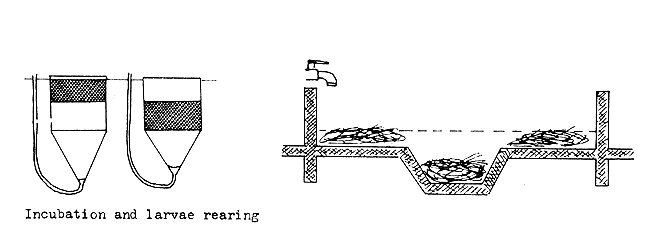 |
| When the larvae become fry, they are taken out of the rearing device and put into the nursing tank |
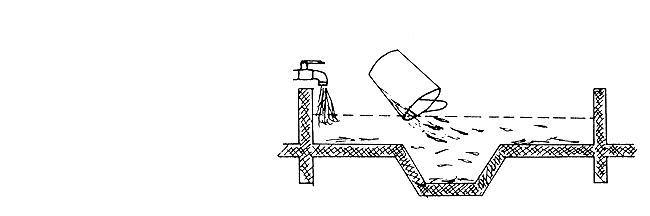 |
Figure 50 Nursing fry in special nursing tank
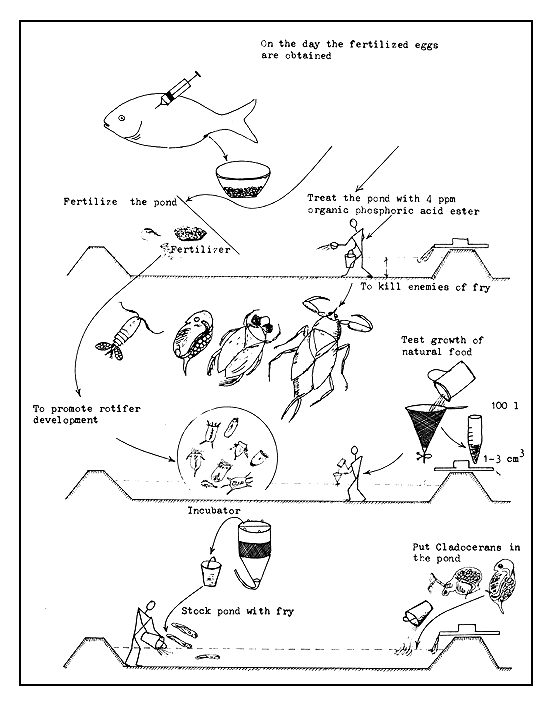
Figure 51 Nursing fish fry in small earthen ponds

Figure 52 Life cycle of Ichthyophthirius
 | |
 | |
 | |
 |
Figure 53 The main single celled animal parasites of young fish
| (A) Dactylogyrus anchoratus | (B) Gyrodactylus elegans |
 |  |
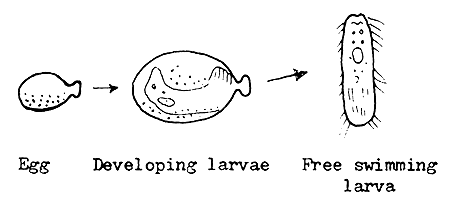 | |
Figure 54 The common gill-worms
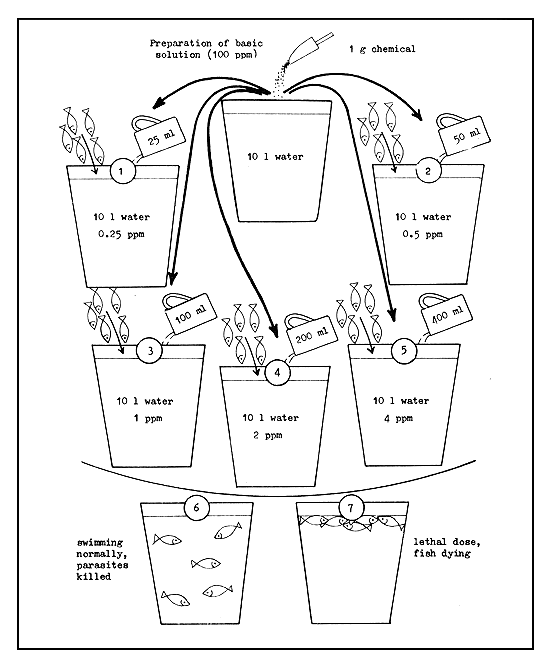
Figure 55 Methods of testing chemicals to determine lethal doses and tolerance limits
![]()
![]()
![]()