The purpose of making a soil survey is to obtain a
representative image of the various types of soils and of
the soil horizons present on the site where you plan to
build fish-ponds. To save time, effort and money, a soil
survey of the site should be done as early as possible.
It should be done before the purchase of a site which may
prove to have soils unsuitable for pond construction and
before designing the fish-farm.
2.1 Soil samples
Which kind of soil sample do you need?
Soil samples may be taken in two ways, according to
the kind of tests to be performed. They are:
Disturbed samples which do not represent exactly
how the soil was in its natural state before
sampling;
Undisturbed samples which represent exactly how
the soil was in its natural state before sampling.
Disturbed samples are used for the more simple tests that will be performed
and particularly for those tests which you will perform yourself in
the field. Undisturbed samples are necessary for the more sophisticated
tests which must be performed in the laboratory for more detailed physical
and chemical analyses. Undisturbed samples must be collected with greater
care for they should represent exactly the nature of the soil. For a
complete study of the soils on your site, you will need both disturbed
and undisturbed samples.
How deep should you take soil samples?
Soil samples for aquaculture are normally taken to a depth
of 2 metres, so you should examine each soil horizon to that
depth. If the water table is found at a depth of less than 2
metres, soil samples should always be taken as deep as possible.
Which precautions should you observe when collecting soil samples?
Sample all soil horizons over 10 cm in thickness;
all samples should represent natural soil horizons or stratifications;
samples should not be taken at arbitrary depths;
If you have to examine and compare the soil samples
when you take them, carefully collect them in separate piles
to avoid mixing different samples and place the piles on sheets
of plastic or newspapers so that they do not become mixed with
other materials such as leaves, manure or gravel which may be
on the ground;
Keep soil samples separate
If you do not plan to examine and compare the
soil samples when you take them, place them immediately in strong
plastic bags or in canvas bags with plastic liners; tie all
bags tightly;
Bag soil samples and label them
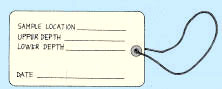
Label all sample bags carefully and completely;
write clearly on the label the identification number of the
sampling location, the upper and lower depths of the horizon
sampled, and the date.
A soil sample label
Soil samples for chemical analysis
Each sample taken for chemical analysis should
weigh about 1 kilogram except in gravel soils
when the sample should be large enough to contain
at least 100 grams of fine earth (particles
smaller than 2 mm in diameter);
Remove stones and large pieces of organic
material such as leaves and roots in surface
samples;
Avoid mixing samples from different horizons;
To obtain samples from a soil profile in an open
pit, proceed as described in Section 2.2.
What to do with your soil samples
You may perform simple tests in the field
yourself. This is done at the sampling site, as
described later in this manual;
You may collect the soil samples and bring them
to a specialized soil laboratory for more
detailed physical and chemical analyses; such
laboratory facilities exist in some universities
(for example, Faculties of Agricultural Science
or Departments of Civil Engineering) and in
public administrations responsible for
Agriculture, Forestry or Public Works.
Remember ...
2.2 Soil sampling methods
Soil samples may be taken by three methods which
involve either digging, drilling or boring holes at the
place on your site where you have chosen to collect
samples from different depths. They are:
Open test pits are the only means available actually to see and
be able to examine a soil profile in its natural state.
They may be dug by hand or by special excavating equipment such
as a trench digger. If necessary, you may obtain undisturbed samples
from selected horizons of an open pit.
Dig pit 0.80 x 1.50 x 2 m
The basic steps to follow when
digging an open pit are:
Dig a pit with very straight sides 0.80 x 1.50 m
and 2 m deep or, if less, until you reach the
parent rock; the upper part of the pit should be
wide enough for you to see the bottom easily (the
drawing shows you how);
If you have selected a site with alluvial soil,
you may find ground water before you reach 2
metres. If you find water, further digging is
impossible but sample the soil at the bottom of
the pit as far down as possible;
When you have finished digging, examine one of
the well-exposed sides of the pit carefully to
determine the different soil horizons: this is
called a soil profile; it should be examined when
freshly dug. Make a drawing of this soil profile
for each pit you dig and measure and write the
depths of each soil horizon. Carefully write on
your drawing the location of the site where each
sample was taken.
Draw and label each profile
Now you are ready to begin taking
the disturbed or undisturbed soil samples that you need,
either for field testing or for laboratory testing. To
obtain samples for chemical analysis, proceed as follows:
Carefully clean the whole vertical profile;
Sample each horizon from bottom to top, starting
with the lowest horizon and proceeding upward.
You will be shown how to take samples later in
this chapter;
To sample the uppermost horizons, which may have been disturbed
when digging the pit, move to an undisturbed area as
close as possible to the actual pit, dig a shallow hole and take the
sample there.
Clean the whole profile
Sample top horizons in an undisturbed
area
The
auger boring method
The auger boring method is a way to obtain soil samples from different
depths by drilling, without having to dig a pit. This way, a continuous
series of soil samples is taken which makes it possible to assemble
a core* showing the soil horizons. The auger boring method
is cheap and fast, you can quickly check the soil at several places
on your site, but it provides only disturbed samples. An
auger may be used in most soils above the water table and in cohesive
soils below the water table. If you do not have an auger, you may be
able to borrow one from a neighbouring agricultural station or experimental
farm.
Two common soil augers
There are many kinds of soil augers but the most common kinds
are the bucket auger and the screw auger.
A standard bucket auger is a metal cylinder about
16 cm long and 8-10 cm in diameter. It has a cutting edge on the
bottom surface which enables it to cut through most soils easily.
Generally, bucket augers are equipped with an extension shaft
and handle which allow you to take samples at greater depths,
usually down to 1.1 m. A sample taken with a bucket auger is slightly
disturbed but it is acceptable for most sampling purposes and
it provides a sample large enough for further laboratory analysis.
A bucket auger with a diameter of 10 cm is especially good for
local permeability tests (see Section 9.6).
Some limitations when using a bucket auger are:
It is less efficient in soils which contain a lot of sand
and gravel;
It is difficult to use in clay soils;
The sampling depth is limited to a little more than 1 m at
the most.
Bucket auger
A screw auger is a metal
spiral about 30 cm long and 3.5-4 cm in diameter. Screw augers are
equipped with several extension rods, usually 30 cm long, which
can be attached, one by one, to take samples at greater depths.
Some limitations when using a screw auger are:
Soil samples are severely disturbed;
It is not efficient in soils which contain a lot of sand and
gravel;
It is difficult to use in hard clay.
Screw auger
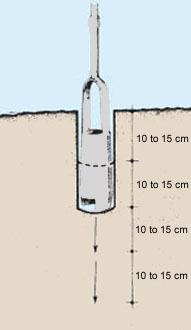
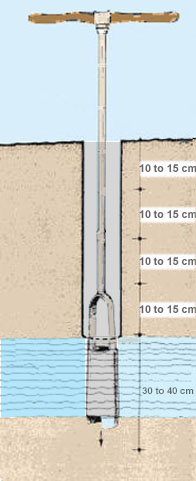
The basic steps to follow when sampling with an auger are:
Drill the auger into the soil to a depth of 10-15 cm;
Pull the auger up carefully to keep the soil in place, just
as it was in the ground, and place the soil sample on a sheet
of plastic or newspaper;
Continue drilling 10 to 15 cm at a time; place the successive
sections one after the other to assemble a core* showing the
soil horizons;
Drill into soil
Place samples in order of removal
Make a drawing of the core; measure and write the depths at
which you observe the various horizons;
Draw sampled core and write depths
If you reach water, drill more carefully but try to continue
drilling for another 30 to 40 cm.
Note: if the soil below the water contains a lot
of sand, the sides of the hole will not stay in place and you
will have to stop drilling. If the soil below the water contains
enough clay, the sides of the hole will stay in place and you
will be able to continue to drill, even below the water level.
If you reach water, try to continue drilling
The thin-walled tube method
With the thin-walled tube method, you use a light-weight tube
or pipe which is open at both ends. It is pushed into the soil
to obtain a sample and is then removed from the hole. If it is
well done, this method will provide undisturbed samples.
Standard thin-walled tubes are manufactured about 30-60 cm long
and 4-7 cm in diameter. You can also make your own sampling tubes
from lengths of steel pipes made of No. 16 (1.6-mm) or No. 18
(1.25-mm) gauge steel, 15-30 cm long and 3.5-5 cm in diameter.
Some limitations when using a thin-walled tube are:
It is not effective in loose soils;
It is not effective in hard or gravelly soils.
It is important to remember that, if used properly, this method
will enable you to obtain practically undisturbed soil samples.
The degree of disturbance of the samples will depend on the manner
in which the sampling tube is inserted into the soil and on the
characteristics of the tube. The greatest disturbance is caused
when pushing or driving the sampling tube into the soil, so this
should be done with great care. There is also less chance of disturbance
if the tube is thin-walled and sharpened to a good cutting edge
at one end.
A standard thin-walled sampling tube
Making your own sampling tube
The basic steps to follow when sampling with a thin-walled tube are:
Determine the various soil horizons on the soil profile; prepare
a sketch of the soil profile and write in the depths of the
layers;
Write in depths
Carefully oil the inside wall of each sampling tube (you can
use old motor-oil);
Oil the tube inside
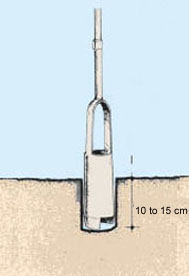
At the spot where you wish to obtain a soil sample, insert
one sampling tube horizontally into the soil; try to push
the tube into the soil at a high and constant speed;
only if necessary, use a hammer and a piece of wood;
Dig the sampling tube out of the ground with a knife; be careful
to keep it horizontal so that you do not disturb the enclosed
soil sample;
Place the closed sampling tube in a plastic bag and label
it;
Repeat this procedure along the soil profile as many times
as necessary.
Close the two ends of the tube tightly to keep the soil sample
inside; you can use pieces of cloth, plastic sheet, or pieces
of tyre inner tube and string to close the ends;
Close both ends of tube
2.3 How to make a soil survey for a freshwater fish-farm1
1 The survey procedures described here are
simple and suitable for the study of potential sites for
fish-pond construction. For other areas of agriculture,
there are more elaborate procedures such as those
described in "Soil survey investigations for
irrigation", FAO Soils Bulletin, 42 (1979).
A soil survey is conducted in two parts
The first part is a short, quick survey to get a
general idea of the soil varieties present and where they
are found on the site. This is called a reconnaissance
survey. A reconnaissance survey is usually conducted by
digging a number of open pits and examining the exposed soil
profiles. Selected samples are then taken for field or
laboratory testing. The results of this quick survey
should enable you to determine which parts of the site
may be suitable for pond construction, such as those with
good impermeable soil, and which parts of the site are
unsuitable, such as those with gravel beds or thick
layers of organic soil. You will learn how
to make a reconnaissance survey in Section 2.4.
The second part is a more complete survey of the parts
of the site which you found to be suitable in the
reconnaissance survey. This is called a detailed survey.
A detailed survey is usually conducted by drilling a
number of holes using the auger boring method. The auger
samples you take will allow you to determine in greater
detail the existing soil conditions and the suitability
of the soils present. If necessary, you can take
undisturbed soil samples to a laboratory for additional
testing. You will learn how to make a
detailed survey in Section 2.5.
Note: the number of samples you will have to take on a
site will depend on the variety of soil conditions
present. The greater the variety, the greater the number
of samples you will have to take and examine to get a
clear picture of possible site suitability.
2.4 Making a
reconnaissance soil survey
The following are some basic steps to help you when
making a reconnaissance soil survey:
Select a site for your proposed fish-farm.
Preparing for the survey
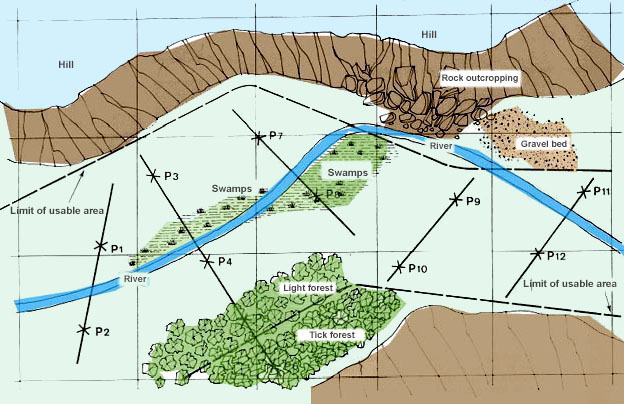
Draw a small sketch map of the proposed site
and locate all of the major topographical features such as streams,
rivers, swamps, gravel beds, rock outcroppings, hills and anthills,
forest or savannah lands (see example below);
Review the sketch map you have drawn and study
all topographical features and any other factors which could
affect soil quality such as types of vegetation, human activities
and general topography;
On the basis of this study, decide upon a plan
for your reconnaissance survey, keeping in mind that you should
provide at least one sample of each kind of soil from the various
parts of your selected site for pond construction. As a rule,
you should take soil samples from at least one location
in each hectare of land;
Number the location of each place you have chosen
to take soil samples from on your sketch map. You have already
been told that to make a reconnaissance survey you usually dig
open test pits. So, number each of your pit sampling locations
with P. Number them consecutively P1, P2, P3, P4 ... P12, until
all the locations have been numbered (see 12 locations in the
example below).
Note: when making a soil survey in a valley, plan your
survey to obtain samples across the valley and along the
slope where most of the soil variation occurs.
Note: when you have different kinds of vegetation such
as cultivated land, pasture, open savannah, forested savannah, and light
and thick forest area, plan your reconnaissance survey so that you obtain
soil samples from each of the different vegetations. You can eliminate
areas from your plan with large surface stones, gravel beds or rock
outcroppings which are unsuitable for earth-pond construction. Most
thickly forested areas can also be considered unsuitable.
Note: each square is 100 x 100 m or 1 ha and the
total usable area is about 7.5 ha.
Digging the open pits and examining the soil profiles
In each of the locations you have numbered on your sketch
map, dig an open pit 0.80 x 1.50 m and 2.00
m deep;
Dig each pit and examine each profile
Examine the soil profile as soon as it is exposed
when it is still fresh so that you can define the horizons more
easily. If it becomes dry before you can examine it, cut a vertical
slice from the side of the pit and examine the fresh
profile, as you were told in section 2.2;
Make a drawing of the profile as soon as you
have examined it. Record your findings and any other field observations
you have made that may be of value later. Number the drawing
according to your site map.
Draw and label each profile
Taking the samples
Now you are ready to take the soil samples that you will need from
the profile. If you need disturbed samples, they can be taken with
a small shovel or garden trowel. If you need undisturbed samples,
they can be taken from the various soil horizons using the thin-walled tube method.
Taking a disturbed sample
Taking an undisturbed sample
Bag and label all of the soil samples that you take and store
them in a safe, dry place until you are ready to use them. Remember
to note on the label the number of the sample location, the
upper and lower depths of the soil horizon samples and the date.
Note: when you have completed the reconnaissance survey
and have roughly determined which different soil types are present
and where they are found on the site, note this information on
your site map. If the results of the reconnaissance survey are
satisfactory, you are ready to do a more detailed survey.
Bag, and label your samples
2.5 Making a
detailed soil survey
The following are some basic steps to help you when
making a detailed soil survey.
Preparing for the survey
Carefully study your site map and the notes of
your findings and other field observations from
your reconnaissance survey. Decide upon a plan
for your detailed survey to complete this
information. In particular, you will need to
locate more accurately the various types of soil
present on the parts of the site which may be
suitable for pond construction;
Select the locations where you need to take additional
soil samples. As a rule, this will mean choosing
two or more sampling locations in each hectare of
land;
Number on your site map each new location from
which you have chosen to take additional soil
samples. You have already been told that to make
a detailed survey you usually drill a number of
holes using the auger boring method. So, number
each of your auger sampling locations with A.
Number them consecutively, being careful not to
use numbers already used, as follows: A13, A14, A15,
A16 ... A29, until all the locations have been
numbered (see 17 new locations on site map below).
Note: each square is 100 x 100 m or 1 ha
Taking auger samples and examining the soil profiles
Examine these samples as soon as possible, while they are
still fresh. Make a drawing of each core* and record
your findings and any other field observations you
have made that may be of value later. Number each drawing according
to your site map.
Draw sample core and write depths
Taking subsamples
Take subsamples from the core*, if necessary,
for later laboratory analysis. You can do this by first defining
the various horizons present and then, using your hand or a
small trowel, taking a soil sample from selected horizons to
complete the information available from the reconnaissance survey
open pits.
Take subsamples
Bag and label all of the soil samples that you
take and store them in a safe, dry place until you are ready
to use them. Remember to note on the label the number of the
sample location, the upper and lower depths of the soil horizon
sampled and the date.
Bag, label and store samples
Note: when you have completed the detailed survey,
compare the results with the results of your
reconnaissance survey. Draw a final map showing the
distribution of the different soil types. If there are
any doubts, take additional auger samples in specific
locations to complete your information. The soil samples
you have already taken may also be examined again and
additional samples (for example, undisturbed samples from
the open pits) may be taken to check further on
particular soil properties.