|
Where water comes from and where water
goes
 |
1. Water is essential for the life of fish. It is the medium that must supply or support all their needs, including breathing, eating, reproducing and growing.
2. In a previous manual (Water, FAO Training Series, 4) you learned:
3. Here you will learn a bit more about water itself, and about the main physical and chemical characteristics that are important for the production of fish in earthen ponds (see Sections 2.2 to 2.5).
4. Once you know your water well, you will understand more easily how to control its quality and, if necessary, improve it through good pond management practices (see Sections 2.6 to 2.9).
|
Where water comes from and where water
goes
|
Pond water composition |
||||||
|
5. Pond water contains two major groups of substances as shown in the attached chart:
6. The composition of pond water changes continuously, depending on climatic and seasonal changes, and on how a pond is used. It is the aim of good management to control the composition to yield the best conditions for the fish. |
General composition of water
|
|||||
7. Some of these substances are of particular importance for
successful fish farming. You will therefore learn more about:
|
Pond water changes with climate and season
 |
|||||
Changing water composition |
||||||
|
8. The characteristics of pond water depend both on the water that has been used to fill the pond and on the characteristics of the soil. However, within the pond water, some major chemical processes take place:
|
Respiration
 |
|||||
|
Photosynthesis
 |
Decomposition
 |
|||||
9. These processes constantly change the water composition, for example:
10. The greater the quantity of plants, animals and bacteria in the water, the more these processes change the water composition. In heavily stocked ponds, therefore, these changes are greater and need more careful management.
11. All of these chemical processes are influenced by the water temperature: the warmer the water, the more these processes increase, and the more quickly the water composition can change.
12. To manage and control the water composition ,you need to sample and measure the composition particularly of the more important characteristics. In the next sections you will also learn more about the four water characteristics that are of particular importance for fish pond management:
First we will look at how to sample the water so these factors can be measured.
 |
1. As we will see later, the composition of the water can vary according to:
2. There are three ways in which water is usually sampled.
(a) Directly, with test materials or with an instrument. This method is best for getting immediate information and often lets you measure the water exactly where it lies in the pond.
(b) Indirectly, by using a bottle, bucket or other container, and testing the water at the side of the pond. This method may be necessary if you have to add chemicals to the water to test it. It is more difficult to get water from a precise location this way.
(c) Indirectly, as above, but taking the water to a laboratory to test it. Although the methods and the equipment used can give more precise results, the water may have to be specially preserved to make sure it does not change during transport to the laboratory.
3. Whichever method is used, you should:
4. This procedure is the best for testing for dissolved oxygen using chemical methods (see Section 2.5). It may also be used for other analyses. Use a narrow-mouthed glass bottle of known volume, for example 100 ml or 250 ml. This sample bottle should first be washed out and rinsed with the pond water, then carefully filled, avoiding splashing or bubbling. Then with the bottle held below the water surface, push the stopper in. Take care to avoid trapping air bubbles in the neck of the bottle.
5. This method is good for surface and shallow waters. To obtain a sample from deeper water, however, you need to transform the sample bottle into a water sampler.
6. You can build a simple water sampler in the following way.
(a) Obtain a narrow-mouthed bottle, preferably made of glass and containing not more than 500 ml of water.
(b) Obtain a good stopper that fits tight into the mouth of the bottle.
(c) Firmly attach a weight, such as a stone or a heavy piece of metal, to the lower part of the bottle so that the bottle will easily sink.
(d) Attach a piece of string to the neck of the bottle, slightly longer than the maximum depth of the water to be sampled.
Note: instead of only one piece of string, you can also use two, one attached to the bottle and the other attached to the top of the stopper.
(e) Attach the stopper securely to the same piece of string, just above the opening of the bottle, at a distance equal to at least twice the length of the stopper.
(f) Mark the string with knots spaced at fixed intervals, such as 20 or 50 cm apart, so that you will know at which depth the bottle mouth opens to obtain the water sample.
|
A simple water sampler made from a 250-ml bottle
with a tight stopper and a weight attached to the bottom of the bottle
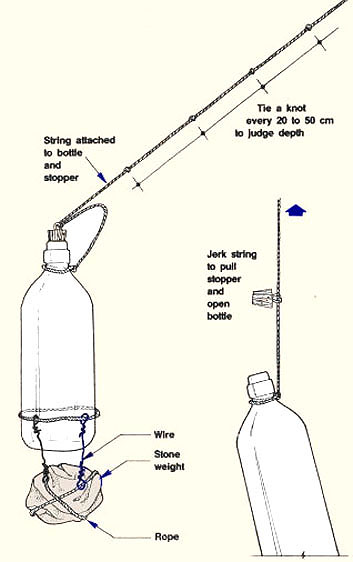 |
| 7. You may also secure the sampling bottle to a piece of wood with a rubber strap, for example, attaching a string to the top of the stopper, as shown in the drawing. |
You can build a wooden frame with a
handle to lower the bottle into the water  |
8. To obtain a water sample from a certain depth, proceed as follows.
(a) Put the stopper firmly in place to close the water sampler.
(b) Lower the sampler into the water to the desired depth.
(c) Jerk the string sharply to pull the stopper out and open the sampler. It should now start filling with water, while air bubbles appear on the surface of the pond.
(d) When air bubbles no longer appear, carefully pull the full water sampler out of the pond.
(e) Immediately measure the water temperature (see Section 2.4) and the chemical characteristics.
1. Water may be acid, alkaline or neutral. Depending on this, water will react in different ways with the substances dissolved in it. It will also affect in different ways the plants and animals living in the water. The measure of the alkalinity or acidity of water is expressed by its pH value. The pH value ranges from 0 to 14, with pH 7 indicating that the water is neutral. Values smaller than 7 indicate acidity and values greater than 7 indicate alkalinity.
2. Obtain a water sample, using one of the methods described in the previous section. You can use methods and tools to measure the pH of water similar to those you used to measure the pH of soil (Soil, 6, Section 4.1).
(a) pH indicator paper: a thin strip of paper (such as chemically treated litmus paper) is partly dipped into the water to be tested. The colour of the paper changes, and this new colour is compared to a colour chart, which gives the pH value according to the colour obtained. You can buy litmus paper cheaply from some chemists.
| (b) Colour comparator: cheap water-testing kits can be bought from special chemical suppliers. They usually include a number of liquid indicators. A few drops of one of these colour indicators are added to a small water sample, and the new colour of the solution is compared with a set of standard colours supplied with the testing kit. |
Colour comparator
 |
|
|
(c) pH meter: such equipment provides the easiest way for determining the water pH, even in the field, but it is relatively expensive. The pH value is directly read from the meter after placing the glass electrodes in a water sample. Such electrodes are very fragile and should be well protected when being transported. They should be accurately calibrated in buffer solutions of known pH, at regular intervals. Note: because of the variation of the pH in fish ponds during the day (see below), you should measure pH at a regular time, preferably at sunrise. It is even better to measure the pH at regular intervals of two to three hours from sunrise to sunset, which will give you a good idea of the pH variations during daytime. |
pH meter
 |
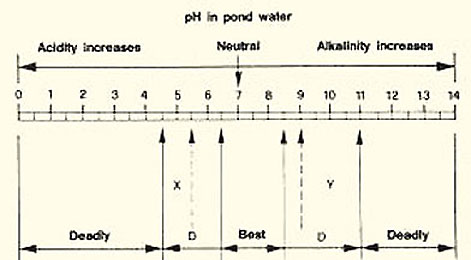
3. Fish production can be greatly affected by excessively low or high pH. Extreme pH values can even kill your fish. The growth of natural food organisms may also be greatly reduced. The critical pH values vary according to the fish species, the size of individual fish and other environmental conditions. For example, fish are more susceptible to extreme pH during their reproductive seasons, and eggs and young fish are more sensitive than adults.
4. Waters ranging in pH from 6.5 to 8.5 (at sunrise) are generally the most suitable for pond fish production. Most cultured fish will die in waters with:
5. Fish reproduction can be greatly affected even at pH below 5.5, while a pH greater than 9 can already be detrimental to fish eggs and juveniles.
 |
|
| D = Decreasing fish production - correction needed
X = Reproduction questionable Y = Eggs/fry questionable |
|
6. The original pH of the water may be affected by the pH of the soil (see Sections 4.1 and 4.2, Soil, 6). However, the pH of pond water varies throughout the day mostly as a result of photosynthesis, and through the night through respiration.
(a) At sunrise, the pH is lowest.
(b) Photosynthesis increases as the light intensity increases. More and more carbon dioxide is removed from the water by the plants causing the pH to increase.
(c) A peak pH value is reached in late afternoon.
|
(d) Light intensity then starts decreasing, which reduces photosynthesis. Less and less carbon dioxide is removed from the water; as respiration adds more carbon dioxide to the water, pH starts to decrease. (e) At sunset, photosynthesis stops, but respiration continues for the rest of the night. More and more carbon dioxide is produced, and pH keeps decreasing until sunrise, when it reaches its minimum. (f) The next day, this cyclic fluctuation of pH starts again. |
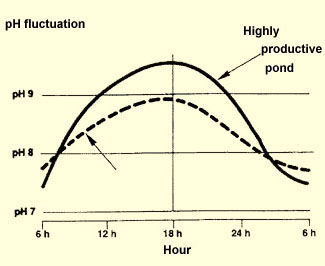 |
7. This pH fluctuation varies in intensity. The more productive the pond, the richer its water will be in minute plant organisms (phytoplankton), the plant and animal respiration will be greater, and the daily fluctuation in pH will be stronger. The pH values of 9.5 will be quite common in late afternoon.
8. As you will learn later in this manual, pond water with a pH unfavourable for good fish production can be corrected.
(a) If the pH is below 6.5 at sunrise, you can use liming (see Chapter 5) and alkaline fertilizers (see Section 6.1).
(b) If the pH is above 8.5 at sunrise, you can use acid fertilizers (see Section 6.1).
2.3 Water turbidity and transparency |
||
|
1. As you learned earlier, pond water contains suspended particles of different kinds. Water turbidity is caused by the presence of these suspended particles in varying quantities: (a) Mineral turbidity is caused by a high content of silt and/or clay particles, which turn the water a light brown, sometimes reddish colour. It may occur when the water supply is turbid or a bottom feeding fish, such as the common carp, stirs up the bottom mud. (b) Plankton turbidity is caused by a high content of minute plants and animals which colour the water in various shades of brown, green, blue-green or yellow-green, depending on which plankton species is dominant. (c) Humic turbidity is caused by the presence of humus (see Section 1.6, Soil, 6), which turns the water a dark brownish colour. Its origin is usually the water supply, although it can also be caused by an excess of organic matter entering the pond. |
With 10% turbidity, light will reach the bottom
of a pond
 |
|
The effects of turbidity in fish ponds |
||
|
2. Mineral and humic turbidity reduce the amount of light that penetrates the water. In highly turbid waters, light penetrates only a short distance, and photosynthesis is reduced. Oxygen production during the daytime is relatively small. Both the growth of the fish and of their natural food organisms can be badly affected. 3. In addition, a high mineral turbidity can affect fish directly by injuring their breathing organs, reducing their growth rate or preventing their reproduction. In the same way, it can harm the minute animals called cladoceres and copepods (zooplankton), which are very important food for young fish (see Section 10.1). |
With 40% turbidity, light will not reach the bottom
of a pond
 |
|
Measuring turbidity |
||||||||||
|
4. Turbidity of pond water varies from almost zero to highly turbid, depending on the amount of suspended particles. The method used for its measurement varies according to the kind of turbidity present. 5. If it is a mineral turbidity (brownish water), you will need the help of a laboratory to determine the weight of material suspended in a given volume of water. This figure is called the total suspended solids (TSS), which is usually expressed in milligrams per litre (mg/l). When taking samples, be careful not to disturb the water too much, as you can increase the TSS very easily. Also, do not take the water only from the surface, as it is often much less turbid. Amount of total suspended solids (TSS)
present in pond water
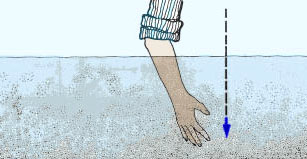
6. If it is a plankton turbidity (greenish water), you can estimate the level yourself using the two simple methods described below. They will also give you an estimate of the potential fertility of your pond, from which you can decide on the kind of management practice to be applied (see also Section 6.0). |
(a) Slowly wade into the shallow part of your pond, trying not to disturb the pond bottom too much. Wade into the pond without disturbing the bottom
 b) Stretch one arm, and immerse it vertically into the water until your hand disappears from sight. (c) Note the water level along your arm:
|
|||||||||
Measuring plankton turbidity with your arm |
||||||||||
|
7. This is a very simple method which does not require any special equipment. Proceed as follows. |
Immerse your arm in the water until your hand disappears
 |
|||||||||
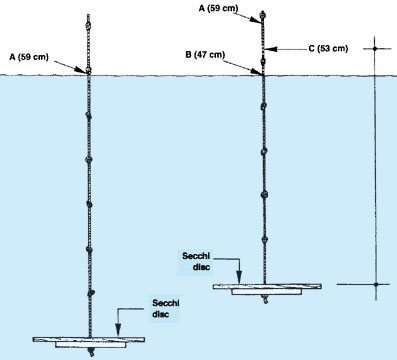
10. To measure the Secchi disc transparency, proceed as follows.
(a) Slowly lower the disc into the water.
(b) Stop when it just disappears from sight.
(c) Note at which point the line breaks the water surface. Mark this point A.
(d) After noting at which point along the line the disc just disappears, lower the disc a little and then raise it until it just reappears. Mark this point B.
(e) Mark point C, midway between points A and B.
(f) Measure the transparency of the water as equal to the distance from the top of the disc to this point C, counting the knots along the line. This figure is the Secchi disc transparency.
 |
11. To obtain the best measurement, take note of the following points:
(a) Measure transparency between 09.00 hours and 15.00 hours on calm days.
(b) Whenever possible, make the readings when the sun is out, not behind a cloud.
(c) Look at the sinking disc from directly above, if possible with the sun behind you.
(d) Keep the disc clean, particularly the two white quadrants. If necessary, repaint the disc black and white.
Example
If the Secchi disc transparency is:
12. There are several ways to control water turbidity, at least partly, depending on the kind of turbidity present.
(a) To control mineral turbidity, you may use:
(b) To control plankton turbidity, you may use:
1. The growth and activity of the fish depend on its body temperature. The body temperature of fish is about the same as the water temperature and varies with it. A relatively low water temperature can adversely affect fish by:
2. Each fish species is adapted to grow and reproduce within well-defined ranges of water temperatures, but optimum growth and reproduction take place within narrower ranges of temperature. It is important, therefore, to know the water temperatures available at your fish farm well in order to select the right species of fish and to plan its management accordingly.
3. There are two main groups of fish (see Table 1):
