1. Transport of live fish is common practice on many fish farms, used for example:
2. The duration of transport varies according to the distance to be covered and the methods being used:
3. Depending on available equipment, any means of transport can be considered. The simplest is by foot, horse and bicycle. Faster ways for longer distances involve motorcycles, cars, pickups, trucks and public transport by bus, train and air.
4. At the end of this section, you will learn how to select the best way to transport your fish, according to these various factors (see Table 32). But first, you should learn and understand basic facts about the transport of live fish.
5. Live fish are generally transported in water. The quality of this water changes progressively during transport. Major changes occur in the concentration of the chemicals:
a) Dissolved oxygen (DO) is mainly used by fish for their respiration (see Sections 2.0 and 2.5).Bacterial activity and oxidation processes will also use oxygen in the presence of organic matter. DO consumption by fish varies as shown in the chart below.
|
Examples of variations in consumption of oxygen
by fish
|
|||||||||||||||||||||||||
Note: that 1 kg of small fish uses more DO
than 1 kg of larger fish.
|
||||||||||||||||||||||||
Note: that quiet fish consume much less oxygen
than active or nervous fish.
|
(b) Ammonia is excreted by fish and produced by bacteria in different forms. The most toxic form, free or non-ionized ammonia (NH3), becomes more important as water temperature and pH increase (Section 2.1).
Example
The percentage of total ammonia present in the water as toxic free
ammonia is shown below.
For example, at 20 ºC and pH 7, only 0.40 percent of total ammonia is present
as NH3, while at 30 ºC and pH 9, as much as 44.6 percent of the total
ammonia is under that toxic form.
|
(c) Carbon dioxide (C02) is produced by fish as a by-product of respiration, at the rate of about 1.35 mg for each mg of DO consumed (0.9 ml per ml of DO). Bacteria also produce C02 .Carbon dioxide exists in different forms; the most toxic form, free C02, increases as water pH decreases.
Example
The approximate percentage of the total carbon dioxide present in the water as toxic free C02 increases as pH decreases:
|
6. Other changes in water quality may also take place during transport.
(a) Increased water temperature in warm climates increases oxygen consumption and the content of toxic free ammonia.
(b) Increased carbon dioxide content and thus decreased pH, reduce toxic free ammonia but increase the content of toxic free C02.
(c) Increased suspended solids from fish waste.
7. For long transport periods, it is best to start off with water with the following properties.
(a) It is cool, so fish and bacteria will be less active, thus reducing DO consumption and production of ammonia/carbon dioxide. (Use ice if necessary as described in paragraphs 11 to 13.)
Note: do not expose the fish to a sudden change in temperature; condition them properly, if necessary, both before and after transport (see paragraph 11 to 13).
(b) The pH is about 7 to 7.5, and toxic free C02 and free ammonia are relatively low. Avoid especially water with extreme pH values.
(c) The water is rather alkaline, with total alkalinity (see Section 5.0) of at least 90 mg CaCO3/l, which helps pH to remain more stable.
(d) It is free from silt or suspended solids, to reduce stress to the fish gills, to reduce bacteria in organic solids, and to reduce risk of low oxygen levels caused by decomposition of organic material.
(e) It is free of harmful chemicals, such as hydrogen sulphide, dissolved iron, pesticides and various pollutants.
8. During long transport, it is sometimes useful to check on water quality by using simple chemical equipment and test kits. Remember that your fish are in danger under the following conditions:
9. These conditions have much more dangerous outcomes if several occur at the same time.
10. The longer the duration of the transport, the more carefully it should be organized. Plan well ahead, taking into account the following points.
(a) Take good care of your fish during harvest (see Chapter 11) and grading/sorting (see Chapter 12), to reduce stress and injuries. Local transport during these operations should be done under the best possible conditions.
(b) Hold your fish in storage (see Chapter 13) without food and long enough to empty their digestive tract completely. The transport water will then remain cleaner. Minimum duration of fasting depends on water temperature and species:
Note: you can reduce this storage time by stopping any distribution of feed 6 to 12 hours before harvest.
(c) Treat your fish to get rid of external parasites (see Chapter 15) after their stomach is empty and at least 12 hours before any transport of more than five hours duration.
(d) Measure the quantities of fish to be transported as efficiently as possible:
(e) Gradually acclimatize your fish whenever there is a more than a 2 ºC to 3 ºC difference between the harvest or storage water and the transport water temperature. Do it gradually at the rate of at least 20 minutes for each difference of 5ºC
(f ) Clean your fish well in good water before loading them in the transport container.
(g) Keep your fish quiet during transport. Keep them in the dark and away from sudden noises.
(h) Keep your fish cool during transport:
(i ) Reduce total transport time, by avoiding delays and by keeping stops to a minimum. Good advanced planning is essential.
(j ) Keep transport containers moving so that the regular agitation of the water helps improve its quality by increasing DO content (see Section 2.5) and decreasing free toxic carbon dioxide content. Limit any stop to 15 minutes at the most.
(k) Avoid jolting containers too much because very strong water movements and splashing may hurt your fish badly.
(l ) Do not feed your fish during transport.
(m) Exchange transport water with better-oxygenated and cooler water:
(n) Make sure water quality is acceptable. Avoid using deoxygenated water from wells and cisterns, polluted water and water which is too acid. Proceed gradually exchanging not more than half the water volume at first. Wait for at least 10 minutes before continuing with the water change, allowing at least 20 minutes per 5 ºC of temperature difference.
(o) Choose the loading rate carefully, depending on species, travel time and transport conditions (see paragraphs 16 and 17).
(p) On arrival, gradually acclimatize the transported fish to the water in which they have to be stocked:
(q) Clean and disinfect your transport equipment regularly, including containers, handling nets, etc. (see Chapter 15).
11. You can easily lower the temperature of transport water in the following ways.
(a) Before loading the fish in the containers, add ice to their water: 600 g ice per 10 l of water reduces its temperature by about 5 ºC.
(b) After loading the fish you may also use ice:
12. Remember to condition your fish gradually to a lower temperature, at the rate of at least 20 minutes for every 5 ºC. Warmwater fish such as tilapias should not be transported in water cooler than 15 ºC. For common carps, minimum temperature is about 10 ºC.
13. On arrival you will have to condition your fish again if water temperatures are too different.
Note: never use ice for transporting early fry.
14. Even transport over a short distance cannot be successful if an adequate content of dissolved oxygen (DO) is not maintained throughout its duration. You have learned earlier (see Section 2.5) and again in the previous paragraphs that the DO requirements of fish greatly vary with species, size, activity, water temperature, etc. It is safe in all cases to keep fish in water with a DO content of at least 5 mg/l. The higher the overall level, the better the condition of the fish will be during and after transport. To improve the DO content you have also learned that you can:
15. To be able to increase the duration of transport and the loading rate of the containers, you need to provide supplementary DO, in addition to the amounts normally present in the water. You can do this in three different ways.
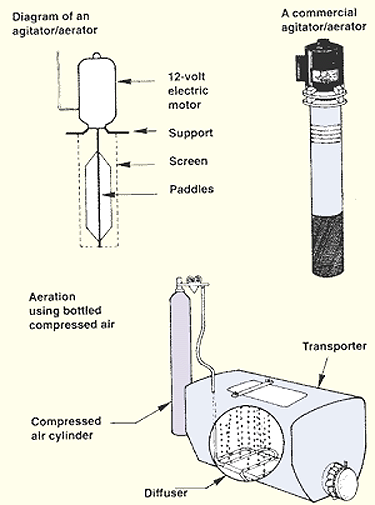
(a) You can increase the agitation of the surface water, mixing atmospheric air into the water, for example with a 12-volt DC agitator/aerator. You may buy such equipment from specialized suppliers.
(b) You can add atmospheric oxygen from a pressurized (compressed) air supply, in the form of small air bubbles rising through the water, created by a simple air diffuser, such as an air stone (from an aquarium shop) or a home-made device. For compressed air, you may use:
(c) You can add pure oxygen from a cylinder containing compressed oxygen and equipped with a medical pressure regulator. A special diffuser should be used to produce very fine oxygen bubbles. Pure oxygen is relatively expensive and is usually reserved for long transports; to conserve oxygen, it is best to use it in well-sealed transport tanks.
|
|
16. The number (N/I water) or weight (g/I water) of fish which you can safely transport in a certain container under a specific set of conditions (especially fish size, water temperature and transport duration) is usually called the loading rate or carrying capacity.
17. In the following sections, average values of loading rates will be given as guidelines. These should not be used automatically. Revise them upward or downward to adapt them to your own set of transport conditions, taking into account the basic factors you have learned earlier. Consult Table 32, which summarizes the practical application of these factors. Always remember:
18. Select the method of transport according to the kind of container available and the kind of fish to be moved:
(a) Broodfish are the most difficult of all. You should only transport them within the confines of the farm. Leave the organization of longer journeys to specialists. Handle broodstock with particular care. Restrain them from jumping out of the water.
(b) Fry and fingerlings can be transported in many ways, both on the farm and off. Routine transports involve small fish.
(c) Food fish are transported to markets or processing plants. If a healthy and lively appearance is a selling asset, reduce loading rates accordingly.
19. To select the method best suited to your needs, consult Table 33. Each of the methods mentioned is fully explained and illustrated in the following sections.
1. To transport fish breeders on the farm, you may use one of the following devices according to size, number and distance:
|
|
|
 |
 |
|
Double hammock on a wooden frame
 Note: use plastic or waterproof canvas to hold sufficient water during transport. Note: a cover flap or a piece of cloth hung over the hammocks will prevent fish from jumping out during transport. |
2. You may also use a simple hammock or canvas pool (see Section 14.3), or one of the transport tanks to be described later (see Section 14.5).
Remember: it is better to handle broodfish with an open-end dip net (see Section 8.4).
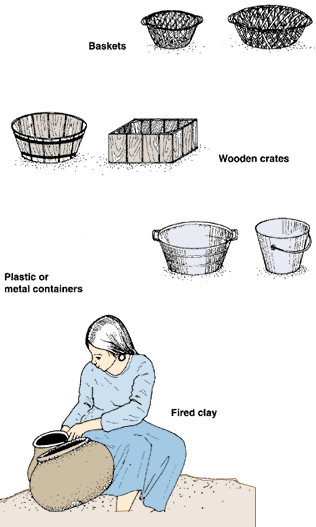
14.2 Transport of juvenile fish in small containers |
||
|
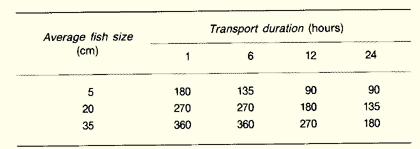
1. Various small containers made of fired clay, wood/bamboo, plastic or metal may be used for transporting small fish. Generally, distances are relatively short, and transport within the farm usually lasts no more than 30 minutes. But, with careful handling and frequent renewal of water, these containers can also be used for beyond the farm transport over longer periods ranging from a few hours to one or two days. 2. The following methods can be considered. (a) Small baskets, made of various vegetal materials, can be used to carry small numbers of resistant fish such as tilapias without water over very short distances. They can be carried by hand or on the head. Keep the fish moist and protect them from the sunlight with wet grass. Do not overload the basket. Limit transport time to a few minutes at the most. (b) Earthenware round containers are very popular in Asia. They have the advantage of keeping the water cool and can be carried either as a head load or hanging from a bamboo shoulder pole. The chart below describes their use for Indian major carp fry. Number of Indian major carp fry to be safely transported
in earthenware jars of approximately 27-l capacity under tropical conditions
|
Transport in small containers
 |
|
|
Note: baskets or wooden crates can be lined with plastic to hold water. |
||
| (c) Metal containers with a
similar shape to the above or square or rectangular-sided metal boxes have
the advantage of being unbreakable. Water warms up more rapidly unless the
container is insulated. A perforated lid is usually added to close the top.
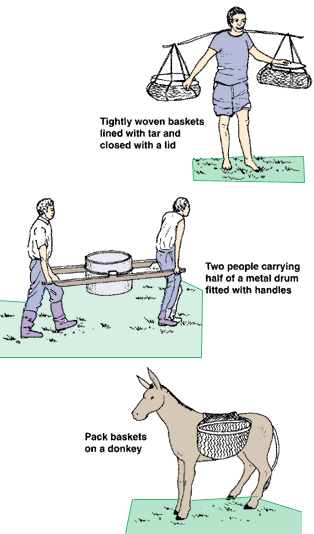
(d) A tightly woven, round bamboo container can be made watertight from inside with tar and closed with a lid. It is easily carried from a bamboo sling over short to medium distances. (e) Metal, wood or plastic buckets with at least 5 l of water are commonly used for on-farm transport. They can be carried as a head load, by hand or from a shoulder yoke (see Section 4.1,Construction, 20). (f) Jerry cans with a 20-l capacity made of metal or plastic may be easily carried on the back of a bicycle, a motorcycle or a pack animal such as a donkey or horse. (g) Half of a metal drum containing water is easily carried by two people over short distances, if it is fitted on two sides:
Take care to clean the metal drum thoroughly before using it for carrying live fish. (h) A metal or plastic garbage bin holding 20 to 40 l of water can be carried by two people. Support handles can also be used to make carrying easier. (i) Rectangular plastic fish boxes can be used by two people for short distances. They should be covered to control splashing and escape of fish. 3. Some of these small containers can easily be fixed on the back of a bicycle or motorcycle for faster and more distant delivery. Donkeys, mules and horses can be used in a similar way, particularly in hilly terrain, if they are equipped with a good pack harness. |
 |
|
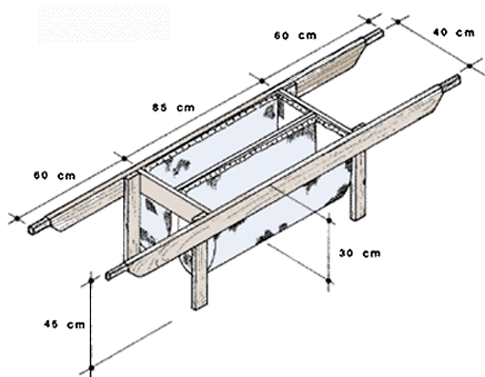
1. You have learned above how to transport broodfish in a double hammock. In a similar way, you can transport smaller fish for short distances in a simple hammock. Make a strong but light frame with metal tubes or wood. Hang a pocket 30 cm deep from it, made from impervious canvas or strong plastic and half-filled with water. After each transport, rinse it out well.
2. If you have a cart or a trailer or the back of a pickup truck, you can easily transform it into an artificial pool by lining its bottom and sides with a large piece of impervious canvas or strong plastic. Carefully fix the liner over the top of the side boards. Fill partly with clean water and introduce the fish. Cover the pool, preferably with a frame (or several smaller ones) made from wood or bamboo and woven vegetation to protect from direct sunlight and to keep the fish from jumping out. You can safely carry live fish for up to a few hours, especially in cool weather.
|
A single hammock
 |
 |
Note: for additional information on building this kind of fish transport see a double hammock in section 14.1 para. 1.
1. Large wooden barrels or metal drums loaded on an oxen-drawn cart, a simple platform trailer or a light pickup truck are very useful for fish transport.
2. Standard metal oil drums (with a capacity of approximately 200 l) are widely available and can easily be adapted by:
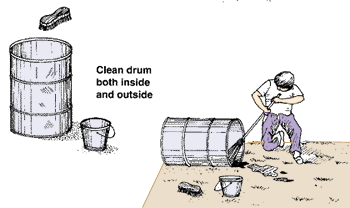
3. When using the drum for carrying fish, proceed as follows.
(a) Clean the drum well, using a detergent soap if necessary and rinsing it away thoroughly.
(b) Place the drum vertically on the floor of the cart or trailer, in its intended transport position.
(c) Fill it half full with clean water, about 100 l.
(d) Add the batch of fish to be transported. Estimate loading rate according to what you have learned in Section 14.0. For example you can safely transport 5 to 7 kg of young tilapias for several hours.
(e) Add water until the drum is about two-thirds full. The total volume (water + fish) is then about 135 l, of which 120 to 125 l is water.
(f) Fix the drum well, so that it does not slide during transport.
(g) Take the usual precautions for live fish transport (see Section 14.0). If necessary, add water to compensate for loss. Keep the drum about two-thirds full.
|
Metal drum transport
 |
 |
Increasing the loading rate of an oil drum |
||
|
4. You can modify an oil drum by fitting a 12-volt electric agitator/ aerator to increase loading rate and transport time. Proceed as follows. (a) Make the access hole:
(b) Make the lid:
(c) Attach the lid:
|
 |
|
(d) Set up the agitator/aerator:
(e) Secure the drum:
 |
|
Diagram of an assembled improved drum transport
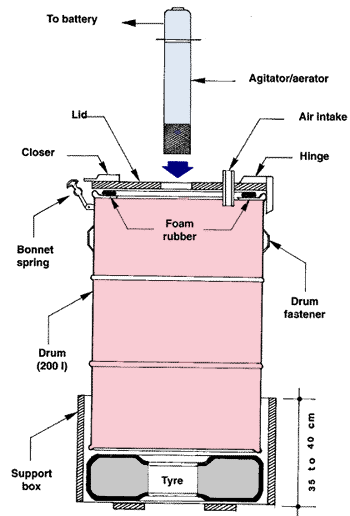 |
(a) Fill the drum three-quarters full with water.
(b) Transfer the fish to the water. Adjust the loading rate to transport conditions (see Section 14.0). Usually 20 to 30 kg of tilapia juveniles can be safely transported for 30 minutes to two hours (see also guidelines in Table 34).
|
TABLE 34
Guidelines for the weight of warmwater fish to be transported in an improved drum transporter (in g/I of water)  Note:
|
Note: do not transport very small fish in this type of transporter; if smaller than 8 to 10 g they can be injured by the strong water movements generated by the fast-rotating paddles of the agitator/aerator.
(c) Add enough water to fill up the drum.
(d) Tightly close the lid with the spring.
(e) Start the engine of the vehicle (or connect the independent battery) and switch the agitator/aerator on. Check that water does not leak around the lid.
(f) Take the usual precautions during transport (see Section 14.0).
(g) To unload, switch the agitator off, open the lid and catch the fish with a dip net. Water can easily be drained out by siphoning.
Note: you can fit a holding net (for example with 6-mm mesh) inside the drum to make it easier to remove fish after use.
5. Remember the following points.
(a) Make sure the agitator is properly shielded with a suitable protection screen to prevent the fish from being damaged by its paddles.
(b) Most agitators also require a minimum water level around the protection screen. Check this level and mark it with paint inside the drum. Make sure the water level does not go below this during operation.
(c) If the agitator is running from the vehicle battery, never switch it on for more than one minute if the engine is not running. It is best to keep the engine running at all times. During transport, switch off the agitator before starting the engine.
(d) Always carry a few spare 16-amp fuses in the vehicle.
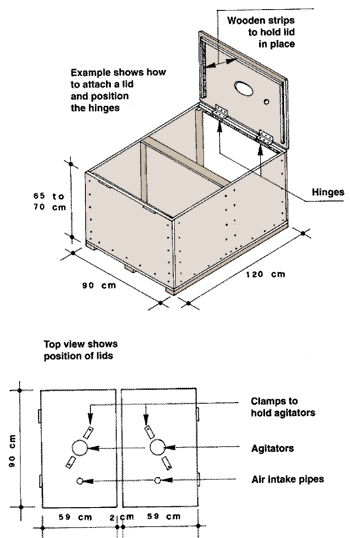
1. Road transport of medium duration is most commonly done using specialized rectangular tanks, in which additional oxygen is made available through agitation, aeration or oxygenation. Such transporters are also very useful for shorter transport of fish on the farm, particularly on large farms where distances are longer and many activities involve transport. Tanks can simply be mounted on the back of a pickup truck or on a small tractor-pulled trailer.
2. You can easily make a simple transporter which will fit in the back of most pickup trucks, leaving space for a 200-l spare fuel drum. Keep the transporter shaded, for example by a canvas awning over the back of the truck.
3. To remove fish more easily from the transporter and to protect them from excessive jolting and water movement, hold them in a 6-mm mesh net suspended in the tank. This net should be as smooth as possible to avoid damaging the fish. Knotless netting is preferable (see Chapter 8).
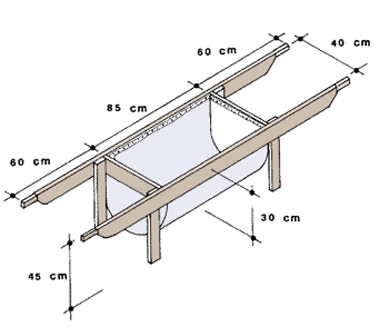
4. This simple wooden tank, with overall dimensions of 120 x 90 x 67.5 cm, consists of two compartments. Each has a total capacity of about 270 l. Two 12-volt DC agitators/aerators are used to move and oxygenate the water. This is more efficient in shallower water, and makes it possible to use slightly higher loading rates than for the drum transporter described earlier. You may also use this type of transporter coupled to a cylinder of compressed air or oxygen as described below.
5. To make this fish transporter, use preferably marine plywood and hard wood framing. You also need four strong hinges, some waterproof glue and coal tar or aquarium or other non-toxic sealant, and good quality waterproof paint. If available, fibreglass can be used to make the tank stronger and more durable. If required, obtain two agitator/aerators as described earlier (see Section 14.4) from a specialized supplier.
6. To make the tank proceed as follows.
(a) Make the two-compartment box:
(b) Make the two lids:
(c) Fix a lid to each box with two strong brass hinges. You may also use a 90 x 10 cm strip of strong but supple material such as thick rubber, leather or canvas. Carefully check that the lid closes tightly against the top edges of the box.
(d) Along the central edge of one of the lids, fix a 5-cm wide slat, which overlaps by about 3 cm. This will cover the gap between the two closed lids and will improve watertightness.
(e) In the middle of the opening edge of the lids, fix a handle.
(f) On each side of the two lids and close to the opening edge, place a door or latch to attach the lids securely.
|
Making a two-compartment storage tank
 |
7. This transporter uses two electrical agitators/aerators. It is important to connect them properly to the battery of the vehicle and to be able to switch them on and off according to needs, without damaging the electrical system of the vehicle. The following instructions are for a negative-earth vehicle, now by far the most common. Check with a mechanic if in doubt.
(a) Place two electrical sockets near the electrical control panel or fuse box of the vehicle. It is best if you can find a type which accepts a plug in only one position.
(b) Connect the sockets together with two electrical wires. Use different coloured wires if possible:
(c) Connect the above negative wire to the "earth", for example to any point of the vehicle's metal body. Drill a small hole to fix a bolt, nut and spring washer. Carefully remove all dirt and paint around the hole and scrape it to bare metal. Loop the end of the wire between the metal and the spring washer before tightening the nut and bolt.
(d) Connect the positive wire to an electrical switch easily accessible from the driver's seat.
(e) Connect the electrical switch to a fuse box holding one 16-amp fuse.
(f) Connect this fuse box to the positive pole of the vehicle battery. Make sure that the voltage of the battery is the same as the voltage of the agitators/aerators, usually 12 volts.
(g) Connect the two wires of each agitator/aerator into a plug fitting the sockets used in (a) above. Preferably use a one-way, non-reversible plug, otherwise mark clearly the correct way to fit the plug into the socket. Be careful to make the right connections:
|
How to connect two agitator/aerators
to the battery of a vehicle 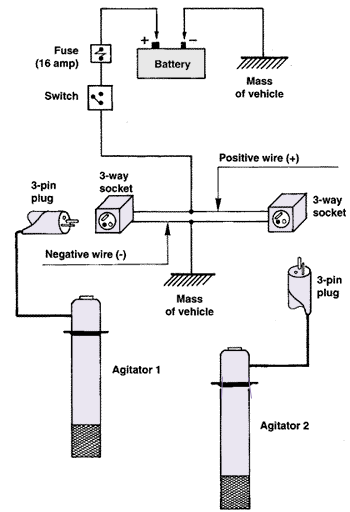 |
9. Fix the wooden tank safely on the floor of the transporting vehicle/ trailer, using strong ropes as necessary (see Section 14.4).
10. To transport live fish proceed as follows.
(a) Rinse the tank well.
(b) Suspend a holding net inside each compartment.
(c) Fill the tank three-quarters full with clean water.
(d) Load the fish. Adapt the loading rate to local conditions (see Section 14.0). Guidelines for warmwater fish are in Table 35, which you may apply for an average water volume of 220 l in each compartment.For example 25 to 35 kg of young tilapias may be safely transported in each compartment for several hours.
(e) Add water to fill the compartments near to the top.
(f) Close the lids and fasten them with the latches.
(g) Clamp the agitators/aerators in the central holes.
(h) Plug them in the sockets, making sure they are plugged in correctly.
(i) Start the engine of the vehicle.
(i) Switch the agitators/aerators on.
(k) Check for any water leaks around the lids.
11. You are now ready to start your transport. Observe the recommendations given earlier (see Section 14.0), and in particular for using electrical aerators powered by a vehicle battery (see Section 14.4).
Adapted from a design by G. Mievis, Fao Aquaculturist, Central African Republic
12. Large plastic barrels are sometimes available locally, for example from wine or chemical importers or food traders. Such barrels, which typically have a total capacity of up to 225 l, can easily be made into cheap and efficient transporters. Proceed as follows.
(a) Place the barrel horizontally.
(b) On the top, draw a 36 x 50 cm rectangle and cut it neatly out.
(c) At least 10 cm away from the opening, cut a hole in the top of the barrel suitably sized for an electrical agitator/aerator.
(d) Reinforce the edges of the main opening with a metal frame:
|
Prepare the plastic barrel
 |
|
Make a wooden cradle to support the barrel
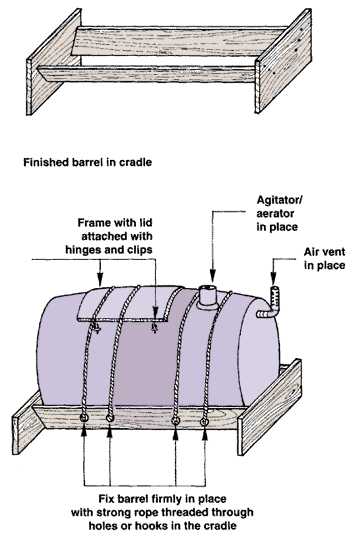 |
(e) Fasten some synthetic foam rubber 2 to 3 cm thick with glue to the top surfaces of the frame.
(f) Make a lid from wood or metal to fit exactly inside the metal frame and rest on the foam rubber. Protect it with several coats of paint, if necessary.
(g) Fix the lid to the frame with two strong hinges. On the other side, fix one or two bonnet clips (truck model) to ensure a watertight closure.
(h) Make a strong wooden cradle to support the plastic barrel, for example with 25 to 30 mm planking or 50 x 50 mm timber and long screws as shown.
(i) Make sure that the barrel sits firmly on the cradle, and that the lid is held tightly in place. Attach one or two strong ropes from one side of the cradle over the barrel and its lid, and tighten down to the other side. You can fix hooks to the cradle base so that you can attach the ropes easily.
(j) In the plug hole, glue a 5 cm plastic pipe fitted to a 90º elbow pipe and extending slightly above the top of the barrel. This is the air vent.
13. Secure the cradle safely on the floor of the transporting vehicle using strong ropes as necessary (see Section 144). Place and fix the barrel in its cradle with the opening and lid firmly positioned at the top of the barrel.
14. Prepare the electrical connection for the single agitator/aerator (see paragraph 8). You may bolt its supports to the top of the barrel, on each side of the opening. To transport live fish, proceed as described for the two-compartment tank, except that:
15. Various transport tanks usually made from fibreglass, are available from specialized suppliers. They are usually fitted with one or more top-loading hatches, and often have a bottom discharge port at the side or at one end. This is normally fitted with a simple pipe valve, a sliding shutter, or for very delicate fish, a special cloth diaphragm valve (Mucar valve). These tanks have a very smooth inside surface and do not normally need an inner holding net. The discharge port is particularly useful with drop-sided or flat- bed trailers, as it can be connected to a simple fibreglass or wooden chute or a delivery pipe, to discharge the fish directly into the pond or holding area.
16. As you have learned earlier (see Section 14.0), there are several ways to improve the DO content of transport water. A simple and efficient way is to use compressed air or pure oxygen, continuously supplied from a storage cylinder. You may use this type of system with the transporters already described (see Section 14.4) or with fibreglass tanks available from specialized suppliers.
17. You can rent or buy such a cylinder from specialized stores, where it can be refilled with gas or exchanged for a full one. Be careful to ensure you are getting the gas you require.
Note: compressed oxygen gives four to five times as much oxygen as compressed air, but is much more expensive. For short to medium distances, compressed air is usually sufficient.
18. When using this oxygenation system remember the following points.
(a) You do not need an electrical agitator/aerator. You can either disconnect existing aerators or keep them ready as backup. Cover aerator openings securely if the aerator is removed.
(b) Make an additional small hole in each lid to introduce the oxygenation pipe into the tank.
(c) If you are using pure oxygen, make the tank as airtight as possible to avoid waste.
19. At the bottom of the tank, place a horizontal gas diffuser, which you can buy from specialized suppliers. These diffusers are quite efficient but can be expensive. You can also make simple ones.
(a) You can use a metal or plastic T- or Y-junction and a flexible rubber or plastic tube or rigid plastic (PVC) pipe (0.6 to 1 cm in diameter), in which you make a series of small holes, for example using a red-hot needle. These holes should ideally be about 1 mm in diameter and 1 cm apart over the upper surface of the diffuser pipe.
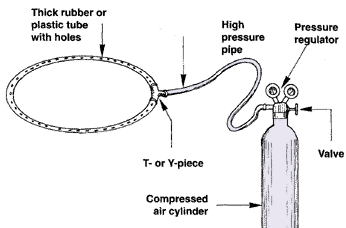 |
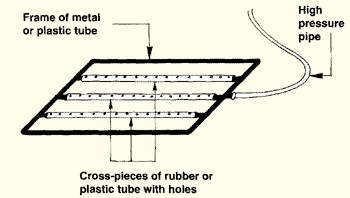
(b) You can construct a rectangular frame made of metal or plastic pipe (1 to 1.5 cm in diameter), with cross-pieces of flexible rubber, plastic tubing or plastic pipe perforated with small holes.
 |
(c) A rectangular metal frame with eyes or hooks fixed to the inside can also be used. A strong rubber or plastic pipe with small holes is attached as shown.
 |
(d) You can also make a quite efficient diffuser from pumice (a light volcanic rock with many holes trapped inside it) or from coral rock, as follows:
20. Apply the general recommendations given earlier in Section 14.0 as well as those listed in the box below. In addition, proceed as follows.
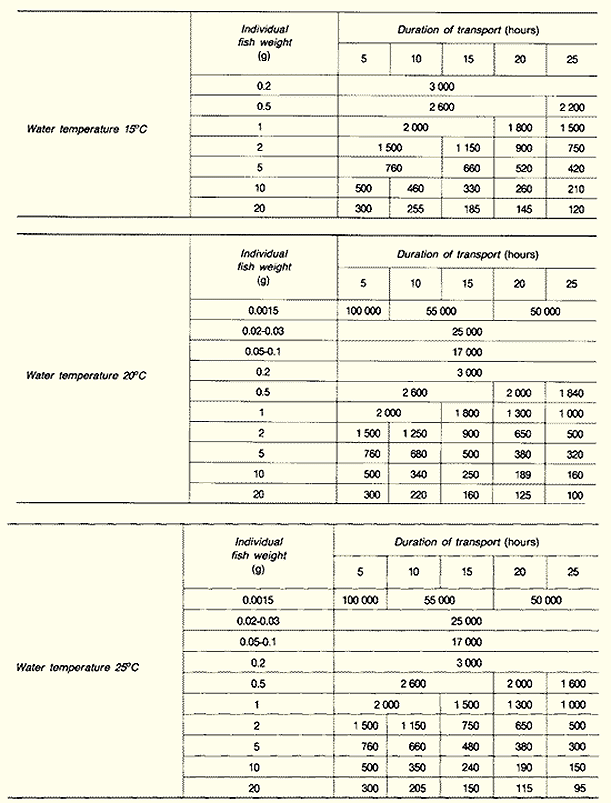
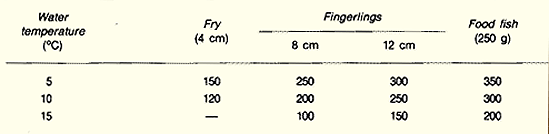
(a) Calculate the safe loading rate according to local conditions and experience. Guidelines are given in Table 36. This table applies to the combined volume of water and fish used for the transport.
(b) Place the diffuser at the bottom of the transporter and connect it.
(c) Fill the transporter with water, up to three-quarters of its volume.
(d) Gradually open the valve of the gas cylinder. Carefully adjust the air or oxygen supply, so that small gas bubbles slowly rise through the water. Do not supply too strong a flow of gas.
(e) Load the fish and fill up the transporter with water. Close it tightly.
(f) Start the transport. Ten to 15 minutes after departure, stop and check the behaviour of the fish.
|
BE CAREFUL when using gas cylinders:
|
|
Warmwater fish to be transported at 16 ºC
to 20 ºC
for 6 to 12 h (as number of fish per 100 l water) 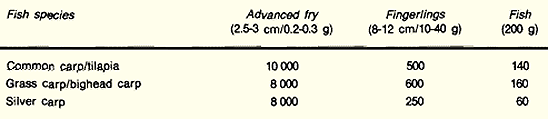 |
|
Rainbow trout to be transported for 4 to
8 h (loading rates in g/l)
 |
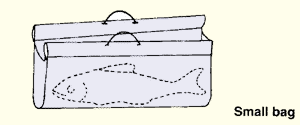
1. Large plastic bags are now commonly used to transport live fish particularly small fry and fingerlings, when the duration of the trip is relatively long. Fish are transported in a small volume of water in the bottom part of the bag, the remaining volume being filled up with compressed air or pure oxygen. The pressurized gas allows oxygen to diffuse slowly into the water. Transport may last up to 48 hours after which it is preferable to change the water and to refill the bag with gas.
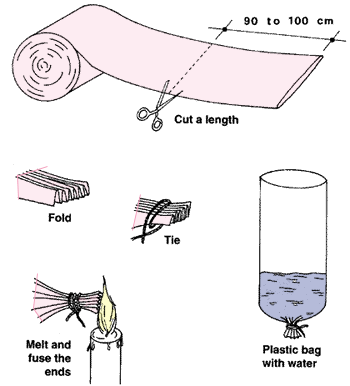
2. You can obtain plastic bags either as ready-made plastic bags from specialized stores, or by making them from a roll of plastic sleeve as explained below.
3. Look for plastic material which is clear, so that you may easily observe the behaviour of the fish.
4. It should also be strong, with a minimum thickness of:
5. The plastic should be wide enough, from 45 to 55 cm, providing a diameter of 28.6 to 35 cm for the bag.
6. You can usually buy plastic bags with these characteristics and with a total length of 80 to 110 cm.
7. To transport very small fish, you should look for plastic bags with rounded bottoms to eliminate corners where fish can become trapped and die.
8. You can make either single- or double-walled bags. Obtain a roll of clear, thick plastic sleeve 45 to 55 cm wide. To make single bags from it, proceed as follows.
(a) Cut a length of 90 to 100 cm.
(b) Fold together one extremity of the sleeve.
(c) Tie this fold together tightly with a piece of string.
(d) Melt and fuse the ends of the fold with the flame of a candle or lighter.
 |
9. To make double bags cut a length of 180 cm. Make a tight knot in the middle. Pull the bottom half of the sleeve up over the top half.
10. To prepare fish for transport proceed as follows.
(a) Pour clean water into the bag, up to a little less than one-third of its total volume. This is usually about 10 to 20 l of water. If the transport is to last more than 24 hours, reduce this to about one-quarter of the bag volume (see below).
b) Check that there is no water leakage.
(c) Place the fish in the water. Loading rate varies, as you will be shown in the next subsection.
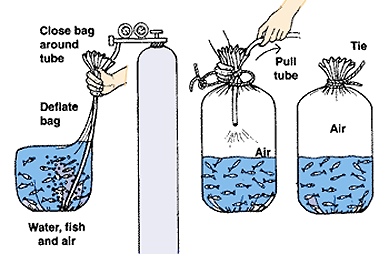
(d) Take the bag to a gas cylinder:
(e) Close the top of the bag together in your hand, and push the high pressure tube from the gas cylinder through it into the bag, so that its lower end lies below the water level.
 |
(f) Hold the bag loosely around the tube and deflate the upper part squeezing the air out through the top opening.
(g) Slowly open the valve of the gas cylinder and let gas bubble through the water for 20 to 30 seconds.
(h) Close your hand tightly around the top of the bag, lift the tube out of the water and inflate the upper part of the bag fully.
(i) Close the valve of the gas cylinder and quickly remove the tube from the bag while twisting the top of the bag tight to avoid gas escaping.
(j) Fold the twisted part on itself and tie it tightly together, so that the bag is well sealed. You could use strong twine or light wire. A strong rubber band such as a 1.5 to 2 cm wide piece of inner tube is also convenient. If you are using wire, be careful that the ends are well secured so they do not burst bags.
(k) Check for possible water leaks again.
(l) For additional safety, place the bag into a second bag and close this separately using similar techniques.
(m) To cool the water in the bags, you may use crushed ice, at 5 to 10 percent of the water volume. Do not use ice for transporting early fry.
 |
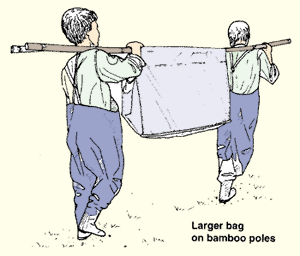
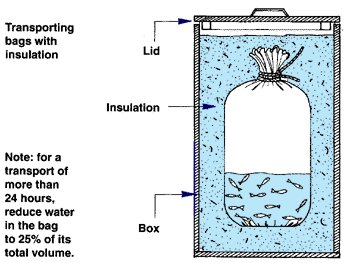
11. When transporting sealed plastic bags you should protect them well using, for example:
12. This will protect your plastic bags from being accidentally punctured. It will also make your fish quieter by keeping them in darkness, and will reduce their oxygen consumption.
13. You can improve transport conditions further by using:
 |
 |
14. Handle the bags with care, especially during transport. If the water splashes too much, it may kill your fish, particularly when they are very small.
Remember: when handling bags, do not smoke or light a fire. Not only can cigarettes and hot ash easily puncture plastic bags but, in the presence of pure oxygen, they may also cause an explosion.
15. When the sealed plastic bags reach their destination, the fish inside should be gradually acclimatized to the quality of the water where they are to be stocked. Temperature and chemical characteristics may both be very different from those of the transport water, especially if the transport has lasted relatively long (see Section 14.0).
16. To acclimatize your fish safely to the new conditions, proceed as follows.
(a) Make sure the receiving water is suitable for the fish.
(b) On arrival, do not open the bags. Float the sealed bags in the receiving water to equalize temperatures slowly. You will need about 20 minutes for each 5 ºC difference.
(c) When water temperatures inside and outside the bags are about equal, open the bags.
(d) After a long transport, or if it is known or suspected that the chemical composition of the receiving water is notably different from that of the transport water, gradually equalize the water quality as follows:
(e) Clean the bag well so that it may be reused.
|
Acclimatize fish to local temperature and water
quality
 |
17. You may determine loading capacity in two ways.
(a) You may calculate it on the basis of the average weight of the fish. This method can be applied with a ratio of three volumes of gas to one volume of water, either:
(b) You may refer to standard tables on the basis of average weight of fish, water temperature and duration of transport. For best results, you should use plastic bags filled with 20 l of water and at least 20 l of pure oxygen.
18. If you have little experience with the kind of transport to be organized, do a trial run using a few bags to test first loading capacities for the expected transport duration. Adjust loading rates accordingly.
19. To use the calculation method proceed as follows.
(a) Obtain the average weight (AW) of your fish (see Section 8.6).
(b) Calculate the loading rate (LR) of a bag, either in g/I or in number of fish/I of water in the bag:
Example
On average, the fish to be transported weigh AW = 27.7 g each. If you use three volumes of compressed air per volume of water, the loading rate of each bag is:
LR = 19 Ö(27.7 g) = 19 x 5.26 g = about 100 g/I; or
LR = 19 Ö(27.7 g) = 19 ÷ 5.26 g = 3.6 fish/I;
Note: the loading rate with pure oxygen is twice as much as with compressed air.
Example
On average, each fish weighs AW 6.5 g. Using pure oxygen for transport, the loading rate is:
LR = 38 Ö6.5 g = 38 x 2.55 g = 96.9 g/I; or
LR = 38 ÷ Ö6 5 g = 38 ÷ 2.55 g = 14.9 fish/l
(c) If necessary adjust the calculated loading rate LR according to your own conditions:
Example
To transport 27.7 g common carps under compressed air but for only 5 h, you may increase LR as follows:
100 g/I + (100 g/I x 0.30) = 130 g/I or
3.6 fish/I + (3.6 x 0.30) = about 4.7 fish/I.
However, to transport 27.7 g silver carp under compressed air for 12 to 20 h, you should decrease LR as follows:
100 g/I - (100 g/I x 0.30) = 70 g/I or
3.6 fish/l - (3.6 x 0.30) = about 2.5 fish/I.
(d) Estimate the total volume V of each bag, when filled and sealed.
Example
A plastic bag is 55 cm wide and 80 cm long. After sealing, its height will be reduced by about 15 cm to become 80 cm - 15 cm = 65 cm:
(e) Estimate the available water volume in each bag, on the basis that the gas: water ratio should be 3:1, i.e. gas occupies three-quarters and water one-quarter of the total volume V of each bag.
Example
For the plastic bags above (V = 62 l), the available water volume = 62 l x 0.25 = about 15.5 l.
(f) Calculate the loading capacity of each plastic bag by multiplying the loading rate LR, as shown in (b) and (c), by the available water volume as shown in (e).
Example
From the examples above and using compressed air, you may load each bag with:
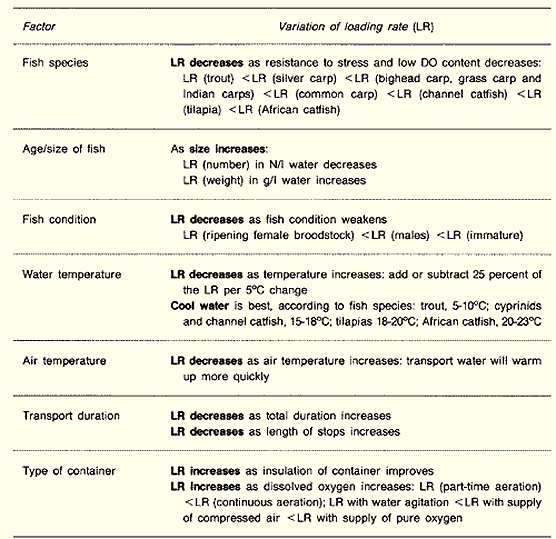
20. The second way to determine the loading capacity of plastic bags is based on standard tables, to be used in the following way.
(a) Obtain large plastic bags, with a total sealed volume of about 60 l.
(b) Obtain the average weight (in g) of your fish (see Section 8.6).
(c) Estimate the total duration (in hours) of the transport, including possible delays.
(d) Estimate the average water temperature (in ºC) during transport.
(e) Enter these data in one of the following tables to obtain the loading capacity LC (in number of fish) for each plastic bag containing 20 l of water and at least 20 l of pure oxygen:
(f) Adjust these loading capacities, if necessary, for different-sized bags, and also:
(g) If you prefer to define the loading capacity by weight, multiply the above LC value (number of fish) by the average weight of your fish (AW in g) to obtain LC (in g) for each plastic bag.
Example
At 20 ºC and for up to 15 h transport under pure oxygen, LC for 0.5 g tilapias is determined from Table 38 as LC = 2600 fish per bag. This is equivalent to LC = 0.5 g x 2600 = 1300 g/bag. If you use compressed air instead of pure oxygen, LC = 2600 fish x 0.50 = 1300 fish/bag or 1300 x 0.5 g = 650 g per bag.