4. EARTHMOVING METHODS
4.0 Introduction
1. Pond construction always involves the transport of earth. There are several methods available, and the choice of a particular method depends mainly on:
- local conditions such as soil on site and transport roads and their suitability for use;
- seasonal conditions;
- average transport distance;
- quantities of earth to be moved;
- work force availability and cost.
4.1 How to move earth by hand or using simple containers
1. The digging-and-throwing method is the simplest method.
(a) For cohesive soils, you can dig and cut blocks of earth.
These blocks can be thrown by hand from one person to the next, along
a human chain.
(b) For all types of soil, you can dig and throw the earth
directly. The throwing distance is in practice limited to 3 m.
(For average working standards see Section
12.7).
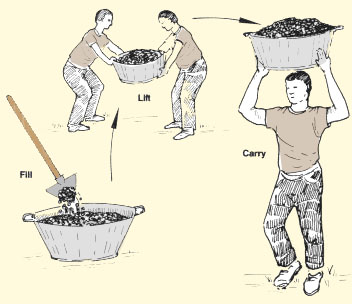
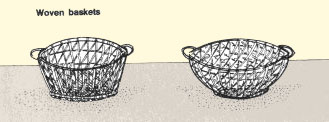
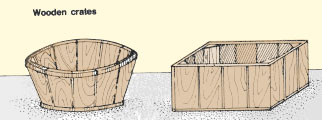
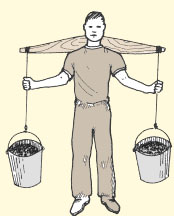
2. If the work is being done by a fairly large group, different types of small containers can be used for earthmoving such as woven baskets, wooden crates, metal buckets or pans. Generally, the container is filled at the digging site and lifted by two workers who place it on the head of each member of the transporting crew.
|
Earthmoving by hand
 |
Earthmoving using containers
 |
|
|
Useful containers for earthmoving
 |
 |
|
 |
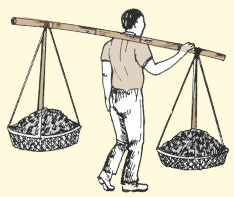
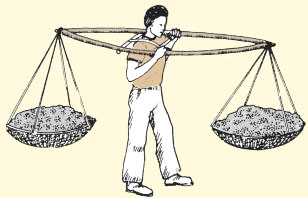
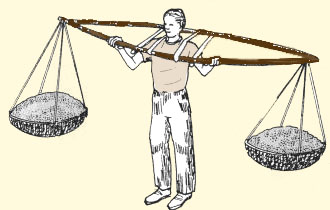
3. Alternatively, using wooden or bamboo shoulder poles, each person may carry two containers balanced either on one shoulder or across two. For distances up to 50 m, the total weight should not exceed the weight of the carrier.
|
Shoulder poles
 |
 |
|
 |

|
How to carve a shoulder yoke
 |
 |
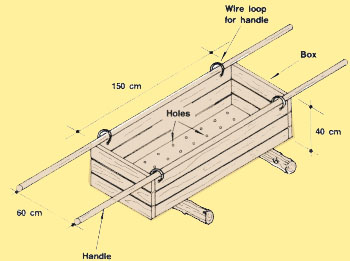
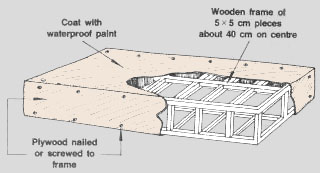
5. You can also build a wooden transport box, which can easily
be carried by two workers. Do not build it too large or too heavy (150
x 60 x 40 cm is a good size). It is best to use light wood and to drill
many holes in the bottom of the box to let any extra water run out before
transport. The handles should be strong. If you use removable ones, you
do not need to build a pair of handles on each transport box, but can
use the same pair for several boxes.
|
A wooden transport box with removable handles
 |
 |
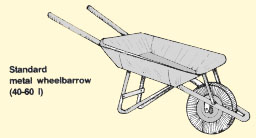
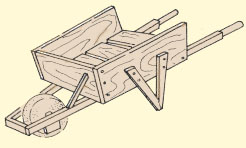
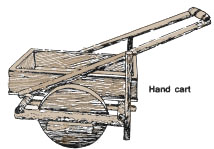
4.2 How to move earth with wheelbarrows
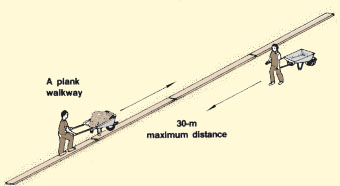
1. It is usually much more efficient to move earth using wheelbarrows, but this method requires a great deal of work. In soft soils and particularly if the wheelbarrows are not equipped with a rubber tyre, walkways made of planks might be required when pushing loaded wheelbarrows. In such cases:
- use planks 4 to 6 m long, 3 cm thick and 30 cm wide;
- the transport distance is usually limited by the availability of planks to 30 m maximum.
2. In wet conditions it may be difficult to use barrows on sloping ground.
3. Standard metal wheelbarrows can transport from 40 l (0.04 m3) to 60 l (0.06 m3) of earth.
|
Using a plank walkway
 |
||
 |
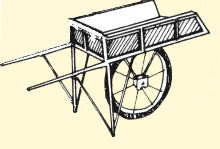
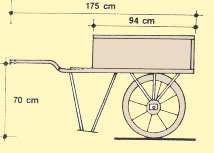
Making your own wheelbarrow |
||
|
4. The illustrations show designs for a number of wheelbarrows which can be made using locally available material. 5. The traditional northern Chinese wheelbarrow, made with a hardwood frame and a large-diameter central spoked wheel, supports either a container above the wheel or a basket on either side of the wheel (total carrying capacity 100 to 120 kg or more). Two handles are used for pushing and balancing the barrow, which must be kept vertical while in use, as the heavy loads carried can easily tip. In addition, a strap which passes around the user's shoulders (not shown in this drawing) helps in pulling the barrow. For slopes, one or more helpers may be needed to pull the barrow. This design is very efficient for heavier loads in moderate to good ground conditions. It can be used to carry heavy loads over long distances. |
The Chinese wheelbarrow
 |
|
Note: when this wheelbarrow is balanced near the centre of the load, very little force is needed to lift the handles.
|
How to make a Chinese wheelbarrow
|
||||
 |
 |
 |
||
Other wheelbarrows
6. Other wheelbarrows that can be built using scrap wood or an old oil drum and pipe sections are also illustrated.
|
Wooden pole wheelbarrow
 |
Wooden board wheelbarrow (Congo)
 |
|
|
How to make an oil drum wheelbarrow
 |
  |
Using a wheelbarrow
7. You can plan the work outputs with a wheelbarrow by considering the following conditions.
(a) For distances shorter than 20 m along level ground, the total distance covered back and forth by one worker with a standard wheelbarrow averages 2 800 m per hour. For sloping ground this distance will be reduced by approximately 10 percent for a 1:50 slope and 20 to 25 percent for a 1:20 slope carrying the full load uphill. Downhill slopes will increase distances by similar amounts.
Example
The average transport distance is 17 m. Each wheelbarrow
will make 2800 m ÷ (17 m x 2) = 82 trips per working hour.
For a five-hour working day it will make 82 x 5 = 410 trips
If each wheelbarrow contains 50 l = 0.05 m3 earth, it will
transport 410 x 0.05 m3 = 20.5 m 3 per day.
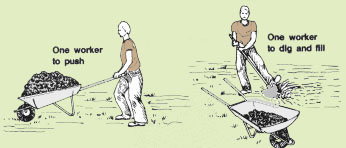
(b) To transport material for distances up to 30 m, for each wheelbarrow you will need at least:
- one worker to dig and fill the wheelbarrow;
- one worker to push the wheelbarrow.
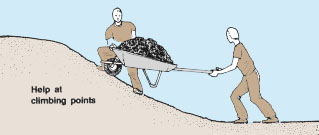
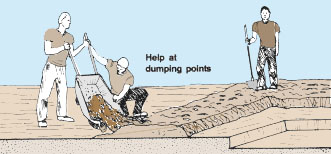
(c) You might need additional workers at particular spots:
- along the transport road at climbing points, to help bring the wheelbarrow up the slope;
- at the dumping site, to help empty the wheelbarrow completely.
|
Transporting earth by wheelbarrow
 |
 |
|
 |
4.3 Draught animal power
1. Draught animal power has been used for thousands of years to provide power for traction, for example for pulling carts, scrapers and scoops. The most commonly used animals are oxen, buffaloes and donkeys.
2. For any species, provided the animals are in good condition, the power and pull capability depends mainly on the weight of the animal and on the ground conditions, as shown in the following chart.
* The pull:weight ratio is based on the continuous capability of the animal over a working period of three to four hours. The lower value of pull:weight ratio should be used when walking conditions are poor (i.e. rough or soft ground); the higher value may be used when conditions are good |
||||||||||||||||||||||||||||||||||||||||
Example
A 450-kg ox walking over good ground has a pull : weight ratio of 0.12. It should be capable of providing a pull of about 0.12 x 450 kg = 54 kg
3. For pulling carts with wooden wheels on damp and flat agricultural soil, you should check that the pull capability of your animal equals at least 10 percent of the total load, that is cart weight plus earth load. If the ground is sloping, you should increase this percentage accordingly. If you use pneumatic tyred wheels, you might reduce the pull capability to 5 to 8 percent of the total load.
Example
If your cart with wooden wheels weighs 250 kg and its useful load of earth is 1000 kg, you will require a minimum pulling capability of (1000 kg + 250 kg) x 0.10 = 1250 kg x 0.10 = 125 kg to pull it over damp or flat agricultural soil. On a 5-percent slope, you should add (125 kg x 0.05) = 6.25 kg, totalling 131.25 kg. If your cart has pneumatic tyred wheels, on a 5-percent slope you will require a pull capability of about 131.25 kg x 0.70 = about 92 kg.
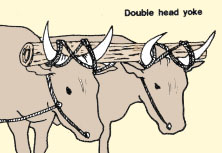
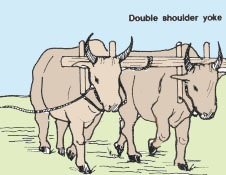
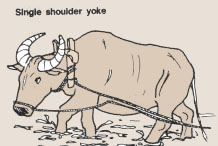
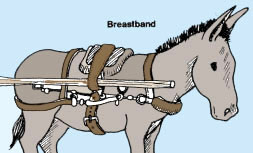
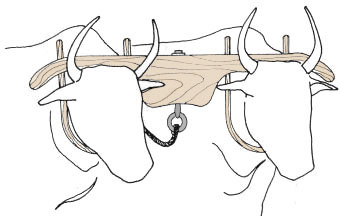
4. There are several types of harness in use. The most effective type depends on the species and breed of animal:
- yokes are best for bovines, which have strong shoulders;
- collars or breastbands are best for donkeys, horses and mules, which produce their best pull from the breast.
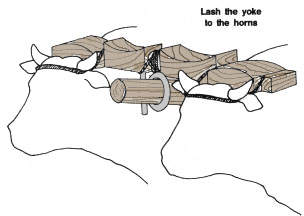
5. Yokes may be used for single animals or to harness animals together in pairs, but they should be adapted to the species of bovine used, for example:
- with zebus use the shoulder yoke;
- with n'damas use the neck yoke or forehead yoke.
|
Various kinds of animal harness
 |
 |
 |
 |
 |
|
|
How to make a double shoulder yoke
 |
How to make a double head yoke
 |
|
 |
 |
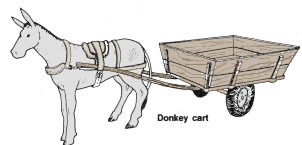
4.4 How to move earth with carts
1. To move earth over longer distances, simple carts can be either pushed or pulled by hand or drawn by animals. Soil conditions must be favourable. Transport will be easier if a track or road with a hard, clean surface is used. Remember that a well-made cart must be correctly balanced when empty. Also keep it balanced when loaded, and keep the wheel hubs and axles well greased.
2. Carts can be built very simply using wood or bamboo. Wooden wheels can be used, or old car wheels can be fitted by most local workshops. This will improve the handling of the cart and make it easier to pull. If the load is properly balanced, a load of up to 400 kg for a donkey and 800 kg for a pair of oxen is manageable on flat and firm ground (see Section 4.3). A 1:20 uphill slope reduces this by 50 to 60 percent; a 1:50 slope reduces the load by about 20 percent.
|
Various carts suitable for moving earth
 |
 |
|
 |
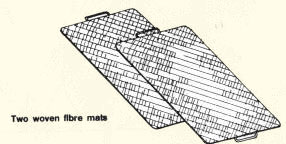
3. You can improve the use of your cart for carrying earth by placing
on its floor two fibre mats with strong handles on each outer
side. Load the earth on top of these mats. When the cart is full, bring
the sides of the mats up and firmly tie the two handles together. To unload,
detach the ropes keeping the sides of the mats vertical and pull the package
of mats off the cart floor. Move the cart forward and free the mats from
under the dumped earth.
|
Using fibre mats and a two-wheel
cart to carry earth  |
 |
 |
||
 |
 |
 |
4. You can also use a tipping cart to carry earth. Notice that a chain at the front of the cart can be released when you are ready to tip the cart and dump the load.
|
A tipping cart for moving earth Cart
ready for use
 |
Cart in the dumping position
 |
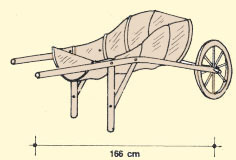
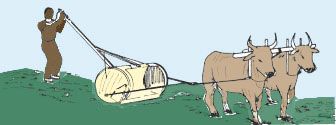
4.5 How to move earth with an oil drum scraper
1. A scraper is a piece of equipment, usually animal drawn, which fills with earth as it is moving. When full, the earth is transported over a short distance and dumped. This device is particularly useful for levelling off uneven ground.
2. The scraper can be built by a blacksmith from an old oil drum and scrap metal. It is cheap to build and moves earth quite efficiently over short distances (70 to 200 m) when pulled, for example, by a team of oxen and operated by one person.
3. It works best when the soil has been loosened up first, by ploughing for example. It is estimated that under normal use the oil drum scraper will last for at least five years.
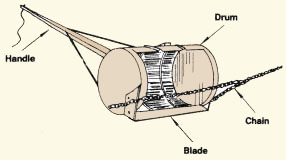
Materials for an oil drum scraper
- 1 oil drum (200 l), strong and without rust;
- 1 metal blade, 5 to 8 mm thick, 88 cm long, tapered to a sharp edge along one side (old truck springs make good blades);
- 2 metal blade holders, 5 to 8 mm thick;
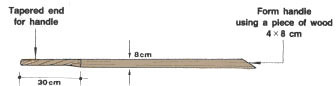
- 1 softwood handle, 3 m long, 4 x 8 cm or an 8-cm diameter pole;
- 1 wood handle brace, 150 cm long, 3 x 8 cm;
- 1 wood block, 12 cm long, 3 x 8 cm;
- 1 steel bolt, 1 cm in diameter, 10 cm long;
- 5 nails, 9 cm long;
- wire, at least 3 mm thick, 12 m long;
- chain, links 7 mm thick, 4 m long, with hook at each end;
- rope, 12 mm in diameter, 3 m long.
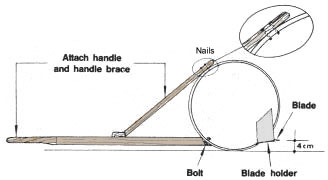
|
Using an oil drum scraper
 |
Parts of an oil drum scraper
 |
Building the oil drum scraper
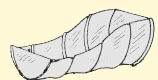
4. Cut the side of the drum halfway around, starting next to the welded seam and leaving 6 cm of metal on each side to form runners, except for the last 30 cm where it should be cut next to the edges of the drum.
 |
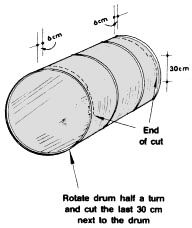 |
5. Pull the cut-out section forward and flatten it with a hammer. Fold the cut-out section back 17 to 20 cm from the end of the cut to form a double bottom. Weld it in place.
 |
 |
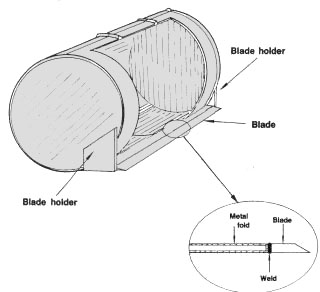
| 6. Butt the blade against the foot of the
drum fold, with its sharpened edge directed forward. Weld
it with five spots of welding 3 cm long, evenly spaced.
7. On each side of the blade, place a metal blade holder vertically, the lower tip being level with the end of the cut. Weld the blade holders to the outside of the drum and to its heavy outer rims. Weld the blade to the inside of each blade holder. 8. Taper the end of the handle for its last 30 cm. Angle the other end to fit the drum. |
Attach blade and blade holders
 |
9. Position the drum so that the edge of the blade is exactly 4 cm above the ground. Place the handle on the ground, at the centre of the bottom of the drum and at a right angle to its axis.
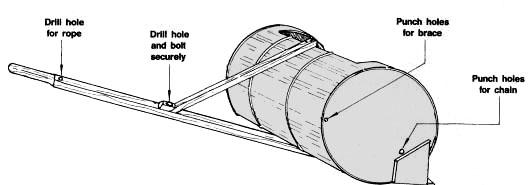
10. Punch a hole through the bottom of the drum. Drill a hole through the end of the handle. Bolt the handle to the drum.
11. Bend 2.5 cm of the upper edge of the drum metal up. Punch two small holes in the metal and drive two nails through the holes into the end face of the wooden handle brace.
12. Check that the blade is still 4 cm above the ground and nail the wooden block on to the handle, against the lower end of the brace. Drive a nail through the end of the brace into the handle.
 |
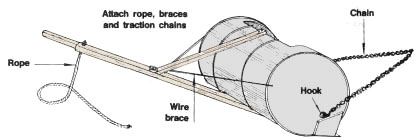
 |
13. Drill a hole 1.5 cm in diameter and 20 cm from the end of the handle to be used to attach a piece of rope. Drill a hole through both the handle brace and the handle to bolt them together.
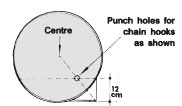
14. Punch holes through each end of the drum for the traction chain as shown below. Punch holes through each end of the drum to attach wire braces to stabilize the handle as shown below.
15. Thread the end of the rope through the handle and knot it securely in place.
16. Thread four strands of wire through the holes at the back of the drum and secure them to the handle brace. If necessary, twist the wires with a long nail to tighten the brace, but make sure that the handle is at right angles to the drum.
17. Attach the hooks of the traction chain to the holes at the front of the drum.
|
Drill and punch holes
 |
||
 |
Note: Punch holes for wire braces and chains on both sides of drum |
|
Operating the oil drum scraper |
||
| 18. Before using the scraper, plough the ground where you want to remove soil. This will make it easier to load the soil into the scraper. |
 |
|
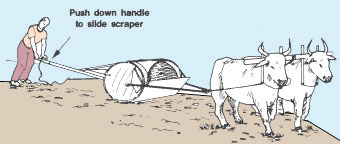
| 19. Move the scraper into position by pushing down on the handle to lift the blade off the soil. Let the animals slide the scraper forward to the point where you want to start removing soil. |
 |
|
| 20. As the scraper moves forward, start loading it by lifting the handle to let the blade dig slightly into the soil. Do not make too deep a cut, as this would either turn the scraper over or pull the animals to a stop. |
 |
|
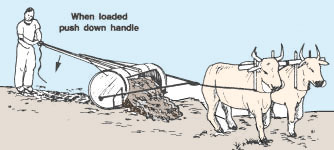
| 21. When the scraper is full, push down on the handle and let the scraper slide forward to where you want to unload it. |
 |
|
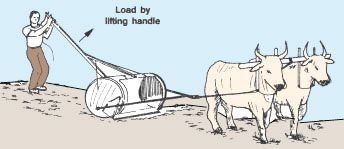
| 22. To unload, lift the handle so that the animals can pull the scraper into the dumping position. |
 |
BE CAREFUL
Never have any part of your body directly above the handle of the scraper while operating it. Always keep a firm grip on the handle while loading or getting ready to unload, controlling it at all times.
Note: the power that is used to pull the scraper will also help in operating it. You will learn by experience how to hold the handle for a proper cut and smooth handling.
23. Use the rope to control the scraper's position:
|
|


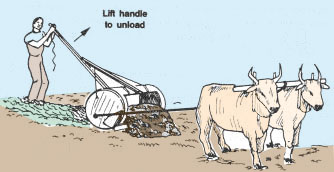
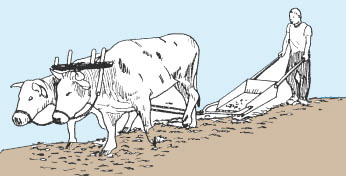
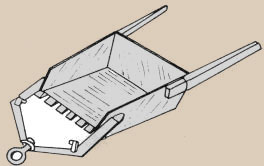
4.6 How to move earth with a dam scoop
1. The dam scoop, or soil scoop, is a simple, robust animal-drawn implement which can be either bought or made locally. It is similar to but generally smaller than the oil drum scraper described in Section 4.5, its capacity varying from 50 to 150 litres.
2. The dam scoop should be used on dry ground which is sufficiently loose so loading will not be too difficult. Loading is automatic, and unloading is done by tipping over where desired using a simple stop-and-catch device. The transport distance to be covered should be fairly short, not more than 40 to 50 metres.
|
Excavating a pond using an ox-drawn scoop
 |
Two examples of dam or soil scoop
 |
|
 |
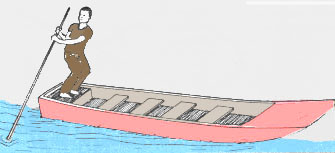
4.7 How to move earth with a boat, float or raft
1. In areas which are flooded (even temporarily) or adjacent to rivers or canals, simple flat-bottomed boats or floats can be useful for moving earth. In some cases it may even be worthwhile to flood all or part of a pond during construction to simplify the movement of earth, as using a float or boat requires much less work than movement by cart or scraper.
2. For simple construction work, a load of from 500 kg to 2 to 3 tonnes is common. As a rough guide:
|
Flat-bottomed boat
 |
|
|
Float
 |
|
|
Raft
 |
3. If the water is shallow, it may be necessary to reduce the load to keep the boat or float high enough above the water level.
4.8 Earthmoving machines
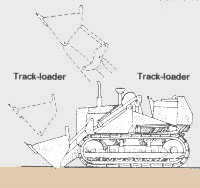
1. When relatively large areas of land or large volumes of earth are involved, machines are generally preferred to move earth, if local conditions make it possible.
2. For maximum efficiency and minimum cost, the choice of an earthmoving machine should take into account the distance of transport, the local conditions, the period the machine can operate daily and the characteristics of the earth to be moved. Remember also that under wet soil conditions, a machine with tracks will usually be more efficient than one with wheels.
3. There are various earthmoving activities: loosening and digging up the earth, moving it, lifting it up to another area or into another machine, and placing it in or on a specific location. Other machines (see later) can be used for compacting the final earth construction. Some machines are built for specific tasks, others are capable of more than one task.
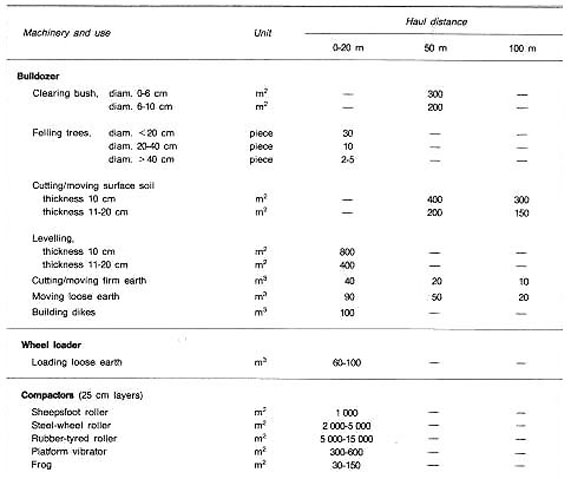
4. Although the selection and planning of the use of the most efficient machinery is often best left to an experienced local contractor, Table 18 provides some guidance to use in normal field conditions.
5. The average hourly output of bulldozers and wheel-loaders for different types of earthwork are given in Tables 19 and 20.
 |
 |
 |
|
TABLE 20
* When completely filled. In practice, filling is usually 30
to 60% of this, depending on site conditions Note: it is possible to estimate output by defining the time for each trip based on: excavation of blade load 0.5-1 min; pushing 2 km/h; returning 4-5 km/h; turning, positioning, gear change 0.5-1 min; allow a maximum of 50 min per hour These output figures decrease considerably in difficult site conditions such as sloping ground |
6. Loaders either on wheels or on tracks are not only very efficient for loading material on to lorries but also for excavating thin soil layers over large areas and for clearing forested areas (see Chapter 5). Their bucket size varies from 0.5 m3 to 6 m3 . A loader with a 0.75 m3 bucket, for example, equals approximately the loading capacity of a team of 30 workers.
7. A backhoe is a powerful arm and bucket mounted at the back of a tractor and hydraulically controlled. It can be extremely useful, particularly for small works. It is a multipurpose machine, particularly efficient for digging ditches and foundations, placing material nearby and building up small dikes. Many backhoes are also equipped with a front-end bulldozer blade, although their capacity is much smaller than that of a specialized bulldozer.
|
Small backhoe on tracks
 |
Small backhoe on wheel-tractor
 |
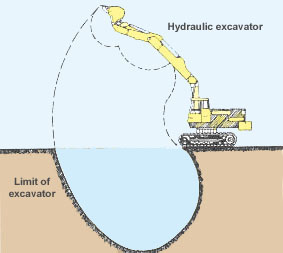
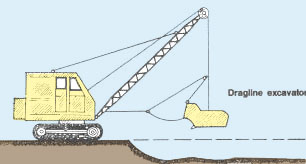
8. Where heavy and difficult digging is required, where it is necessary to dig under water, to finish side slopes or to dig trenches and canals, other machines may be used:
- hydraulic excavator, with a 360° revolving backhoe;
- hydraulic shovel, similar except for the front-loading bucket;
- dragline excavator, with a large bucket controlled by cables.
9. However, these specialized machines are expensive to operate and would only be used in difficult or unusual circumstances.
 |
 |
|
 |