10 FISH FEEDS AND FEEDING
10.0 Introduction
1. In Section 2.0 of this manual, you have learned that plants are able, through photosynthesis, to utilize sunlight and simple nutrients to produce new organic material. On the contrary, animals, including fish, cannot. Thus to survive, grow and reproduce, fish need to feed on organic materials such as plants, other animals, or prepared feeds containing plant and/or animal material. It is therefore most important for you to ensure that your fish get the food they require, both in quality and in quantity.
Selecting fish foods
2. There are three types of food used in fish ponds:
- natural food;
- supplementary feeds;
- complete feeds.
3. Natural food is found naturally in the pond. It may include detritus*, bacteria*, plankton*, worms, insects, snails, aquatic plants and fish. Their abundance greatly depends on water quality. Liming (see Chapter 5) and fertilization (Chapter 6), in particular organic fertilization, can help you to provide a good supply of natural food to your fish.
4. Supplementary feeds are feeds regularly distributed to the fish in the pond. They usually consist of cheap materials locally available such as terrestrial plants, kitchen wastes or agricultural by-products.
5. Complete feeds may also be regularly distributed. They are made from a mixture of carefully selected ingredients to provide all the nutrients necessary for the fish to grow well. They must be made in a form which the fish find easy to eat and digest. These feeds are quite difficult to make on the farm and are usually quite expensive to buy.
6. The system of production can be defined according to the type of food given to the fish:
- extensive: fish production depends entirely on natural food;
- semi-intensive: fish production depends on both natural food and supplementary feed; more fish may be reared in the pond;
- intensive: fish production depends entirely on complete feed, and the stocking rate no longer depends on food availability but on other factors such as water quality.
7. In the following sections, you will learn more about natural food (Section 10.1) and supplementary feeds (Sections 10.2 to 10.6). If you are interested in complete feeds, you should read another FAO manual entitled Feed and feeding of fish and shrimp: a manual on the preparation and presentation of compound feeds for shrimp and fish in aquaculture, by M.B. New (Rome, FAO, ADCP Report 87/26, 275 pp., 1987).
There are several kinds of natural foods
1. Natural fish foods present in a fish pond are very diverse and usually consist of a complex mixture of plants and animals.
(a) They range from microscopic to relatively large size.
(b) They may be alive or dead (detritus) and available from bacterial decomposition.
(c) They are generally present in various parts of the pond:
- near the shore such as rooted high plants;
- floating in the water such as plankton;
- on the surface of or within the bottom (benthic material or benthos*) such as worms, insect larvae and snails;
- covering the surface of submerged objects (biological cover or autwuchs*);
- swimming around such as aquatic insects, frogs and fish (nekton*).
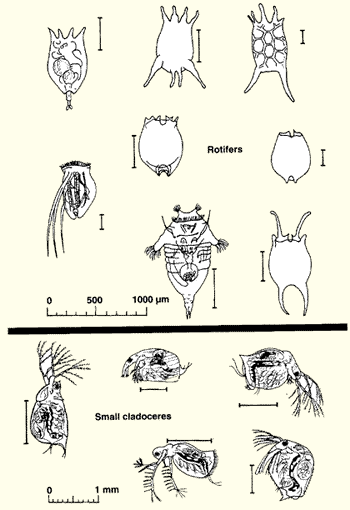
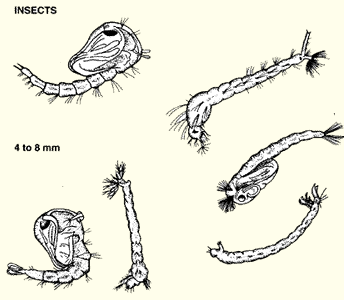
2. To help you manage your pond through fertilization (see Chapter 6), you should learn to recognize the most important groups of natural fish foods. For this you will need a simple microscope (see also Section 15.3), which you might be able to find in a local health centre, school or in a fish-fry production centre. Ask your extension agent for advice. Look at the following pictures remember that some of these organisms can be very small and practically invisible to the naked eye.
Note: 1 micrometre (micron)= 1�m = 0.001 mm.
|
Phytoplankton
 |
|
Zooplankton
 |
 |
 |
 |
 |
 |
 |
Which natural food do fish prefer
3. The food preferred by fish varies considerably, depending on species and development stage.
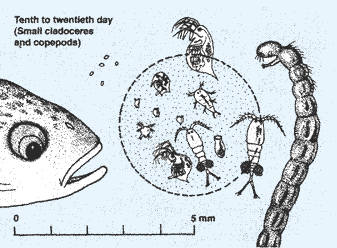
4. As you have already learned, fish larvae do not actively feed but survive on reserve food in their yolk sac (see Section 9.4). A short time before the yolk sac is absorbed, early fry start eating natural foods, which usually consist first of the smallest plankton such as microscopic algae and rotifers. As their mouth size increases, the fry eat increasingly larger plankton (cladoceres/copepods) and insect larvae/pupae. Little by little, as the fry grow older, food preferences change to resemble more and more those of adult fish.
|
First month of feeding for common carp
 |
 |
 |

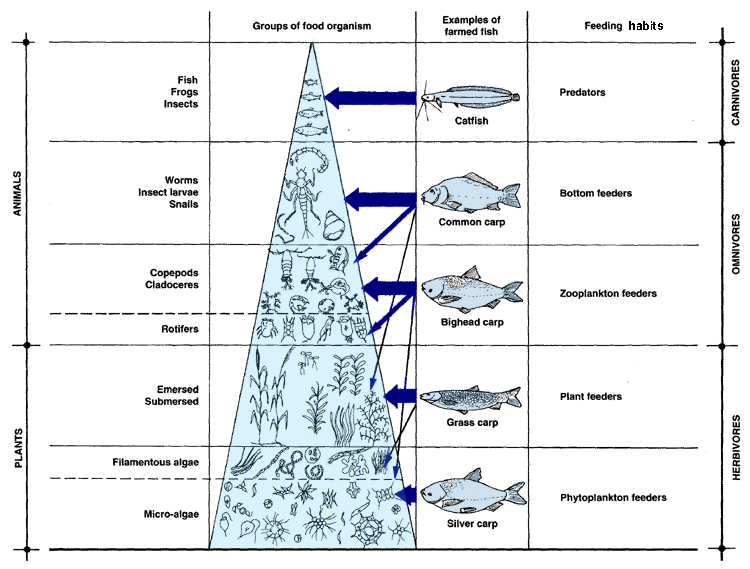
5. Adult fish belong to different categories according to their feeding preferences, as illustrated in Table 27.
(a) Herbivores prefer plant materials such as:
- phytoplankton*, for example the Chinese silver carp;
- higher plants, for example Tilapia rendalli, grass carp, and the Asian cyprinid Puntius.
(b) Omnivores eat a mixture of various natural foods, although most of them have preferences for certain foods such as:
- zooplankton*, for example the Chinese bighead carp;
- bottom fauna, for example common carp;
- bottom detritus for example mrigal, an Indian cyprinid;
- phytoplankton, for example the Nile tilapia;
- fruits and seeds, for example the South American Colossoma.
(c) Carnivores prefer animal food such as insects, tadpoles, frogs and smaller fish, for example trout and catfishes such as African Clarias and Asian Pangasius.
6. You should ensure that there is a good supply of the type of natural food your particular fish species prefers. Phytoplankton organisms are the easiest to produce using a good fertilization programme (see Chapter 6). Zooplankton will then develop rapidly in the presence of algae to graze upon.
7. If you want to encourage the growth of biological cover, a mixture of minute surface-attached plants and animals, in nursery ponds, you can fertilize the water and use bundles of dried grass or crop stems fixed underwater.
 |
Checking on phytoplankton
8. If your fish are phytoplankton feeders, it is particularly important to control regularly both the quality and the quantity available.
9. To check on quality, slowly pull a phytoplankton net (see paragraphs 12 to 15) across the pond in one direction. Try to cover a large area of water. Determine which types of algae are present with the help of a simple microscope (see Section 15.3). There should not be too many filamentous algae.
 |
10. To check on quantity, estimate water transparency either with a Secchi disk or with your arm (see Section 2.3). The abundance of plankton is good as long as the transparency is less than 60 cm (see Section 6.0).
 |
Checking on zooplankton
11. Control quality and quantity of the zooplankton as follows:
(a) Check on quality by slowly pulling a zooplankton net (see paragraphs 12 to 15) across the pond in one direction. Try to cover a large area. Determine which are the predominant types of zooplankters present with the help of a simple microscope (see Section 15.3). Look especially for eggs and juveniles:
- if there are many, adequate food is present for a healthy development of the zooplankton;
- if there are only a few, food for zooplankters is lacking.
(b) Check on quantity by filtering through your zooplankton net a known volume of pond water taken at several sampling points throughout the pond. Proceed as follows:
- using a 10-l bucket for example, take five water samples to obtain a total volume of 50 l;
- filter them through your net to concentrate the zooplankton within its bottom container;
- transfer this zooplankton into a graduated glass tube;
- kill the zooplankters by adding a pinch of table salt or a few drops of formalin;
- let them settle for about one hour at the bottom of the tube;
- measure the settled volume of zooplankton;
- if it is equivalent to at least 3 ml/100 I water, there is enough zooplankton available to feed your fish. If you have sampled, for example 50 l of water, you should then have a settled volume of at least 1.5 ml.
Making your own plankton net1
1 Adapted from E. Woynarovich in Elementary guide to fish culture in Nepal, p. 111. Rome, FAO, 1975.12. To make a small plankton net, you should first obtain, from a specialized supplier, some synthetic fine-mesh cloth called silk bolting cloth:
- for a phytoplankton net, select a 0.025 mm mesh (25 �m);
- for a zooplankton net, select a 0.080 to 0.100 mm mesh (80 to 100 �m).
13. You will also need:
- some linen cloth (see drawing);
- galvanized wire, 2 to 3 mm thick, about 80 cm long;
- one small container to be used as a plankton collector;
- about 10 cm of flexible tubing;
- one spring clamp, to close this tubing tightly.
14. To make the plankton net proceed as follows.
(a) Cut a piece of silk bolting cloth (as shown).
(b) Cut a piece of linen cloth (as shown).
(c) Fold it in two and sew it with double stitches to the silk bolting cloth (as shown).
(d) Finish the conical net with double stitches along its side.
(e) Attach the plankton collector to the lower end with glue and thread.
(f ) Fix the flexible tubing to this collector.
(g) Insert the galvanized wire in to the top of the linen cloth, shaping it into a supporting ring. Turn the ends into a small handle.
(h) Close the drain tube with the clamp.
15. Your plankton net is ready to be used. Strain pond water through it and concentrate plankton into the bottom collector. At the end of the sampling, open the bottom clamp and transfer the plankton through the drain tube into a small vial for further processing.
|
Details for making a small plankton net
 |
10.2 Supplementary feeds: qualitative aspects
Why use supplementary feeding
1. There are several reasons why you should supplement the natural foods available within the pond with artificial feedstuffs originating from outside the pond, for example:
- when natural foods become insufficient to feed your fish well and ensure good growth; and
- when you wish to raise more fish in your pond to produce a higher crop and still have good growth.
2. As you make more use of supplementary feeds, you change from an extensive system to a semi-intensive system of production.
Selecting supplementary feeds
3. When deciding on the use of supplementary feeds on your farm and their selection, look for feedstuffs that are:
- of good nutritional values: with high protein* and carbohydrate* content and low fibre content (see paragraphs 6 to 9);
- well accepted by the fish you plan to feed;
- cheap in price: for a given food quality, the lower the cost, the better;
- available most of the fish-growing season;
- of minimum additional cost for transport, handling and processing;
- easy to handle and store.
Note: of particular importance for small rural farmers: if possible, it may be better to group together to buy bulk quantities and reduce selling price and transport and storage costs.
4. Many kinds of materials may be used as supplementary feeds for your fish such as:
- terrestrial plants: grasses, legumes, leaves and seeds of leguminous shrubs and trees (see Section 4.1), fruits, vegetables;
- aquatic plants: water hyacinth, water lettuce, duckweed;
- small terrestrial animals: earthworms, termites, snails;
- aquatic animals: worms, tadpoles, frogs, trash fish;
- rice: broken, polishings, bran, hulls;
- wheat: middlings, bran;
- maize: gluten feed, gluten meal;
- Oil/cakes after extraction of oil from seeds of mustard, coconut, groundnut, African palm, cotton, sunflower, soybean;
- sugar cane: molasses, filter-press cake, bagasses;
- coffee pulp;
- cottonseeds;
- brewery wastes and yeast;
- kitchen wastes;
- slaughterhouse wastes: offals, blood, rumen contents;
- silkworm pupae;
- manure: chicken droppings, pig manure (see Chapter 7).
5. Select the feedstuffs most useful to you according to the criteria given above.
6. Feedstuffs are classified according to their relative content of protein, carbohydrate and fibre as shown in Table 28.
 |
7. Proteins are primarily made of water, carbon and nitrogen. They are broken down during digestion by the fish into different amino-acids* used for growth, reproduction, repairs and secretion processes. Proteins are mostly found in animal by-products, oil-bearing seeds and their processed cakes. Juveniles and broodstock fish require more proteins than others.
8. Carbohydrates such as starches, sugars and cellulose are primarily made of water and carbon. They provide the energy required by fish for maintenance and living activities. Good carbohydrates are mostly found in cereals and molasses. Indigestible cellulose predominates in brans, hulls, coffee pulp, sugar cane bagasse and whole cottonseeds, where fibre content is also high.
9. To obtain best results, use simple mixtures of various feedstuffs to provide your fish with the additional proteins and good carbohydrates required. As far as possible, avoid using a high proportion of fibrous materials to feed your fish. Remember that such materials might instead be very useful for preparing compost (see Section 6.3).
Presenting supplementary feeds
10. Supplementary feedstuffs are available in two forms: dry and wet.
11. Dry feedstuffs such as cereals and cakes are easier to store, to transport and to distribute to the fish.
12. Wet feedstuffs such as blood, rumen contents, molasses and brewery wastes require special treatment before feeding, for example mixing with dry feedstuffs to absorb part of the moisture or drying to improve storage life (see Section 10.6).
13. As a result, supplementary feeds are usually presented to fish either dry (about 10 percent moisture) or moist (30 to 50 percent moisture). This last form is preferred by some species and may be more palatable and better digested, giving better results. The feed may also be better utilized by reducing losses. But moist feeds do not keep well, and only small quantities should be prepared at a time.
How fine should the feedstuffs be
14. It is important to adapt the size of the feedstuff particles to the mouth size of the fish to reduce feed losses and maximize feed utilization (see the chart below). Depending on the size of the fish, preparation may involve different processes, such as:
- crushing or grinding dry feedstuffs for juvenile fish; and
- chopping plant materials into small pieces for herbivorous fish.
15. Remember that feed particles should not be finer than necessary, because with fine particles:
- nutrients are more easily dissolved into the water;
- it becomes more difficult for the fish to feed properly;
- more particles may be lost by the fish and will decompose in the water.
|
Recommended sizes of feed particles
(diameter in mm)
 |
10.3 Supplementary feeds: quantities to use
1. You should aim at providing all the feed the fish need to:
- maintain body functions such as blood circulation and routine respiration; and
- grow, increasing in size and producing eggs, for example.
2. If the quantity or quality of feed available is limited, fish may not grow, may lose weight, or may even die from food deficiency. Growth will occur only after maintenance needs are satisfied. These needs increase with water temperature, because the activity of the fish also increases. They are relatively greater in small fish compared with larger fish.
Example
Your pond contains 1000 kg of common carp at a water temperature of 25�C. You feed these fish with cereal grains. To cover their maintenance needs only, they must be fed the following amounts, according to the average size of the fish:
 |
If you want the fish to grow, they must be fed more than these maintenance
rations every day.
Note: in practice, some of this feed will be available through
natural feeding in the pond; you will have to plan your feeding depending
on how much natural food is available.
How much supplementary feed to use
3. It is not easy to determine how much artificial food you should distribute regularly to each pond to obtain the best results. Common problems which you should try to avoid are:
- underfeeding, which leads to a loss in fish production;
- overfeeding, which is uneconomical and may also result in poor water quality and production losses.
4. As an approximate guide, you can use the following chart to estimate how much production you can obtain without feeding. Additional production will therefore require supplementary feed.
|
Production potential without feeding
 |
Example
You have a 1 000-m2, or 0.1-ha pond, fertilized to an average extent. You might expect 100 to 200 kg of fish per year. If you wish to produce, say 400 kg, you will need supplementary feeds sufficient for 200 to 300 kg of production.
5. You can estimate the quantity of feed required by using food conversion ratios (FCR) for the feeds involved (see paragraphs 16 to 21). In practice, they should be calculated on the basis of actual results in local conditions. Typical food conversion ratios range from 8 to 15 kg of feed material per kg of fish produced.
Example
The estimated food conversion ratio for the supplementary feeds available is 6:1. In the case above, a 200 to 300 kg production will require (200 to 300) x 6 = 1 200 to 1800 kg of supplementary feeds.
6. With a continuous stock of fish in the pond, this feed would be given in similar amounts throughout the year, in this case an average of 4 to 5 kg/day. But if single crops are being grown, feed requirements increase towards harvest time; see the following chart to estimate the daily quantity of supplementary feeds required.
|
Variation of feed requirement over time
 Note: over each time period, gradually adjust feeding from less than average (at the start) to more than average (at the end). |
Example
If a total of 1000 kg feed is required over a 200-day period, calculate average quantity to be fed each day as follows:
 |
7. While these calculations will give you some appropriate guidance, the determination of the amount of supplementary feeding to be provided to a particular pond has to be based on past experience. This is one of the reasons why keeping accurate records from each pond is so important (see Chapter 16).
8. When doing this, however, you should take into account the following points.
(a) Small fish need more food than larger ones.
(b) If there is plenty of natural food, use less supplementary feed.
(c) If the fish stocking rate is low, you may use less supplementary feed and rely more on natural food.
(d) The better the quality of the feed, the less you will need.
(e) More food is required in warm water than in cooler water.
9. Therefore, you should constantly adjust the feeding throughout the production cycle to obtain the best results, as you will learn in the following paragraphs.
10. The total quantity of supplementary feeding to be given daily to the fish in a particular pond is usually expressed as a percentage of the total weight or biomass (B), of fish present. This percentage is called the daily feeding rate (DFR).
Example
If DFR = 2.5 percent of the fish biomass B = 80 kg, you will require 80 kg x (2.5 � 100) = 2.0 kg of supplementary feed to be distributed daily in the pond.
11. Table 29 will assist you to determine rapidly the daily food requirements of ponds according to the fish biomass present and to the selected daily feeding rate.

How the daily feeding rate varies
12. The daily feeding rate varies as explained above, with such factors as the following.
(a) Species and individual fish size.
|
Possible variation of DFR (percent fish weight)
with fish size  |
(b) Species and water temperature.
|
Variation of DFR with water temperature for
common carp weighing 20 to 50 g  |
(c) Species and amount of natural food present. Remember that it takes a few years for the natural production level of a new pond to stabilize.
Example
If you farm Nile tilapia, regularly fertilize your pond with organic manure to produce a good plankton bloom (see Section 6.2 and Chapter 7); you may then reduce supplementary feeding by as much as half.
How often should you feed your fish during the day
13. Increasing the frequency of supplementary feeding during the day has several advantages, particularly if natural food does not form a major part of the daily food intake, namely:
- reducing food wastage;
- reducing dissolved oxygen consumption and improving water quality;
- reducing nutrient losses attributable to leaching, thereby improving food quality;
- improving uniformity of fish sizes, giving more possibility for the less aggressive fish to feed;
- improving fish growth and feed utilization.
14. Before deciding on how frequently you should feed your fish, note the following points.
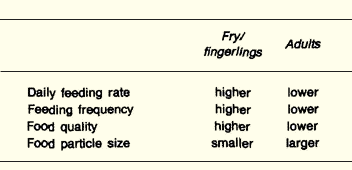
(a) The smaller the fish, the more frequently they should be fed.
(b) Dry feeds need to be distributed more often than moist feeds.
(c) In any one feeding, no more than 3 percent of the total fish weight should be distributed.
(d) The feeding frequency should be reduced as the water temperature cools down, or if it exceeds optimum levels.
(e) The frequency should be adapted to the fish species. Tilapias do much better with small but frequent meals. On the contrary, trout larger than 50 g do well on one meal a day.
(f) The feeding cost should be checked to make sure it is not excessive compared to the yields obtained.
|
Possible feeding schedule for tilapias and
various carps
in warm water conditions according to size 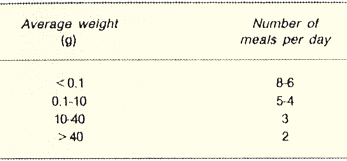 |
15. After deciding on how often you will feed your fish each day, subdivide the daily ration accordingly. Adjust it frequently on the basis of feed utilization.
Example
You determine a daily ration of 2 kg. If you decide to feed your fish twice a day, each meal should be made of 2 kg � 2 = 1 kg of feedstuffs
Checking on feed utilization
16. You should regularly check on feed utilization to adjust feeding properly. This is usually done on several occasions.
(a) Before feeding, check it there is any feed left over from the previous meal. To do this you may need to use a light scoop made of fine-mesh metal netting mounted on a long handle. Adjust the feeding accordingly.
Example
Fingerling common carp are fed once a day in the presence of a good supply of natural food. Two to three hours after feeding, check the feeding place. If there is no feed left, increase the DFR slightly on the next day.If there is feed left over, check again five to six hours later. If there is little feed left over, use the same DFR on the next day. If there is more feed left over, decrease the DFR on the next day.
(b) During feeding, observe your fish carefully to see how actively they eat. A good appetite is a sign of good health and good water quality.
(c) Every 15 to 30 days, check on the new fish biomass present in the pond (see Section 16.4), and adjust the daily feeding ration accordingly. Check on feed utilization during the last 15- to 30-day period by calculating the food conversion ratio for this period (see paragraphs 17 to 19).
(d) At the end of the production cycle, check on feed utilization by calculating the food conversion ratio for this particular cycle (see paragraph 20). Base your calculation on accurate records (see Chapter 16).
 |
Determining and using the food conversion ratio
17. The food conversion ratio (FCR) is the ratio of the quantity of food distributed (in kg) to the weight gain of fish (in kg), over the same period of time.
Example
Over a period of one month, the fish biomass has increased by 12 kg. The quantity of supplementary feed distributed has been 48 kg. FCR = 48 kg � 12 kg = 4.
18. The FCR can vary considerably, usually depending on the same factors affecting daily feeding rate, such as species, kind of feed, water quality and natural food availability. Remember that the lower the FCR, the better the feed is being utilized by your fish. Some typical FCR values are given in the chart below.
19. If you wish to be more precise, you should consider the fish production resulting from natural food separately. Deduct it from the total weight gain before determining the FCR for supplementary feeds only.
Example
In the earlier case, it is estimated that natural food supplies 25 percent of the fish growth, i.e. 12 kg x 0.25 = 3 kg. FCR of supplementary feeds is therefore 48 kg � (12 - 3) kg = 5.33.
20. To judge the efficiency of the feed utilization in a particular pond, determine the FCR for the period under consideration. Compare this observed FCR with the most reliable value known for the type of feed used, such as the FCR determined from past experience on your own farm or under similar conditions on other farms.
(a) if this observed FCR is much higher, there is a problem such as low dissolved oxygen, overfeeding, bad quality feed, lack of natural food or diseased fish. Determine and correct the problem.
(b) if this observed FCR is equal or lower, production conditions have been normal or even better than average. Try to keep it this way.
|
Typical values of the food conversion ratio
(FCR) for common supplementary feeds
 Note: remember to compare FCR values on the same basis, i.e. with or without the effects of natural feeding. |
21. Once you have established the FCR of a certain kind of supplementary feed, you can easily estimate how much of such feed (F in kg) you will require over a certain period of time to produce a certain fish yield (Y in kg) as: F = Y x FCR (see paragraph 5).
Stopping the feeding of your fish
22. There are several occasions on which it is advantageous or even compulsory to stop feeding your fish:
- when the water temperature is too low or too high (see example);
- when dissolved oxygen content is limited (see Section 2.5);
- on the day you apply manure to the pond (see Section 6.2);
- if ever a disease epidemic appears in the pond (see Chapter 15).
Example
When the water temperature is too extreme, fish stop feeding
 |
23. Do not feed your fish for two or three days before stressing handling activities such as:
- sorting or grading them (see Section 12.0);
- transporting them alive (see Section 14.0);
- their final harvest (see Section 11.0);
- marketing them (see Section 16.8).
10.4 How to distribute supplementary feeds
1. In the two previous sections, you have learned which kind and what quantities of supplementary feeds can be used. Now you should learn when, where and how to apply these feeds in your ponds. One of the basic points is to adjust distribution according to the fish size and/or age.
Example
Feed your fish correctly according to their age.
 |
When to feed your fish
2. Under normal rearing conditions, it is best to feed your fish at least once a day, usually for six days a week. Feed more often if possible, particularly for juvenile fish (see Section 10.3, paragraphs 13 and 14). In some conditions, such as limiting low temperatures, feed only every two to three days.
3. The best feeding time of the day is early morning, as water temperature and DO content start increasing (see Section 2.5). A second distribution may take place in late afternoon, a couple of hours before sunset.
4. In some cases, using demand feeders (see paragraphs 12 to 16), feeding time and amount are determined directly by the choice of the fish: feed is supplied when the fish are hungry.
Where to distribute feed
5. Depending on the type of feed, the size of the pond and the distribution method, feed may be applied in the following manner.
(a) On the entire pond area, for example when hand feeding finely ground dry feedstuffs in small ponds. It makes the food available over a wide area thus reducing competition among the fish.
(b) At selected feeding places, for example when feeding sinking feedstuffs in large ponds. It then becomes easier to check on food utilization. Proceed as follows:
- select areas with a firm bottom, avoiding soft mud;
- choose shallow water 0.6 to 1 m deep;
- in large ponds, if you have no boat, keep the feeding places near the shores;
- it is best to have several feeding places: in large ponds, 5 to 7 places/ha for juveniles, and 3 to 4 places/ha for older fish;
- mark the selected areas well, with a vertical wooden pole emerging above the water surface;
- change feed sites if spoiled food builds up on existing sites.
 |
Measuring feedstuff quantities
6. On fish farms, quantities have to be measured several times:
- when preparing supplementary feed from a mixture of several feedstuffs;
Example
Based on local availability of feedstuffs, you decide to feed your Nile tilapia juveniles with the following mixture
- wheat bran 10 percent by weight
- wheat middlings 45 percent
- peanut cake 45 percent
- when feeding your fish their daily food ration in a particular pond.
In both cases, the quantities required may be measured either by weight or by volume.
7. To measure by weight you will require a balance or a weighing scale to weigh the feedstuffs (see Section 8.6).
Example
To prepare 80 kg of the above food mix, weigh and mix well together the following:
- wheat bran: 80 kg x 0.10 = 8.0 kg
- wheat middlings: 80 kg x 0.45 = 36 kg
- peanut cake: 80 kg x 0.45 = 36 kg
8. To measure by volume you may require containers of different sizes, which you should clearly identify with a painted number for example; for each container, use known volumes of water to determine partial and total volumes, for example by 0.5-litre intervals; clearly paint a thin line inside the container at each of these levels.
Note: you may also use a small container marked with a fixed volume, such as 0.5, 1 or 5 litres, depending on the quantities of feed to be measured. For larger quantities you may use a wheelbarrow or a clean 200-l oil drum which should be calibrated beforehand.
9. Before using such containers for measuring volumes of feedstuffs, you should determine equivalences in the following way.
(a) From Table 30 (Section 10.5), find the specific weight of each of the feedstuffs to be used. If you have a balance at your disposal, you may also determine more accurately this specific weight yourself by weighing (in grams) 1 litre of each feedstuff.
(b) Determine which volume (in l) of each feedstuff is to be measured to obtain the weight (in g) required.
(c) If you are feeding a feed mix, determine the equivalent volume of each feed ration by a simple rule of three.
Example
To prepare 80 kg of the above feed mix by the volume method, proceed as follows.
(a) Find specific weights from Table 30 equal to 210 g/I (coarse wheat bran), 340 g/I (wheat middlings) and 600 g/l (peanut cake).
(b) Determine how much weight (in g) of each feedstuff is required (see example above).
(c) Use the following volumes (in l) of each feedstuff:
- wheat bran: 8 000 g � 210 g/I = 38.1 l (say 38 l);
- wheat middlings: 36000 g � 340 g/I = 105.9 l (say 106 l);
- peanut cake: 36 000 g � 600 g/I = 60 l.
(d) Mix these volumes together well to obtain a total of about 204 l of the feed mix.
If you have to put a ration of 1.2 kg of this feed mix in a pond, measure out a volume of 3 litres because:
- 80 kg are equivalent to 204 l;
- 1 kg is equivalent to (204 l � 80);
- 1.2 kg are equivalent to (204 l � 80) x 1.2 = 3 l.
Distributing feeds
10. There are several ways by which supplementary feeds may be distributed. One of the most common is hand feeding, where feedstuffs are broadcasted by hand or thrown by shovel into the pond. It has the great advantage of giving a regular opportunity to note the feeding behaviour of the fish. If abnormal, possible reasons may be investigated immediately and remedial action taken.
11. To concentrate feeding within selected areas and to avoid contact of the feed with the pond bottom, you may prefer to use one of the following methods:
- a raised pond floor area made by piling up pond soil to make a mound just below the natural water level;
- a fixed floating frame made of bamboo, for example; floating food items such as green fodder plants, chopped aquatic plants or dry, finely ground bran are thrown into the frame;
- a fixed submerged tray, such as a split bamboo tray, on which sinking feed is placed (best for juvenile fish to reduce waste);
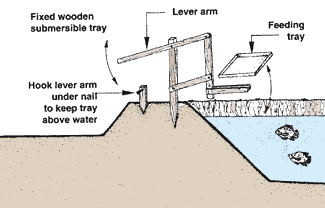
- a fixed submersible tray, placed on supports which may be raised above the water level using a simple lever assembly operated from the top of the dike;
- a floating tray, easily built as shown, usually tethered to the pond bank;
- perforated devices, such as woven baskets, metal or plastic containers, and pockets made of small-mesh netting; moist feed is pressed inside so as to squeeze slightly through the numerous holes all around the device; fish obtain their food by nibbling and sucking the moist mash through these holes (best for juveniles ).
 |
 |
 |
 |
|
Floating feed tray, with a frame of light
metal strips
(3 to 5 mm thick), which can be tethered to the pond bank or anchored to the pond bottom (as shown below)  |
 |
12. Mechanical feeding can be easily achieved using a simple demand feeder, from which fish learn to release a fixed quantity of dry feedstuffs by touching a trigger rod. You can easily build one yourself (see following) from an oil drum, a large plastic pipe or plastic container, or with wood and plywood.
13. In large ponds, such demand feeders may help a lot to reduce the labour involved in feeding. But remember:
- use at least four feeders per hectare of pond;
- check regularly for uneaten food under each feeder, particularly on windy days;
- restrict their use to fish large enough to activate them properly.
 |
Building a simple plastic demand feeder
14. There are five main parts to such a feeder: the main container holding the feed, a lid, a base funnel, the feeder trigger, which is touched by the fish to release feed, and a support bracket or frame to suspend the feeder over the pond. Proceed as follows.
(a) The main container can be made from a plastic bucket, or a piece of pipe 10 cm in diameter x 15 cm long for a fry or fingerling feeder, 20 cm in diameter x 30 cm for larger fish. A plastic bucket with a lid can be very useful.
(b) If you need to make a lid, preferably with a slight slope to disperse rain, make one from plastic sheet, plywood, or light sheet metal (e.g. oil drum or light aluminium). You can attach this with simple clips or with strong rubber ties (e.g. inner tube) or with twine. Make holes in the body of the container if necessary, to attach the clips or twine.
(c) Obtain a funnel matching as well as possible the diameter of the pipe or the base of the bucket. If the funnel is slightly large, trim it down to the right size by cutting off a suitable amount at the top. With a bucket, you may cut a base hole to match the size of the funnel, but do not leave more than 25 mm as a lip between the base and the funnel, as it will catch the feed.
(d) Attach the base funnel to the container. You can use a drill or a hot wire to pierce holes through both and tie them together with light wire or strong twine. If possible cover the joint with aquarium sealant or, on the outside, with waterproof tape.
(e) For the feeder trigger, you will need two pieces of medium wire and a small piece of cork or a plastic top (for example from a detergent bottle). The first piece of wire should be 50 to 70 mm longer than the diameter of the pipe or bucket. Drill or pierce holes on either side of the container, about 30 to 50 mm from the top, and run this piece through. Bend over each end to hold it in place.
(f) The second piece of wire is the main pendulum. It hangs from the first wire, runs through the funnel and down into the water to the level at which the fish can operate the trigger. If the distance from the top wire to the bottom of the funnel is, for example, 30 cm and the distance from there to the water level is, say, 40 cm, you should allow at least 80 cm. Adjust this according to your own conditions.
(g) A small hook is formed at the top end with which you can then thread the cork or bottle top on the wire. This is the regulator for the feed. Then drop the wire through the funnel and hang it by the hook from the top wire so that the regulator sits inside the funnel, just above its spout. This is an internal regulator, which is slightly stiffer to operate so that the feed is less affected by splashing.
(h) Alternatively, drop the wire through the funnel and attach the regulator below the funnel spout. This is an external regulator. It is easier to operate, but the feed is more easily made wet by splashing and may tend to clog up.
(i) The bottom of the pendulum extending below the water can be turned up in a small loop. You may attach a small piece of wood or plastic, brightly coloured, to make it easier for the fish to operate.
(j) The trigger can be adjusted by moving the regulator up or down the pendulum until a suitable gap size permits the feed particles to fall between the regulator and the funnel spout. If necessary you can cut the spout to make it wider and allow larger particles to fall through.
(k) Finally the feeder should be attached to a suitable support. For servicing by boat, the feeder can be tied or bolted on to a post or a simple wooden platform. For access from the side, a swivelling support is best. For this you need a solidly driven vertical post, for example 8 x 8 cm, about 1.5 m above water level with a strong bolt or pin fitted into the top. On this, attach a wooden crossbeam 2 to 3 m long, 5 to 8 cm wide, 8 to 10 cm deep, set so that it balances on the vertical post. The crossbeam is fitted with a steel angle-bracket at one end, on which the feeder is attached. A counterbalance weight (for example, a boulder or a concrete block) is attached to the other end. Brace the vertical post if necessary.
(l) If you have access to welding gear, you can make a swivelling support with a metal pipe and bar. For the base you will need 80 to 100 cm of plastic or steel pipe, well cemented in, in which the main upright pipe can be fitted, sized so that it can swivel freely. The arm to support the feeder can be welded to the top of this, with suitable support bracing.
|
Schematic diagram of the main parts of a demand
feeder
 |
Note: the main container and funnel of a demand feeder can be made using plastic, light sheet metal or even a plywood box (use marine-grade plywood if possible) assembled with small nails, waterproof glue and protected by a coating of varnish; the diagram above shows the arrangement of the various parts; the detailed instructions below tell you how to build a simple demand feeder using a plastic bucket and a kitchen funnel.
10.5 Transport and storage of feedstuffs
Transporting feedstuffs
1. Feedstuffs produced outside the fish farm have to be regularly acquired and brought close to the ponds to be stored. For large quantities, a truck is usually used to transport them, but simpler means can also be used such as animal-drawn carts or small bicycle-drawn trailers.
2. On the farm itself, feed materials are further moved around for processing (see Section 10.6) and distribution in the ponds. Over short distances, containers (such as baskets, bags or buckets) or wheelbarrows are used. Over longer distances, carts and trailers are preferred.
3. It is important to reduce transport costs as much as possible. It is usually cheaper, per weight of feed, to transport large quantities in bulk deliveries, but this may require considerable storage before the material is needed. Storage itself may be expensive, and feed quality may deteriorate. One way of reducing this problem is for neighbouring farmers to group their orders and use common transport. Use Table 30 to estimate the volumes to be transported and their cost, according to the feedstuffs required (see Section 10.6).

Important factors during storage
4. Feedstuffs must be stored with special care to prevent excessive deterioration in quality and feed losses. The most Important factors to control are the following.
(a) Moisture content of both air and feedstuffs should be maintained as low as possible. You should try to keep the relative humidity of the air below 75 percent.
(b) Temperature of both air and feedstuffs should be kept as low as possible. At temperatures above 25�C, the rates of deterioration and loss may rapidly increase.
(c) Moulds (fungi*) and insects (beetles, moths, weevils, etc.) may cause considerable losses and may contaminate feeds with their metabolic by-products. High temperature and high moisture levels favour their development (see box).
(d) Rodents (mice, rats, etc.) and birds can consume important quantities of feedstuffs. Their wastes may also contaminate the feeds.
(e) Human theft and indirect damage to feed stores may also increase other control problems.
|
Improving the storage of feedstuffs
5. To reduce such deterioration and loss of feedstuffs to a minimum during their storage on your fish farm, pay special attention to the following points.
(a) Keep the storage areas as dry and cool as possible:
- provide a good roof to protect against rainstorms and sunlight;
- protect the floor from flooding or rising moisture (a raised concrete floor or a wooden platform are best);
- provide good ventilation through the building (it is best to have its length facing prevailing winds and cut openings in these walls, low down on the front wall and high up on the opposite wall).
 |
(b) Close all openings with small-mesh metal netting to prevent the entry of rodents and birds. Make sure the netting is well embedded, to prevent animals passing under it. The presence of a few cats can be very effective in achieving total control of these animals. Lock the door properly. Use ledges to deter ants or termites from entering.
(c) Be particularly selective when buying feedstuffs. Pay only for materials that are dry, not mouldy and not infested by insects. Sieve a sample to check for mites, insect larvae, pupae, animal droppings, etc. The materials should be loose, free-flowing and should not have been overheated inside storage piles.
(d) If bags are used to store feedstuffs, do not stack them too high. If possible, raise these stacks off the ground on wooden platforms.
(e) Improve air circulation around individual stacks by:
- leaving a space between stacks and walls;
- separating individual stacks from each other.
(f) If materials are stored loose, turn them over from time to time to make sure they are dry and do not overheat in the centre of the pile. You can use a thermometer on a simple rod to test material temperature.
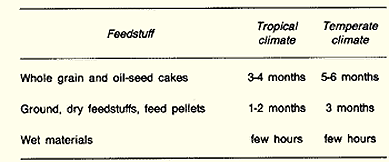
(g) Manage your stocks well, limiting their storage time (see chart) to a minimum by:
- buying reasonable quantities and avoiding excessive stocks;
- rotating your stocks carefully, using the oldest feedstuffs first,
- storing the newest materials behind, if necessary;
- labelling your stocks clearly, with name and date of entry; and
- using damaged bags first.
(h) Keep the storage areas clean by sweeping floor and walls regularly and removing spilled materials and broken bags.
(i) Keep good records (see Section 16.6).
|
Safe storage time for feedstuffs under good
conditions
 |
Storing small quantities of fish feeds
6. If the quantities of feedstuffs to be stored are not too large, one safe way to store them is to use clean containers such as old metal drums or wooden crates. You may also build storage bins yourself from wood. Such bins are also useful to keep processed supplementary feeds, for example a ground mixture of several feedstuffs, ready for distribution to the fish over a week's time.
 |
How much storage space will you require
7. You can easily estimate how much storage space you will require from Table 30. For each feedstuff, determine how much is the maximum quantity to be stocked safely (see paragraph 5). Calculate the corresponding volume. Add 20 percent of this volume to estimate the minimum storage space required.
Note: if feed mixes might change, base storage volumes on the most bulky ingredient.
Example
It is estimated that over the next three months you will need to stock 1250 kg of rice polishings, 800 kg of rice bran and 650 kg of cottonseed oilcake. The corresponding volumes of feedstuffs on the basis of their specific volumes (Table 30) are as follows:
| rice polishings: 2.1 l/kg x 1250 kg | = 2625 l |
| rice bran: 3.1 l/kg x 800 kg | = 2480 l |
| cottonseed oilcake: 1.5 l/kg x 650 kg | = 975 l |
| total volume | 6 080 l |
The minimum storage space required is 6080 l + (6 080 l x 0.20) = 6080 l + 1216 l = 7296 I, say 7300 l = 7.3m3
10.6 Processing feedstuffs
1. On small-scale rural fish farms, local feedstuffs are usually given to the fish in their natural state. As the production scale increases, however, some kind of processing is often used to improve the utilization of available feedstuffs and reduce feeding costs. This may involve one or several successive operations such as grinding, sieving, mixing, steaming, drying and forming feed materials into a compact shape.
Feeding the right particle size
2. You have already learned earlier (see Section 10.2) that the size of the individual feed particles should be well adapted to both size and species of fish. Particle size can be altered by milling, crushing, pounding or grinding. It is best to chop or pulp grasses and other plant materials before feeding them to fish. For very small fish it is particularly important to adapt the feed particle size correctly to the size of the fish mouth by sieving dry materials to specific sizes.
3. Remember, however, to reduce particle size only as far as necessary, because the finer the feed particles are:
- the more work is required;
- the more nutrients are lost when dissolved in water;
- the more feed is lost to other small animals;
- the more rapidly the feed breaks down in the water;
- the more difficult it is for larger fish to feed adequately.
Mixing several feedstuffs together
4. Mixing two or more feedstuffs together may result in several advantages.
(a) The fish feed is better balanced from the nutritional point of view.This consideration is especially important for broodstock and juveniles.
(b) Locally available feedstuffs are better used.
(c) Liquid feedstuffs can be used more efficiently by absorbing them on to dry materials (see paragraphs 13 and 14).
5. Dry and moist feedstuffs can be mixed in several ways.
- by hand or by shovel on a clean area;
- by mixing and pounding with pestle and mortar;
- by using a clean concrete mixer.
 |
6. Be careful:
- to measure the correct quantities of each feedstuff (see Section 10.4);
- to avoid contaminating the fish feed, for example with a pesticide or with other chemicals stored nearby.
Cooking or steaming feedstuffs
7. Cooking or steaming some feedstuffs may be required mainly to give the mixture a sticky consistency by gelatinizing the starches present and thus producing a feed which is more stable in water (see paragraph 10). It can also help to improve the digestibility of some feeds, making them more useful to the fish, and can help to kill off any unwanted organisms in the feed material.
 |
8. You can easily prepare them by using a home-made cooker. Mix well together various feedstuffs such as brewery waste and rice bran. Steam this wet mixture for 30 minutes to obtain a moist cake, which may then be blended with other dry feedstuffs such as oilcakes and blood meal with a further addition of water.
|
Parts of a home-made steam cooker and the
materials used
 |
Forming the feed into a compact shape
9. It is more efficient to give fish a form of feed In which individual fine particles stick together until they have been ingested, rather than a form which will break down immediately into numerous small particles as soon as it is thrown into the pond.
10. To form fish feed into a compact shape, adopt the following principles.
(a) Use finely ground or sieved feedstuffs only. The size of individual particles should be smaller than 2 mm, preferably even smaller than 1 mm.
(b) Increase the moisture content by adding:
- a liquid: water is generally used, but fish or vegetable oil can also be used and can also help to increase the energy in the feed; or
- a moist ingredient with binding properties (feed binder), which will increase the stability of the fish feed underwater; examples are starches from cooked potatoes, cassava or cereals (see paragraph 7), or 5 to 6 percent by weight of dry, pulverized yellow clay.
(c) Mix well together until the feed reaches consistency of firm dough. Check stickiness by squeezing a ball of the dough in your hand. It should stay together as you release the pressure.
(d) Divide the dough into individual portions.
(e) Shape each portion as best adapted to your fish, (for example flat cake, large lump or moist ball). Moist pellets can be made using a meat mincer.
Use this moist feed on the same day. For longer storage, dry it as described below.
11. Remember:
- do not add too much liquid at once;
- the finer the feedstuffs, the better the water stability of the feed.
Note: dry pellets are available from specialized suppliers in different sizes and qualities as compound balanced feeds for more intensive culture systems, in which natural food becomes a secondary source of nutrients.
 |
Drying liquid and wet feedstuffs
12. Liquid and wet feedstuffs such as animal blood, cattle rumen contents and brewery waste must be dried if they are to be stored. You have just learned that moist feed should also be dried before being stored; in the following paragraphs, you will now learn some simple ways to do this. Always remember that you should:
- dry feedstuffs as fast as possible to avoid spoilage by fermentation and mould;
- achieve a final moisture content of 10 percent or less;
- use clean drying surfaces;
- protect the drying feedstuff from excessive humidity and rain by using removable trays or netting if necessary;
- keep the feedstuff out of the reach of birds and other animals; � prevent any contamination.
13. One simple way to dry materials is to mix the wet feedstuffs with dry feedstuffs such as cereal brans or oilcakes to progressively absorb the excess moisture. Such a semi-moist mix can then be more rapidly dried.
 |
Processing fresh blood
14. To process blood simply and quickly, proceed as follows.
(a) Put finely powdered lime into the bottom of a blood-collecting bucket. One percent by weight of quick lime is preferred (see Section 5.2).You may also use 3 percent by weight of slaked lime. Assume 1 litre of blood equals 1 kg.
(b) Fill the bucket with blood.
(c) Stir well until the blood hardens into a black, rubber-like mass.
(d) Spread the hardened blood in a thin layer on a clean surface in a sunny place. You may use sacks, mats or a platform. You may also use a solar dryer (see paragraphs 17 to 20).
 |
Note: lime-treated blood does not stick or decompose. It does not attract flies. Its food value is enhanced by the additional calcium present.
Processing fresh rumen contents
15. The undigested mixture found in the first three stomachs of herbivores such as cattle, sheep and goats, called rumen contents, is usually available from local slaughterhouses. Collect it in a receptacle such as a half-drum and process it as follows.
(a) Select an area exposed to direct sun.
(b) Spread the rumen contents well over mats,. corrugated iron sheets,trays or a concrete platform. The thickness of the layer should not exceed 5 to 7 cm.
(c) Rake the drying mass over from time to time.
(d) Once dried, you may easily pound the material with a pestle and mortar.
16. You may also use a dryer (see paragraphs 17 to 22), which will make this process faster, even in the absence of sun.
 |
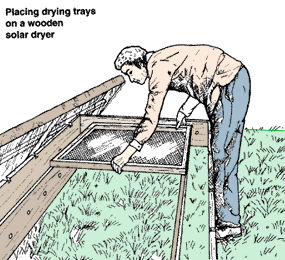
Building a simple solar dryer
17. A simple solar dryer can be easily built from bamboo poles and plastic sheets. For best results, you will require both clear plastic and opaque (black or green) plastic sheeting. A chimney improves the air circulation over the drying material and releases the moist warm air. Select a place fully exposed to the sun and not too exposed to high winds to lengthen the life of the plastic sheeting.
 |
Building an insulated solar dryer
18. An insulated solar dryer can be used to maintain higher drying temperatures; it can be built from wood and plastic sheeting as follows:
(a) Build an outer box 240 x 120 cm and 22.5 cm deep:
- set it up on four legs 15 cm high;
- drill three rows of 5-cm diameter holes at 15-cm intervals in the bottom of the box;
- drill one row of 5-cm holes at 15-cm intervals in the sides of the box;
- along the upper edge of the sides, cut out a series of 2.5 x 7.5 cm notches at 30-cm intervals (see drawing).
(b) Similarly build an inner box 210 x 90 cm and 15 cm deep:
- fit this box inside the outer box so that it stands in the middle about 15 cm from the sides of the outer box;
- drill a series of 5-cm holes in its bottom matching those of the outer box;
- remove the inner box from the outer box and set it aside.
|
Home-made wooden solar dryer
 |
(c) Prepare three battens about 10 cm wide, 220 cm long and 5 cm thick:
- through each of them, drill a series of 5-cm holes matching exactly those drilled through the outer box bottom;
- fix each batten to the outer box bottom over a row of holes, and check that the holes match well;
- fill the spaces between the battens with insulating material such as dried grass or leaves, wood shavings, rice straws, etc.
(d) Fix the inner box back into the outer box so that its bottom holes match the battens' holes exactly.
(e) Pack the spaces between the two boxes with similar insulating material, up to about half the height of the inner box.
(f) Paint all inside surfaces matt black to achieve higher absorption and retention of heat.
(g) Build the cover of the dryer:
- make a wooden frame 250 x 135 cm;
- at the centre of its width, fix a wooden board 10 x 250 cm;
- over the bottom of the frame, attach a clear plastic sheet;
- cover the top of the frame with a second clear plastic sheet, slightly sloping over the central board;
- attach its sides to the bottom of the frame and over the sides of the first plastic sheet.
(h) Build two drying trays to fit on top of the inner box:make two shallow wooden frames 100 x 105 cm;fix a base of fine-mesh wire to each of them.
 |
|
Building a cover
 |
 |
19. To dry blood, rumen contents or other materials in the sun:
- fit the two trays into the solar dryer;
- spread the material evenly on the trays in a thin layer;
- place the cover on top of the dryer;
- drying is achieved by air circulation; cool air enters the holes in the base of the boxes, warms up, dries the contents and flows out of the notches cut in the sides of the outer box;
- rake the material over frequently;
- proceed with the drying until the moisture content of the material is below 10 percent.
20. For best results:
- you need sunny weather to build up heat in the dryer (because of the insulating material, the dryer keeps functioning during occasional cloudy periods);
- shelter the dryer from the wind to reduce damage to the plastic sheets;
- repair the plastic cover as soon as it is damaged to maintain an insulating layer of air trapped between the two plastic sheets; if extra air circulation is required, drill additional holes in the side of the boxes, connecting inner and outer holes with bamboo, plastic or sheet metal (tin can) pipes, together with additional upper holes or notches for air outlet;
- for even better air control, an end chimney can be used instead (see earlier example below paragraph 17). You can put a simple flap on it to control the flow of air.
 |
 |
Building an all-weather dryer
21. The previous dryer functions best in sunny conditions. If drying has to be continued during long periods of cloudy or rainy weather, it may be worthwhile building an all-weather dryer incorporating heating. It can also be used as a solar dryer during sunny days.
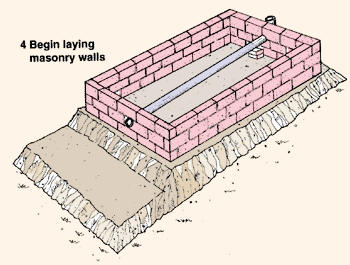
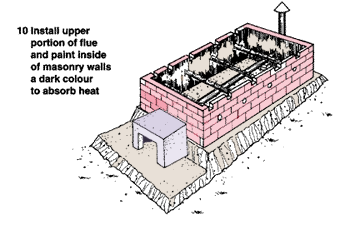
22. For this you need to build a permanent structure, using fired bricks, cement blocks or stones. Inside dimensions may be the same as those of the above solar dryer. Major differences are the following.
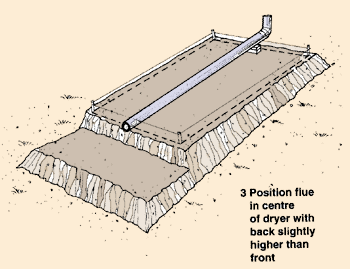
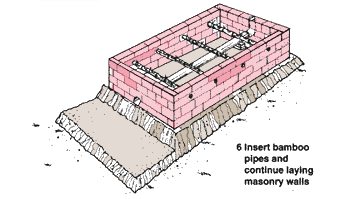
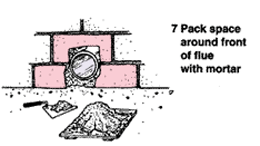
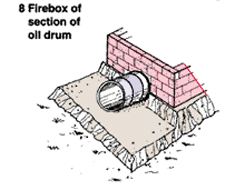
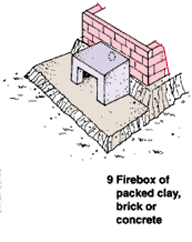
(a) Build the firebox of clay, bricks or from a portion of an oil drum. The end of this firebox should face the prevailing wind.
(b) Connect a long metal tubular flue, which also acts as a chimney, to the firebox. Provide the chimney with a damper to stop the draught during solar drying.
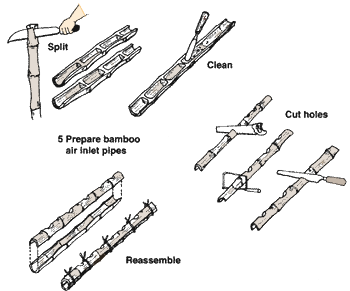
(c) Provide inside ventilation by using perforated bamboo tubes of 5 to 7.5 cm diameter (see Section 3.1, Construction, 20).Place them above the flue pipe and across the dryer.
 |
|
Building a masonry all-weather dryer
 |
 |
 |
 |
 |
 |
 |
 |
 |
 |