|
|
1. Outlet structures are built for two main reasons:
2. In addition to these major functions, a good outlet should also ensure as far as possible that:
3. In most cases, outlets have three main elements:
4. Pond outlets can be built in various ways, using different materials such as bamboo, wood, bricks, cement blocks or concrete. There are four main types, which will be discussed in turn:
5. The main principles of design, including pipes and overflows, are discussed first in the next section.
|
|
1. When designing and constructing an outlet structure, you should pay particular attention to the following points:
(a) Design a water discharge capacity large enough so that the pond can be drained within a reasonable amount of time, from a few hours for a small pond to one to two days for a large pond. (To select the right size of pipes see later in this section.)
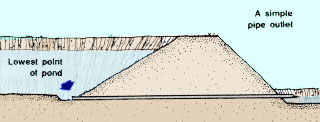
(b) Design the elevation of the bottom of the outlet structure low enough to ensure complete drainage of the pond, so that:
(c) Design its total length so that the water will be discharged well away from the outside toe of the dike to avoid damaging it by erosion.
(d) For a barrage pond, the outlet should be built away from the streambed if possible and dug in lower than the lowest point of the pond bottom.
(e) Plan for the outlet to be built before or right after the beginning of the dike construction, depending on the type of pond. (see Table 50, section 12.6)
(f) If the outlet structure is heavy, be sure to build it on very well compacted soil only (see Section 6.2). You may also need to support it with simple piling.
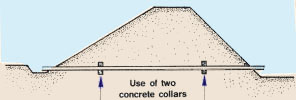
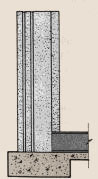
(g) If there is an outlet pipe through the dike, it is always best to build at least one antiseepage concrete collar around it:
(h) When building the dike above the pipes, be sure to compact the earth well around them.
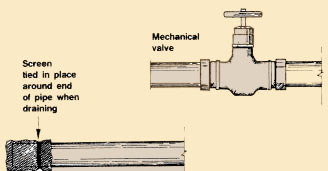
(i) Remember that small pipes can become easily blocked, particularly inside the pond. Therefore:
Note: you should try to standardize the type of outlet to be built on your fish farm, to make them easier and more economical to use.
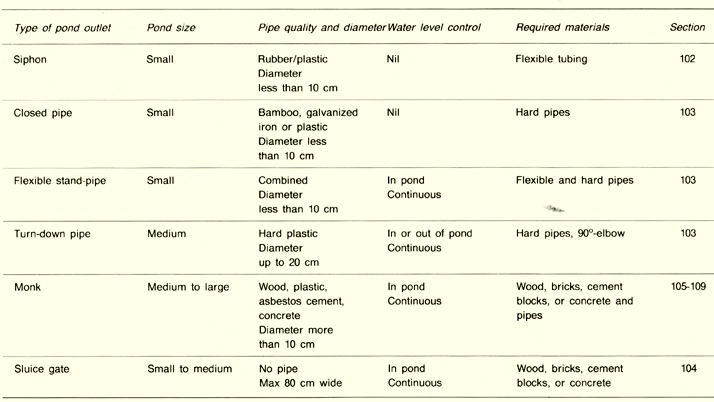
2. To assist you in selecting the right type of outlet, consult Table 46. You should also take into account how much you can invest and which kind of materials are locally available.
|
|
 |
collar |
|
|
concrete around the pipe
 |
||
|
Fill the form with a mixture of one part cement
to two parts sand and some water  Place the pipe in the form |
Remove the form after the concrete |
Section 10.2; Section 10.3; Section 10.4; Section 10.5
Sizing outlet pipes |
||||||||||||||||||
|
3. The inside diameter of outlet pipes will determine the water discharge capacity of the outlet structure. 4. Select the right size and quality of the pipes to be used, according to the size of the pond (see Table 47) and the size of the pipes:
|
TABLE 47
* Not for monks where pipes should be at least 10 cm in diameter |
|||||||||||||||||
5. The water carrying capacity of the selected pipes can be estimated from Graph 1, Tables 13 and 14, or mathematical formulas (see Section 3.8).
Note: for barrage ponds fed directly by a stream, you might need larger pipes than usual if the excess water inflow has to be discharged continuously through the pond outlet. In most cases, it will be safer and more economical to build a lateral overflow structure (see Sections 11.3 and 11.4).
6. In general, in stable soil with well-constructed dikes and smaller pipes, no special precautions are required, apart from ensuring that pipe trenches are level and that the pipe will not be damaged.
7. For longer and larger pipes such as those used in monks, some fixing or foundation may be required. For additional information on monks see Section 10.5.
8. For security reasons, you should always ensure that the water level in the pond does not rise above the designed maximum level and flow over the top of any dike (see Section 11.1 on the discharge of excess water). This circumstance might result not only in the loss of most of your fish but also in heavy repairs before you could use your pond again.
9. In a diversion pond, where most of the excess inflow water is discharged at the inlet diversion structure, a pond outlet such as an open stand-pipe, a monk or a sluice should discharge any excess automatically. But you have to ensure that all screens are kept clean.
10. For a barrage pond directly fed by a stream, however, you need additional emergency such as a mechanical spillway for the continuous discharge of the excess water and possibly an additional emergency spillway for the occasional discharge of flood water (see Sections 11.3 and 11.4).
11. If you do not use an outlet or if you use one which does not regulate the pond water level (a closed pipe, for example), you will definitely need a protection structure to discharge any occasional excess water (see Chapter 11).
1. Very small rural ponds can be harvested by cutting the dike open at one of the deepest points of the pond. It is rebuilt when the pond has to be filled again. In such a case:
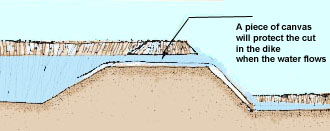
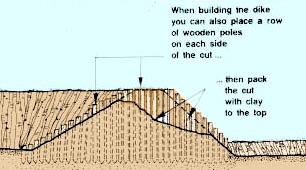
2. If for some reason, you cannot build an outlet for your pond, you can limit the damage to your dike:
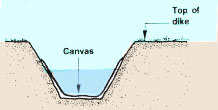
(a) Do not build your pond too deep, and make the cut in stages, draining off the upper levels of water first.
(b) When draining the water, use a piece of canvas.
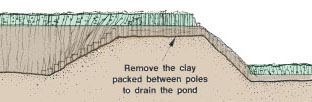
(c) When building the dike, include two rows of strong wooden poles in it. Between them, close the gap by carefully compacting clay soil up to the maximum water level. Protect the top of this gap with stones or gravel, so that any excess water can flow from the pond over it without damage. Each time you drain the pond, cut open the gap between the two rows of poles and rebuild it to fill the pond with water.
 |
 |
|
 |
 |
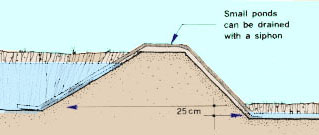
3. Small ponds can be drained either partly or fully, using a siphon (see Section 8.9 for use of siphons). One of the limitations of this method is that the outlet of the siphon has to be at least 20 cm below the level to which you want to drain. using a siphon (see Section 8.9 for use of siphons). One of the limitations of this method is that the outlet of the siphon has to be at least 20 cm below the level to which you want to drain.
| 4. The total length of the siphon should be at least equal to the wet side of the dike plus the dike top width plus the dry side plus 30 cm. The siphon diameter should preferably not be larger than 2 to 3 cm, so that it will be relatively easy to start the siphon flowing. |
 |
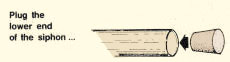
5. To start a siphon flowing, proceed as follows, with the help of another person:
| a) Ask the other person to block the end of the siphon tube at its lowest end outside the pond, using either their hand or a plug. |
 |
|
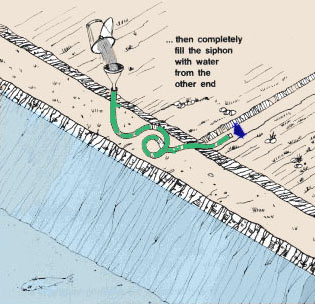
| (b) Position the siphon tube so it can be completely filled
from the other end (which means taking the other end up to the top of the
pond wall). Be careful not to have any kinks which may trap air.
(c) Fill the siphon with water from the other end; when it is full, block this end either with your hand, or better, with a second plug. |
(d) Bring down the end of the pipe slowly and submerge it fully into the pond, keeping it blocked all the time. (e) Ask your assistant to open the other end of the siphon, ensuring that it remains at its lowest level. (f) At the same time, open your end of the siphon, ensuring that it remains well under water. The water should start flowing through the siphon. |
|
 |
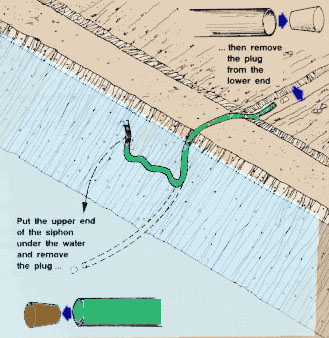 |
(g) As the water keeps flowing continuously and its level drops, ensure that the pond end of the siphon remains under water and that the outer end is kept below the inner water level.
6. To estimate how long it will take you to drain your pond, you can use either Graphs 11 and 12 or Table 45, together with the pond water volume (see Water, 4).
|
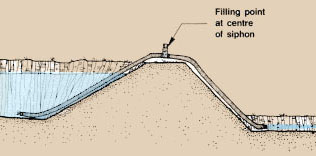
Note: in some cases, it may be useful to make a filling point at the top of the pipe. Proceed as follows:
|
 |
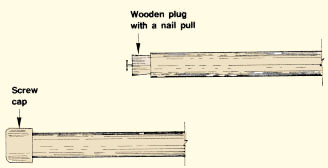
2. The pipeline should be closed at one end before you start filling the pond with water. You should preferably close the end of the pipe that is under water so that it does not become blocked by debris or even a fish. You can use, for example:
 |
 |
3. In some cases, you can also use a stand-pipe, which can be adjusted or renewed as required. This alternative is discussed in detail next in this section.
4. When you wish to drain the pond, proceed as follows:
(a) Remove the plug or cap, or open the valve; if you are using a plug, it may be useful to fix to it a metal or cord loop, which you can pull with a long-handled hook. You can even attach a pulling cord if you affix it securely.
(b) Immediately put a screen on top of the pipe end so that it does not get blocked.
(c) Keep cleaning the screen as necessary.
(d) When the pond is drained, either remove the screen and close the pipe immediately or remove the screen later, when you start filling the pond.
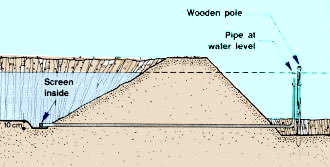
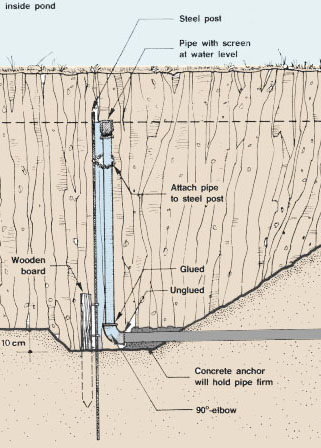
9. Similar to the flexible stand-pipe, this pond outlet is made of three rigid plastic parts:
|
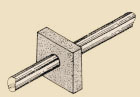
10. To ensure that the 90°-elbow, does not become separate from the horizontal pipe, either by accident or for poaching, protect it as follows: (a) Drive a treated wooden stake about 3 to 5 cm thick and 50 to 60 cm long well into the pond bottom, right in front of the vertical pipe. Choose a water-resistant wood (see Section 3.1). Drive the stake firmly into the pond base, making sure it is long enough to reach up above the top edge of the upright elbow pipe. (b) Right at the back of this stake and at its centre, drive a steel rod or a small diameter steel pipe into the pond bottom to a depth of about 1 m and attach it to the stake. It should be long enough to reach up to the top of the vertical pipe. (c) Weld a chain or tie a rope to the steel post, about 10 cm from its top end. (d) Near the top of the vertical plastic pipe, strongly fix a small device for attaching this chain or rope. You can use, for example, a steel hook, a swivel eye or a small screw-shackle. 11. This type of outlet can be set up either:
12. It is usually best to have the vertical pipe inside the pond to reduce the risk of blocking the horizontal pipe and to control leakage. |
Turn-down pipe inside pond
 |
13. When using such a turn-down pipe, remember the following points:
(a) If possible, design the opening of the horizontal pipe to be at least 10 cm below the lowest point in the pond.
(b) For additional protection, you can cover with concrete the section of the horizontal pipe that sticks out in front of the dike inside the pond.
(c) Always secure the pipe well to the steel post in front of it with the rope or chain.
(d) Tightly fit a screen on top of the vertical pipe.
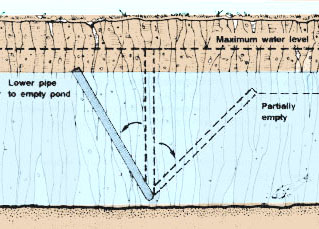
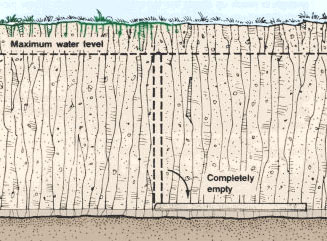
14. To regulate the water level in the pond, set the pipe at the required angle by turning it up or down. Fix it in the set position with the chain or rope.
15. To drain the pond, turn the vertical pipe down progressively, iollowing the water level as it drops. When it has reached the horizontal position, remove the elbow pipe from the end of the horizontal pipe to corroete the draif-4ng and harvest the fish.
Note: keep the screen on the vertical pipe until you detach the elbow from the horizontal pipe. At that moment, immediately transfer the screen to the front end of this pipe.
16. As with the flexible pipe, you can use this system for handling normal overflow water, because any surplus in the pond above the selected pipe level will automatically drain.
|
Using the turn-down pipe
 |
 |
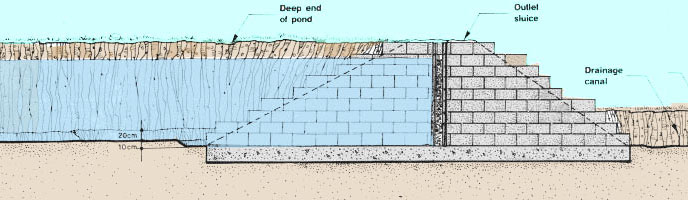
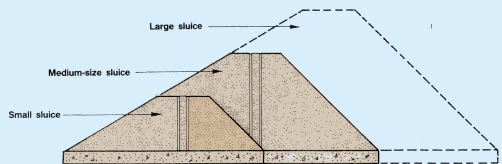
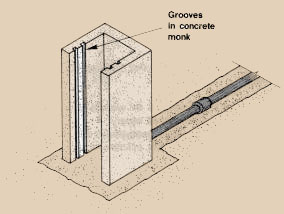
1. A sluice gate consists of a protected opening in the pond dike that can be easily closed with wooden boards to regulate water level and can be screened to avoid fish losses. Whenever required, it can discharge excess water continuously.
2. As the sluice gate is an open outlet structure, it does not require a base pipe through the dike. It has the same functions as a monk (see Section 10.5), but has some advantages:
3. However, its major disadvantage is that it is more expensive to build:
|
It takes much less material to build a monk than
a large sluice
 |
Monk
 |
4. Therefore, sluice gates are usually preferred to monks for small- to medium-size ponds only, when the dike to be crossed is relatively narrow.
|
Example For a pond dike 2 m high with side slopes 1:1.5, you will need the
following quantities of concrete (in cubic metres) to build
sluice gates 0.30 to 0.50 m wide. |
Amount of concrete(m3)
|
|||||||||||||||
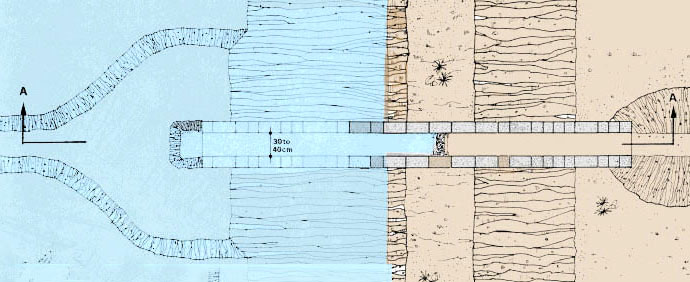
5. A sluice gate essentially consists of:
6. It is best to limit the inside width of the sluice gate to 0.80 m at the most. More than that and it becomes difficult to handle the wooden boards, particularly when the pond is full.
7. The number of grooves can vary according to the size of the pond and the method used for harvesting the fish.
8. If the pond is small, or if the harvesting is done in a catch basin built behind the sluice gate, one set of grooves built into the centre of the sluice gate may be sufficient.
9. If the pond is larger and the harvesting is done in the sluice gate itself, two sets of grooves will make harvesting easier. Build them as follows:
10. It is useful to build a simple bridge over the top of the sluice gate to allow the passage of people and light carts or barrows. It can easily be made by assembling wooden planks together, or by making a simple reinforced slab top, if you are using concrete.
11. To find out how much water you should be able to discharge through typical sluice gates, use Graph 6 and Tables 32 and 33 in Chapter 7.
12. Sluice gates can be built of various materials such as wood, bricks, cement blocks or reinforced concrete. You will now learn how to use each of these materials to build a simple sluice gate.
13. Use strong, resistant wood . Pretreat it with anti-rot compounds before use (see Section 3.1).
| 14. Determine the size of the sluice and the pieces of wood
required according to the size of your dike. If possible, build the sluice
before constructing the dike or leave enough space for the sluice, plus
its anti-seep boards, to be installed in one piece. In this case you may
be able to assemble and prepare the sluice in good working conditions
away from the pond, and then fix it firmly into place on site.
15. If the sluice is too large you will need to build it on site. 16. First excavate and clear out the required area. Pack the base area firmly with good pond soil. If pond soils are very soft, either increase the length of the vertical posts or use more of them. Alternatively you can use piling (see Section 10.7). 17. Mark out the positions for the main vertical posts. Make up the vertical posts into square frames by bolting, screwing or nailing (one point per corner) the horizontal pieces. 18. Fix the frames into position, and drive them well in. Line the frames up, making sure the horizontal pieces are level, and that they line up along the length of the sluice. |
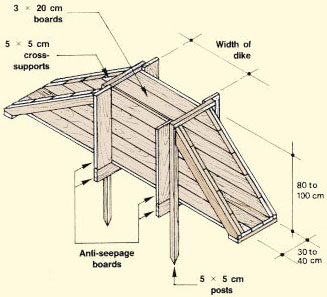 |
|
| 19. Fix the corners of the frame with additional fixings and
brackets or angle pieces if needed. Attach the internal planks of the sluice,
the external anti-seep boards and the guide rails for the sluice boards.
20. Once the sluice is firmly and squarely assembled and in place, finish any anti-rot treatment. If possible, paint over nail-, screw- or bolt-heads with varnish, paint or tar. If necessary, fill any gaps between boards, knot-holes, etc., with clay, tar, putty or mastic sealant. Fill in and pack the dike material around the structure. |
Excavate sluice trench, and clean and pack the
base
 |
|
|
Assemble the posts, cross-supports and anti-seepage
boards,
and drive the frames into the sluice trench 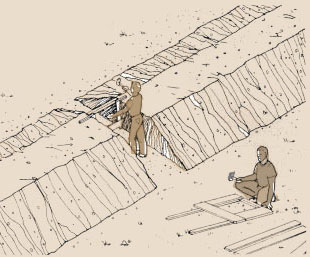 |
A finished wooden sluice gate with internal planks
in place in the trench 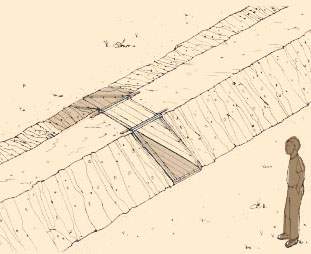 |
21. If you are using bricks or blocks, the structure is considerably heavier and needs good foundations, usually of concrete or reinforced concrete. You also need good masonry skills. You should proceed as follows (see also Section 10.7):
(a) First prepare, mark and level the site. Dig out the foundation area to the required level. If necessary, fix and level foundation piles and lay and level the bedding material.
(b) Mark out and position simple wooden forms for the concrete base and fix them well. Prepare the surfaces, for example using old motor oil. Fix any reinforcement required. If possible, place some wooden blocks 2 to 5 cm below the upper base level, in the position of the walls. Pour the concrete. Use a lean to medium mix containing 195 to 250 kg cement/ m3 (see Section 3.4).
(c) Once the concrete is well set and cured, prepare and position guide markers for the sluice walls. If you have used wooden blocks, remove these to obtain a "key" for the walls. Otherwise, make a key for the walls using a hammer and chisel to cut the foundation. Build the walls, taking particular care to ensure that inner surfaces are smoothly and cleanly finished off. If you wish, fix in attachment bolts for sluice board guides. For the best finish, it is preferable to plaster the inner walls with a medium mortar.
(d) Once the walls are completed, fix the sluice board guides, using pre-placed attachment bolts or masonry bolts and mortar. Make sure they are parallel.
(e) Carefully place and pack the dike material around the sluice structure.
|
Plan of concrete block outlet sluice |
|
Section AA |
22. You can make a stronger structure, of similar weight, by using reinforced concrete. You should proceed as follows (see also Section 10.8):
(a) Prepare the foundation area as for the brick sluice, fix the base reinforcement, and tie in any wall reinforcement that has to connect into the foundation. Take care that all reinforcement is in position. You may need to make temporary holding forms to support the vertical bars.
(b) Pour the foundation concrete and allow it to set and cure.
(c) Mark out positions, place and fix the forms or shutters for the sluice walls (note that if you are making several sluices it may be worth using steel forms that can be re-used repeatedly). Fix in any additional wall reinforcement needed, and if required, fix in attachment bolts for sluice board guides. Make sure the shutters are well secured at the base.
(d) Pour the wall concrete, tamp it well down and allow it to set and cure. Use medium-rich concrete (250-350 kg cement/m3) . Remove all the shuttering, and clean, pick out and finish off all surfaces.
(e) If sluice board guides are to be added, fix these, using pre-placed attachment bolts or masonry bolts and mortar.
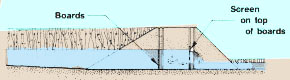
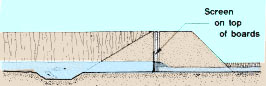
23. Before filling the pond, insert two rows of wooden boards into the set of grooves until you reach a little lower than the maximum water level. Fill the space between these rows with earth or sawdust, compacting well. Place the screen on top of the front row of boards. Fill the pond with water and check that there are no leaks at the sluice gate. If necessary, repeat the compaction process.
24. To drain the pond, remove one pair of boards and the compacted material at a time, keeping the screen on top of the front row of boards while the water flows out. When there are only two to three pairs of boards left at the bottom of the sluice gate, remove all the compacting material and the second row of boards. Then finish in one of the following two ways, according to the harvesting method:
(a) Lower the water further and harvest the fish inside the sluice gate. If there are two sets of grooves, harvest the fish in front of the screen placed in one of the rear grooves. If you need to remove the screen to clean it, first place another screen in the other rear groove.
(b) Alternately let part of the water, together with fish, flow into the catch basin where the latter can be easily harvested; repeat this procedure until all the water and fish have been drained from the pond.
|
Harvesting inside sluice
 |
Harvesting in front of sluice
 |
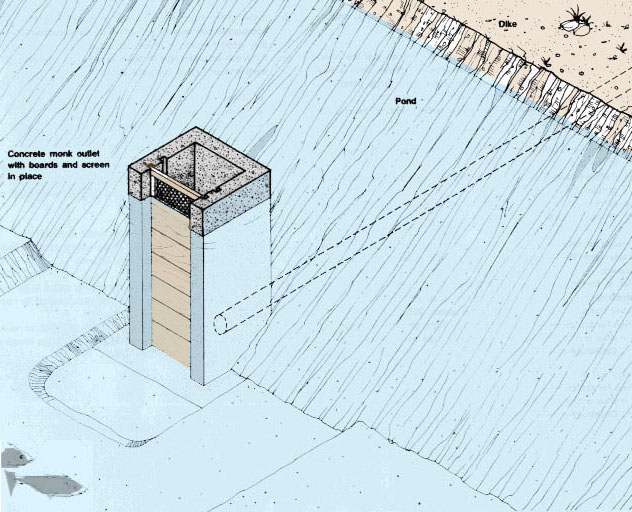
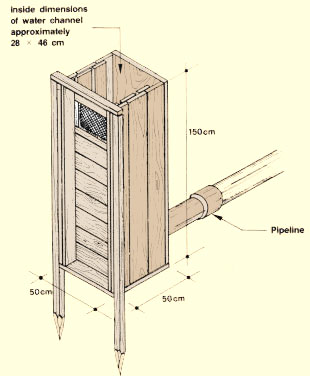
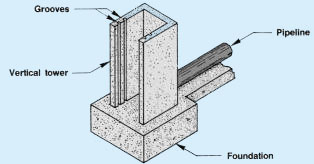
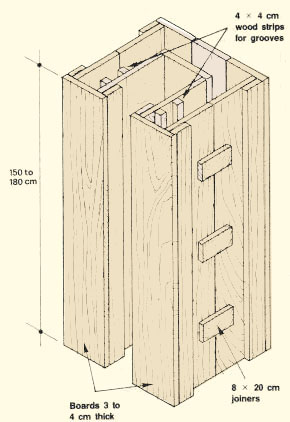
1. The monk is one of the oldest and most common pond draining structures. It consists of a vertical tower closed with wooden boards to regulate the water level. The water is discharged through a pipeline buried under the dike. A screen keeps the farmed fish from leaving the pond.
2. A monk has advantages similar to those of the sluice gate. The pond water level is easily controlled and adjusted. It can function as an overflow. It simplifies the fish harvest. In addition, a monk is more easily protected than a sluice gate, and it is more economical to build if the pond dike is large. However, it has the disadvantage of not being very simple to construct, particularly if it is built with bricks or concrete.
|
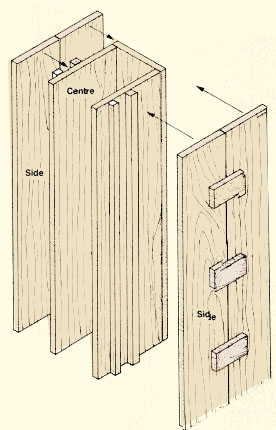
3. The complete monk outlet consists of:
|
Monk
 |
Locating the monk |
||
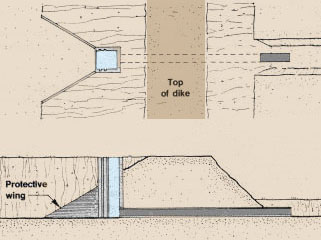
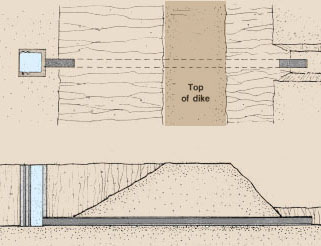
| 4. Similar to any other outlet, the monk is generally built on the side of the pond opposite the water inlet. It may be placed either in the middle of the dike or, when the water drains, for example, in a catch basin common to two adjacent ponds, in a corner of the dike. |
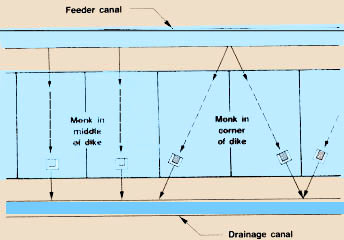 |
|
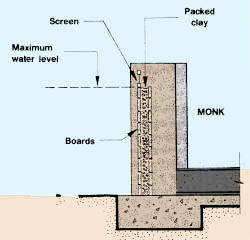
5. The monk can be built either into the dike or freestanding some distance into the pond:
|
Monk built into dike
 |
Monk built in front of dike
 |
6. The water discharge capacity of a monk depends on the inside diameter of the pipeline (see Section 3.8 and Section 10.1).
7. To estimate quickly how much water you should be able to discharge from a typical monk, use the pipe flow Tables 12, 13 and 14 from Section 3.8.
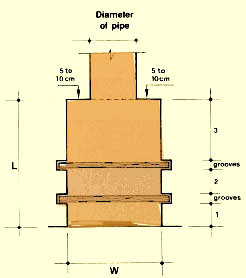
8. The cross-section of the monk increases as the diameter of the pipeline increases. Remember that:
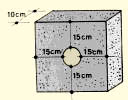
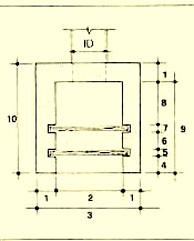
9. To be able to move the boards easily, try to limit the internal width of a monk to 50 cm at the most.
|
Example
|
|||||||||||||||||||||||||||||||||||||||
 |
Calculating dimensions for a monk
Where
|
10. The height of the monk is related to the maximum water depth in the pond. The monk should be at least 20 cm higher than this depth. Usually, the monk has the same height as the outlet dike. Unless specially designed, the height should not exceed 2.5 m.
11. Monks can be built in wood, bricks or concrete depending mainly on the availability of materials, their cost, the local technical expertise and the size of the structure.
12. The most difficult type of monk to build is the brick monk. It requires a very skilled mason to make it so that it is leak-proof. If not done properly, the mortar surfacing will have to be redone frequently, increasing maintenance costs. Generally, wooden and concrete monks are cheaper and easier to build. You will learn how to build these in the next sections.
Note: the following are some points to remember when you build a monk.
(a) The pipeline should be laid down before building the dike and the monk tower.
(b) Build a solid foundation to avoid future problems.
(c) Pay particular attention to:
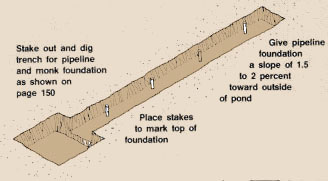
(d) Give a reasonable slope to the pipeline, preferably 1.5 to 2 percent.
(e) If you have to build several monks on your fish farm:
(f) Provide a separate overflow wherever there is danger of uncontrolled entry of flood water into the pond (see Section 11.1).
1. A simple monk outlet can be built entirely of wood. It is the easiest and cheapest type of monk to construct, although you need to be careful to ensure its watertightness and its durability. The height of a wooden monk should be limited to 2 m.
2. To build a wooden monk, select a heavy, durable wood, which is resistant to water such as iroko or mukulungu (see Table 6). To improve its durability, you can treat it with a wood preservative or use discarded motor oil. Remember to wash away surplus preservative before putting your fish in the pond.
3. Use wooden boards without knots, 3 to 5 cm thick. For example, for a 2-m-high monk tower, you will require about 0.4 m3 of wood.
Building the wooden pipeline |
||
|
4. Instead of using standard plastic or cement pipes, you can build a pipeline entirely of wood. Simply nail or screw four boards together in the shape of a box. Fix the structure well over compacted soil, and bury it underneath the outlet dike. Pay particular attention to the compaction of the dike soil around the pipeline (see Section 6.2). 5. In most cases, a foundation is not needed, but in less stable soils such as certain heavy clays, it may be useful to use simple wooden stake piling. |
Pipeline made of wood
 |
|
6. Wooden monks require hardly any foundation, as they are very light. It is normally quite sufficient to use light foundation such as paving slabs or simple wood piling, or larger boards placed flat on the pond floor.
7. Both the small- and the medium-size monks are nailed or screwed together so that the side toward the pond is open. Depending on the overall dimensions and on the width of the boards available, assemble the tower as shown in the drawings.
Note: this monk is built using boards 2 to 3 cm thick
8. It is best to screw an anchoring post on each side of the tower. First drive these two posts well into the bottom of the pond and then screw them on to the monk.
9. For a stronger structure, you can add an oblique brace to each side, supporting the top part of the tower against the pipeline.
|
Small wooden monk
 |
Parts of a small wooden monk
 |
|
|
Medium-size wooden monk Note: this monk is built using boards 2 to 3 cm thick |
Parts of a medium-size wooden monk
 |
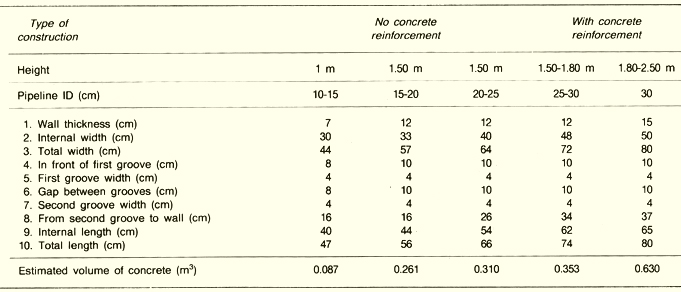
1. Monks of up to 1.5 m in height, fixed to pipelines up to 25 to 30 cm in diameter, can be built using single- thickness brick and mortar. Although taller and wider monks can be built, they require a double-width base and good bracing for stability and strength, and so become too heavy and expensive for most purposes.
2. Suggested dimensions for such monks are given in the first part of Table 48.
3. Small monks can also be built with concrete blocks and with reinforced concrete. In general, the principles of construction are similar (see paragraph 4 onwards), with the following exceptions:
|
TABLE
48 |
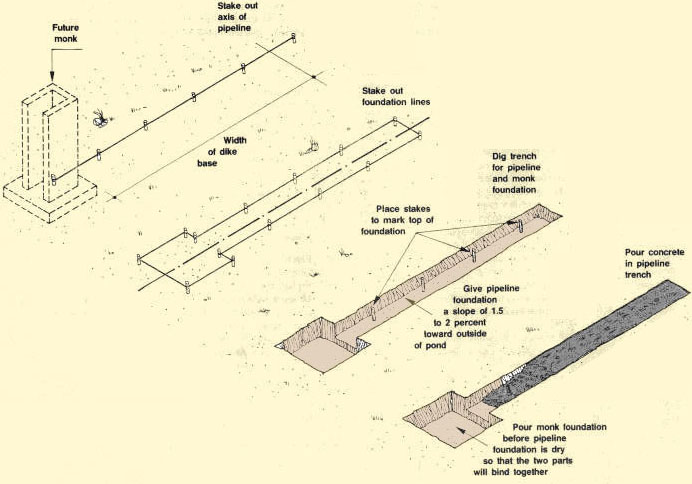
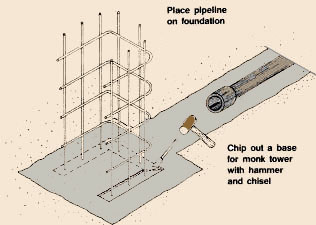
5. To prepare the foundation for a monk pipeline, you can proceed as follows:
(a) Excavate and compact well the area along which you plan to build the pipeline. The level of this area should be at least 10 cm lower than the lowest point in the pond.
(b) Stake out with a marker line the centre line of the pipeline, usually perpendicular to the centre line of the outlet dike (see Section 3.6, Topography). The line should extend to 50 cm beyond the pipeline length at each end.
(c) On each side of this centre line measure a distance equal to half the outside diameter of the pipeline plus 10 to 15 cm. Stake it with marker lines, starting at the back wall of the monk tower. These are the foundation lines.
(d) Remove the central stakes and line, and between the foundation strings, dig a trench whose depth should be:
(e) Prepare the bottom of the trench carefully, giving it a slope of 1.5 to 2 percent toward the outside of the pond.
(f) Drive in stakes down the centre of the trench and adjust their height to the designed thickness of the foundation and the 1.5 to 2 percent slope.
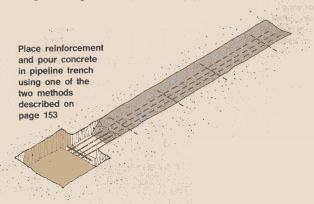
(g) Prepare a lean concrete (175 kg cement/m3).
(h) Place the concrete in the prepared trench. Adjust its surface level to the level of the top of the stakes. Tamp it well, protect it, and let it cure for two days. (For information on cement concrete, see Section 3.4).
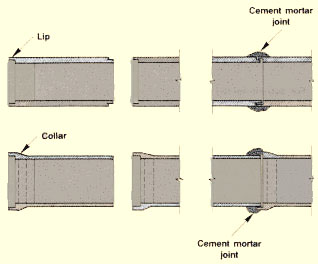
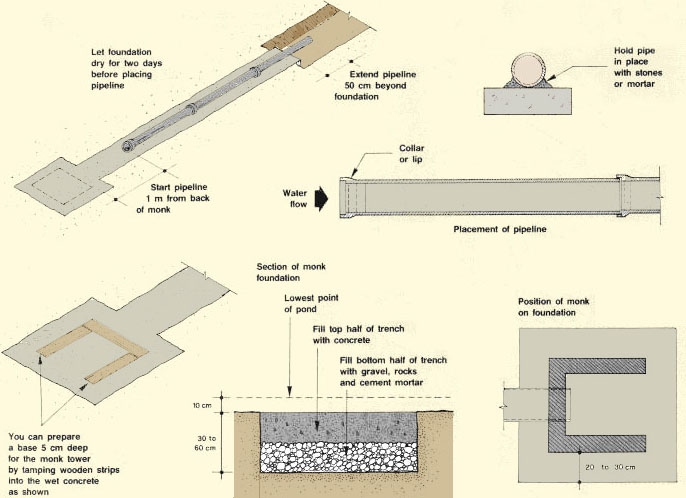
6. When the foundation is ready, lay the pipeline as follows, according to the type of pipe you are using:
(a) If you are using cement or ceramic pipes:
(b) If you are using plastic pipes, there are two main types of connection:
7. For both types, the overall laying procedure is similar to that for cement pipes, although there is less need for joint anchoring, because the pipe joints are typically 3, 6 or even 9 m apart.
8. In the case of solvent-welded pipes, the joints are as strong as the pipe itself, and so the pipe needs less protection from movement. Also, as plastic pipes are flexible and smooth inside, they can deform slightly but still drain well. Therefore it is not necessary to use stiff foundations. It is possible in firm soils to eliminate them altogether, but in soft soils, 5 to 15 cm foundation should be sufficient.
9. For push-fit pipes, pay particular attention to the following:
(a) Make sure joint ends are absolutely clean and free from rough edges (e.g. that come from sawing the pipe), and that the rubber seal ring is not twisted, crushed or broken, and is properly seated.
(b) Use a suitable lubricant on the pipe. Silicon grease is best, but even soapy water will do. Push the pipe in until it reaches the end of the socket. Do not use too much force, as you may split the socket.
10. For solvent-welded pipes, proceed as follows:
(a) Clean the pipe, preferably with the recommended cleaning solution, and apply the cement as instructed. Make sure it is spread all around the pipe.
(b) Push the pipe into the socket. Do not twist it as this may cause "channelling" in the joint, leading to leaks.
(c) Ideally a thin ring of, solvent should appear all around the end of the socket; if this is the case, you should have a good weld.
Note: solvent cements are commonly of two types:
11. Check the pipes and the solvent tin carefully to make sure they match.
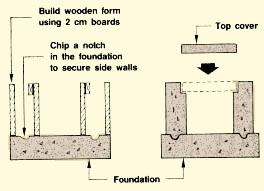
Using a concrete culvert |
||
| 12. A concrete culvert can also be considered. You can easily build it yourself, on top of the prepared foundation, using wooden forms for the two lateral walls and precast slabs for the top cover. Build the culvert up to the back wall of the monk tower. Smooth out its bottom surface well with cement mortar. |
 |
|
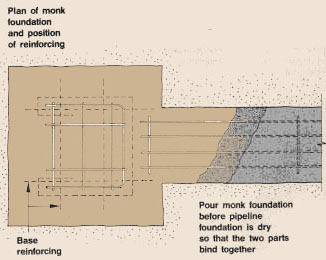
13. As discussed before, the monk tower foundation should be built at the same time as the pipeline foundation. However it is generally thicker than the latter. Proceed as follows:
(a) Starting from the pipeline axis, stake out the tower foundation and mark with lines. The tower foundation usually has a square shape. Its dimensions should be larger than those of the tower:
(b) Between the marker lines, dig a hole whose depth will vary according to the quality of the soil:
(c) Remove all stakes and lines.
(d) Level the bottom of the hole properly.
(e) Fill this hole with foundation materials:
(f) Tamp these materials well and adjust the surface level, as required by the design, so that it is at least 10 cm below the lowest point in the pond.
(g) Protect the surface of the concrete, keep it moist, and let it cure for at least two days.
(h) Remove the wood blocks, leaving the foundation ready for the walls.
Remember: the solidity of a monk tower depends mainly on the stability and strength of its foundation. You should prepare a good foundation for your monk.
|
PREPARING A FOUNDATION FOR PIPELINE AND MONK
|
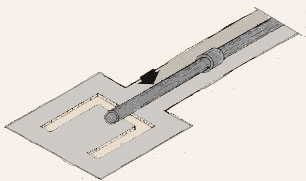
|
If you did not use wooden strips to form
a base |
Place a length of pipe from front end of pipeline
|
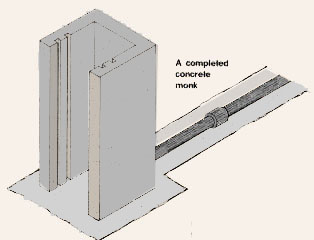
|
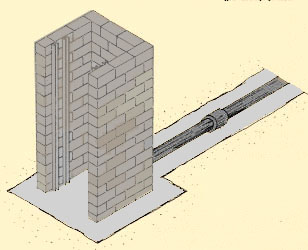
A completed brick or block monk
 |
Note: see section 10.9 for details on how to build two kinds of wooden forms for pouring concrete monks |
Preparing a piled foundation |
||
|
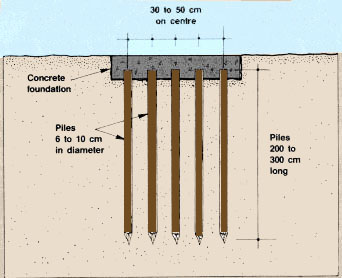
14. In very soft soils, for example those with significant plastic clay content, the use of simple piling will improve the strength of the foundation, In most cases, wood or bamboo can be used, although it is preferable to use durable woods (see Section 3.1). They are typically driven several metres into the ground using a hammer. It is simplest preferable to use durable woods (see Section 3.1). They are typically driven several metres into the ground using a hammer. It is simplest to test first, using 2 to 3 m of pile, 6 to 10 cm in diameter, hammering it in until it will go no further. Cut the remainder of the pile, leaving a short stub above the surface. With this as a guide, you can select a suitable standard length of pile. If any pile fails to drive in completely, cut it to leave a stub, as with the test pile. These simple piles are set at approximately 30 to 50 cm from centre to centre. The normal foundation is then built on top of the piles. Note: to increase stability, some piles can be driven in at an angle, which has the effect of increasing the base area and tying in the foundation more securely. |
 |
|
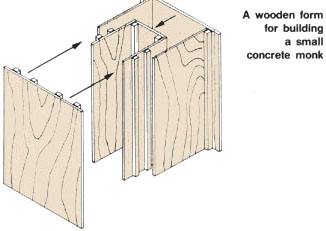
15. To build the monk tower in concrete, you need a wooden form in which to pour the concrete. If you have to build several monk towers of the same dimensions, you can use the wooden form several times, saving time and money. You can also borrow it from or lend it to neighbours and share its cost among a group of people. You will learn more about wooden forms in Section 10.9. (Refer to Section 3.4, for more details about concrete preparation and placing.) You will learn more about wooden forms in Section 10.9. (Refer to Section 3.4, for more details about concrete preparation and placing.)
 |
A completed small concrete monk
 |
16. When you have the wooden form ready on site, proceed as follows:
(a) With two stakes and a line, mark out the longitudinal centre line of the monk foundation. It extends directly from the pipeline centre line.
(b) With nails and a line, mark out on the concrete foundation the exact position of the three tower walls to be built, at similar distances from the longitudinal centre line.
(c) If wooden blocks have been used to make the shape of the wall footings, the next stage is quite simple; if not, you will have some more work. Using a hammer and chisel, make deep lines in the concrete surface, about 2 cm from the strings and outside the position of the walls.
(d) Break the concrete surface between these lines to a depth of about 5 cm. Clean away the broken concrete. This small gully will be used to reinforce the junction of the tower and its foundation.
(e) Clean the elements of the wooden form well, removing any dry concrete. Apply used motor oil to their inside walls so that they can be easily removed from the concrete after it has cured.
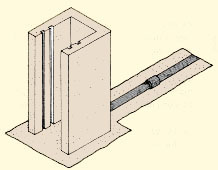
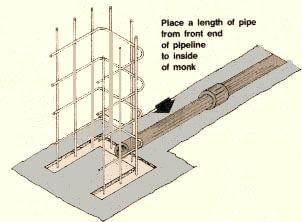
(f) Get a piece of straight pipe long enough to run from the pipeline through to the inside wall of the monk. It should have the same diameter as that of the pipeline.
(g) Place it at the back of the tower, on the centre line of the pipeline, making sure that it overlaps the inside wall slightly. Block it well in place.
(h) Assemble together the elements of the form; check that the form is well centred, both around the piece of pipe in its back walls and in the gully prepared in the foundation.
(i) Brace the assembled form strongly so that it will not move while the concrete is being placed.
(j) Prepare a relatively soft rich concrete (350 kg cement/m3), (see Section 3.4). The quantity required to fill the form can be readily estimated from the dimensions chosen for the tower:
Example
The monk tower is 1.30 m high. The thickness of the walls is 12 cm. Internal width is 33 cm and internal length is 44 cm. The volume of concrete required is obtained as:
Refer to Table 9 (Section 3.4) for concrete at 350 kg cement/m3. Mix 90 kg cement with 113 l sand, 200 l gravel and 50 l water.
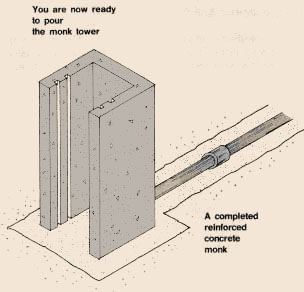
(k) Place the concrete into the form to fill it progressively by layers, tamping each layer well before pouring the next one.
(l) Protect the top of the fresh concrete and let it cure for at least 24 hours before removing the form. Be very careful not to break any part of the concrete, particularly next to the vertical grooves.
(m) Join the pipe piece, which has been placed in the tower, to the pipeline with mortar.
(n) Using ordinary mortar, complete the connection of the tower base with the foundation, both outside and inside. Finish the foundation inside the tower smoothly.
(o) If necessary, finish the grooves smoothly. Their quality can be improved by cementing 4-cm-wide U-irons into the concrete grooves.
Note: if you choose to use U-irons as grooves, enlarge the grooves made by the concrete forms slightly to about 5 cm.
1. Larger monks, higher than 1.5 m and including a pipeline with an inside diameter greater than 25 cm, should be built of reinforced concrete.
2. If you use the dimensions shown in Table 48, for monks with concrete reinforcement, the result will be a monk tower roughly square in shape (72 x 74 cm or 80 x 80 cm, for example), depending on the size of the pipeline.
3. Larger monks are usually equipped with commercially available pipes, either of asbestos cement or concrete, laid down on a good foundation. Such a foundation should be built together with the monk tower foundation. Proceed as described in Section 10.7 with the exception of some dimensions, which should be increased as follows:
(a) The width of the foundation should be at least 30 cm wider than the outside diameter of the pipeline.
(b) The thickness of the foundation should be:
4. To build this foundation you can use rock and mortar for the lower half and lean concrete for the upper half.
5. You can build a thinner foundation (about 15 cm thick) if you use reinforced concrete.
6. One method is as follows:
(a) Fill the bottom half of the trench with concrete.
(b) Tamp it well and level properly.
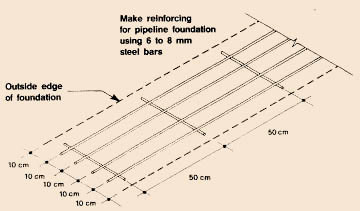
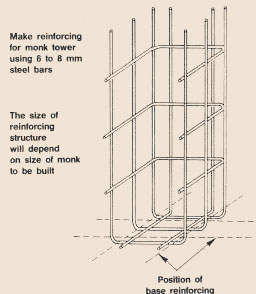
(c) Place the reinforcement (6-8 mm diameter steel bars at about 10 cm intervals, with 6-8 mm cross-bars at about 50 cm intervals tied to these) on top of the wet concrete.
(d) The reinforcing should run the whole length of the pipeline foundation and extend enough to tie in with the monk foundation.
(e) Then, when the concrete below is still wet, cover the reinforcing with more concrete to the top of the trench.
(f) Tamp it well and level properly.
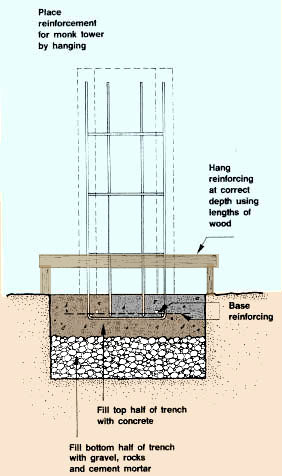
7. An alternative method is as follows:
(a) Hang the reinforcing at the midpoint of the trench using lengths of wood and wire hangers.
(b) Fill the whole trench with concrete and at the same time tamp it well.
(c) When the trench is full to the top, level it properly.
8. When the foundation is ready, lay down the pipeline as explained above for smaller monks (see Section 10.7).
9. If you use 30-cm diameter asbestos cement pipes, you can greatly improve their durability by coating them with 10 cm of soft lean concrete. Do this after finishing all the joints of the pipeline and before building the monk tower.
10. The monk tower foundation is to be built at the same time as the pipeline foundation, as described earlier for smaller monks (see Section 10.7, paragraph 13) except for the following:
(a) The foundation size should be larger than the tower base:
(b) The foundation thickness should be:
(c) When placing concrete in the top half of the foundation:
11. You have learned earlier (see Section 4.5) about steel bar reinforcement for concrete. In this section, you will learn more about this through two specific examples of monks.
12. If you want to build a reinforced monk tower 1.50 m high, with a draining pipeline of 25-cm inside diameter (Table 48, type 4), prepare the reinforcement as follows:
(a) Get about 20 m of 6-mm diameter steel bar reinforcement; cut the following lengths and shape them as indicated:
(b) Assemble them as shown in the drawing, attaching them together at their intersections with 1-mm diameter soft annealed wire:
13. If you want to build a reinforced monk tower 2 m high with a pipeline of 30-cm inside diameter (Table 48, type 5), prepare the reinforcement similarly to the above, as follows:
|
(a) Get about 25 m of 6-mm diameter steel bar reinforcement; cut the following lengths and shape them as indicated:
(b) Assemble them as shown in the drawing, attaching them together at their intersections with 1-mm diameter soft annealed wire. |
 |
|
 |
 |
 |
Note: see section 10.9 for details on how to build two kinds of wooden forms for pouring concrete monks
14. As explained earlier, you need a wooden form in which to pour the concrete (see Section 10.9). To build the tower, proceed as described in Section 10.7, paying particular attention to the following points:
(a) To improve the junction of the foundation and the tower, break the foundation surface where the tower base will sit and all around the vertical reinforcement bars.
(b) Secure the small section of pipe well in the prolongation of the existing pipeline, at the right level in the prepared gully, and within the steel reinforcement.
(c) Assemble the elements of the wooden form together without displacing the steel reinforcement.
(d) Make sure that this reinforcement rises evenly between the sides of the wooden form - it should not run too close to either side. Secure it well there and brace the form so that it will not move when placing the concrete.
(e) Compact the concrete well (see Sections 3.4 and 3.5) without disturbing the position of the reinforcement.
(f) Remove the form very carefully.
(g) Finish the junction between the foundation and the tower with ordinary mortar.
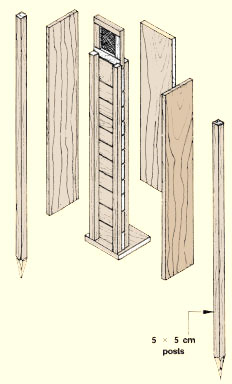
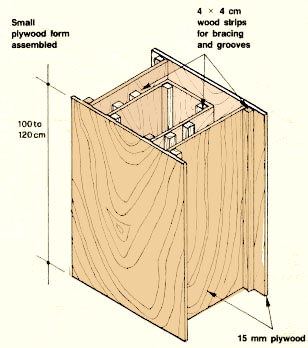
1. In Section 3.4 we dicussed general points on preparing wooden forms for concreting. In this section, you will learn more about the specific design of these forms for building concrete monks.
2. For the construction of small monks about 1 m high at the most, you can use a form made of wood strips and plywood 1.5 cm thick. The drawings show you how to build this kind of form.
 |
 |
Note: if you want a three-groove monk, add one more groove strip to this design
(Adapted from a design by J. Miller, FAO Expert in Rural Fish Farming Development)
3. You can build a simple form made of 3- to 4- cm thick planks. The next drawings show you how to build this kind of form.
|
Medium-size wooden form assembled
 |
Parts of a medium-size wooden form
 |
|
|
The front and back pieces of this wooden form
hold
the centre and side pieces in place 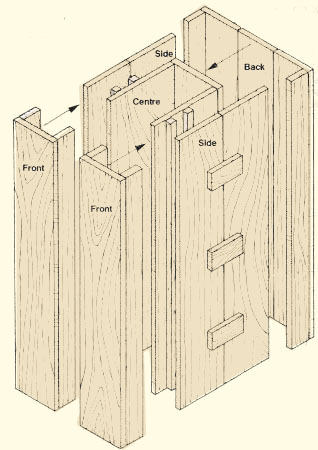 |
||
| Note: if
you want a three-groove monk, add one more groove strip to this design
Note: similar wooden forms can be used to construct sluice gates, water distribution and diversion structures in concrete and reinforced concrete |
||
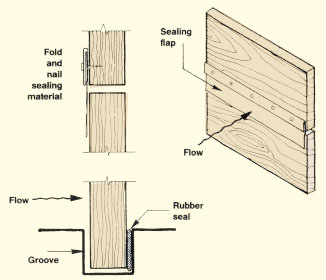
1. Normally, a sluice or a monk is equipped with two pairs of grooves, in which boards are inserted up to the desired water level. To prevent water seepage, the gap between the rows of boards is filled with compressed material such as clayey soil or sawdust.
2. While the pond is in operation, a screen should be fitted on the top of the front row of boards to keep the fish from getting out if the water level should rise. a screen should be fitted on the top of the front row of boards to keep the fish from getting out if the water level should rise.
3. A very small sluice or monk, however, may have only a single row of grooves and boards. In this case, you can prevent seepage by packing strips of jute burlap between the grooves and the boards. The joints between the boards can also be sealed using polythene or rubber flaps.
|
|
 |
 |
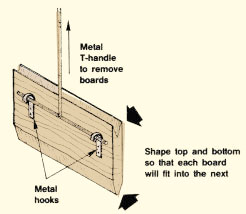
6. Boards for monks and sluices should be made of durable wood, resistant to water and with limited swelling, such as doussie, iroko or mukulungu (Table 6).
7. Size varies according to the dimensions of the structure but, in general, the following rules should be adopted:
8. It is important that the wooden boards do not fit too tightly into the grooves after the wood has swelled under water. If this happens, it will be very difficult to remove the boards when necessary.
9. You can improve the fitting of the wooden boards on top of each other and reduce water losses by:
10. If your monk is rather high and wide, it will be easier to remove the boards from the top of the monk using a handle with a T welded at its end. You can easily have one made by a blacksmith. At the back of each board, secure two steel bolts or hooks to lift it.
11. Another way to reduce water leakage is to use old inner-tube rubber to make a simple seal:
 |
 |
![]()