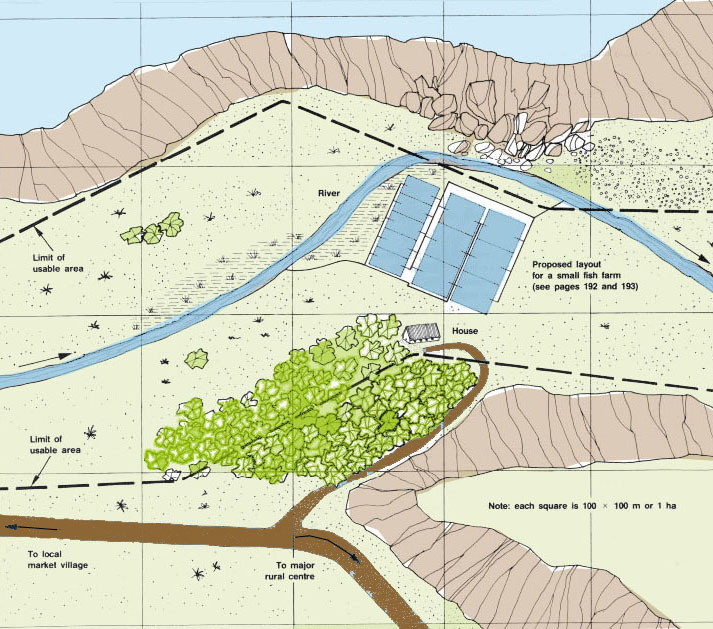
The selected site
1. In the previous chapters you learned how to:
| 2. You have selected a good site both from the technical and economical aspects (see Sections 2.2 and 2.3). You have surveyed this site in detail for its topography and its soils. On these bases and according to your requirements, you have laid out your fish farm and prepared a detailed topographical plan of it (see Section 2.6). |
The selected site
|
3. Now has come the time to decide on the following important issues:
(a) When will the construction begin (see Section 12.1).
(b) Who will construct the farm (see Section 12.2).
(c) How will the construction be done (see Section 12.3).
4. These decisions may lead to further activities, all of which are looked into in this chapter:
(a) Some more detailed plans and drawings may have to be prepared (see Section 12.4).
(b) A series of specifications for the contractor may have to be prepared (see Section 12.5).
(c) A detailed schedule of activities may have to be drawn up (see Section 12.6).
5. Finally, and in all cases, you will wish to know in advance
how much the construction of the fish farm will cost
(see Section 12.8).
1. Before deciding at which time of the year you should build your fish farm, you should ask these questions:
(a) When is the site easily accessible?
(b) When is the soil relatively dry, soft and easily workable?
(c) Will there be water available to fill the pond shortly after building it?
(d) Does it need to be prepared for stocking with fish at a particular time?
(e) Will there be labour, machinery and materials available at that time?
(f) Should I consider building the farm in stages, over several seasons?
2. Accessibility to the site and workable conditions are particularly important if you plan to use machinery for the earthwork. Remember that for materials and supplies such as sand, cement, gravel, wood and pipes, access to the site by vehicles may also be required. It is best to fill the pond with water shortly after construction to avoid the growth of weeds.
3. Under extreme conditions, select the season for construction using the following guidelines;
4. When building a barrage pond, it is best to select the period when the flow of the stream to be dammed is minimal.
1. There are three possibilities:
2. You should consider constructing all or part of the fish farm yourself, for example when:
3. If you decide to construct a larger farm yourself, before starting its construction you should:
4. If you decide to employ a contractor to do part or all of the construction work, it is simplest to discuss a direct contract with a known contractor and to agree with him on an all-inclusive price for the job. This contractor should not only have the required technical qualifications, but should also have reliable financial credentials.
5. In this last case, you do not have to decide for yourself the best way in which to construct the fish farm according to your plans. This should be done by the contractor. But first, you will have to prepare plans and drawings (see Section 12.4) and specifications for the contract (see Section 12.5). The contractor will base the price of the contract on these plans, drawings and specifications. Compare this price with your own estimate (see Section 12.8) and accept it only if they do not differ too much.
1. If you have decided to construct your fish farm yourself, you have two choices of ways to proceed:
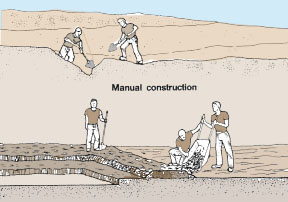
2. The choice largely depends upon the size of the farm to be built and on the availability of machinery. Very small farms up to 1000 m2 are usually built using manual labour only. It is also important to have the farm constructed within a reasonable time to bring it into production and reduce the time before earnings are made on your investment.
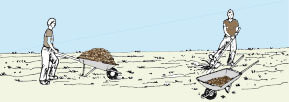
| 3. For manual construction you will need simple equipment such as picks, hoes, shovels and wheelbarrows. It can be done by yourself and your family, assisted by some friends if necessary. You can also contract someone to dig the pond manually for a fixed price based on the earthwork. The size of individual ponds generally does not exceed 400 m2 . From the volume of earthwork required, you can estimate how long it will take you to build each pond and, if necessary, how much it would cost you to subcontract its construction (see Section 12.8). |
 |
|
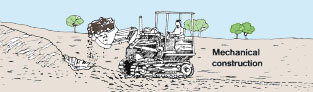
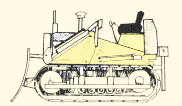
| 4. Mechanical construction is done with earth-moving machines such as bulldozers and wheel loaders (see Section 4.8). Compaction equipment can also be used. This construction method is much faster and not necessarily more expensive than using manual labour only, but it requires the selected site to be accessible to the machinery and to have adequate soil conditions, It also requires skilled operators. The amount of earthwork should be large enough to justify the costs of transporting equipment to the site. One way of reducing these costs would be to join your neighbours and build several fish farms in the same area, using the same machinery. |
 |
5. Normally, you would hire the services of a contractor who owns the necessary equipment. This is usually done either with a price determined by the nature and amount of work to be done or for a weekly, daily or hourly rate. While the latter could be cheaper, you should make sure that the operator is skilled, and be careful if there is a risk of the machinery breaking down or getting stuck during construction. Before discussing the contract, it is best to estimate yourself the volume of earthwork to be done and, from this, the machinery time needed (see Section 12.7). You can do similar calculations for other types of construction work, such as site preparation and dike compaction. Remember that it will always be necessary to use manual labour as well, particularly for finishing the construction.
6. A mixed method is often the most advantageous way to construct medium-size fish farms. This only involves the use of earth-moving equipment, for example an ox-drawn scoop or scraper or a small bulldozer, as discussed in Chapter 4, to speed up the main earth movements. All other types of work are done manually.
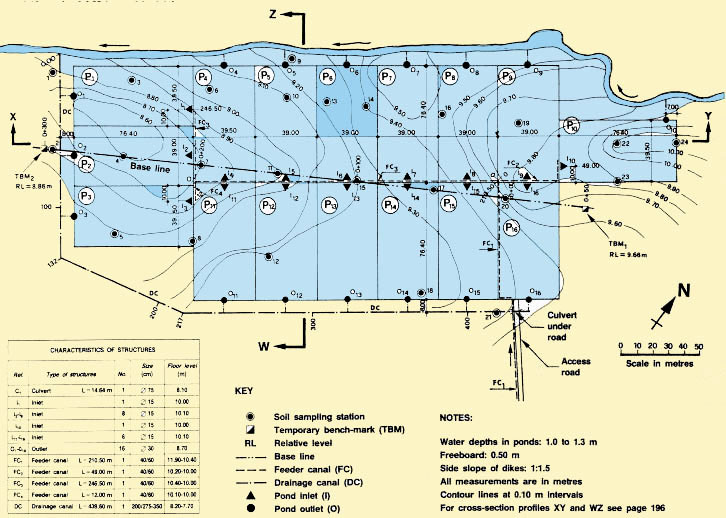
1. At the beginning of this manual (see Section 2.6), you learned how to prepare a topographical plan showing the site elevations and the proposed layout of the fish farm, including all its structures.
2. If the fish farm to be constructed is rather small (less than 5 000 m2) you will not usually need to prepare more detailed plans. It is usually sufficient to mark the main dike boundaries and estimate the volumes of earth required. You will only need to use detailed calculations and markings if the ground is very irregular (see Sections 6.4 to 6.8). As distances are not great, the planning of earth movements is not so important.
3. The most useful additions to the existing topographical plan are the following:
 |
|
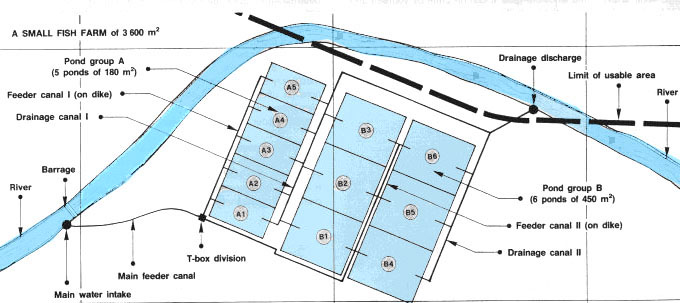
General layout for a small fish farm
 |
 |
 |
4. It may also be useful to prepare detailed drawings of the various structures as a basis for estimating their individual cost (see Section 12.8) and for their construction. Elevations should be clearly indicated to avoid any mistakes later.
5. If the fish farm to be constructed is larger (greater than 5 000 m2), it is advisable to prepare more detailed work plans to be closely followed during construction. For each fish pond prepare a topographical work plan in the following way:
(a) Survey the site area in more detail, either by radiation or using a square grid as discussed in Sections 8.1 and 11.4, Topography, 16. This survey is best done after partial clearing of the vegetation (see Sections 5.2 to 5.5), and it should provide you with accurate information on the positions and the levels of the pond site area. At this stage you will have pegged out the pond area.
(b) Start drawing the topographical work plan of the pond area, including all surveyed points.
(c) Determine the best excavation depth to balance cut and fill volumes according to the type of pond (see Sections 6.4 to 6.8).
(d) Make sure that these calculations tie in with the required feeder and drainage canal levels, and that local soil conditions such as areas of rock, permeable soil, sources of clay, etc. are taken into account.
(e) Try to minimize the distances you move earth within the pond, particularly if you plan to build the pond by hand. As an approximate guide, on flat ground you should aim to transport the earth no more than about one quarter of the pond's width and on steeper slopes, no more than two-thirds of the pond's width.
(f) Make sure that access roads or tracks, feeder canals and drains are laid out to service the site efficiently and well.
Note: in some cases, particularly for large sites with many ponds, it may be necessary to move earth from one area of the site to another. Allow for the extra earth volumes taken away or brought into the pond. Check that the earth volumes balance out over the whole site.
(g) Determine the key elevations of the pond.
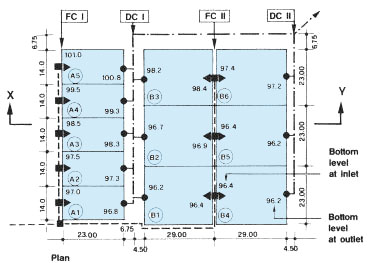
(h) Complete the topographical work plan of the pond by entering the following information on it:
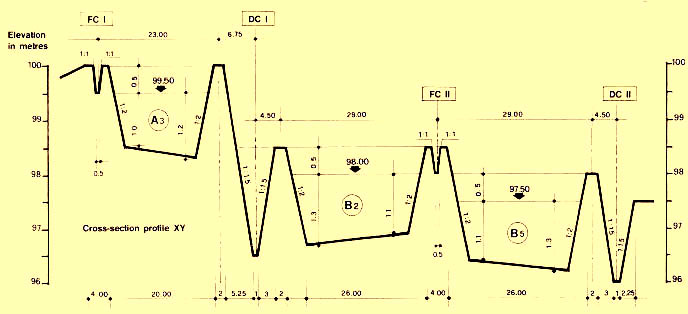
6. It is also better to prepare cross-section profiles of the site and the ponds in two perpendicular directions, especially if the site is sloping and if the ponds are to be constructed at different elevations. Indicate on them the key elevations of the ponds and other structures.
7. Add to the existing topographical plan of the fish farm all information relating to the feeder/drainage canals, road system, service buildings, etc., which do not appear on the work plans.
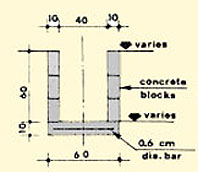
8. Prepare detailed drawings of the various structures, indicating clearly their key elevations and giving a reference number to each kind of structure.
|
Typical structures for a larger fish farm
|
|
|
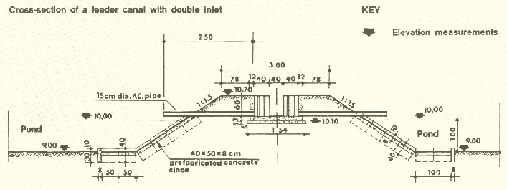
Cross-section feeder canal |
Cross-section of a feeder canal with double inlet
|
|
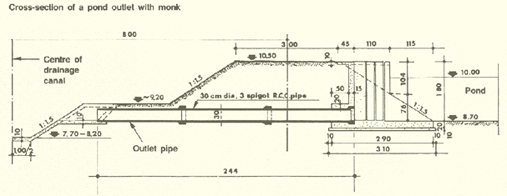
Cross-section pond inlet NOTES: Elevation measurements are in metres; all other measurements are in centimetres |
Cross-section of a pond outlet with monk
|
|
Typical cross-section for a larger fish farm |
1. Preparing the specifications for the construction of a larger fish farm can be a very complicated task, and this should be carried out by a qualified technician or engineer. However, if your fish farm is small (less than 5 000 m2), you may prefer to prepare the specifications yourself for its construction under contract, preferably with some assistance from your extension agent.
2. Make a detailed list of the non-technical specifications, under the following headings:
3. List the technical specifications clearly and in detail, referring to available topographical plans and detailed drawings (see Section 12.4). These specifications should deal separately with the earthwork and the structures as follows:
(a) Earthwork specifications:
(b) Structure specifications, listing type and quality of materials to be used in each case, such as:
4. To be able to give a price quotation for the construction contract, the contractor will require all the above specifications together with topographical plans and detailed drawings.
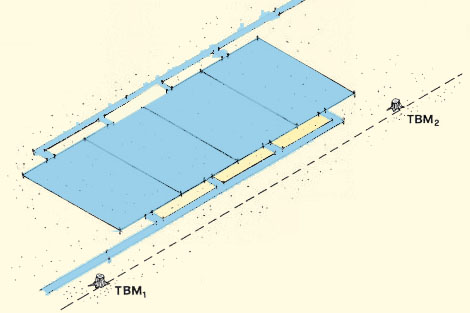
1. If you have decided to construct the fish farm yourself, you should prepare a realistic schedule of activities to help you plan for the required inputs.
2. Before starting construction work, in most cases it is necessary to have a preparatory phase in which you will:
|
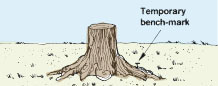 |
3. The temporary bench-marks (TBMs) that you establish allow you to determine and check by levelling the elevations of the dikes, canals and other structures (see Section 8.1, Topography, 16). The main points to consider are that:
|
Stake out ponds and canals and establish temporary
bench-marks |
4. The construction of one or more ponds and structures can then be initiated, following a sequence which varies according to the type of pond, as suggested in Table 50. Not all the steps are necessary in all cases, but depend on the farm design and the kind of structures to be used.
5. You may need to change the order of construction in particular circumstances.
(a) Under swampy conditions or whenever the flooding of the site is to be avoided, it is best to build the drainage system of the farm first.
(b) Whenever the ground is flat (slope less than 0.5 percent), it may be easier to build the drainage canal first, then the inlet canal and then to adjust the levels of the pond dikes and bottom accordingly, at an intermediate elevation.
(c) For small artisanal ponds, it may be easier to finish building the dikes before building the pond outlet. Then you need to cut the dike, put in place the outlet structure, and then rebuild the dike on top.
|
Sunken pond
 |
Diversion pond
 |
|
|
Barrage pond without diversion canal
 |
Barrage pond with diversion canal
 |
6. On the basis of this information, prepare a schedule of activities showing:
|
Schedule of activities |
7. You can improve this schedule of activities by adding a background time scale (in weeks for example) and by showing for each activity:
8. To do this, use the working standards which are given in the next section together with your earthwork estimates and the list of structures to be built.
|
Schedule of activities on a week basis |
1. You will use working standards both before construction starts and during its execution, for example:
2. In the following paragraphs, general standards useful for fish farm construction are provided.
Working standards for manual earthwork |
||
|
3. These working standards will vary mainly with the nature of the soil. The harder the soil, the more difficult it is to work it and the lower the work outputs. The presence of excess water also decreases outputs, particularly in heavy and sticky clays.
|
Manual earthwork
 |
|
|
Example
|
|||||||||||||||||||||||||
| * One 400 m2 diversion
pond ** Two 200 m2 diversion ponds *** Four 400 m2 diversion ponds and two 100 m2 diversion ponds + Including concrete |
|||||||||||||||||||||||||
|
4. When planning earth movements, you should take into account that to minimize costs, distances should be limited as follows:
|
 |
5. Working standards for earthwork with manual labour are given in Table 51. These are the average outputs to be expected from labourers of average strength working for eight hours at digging and throwing the earth 1 m away. The minimum values are for excavating and throwing 1 m away by hoe. The maximum values refer to the use of pick and shovel under similar conditions. These outputs should be slightly reduced as the throwing distance increases.
6. For excavating and forming canals, the output for a trained labourer varies from 0.8 to 1.2 m3 /day.
|
TABLE 51
|
||||||||||||||||||||
7. The nature of the soil determines the excavation method. If the soil is soft, it may be possible to work with a shovel only. If the soil is harder, it is best to first use a pick to loosen the soil before shovelling it away. In this case, the following outputs can be expected for each team of labourers:
8. A standard metal wheelbarrow can transport from 30 litres (0.03 m3) to 60 litres (0.06 m3) of earth. Preferably, you should limit the transport distance to 30 m at the most. For planning purposes, you can then calculate the following:
(a) Estimate the number N of earth loads to be transported over a short distance per working hour as
N = 60 min ÷ (loading time + transport time)
where
loading time averages 1.5 minutes per load; and
transport time is based on the total distance to be covered and an average walking speed of 50 m/min on level ground or 40 to 45 m/min on sloping ground carrying the full load uphill. Downhill slopes will similarly increase transport speed.
Note: it is possible to reduce average loading time and even make it zero by using many wheelbarrows.
Example
You transport earth on level ground over a distance of 20 m. Per working
hour, you will be able to make:
N = 60 min ÷ [1.5 min + (40 m at 50 m/min)]
= 60 min ÷ (1.5 min + 0.80 min)
= 60 min ÷ 2.30 min = 26 trips
(b) Estimate the amount of excavated earth you can load in one wheelbarrow, for example 0.045 m3.
(c) Estimate how many effective working hours there will be for each working day, taking into account resting periods, which normally total about 25 percent. For example, each eight-hour working day may provide six effective working hours.
(d) Estimate the earthwork volume to be moved daily for each wheelbarrow from the above figures.
Example
(e) To service each wheelbarrow for transport distances up to 30 m, you will need at least:
|
 |
(f) You might need additional workers at particular spots:
 |
 |
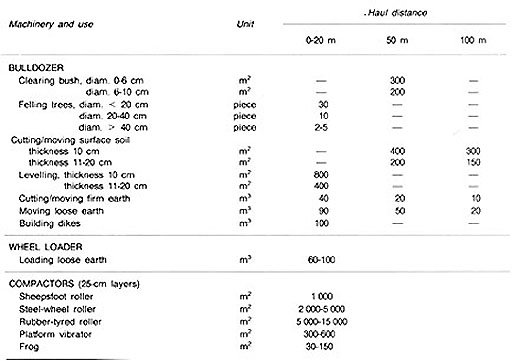
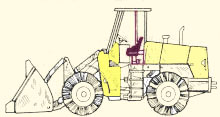
9. Working standards for the most commonly used earthworking machinery are given in Table 52. These machines are particularly useful if relatively large areas of land are involved.
10. Bulldozers' output increases as the engine power increases, as shown in Table 53. These are approximate outputs for normal soil conditions and for a maximum transport distance of 50 m by pushing. Lower outputs should be used as soil conditions worsen, for example in heavy/sticky clays.
Example
One contractor calculated the average time necessary to construct one 2500 m2 diversion pond, as part of a 5 ha commercial farm as given here.
|
| * When completely filled. In practice, filling is usually
30 to 60% of this, depending on site conditions ** Excavations by layers less than 0.5 m thick. Transport over 50 m at most, in good site conditions |
|
|
Bulldozer
 |
Wheel loader
 |
|
|
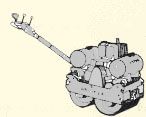
Compactors
 |
 |
11. To build a brick wall (half-stone pattern), you will require about 50 bricks per m2 . A good mason can place at the most 600 to 800 bricks per eight-hour day. Note, however, that walls should not be built up more than about 50 cm/day.
12. To mix and cast concrete, the required labour varies from eight work-hours/m3 (without reinforcement) to ten work-hours/m3 (with reinforcement).
Note: it is possible to estimate output by defining the time for each trip based on: excavation of blade load 0.5-1 min; pushing, 2 km/h; returning 4-5 km/h; turning, positioning, gear change 0.5-1 min; allow a maximum of 50 minutes per hour utilization. These output figures decrease considerably in difficult site conditions such as sloping ground.
1. The construction costs of fish farms vary considerably from place to place, depending particularly on such factors as:
2. By estimating the cost of several alternatives, you will be able to compare them and select the cheapest way. A good solution to reduce the overall cost of the fish farm is to reduce the cost of its structures, for example by fitting the plan as well as possible to the local conditions, choosing a cheaper material and planning for smaller, better adapted structures. You can also reduce cost by developing the farm stage-by-stage, so that earnings from early production can help to pay for later stages of construction. While trying to save on construction costs, beware of:
|
TABLE 54
* The higher the number, the greater the cost |
3. When deciding on which materials to use, it is also important to take into account the useful life of the structures (Table 54). As the useful life increases, the annual depreciation cost of the item (original cost ÷ useful life) decreases, (see Section 16.7, Management, 21).
4. Maintenance costs can also vary according to the type of material used for the construction of a structure. They increase, for example, from concrete to masonry to treated hardwood.
5. Major items of cost for the construction of a fish farm include site preparation, pond construction, water control structures and water transport structures. Other costs may include detailed topographical and soil surveys, pegging of the construction works and miscellaneous expenses such as the settling basin, protection canal, access roads, fencing and service buildings.
6. Additional structures can be constructed according to the needs of the management of the fish stocks such as harvesting and feeding. This is discussed in detail in Management, 21. You should calculate the cost of each item separately. A first estimate of the total cost is obtained by adding all these individual costs together. The final estimate is this first estimate increased by 10 to 15 percent for contingencies.
7. For manual construction only, the cost estimate is based on the working hours required and on the materials to be used. Whenever machinery is involved, individual cost estimates are obtained as follows:
(a) Site preparation:
(b) Pond construction, where the dikes' volume should be equal to excavation volume:
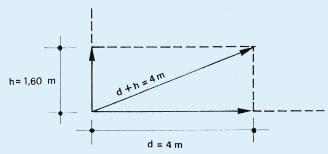
Note: average transport distance d can be estimated according to the local topography and the pond width w, somewhere between d = 0.25 w for flat ground and d = 0.66 w for steep slopes.
(c) Water control structures, where the individual price is determined according to quantity (length/weight/volume) of materials needed and unit price of each material, plus labour cost for construction.
(d) Water transport structures, where the price of the excavation and forming of water canals is calculated according to excavation volume.
Example
A paddy pond 20 m x 20 m = 400 m2 is to be constructed on a flat area of land, with the dikes' cross-section being 2.50 m2 . The vegetation cover consists of cleared rain forest and the topsoil to be removed is 0.20 m deep. The structures are:
|
Construction cost estimate for this 400 m2 paddy pond is obtained as follows:
|
![]()