3. ESTIMATES OF WATER FLOW
3.0 Introduction
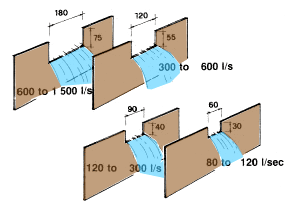
There are a number of good ways to measure the amount of water in a stream or a canal. What method of measurement you should use will depend on several factors:
- The accuracy of the result needed;
- The quantity of water present in the stream or canal you will measure;
- The equipment you have available to use.
Let us compare various methods. Table 3 will help you to compare various methods and to select the one best suited to your needs. Each of these methods is fully explained and illustrated in the following sections.
Note: to find the time it will take to fill or empty a pond using a straight pipe or a siphon, see Sections 3.7 and 3.8.
NOTE: * very simple; ** more difficult; *** most difficult. |
|
Examples
|
|
|
|
|
|
|
|
If you find that your water requirements are no greater than those seen in the examples, you do not need to make any more water flow measurements. |
If you find that your water requirements are greater than those seen in the examples, you should use one of the more accurate methods to measure the water flow so you will be sure that you have sufficient water available. |
|
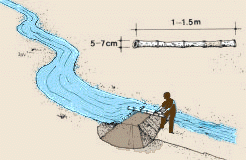
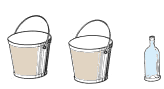
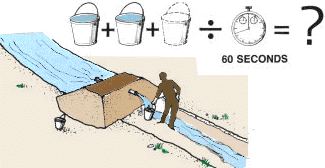
When the dam is about half built, put in a pipe about 5-7 cm in diameter and about 1-1.5 m long. This pipe can be made of bamboo. Finish building the dam across the stream so that all the water flow passes through the pipe. Find at least two buckets or other, similar containers which you can use to catch the water flowing through the pipe. You will also need a bottle or other, smaller 1-litre container. |
|
|
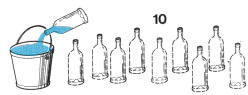
Using the 1-litre container, count the number of litres needed to fill the buckets with water, in order to find how much each bucket will hold. |
Example
|
|
Using one bucket after the other, catch all the water flowing through the pipe for 1 minute (60 seconds). Count how many buckets you can fill during that time. Calculate the total water flow (in l/s). Example
|
|
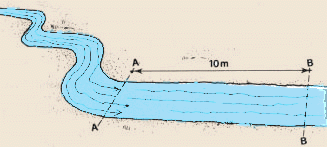
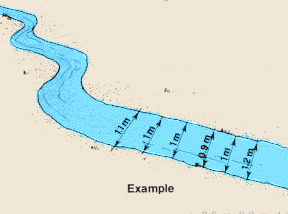
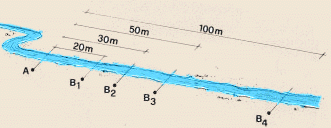
Find the average widthMeasure the width (in m) of the stream in a number of places. Take the measurement that occurs most frequently as the average width. Example
|
|
Find the average depthMeasure the water depth (in m) of the stream at several points along its width. Take half of the deepest measurement as an approximation of the average depth. Example
|
|

Calculate the water flowTo calculate the water flow (in m3) multiply the average water velocity (in m/s) by the average width (in m) and by the average depth (in m). |
Example |
|
| Note: remember that 1 m3 = 1 000 l so multiply by this to convert water flow measurements to litres per second (l/s). |
Example |
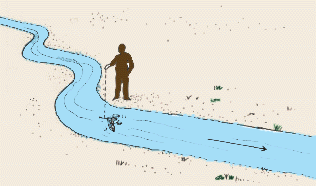
3.4 Float and cross-section methodThis is a simple method for measuring small to large water flow with an accuracy somewhat greater than the float method described in Section 3.3. Like the float method, it is best used in calm water and during periods of good weather when there is little wind. You will need to prepare a float as you were shown in the previous section. |
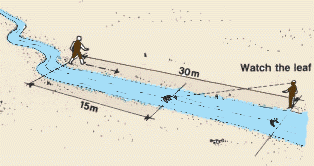
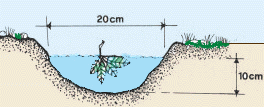
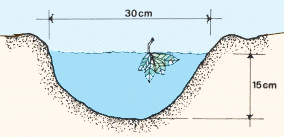
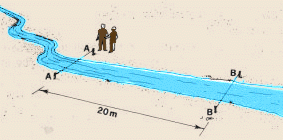
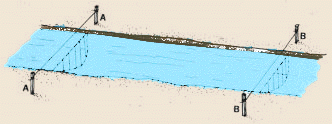
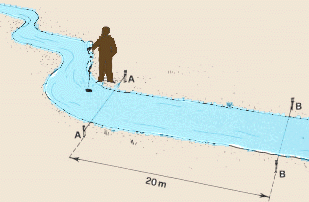
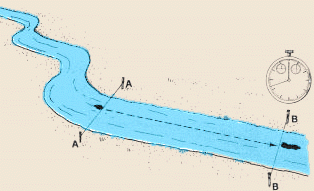
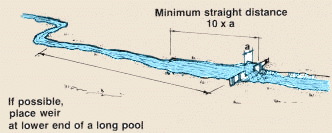
Where to measureFind a length along the stream that is straight for a distance of at least 20 metres. Try to find a place where the water is calm and free from water plants so the float will float easily and smoothly. Mark it with stakes on both sides of the stream at points AA and BB and stretch a line between the stakes. |
|
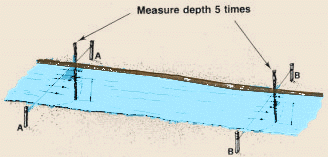
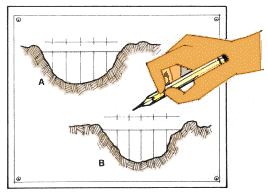
| When you have taken all the measurements at point AA, add the five depth figures and divide by 5 to find the average water depth at AA. |
Example
|
|
| The cross-section (in m2 ) at point AA is the average depth multiplied by the width of the stream. |
Example
|
|
| Now take measurements at point BB as you did at point AA to find the average depth, stream width and cross- section at BB. |
Example |
|
| To calculate the average cross-section of the stream at points AA and BB add the two cross-section values you found and divide by 2. |
Example |
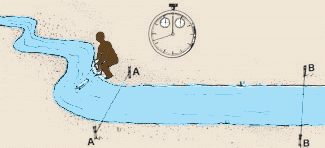
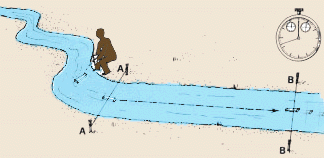
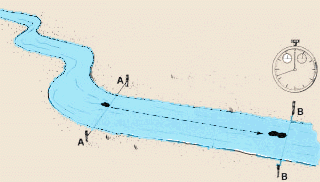
Find the average water velocityNow you must find the average water velocity using a float as described in previous section 3.3. Have a friend put the float in the middle of the stream, a few metres upstream from line AA, and release it gently into the current. Stand at line BB and, using a watch, measure exactly the time (in seconds) it takes the float to travel the distance from AA to BB. |
|
|
|
Repeat the measurement at least three times and calculate the average time by adding all the measurements and dividing by the number of measurements you have taken. Now divide the distance from AA to BB by the average time to find the surface velocity of the water, and multiply this by 0.85 (a correction factor) to estimate the average water velocity. |
Example
|
Calculate the water flowTo calculate the water flow (in m3/s) multiply the average water velocity by the average cross-section. |
Example
|
|
| To express this water flow in litres per second (l/s), multiply the result (in m3/s) by 1000. |
Example
|
|
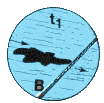
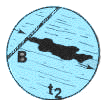
Measure the time (t2, in seconds) it takes for the end of the dye stain to reach line BB.
|
|
|
| Calculate the average time it takes the front and back of the dye stain to reach line BB by adding t1 and t2 and dividing the result by 2. | Example | |
|
Calculate the water velocity (in m/s) by dividing the distance from AA to BB (in m) by the average time (in s). Note: when you use a dye stain you do not have to multiply the water velocity by a correction factor as you do when using a float. |
Example
|
|
| Calculate the average cross-section of the stream as described in section 3.4. |
Example
|
|
| The water flow equals the water velocity multiplied by the average cross-section. |
Example |
Note: you can increase the accuracy of this method if you increase the distance from AA to BB or increase the number of time measurements as described in the previons section.
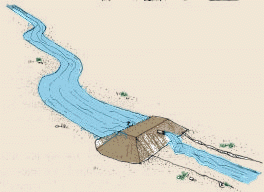
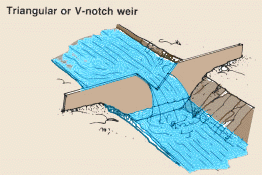
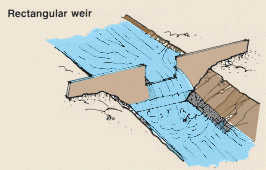
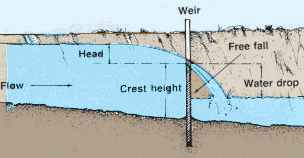
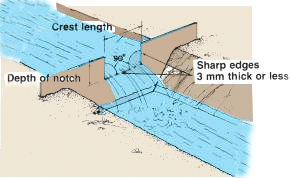
3.6 Weir methodsWeirs are commonly used to measure small and large water flow with high accuracy. They are especially useful for recording water flow over a period of time. |
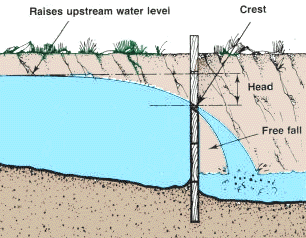
|
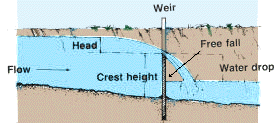
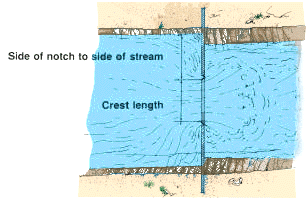
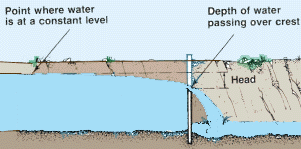
When a weir is in place across the stream it raises the upstream water level. To be efficient, a weir should create a sufficient vertical drop between the notch bottom and the downstream water surface. In such a case, the water will fall free, and air can circulate beneath the water as it overflows. The crest of a weir is the bottom edge of the weir notch. In a rectangular weir the crest length is the width of the notch. In a triangular (or V-notch) weir the crest length is zero. The head of the weir is the vertical distance
from the weir crest to the undisturbed upstream water surface.
|
|
Advantages and disadvantages of weirsAdvantages:
|
|

|
Disadvantages:
|
|
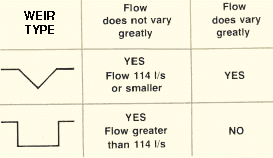
How to choose a suitable weirFirst estimate the stream flow by using the float and cross-section method described in Section 34. |
||
|
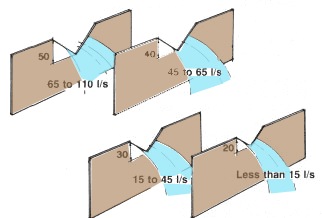
Use a triangular weir if the stream flow to be measured:
Use a rectangular weir if the stream flow to be measured:
|
|
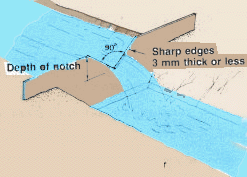
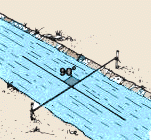
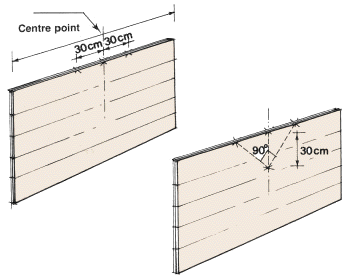
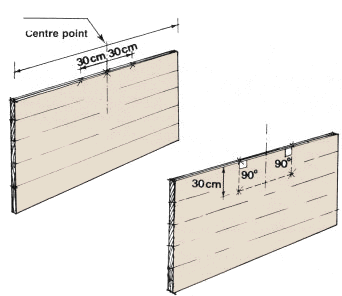
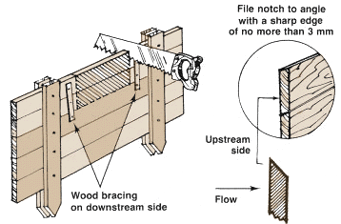
How to design a triangular weirA triangular weir or V-notch weir has a notch that is a right or 90° angle. Both edges of the notch must be sharp and no more than 3 mm thick. |
|
|
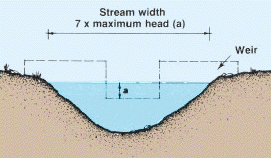
Note: before you begin to build the weir, plan carefully in order to meet the above requirements of head, crest height and water drop. Be particularly careful about the stream width (if possible more than seven times the maximum water head) and the depth of the stream where you plan to install the weir. After the weir is built it will be difficult to change it. |
|
When you estimate water flow using a triangular weir, the error will tend to increase as the head decreases. Under field conditions, if you have fulfilled the requirements listed, the error will generally be limited to 10 percent. In a triangular weir, if you want to decrease the error further you can increase the notch depth, within the limits stated above, which will increase the head. The following notch depths (in cm) are required for the sizes of water flow (in l/s) shown:
|
|
|
If the water flow is more than the largest water flow figure shown above (110 I/s) you will have to approximate the required notch depth. Using Table 4, find the head (in cm) corresponding to the maximum water flow (in I/s) to be measured and add about 10 cm to the head value to obtain the corrected notch depth. |
|
How to design a rectangular weirThe type of rectangular weir discussed in this section has a rectangular notch with a crest length that is less than the width of the stream. All three edges of the notch must be sharp and no more than 3 mm thick. |
|
|
|
To obtain accurate water flow measurements with a rectangular weir, be sure that:
Note: before you begin to build the weir, plan carefully in order to meet the above requirements of head, crest height and water drop. Be particularly careful about the stream width (if possible more than seven times the maximum water head) and the depth of the stream where you plan to install the weir. After the weir is built it will be difficult to change it. |
|
|
When you estimate water flow using a rectangular weir, the error will tend to increase as the head decreases. Under field conditions, if you have fulfilled the requirements listed, the error will generally be limited to 10 percent. In a rectangular weir, if you want to further decrease the error you can reduce the crest length, within the limits stated above which will increase the head. Table 5 may help you to do this. The following notch depths and crest lengths (in cm) are required for the water flow range values shown:
|
|
|
|
To define notch dimensions for a rectangular weir other than those shown above, you can use the white upper part of Table 5. Locate the maximum water flow (in l/s) to be measured, keeping the crest length (in cm) as small as possible. Read horizontally the corresponding head (in cm) and add 10 to 15 cm to find the notch depth you should use. |
Example
|
How to build and install a weirHow you build and install a weir will depend on the speed of
the water flow and the size of the stream. |
|

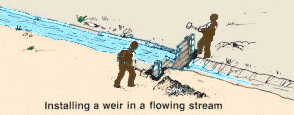
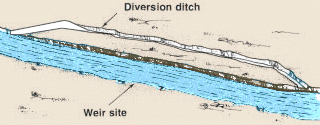
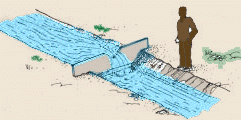
In a flowing streamIf there is a slow water flow or the stream is small, you may choose to build the weir on the bank, where it is dry and easier to work, and install the weir in the flowing stream after it is finished. With a very small stream, a weir that has been built on the bank can be installed by pounding it into place or digging it into the sides and bottom of the stream while the water is flowing. Note: if there is a fast water flow or the stream is large, you may choose to build the weir in place in the stream. The larger the stream, the larger the weir will have to be; it may turn out to be too large and heavy to build it on the bank and place it in the stream after it is finished. |
|
|
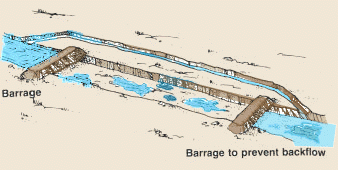
Build a barrage just below the upstream end of the diversion ditch. When the water backs up behind the barrage it will flow through the ditch, around the site and back to the stream. To prevent the water diverted downstream from flowing back into the site you may have to build another barrage below the weir. |
|
|
|
When the water has been diverted and the site is dry, you can begin to build the weir in place. After the weir is finished, remove the barrages and let the water back in the stream channel. It will soon reach its constant level and begin to flow through the notch.
|
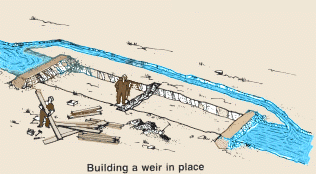 |
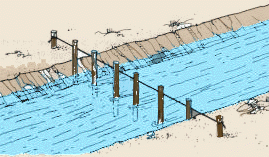
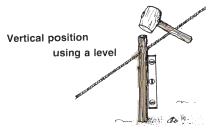
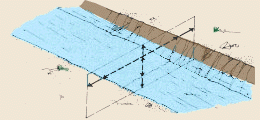
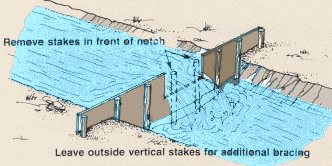
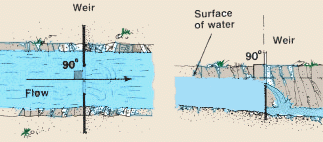
Position of the weir in a streamA weir must be placed or built in the stream in a vertical position and on a line across the stream perpendicular to the water flow. Mark the position you have chosen for the weir by stretching a line across the stream from bank to bank at a right (90°) angle to the water flow. Drive a row of strong wood stakes into the stream bed along the line. Use a level to make sure the stakes are vertical. This row of stakes will help you to position the weir properly, whether it has been built on the bank before installation or built in place in the stream. |
|
|
 |
 |
|
|
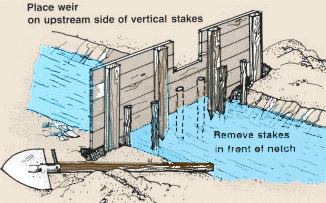
When you are installing a weir that has either been built on the bank, or is being built in place in the stream where the water has not been diverted, position the weir on the upstream side of the vertical stakes so that the flow of the water holds the weir in the correct position against the stakes. After the weir has been well installed in the banks and bottom of the stream, you can remove the vertical stakes if the weir needs no additional bracing. If the water flow is strong and additional bracing is needed, remove only the stakes behind the notch. |
 |
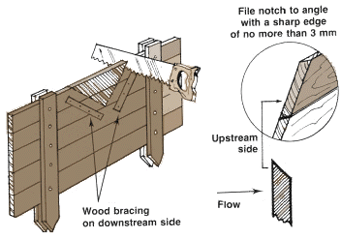
Building a weir of woodYou can build a weir of close-fitting wood boards or planks held together by upright pieces of wood on both sides. The thickness of the wood you should use will depend on the width of the stream and the force of the water flow. For a very small stream you can use light wood, but for a large and fast stream you will need to use heavy wood or timber. |
|
|
| Measure the width of the stream and the distance from the tops of the bank to the stream bed to find out what size of weir you must build. A weir must be built high enough and wide enough so that it can be driven well into the stream banks and bottom to give the necessary support and to prevent water leakage around the sides and under the weir. |
 |
|
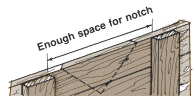
| Build the weir in such a way that there is enough space in the centre between the uprights for the size of notch you will need. |
 |
|
|
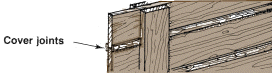
Cover the joints between the wood boards or planks with strips of wood to prevent water leakage. After the weir has been built, you are ready to cut the notch in the upper edge. |
 |

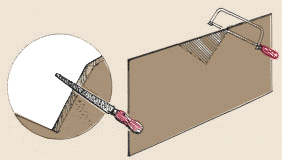
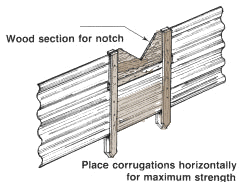
Triangular weirHow to construct a 90° triangular notch in wood:
|
|
|
|
Rectangular weirHow to construct a rectangular notch in wood:
|
|
|
|
|
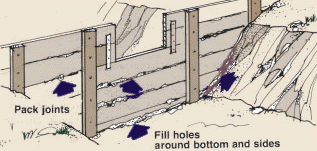
| When the weir is in position in the stream and has been well built into the banks and stream bottom, make sure it is watertight. Pack the joints between the boards with moss, clay or greasy cotton waste. Fill all the holes along the bottom and sides of the weir by packing them with clay, sod or turf. |
 |
Building a weir with other materialsYou can also build a weir with sheet metal or corrugated roof
sheeting.
|
|
Sheet metalThe thickness and strength of the sheet metal you will have to use will depend on the speed of the water flow and the size of the stream. When you cut a notch in sheet metal be careful that the edges are straight and sharp. You might ask the local blacksmith to help. |
|
|
|
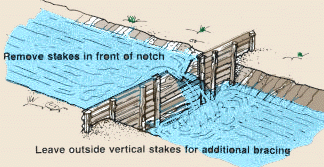
Note: if a weir made of sheet metal needs additional bracing, leave the vertical stakes you have put in the stream to mark the position of the weir, but be sure to remove those stakes in front of the notch.
|
|
Corrugated roof sheetingCorrugated sheeting is usually easy to find in large sheets and much less expensive than sheet metal. Corrugated sheets have the disadvantage of bending along the corrugations. If the corrugations are placed across the stream and the weir is well built into the banks and stream bottom, the sheet will be quite strong.
|
|
|
| A notch cut in a corrugated sheet will be irregular and will give a less accurate result. To avoid this, fit a section of wood into the centre of the sheet and cut the notch in this as described earlier for a regular wood weir. | ||
| Note: if a weir made of corrugated sheeting needs additional bracing, leave the vertical stakes you have put in the stream to mark the position of the weir, but be sure to remove those stakes in front of the notch. |
 |
|
|
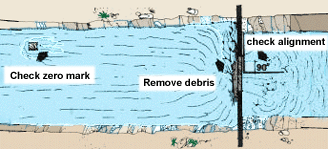
For accurate measurement it is essential that your weir:
While you are installing a weir or building a weir in place, check this regularly. |
 |
Using a weir to determine water flowA weir is used to determine water flow by measuring the head, or the difference between the level of the crest of the weir and the water level upstream from the weir. The level of the water actually passing over the crest of the weir will not be as high as the water level upstream because, as water flows closer to the weir, the level begins to drop before it flows over the crest. |
|
|
|
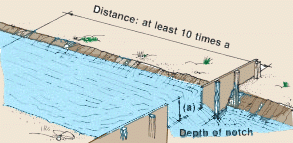
To measure the head, or the constant upstream water level equivalent at the weir, you will have to transfer a point equal to the crest height at the weir to another point upstream where the water level will be constant. Find the upstream point by measuring a distance above the weir that is a least 10 times the depth of the weir notch. |
 |
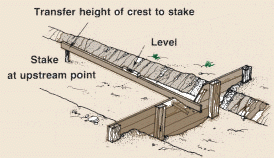
| Drive a stake into the stream bottom
near the bank at the upstream point you have selected. Use a mason's
level and straight board and transfer the height of the weir crest
to the stake. Continue to drive the stake down until the top is
at the same height as the weir crest. |
 |
|
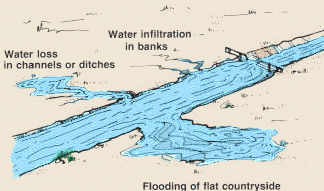
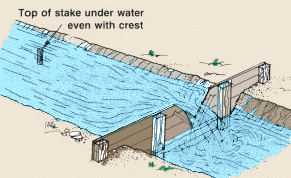
Now let the water flow back into the channel. Be sure to close the diversion ditch so that when the level rises behind the weir no water will be lost in channels or ditches or by infiltrating or flooding (see p. 63). When the constant upstream level has been reached, the top of the stake will be under water. Check to see that the weir is built properly and all requirements have been met. Find the head by placing a measuring stick, with the zero mark at the bottom, on top of the stake and reading the depth figure at the surface of the water. |
 |
Preparing an upstream point to measure the head when you have not diverted the water flow |
||
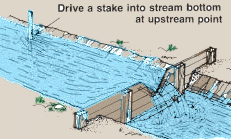
| If you have not diverted
the water from the channel to build the weir, you will have to
prepare this upstream point while the water is in the channel.
Drive a stake into the stream bottom near the bank at the upstream point you have selected. The stake should be tall enough to remain above the surface when the level of the water reaches its maximum height. |
 |
|
|
Hold a measuring stick, with the zero mark at the bottom, in the weir notch. The length of the measuring stick should be a bit longer than the notch is deep. Using a mason's level and straight board, transfer the height of the top of the measuring stick to the stake and mark it. |
|
|
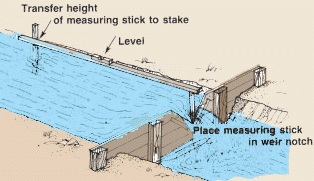
|
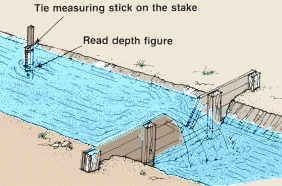
Remove the measuring stick from the notch, place it beside the stake and tie the top of it to the stake, even with this mark. Check to see that the weir is built properly and all requirements have been met, either for the triangular weir or for the rectangular weir. Find the head by reading the depth figure on the measuring stick at the surface of the water.
|
 |
|
|
We have seen previously that triangular weirs are generally used for measuring small water flows while rectangular weirs are used for measuring large water flows. For this reason, measure the head in a triangular weir with a measuring stick graduated in half -centimetres and the head in a rectangular weir with a measuring stick graduated in centimetres. Note: when you are measuring the head at the upstream point, be careful not to disturb the water surface (by standing in the water, for example), which may make the head reading inaccurate. |
 |
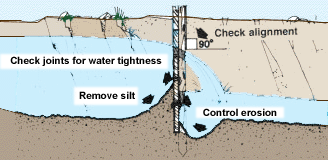
Maintaining a weirTo insure accurate water flow estimates using a weir you must maintain it regularly:
|
|
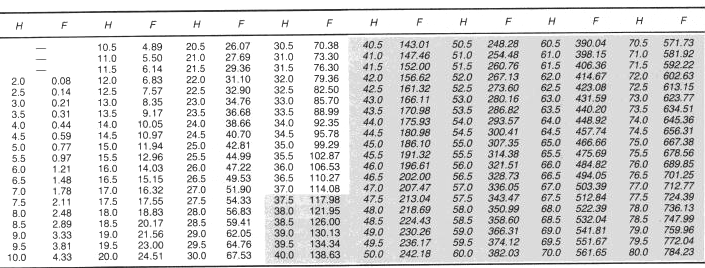
How to calculate water flows using a weirTriangular weir |
||
| When you use a triangular weir, measure the head value (to the nearest half -centimetre) on the upstream measuring point. When you have found the head value, use Table 4 and find the water flow (in l/s). |
Examples |
|
Note: remember that triangular weirs are best suited
to measuring water flows of 114 l/s or smaller. When using Table 4,
all values higher than F = 114.08 l/s and H =37 cm will become less
and less accurate as H and F increase above these values.
|
TABLE 4 NOTE: The grey section is less accurate. |
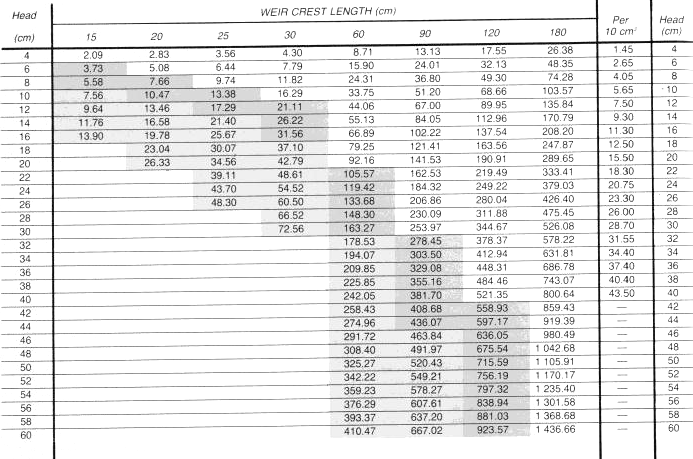
Rectangular weir |
||
| When you use a rectangular weir, measure the head value (to the nearest centimetre) on the upstream measuring point. When you have found the head value, use Table 5 and, in the column corresponding to the weir crest length, find the water flow (in l/s). |
Example |
|
| If you find in-between or odd-number head values, you will have to approximate to find the correct water flow value. Only even-number head values are shown in Table 5. |
Example |
|
|
If the crest length of your weir is greater than 30 cm and is not listed in Table 5 (e.g., 40, 50, 70 and 80 cm), you can calculate the water flow value by using the 10-cm column, at the right of the table, and by following the steps as in the next example below.
|
Example
|
|
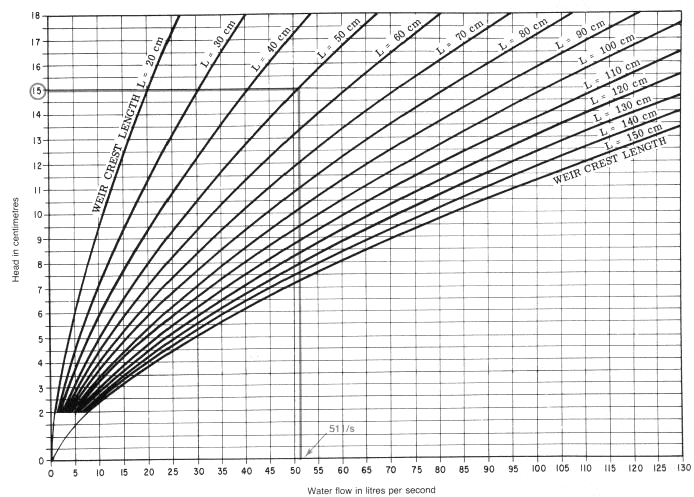
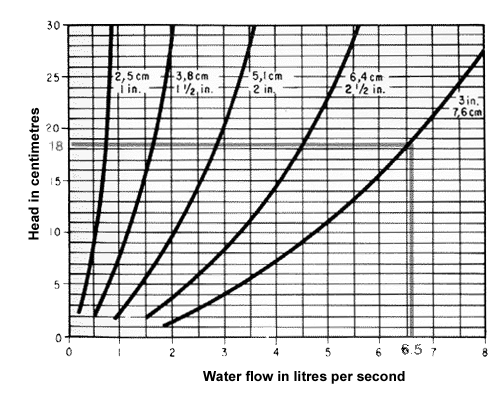
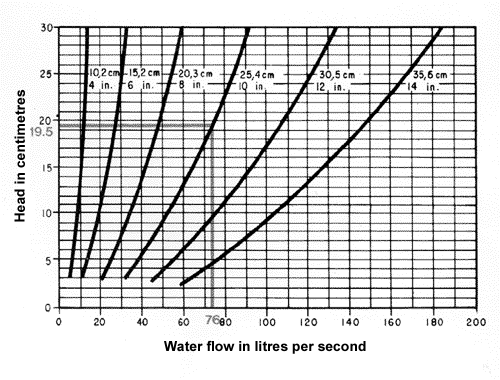
| If you are measuring a water flow that is 130 l/s or less,you can use Table 6. Do this by finding the head (in cm) on the left scale of the table and follow this value horizontally across until you reach the curve that represents the correct crest length. Bring this point vertically down to the bottom scale and read there the water flow (in l/s). |
Example
|
|
NOTE: The accuracy of the water flow values decreases when head values are greater than one third of the crest length. Water values in this table are divided into three sections: white, darker and lighter grey. The values in the white section are the most accurate. In the other two sections, the accuracy decreases as the head increases toward a value equal to the crest length. 1With full end contractions and sharp edges. |
|
1With full end contractions and sharp edges |
3.7 Water flow through a straight pipe |
||
|
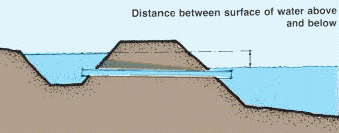
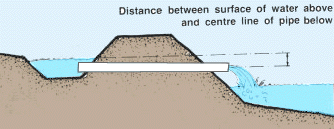
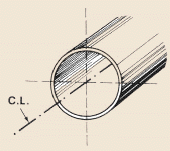
This is a method to estimate water flow through a relatively short, straight pipe, from a higher level to a lower level, and can be used, for example, when you fill or empty a pond. To use this method you will have to find the head (in cm). If water flowing from a higher level to a lower level flows out of the pipe above the water line of the lower level, you can find the head by measuring the vertical distance (C.L) between the surface of the water above and the centre line of the pipe below. |
|
|
| If water flowing from a higher level to a lower level flows out of the pipe below the water line of the lower level, you can find the head by measuring the vertical distance between the surface of the water above and the surface of the water below. |
 |
|
| To
find the head, first prepare a constant point to
measure from. You can do this by using a
mason's level and a straight board, or a line level and
a string tied between two stakes.
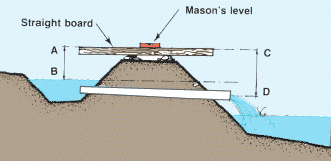
Place a straight board on the top of the bank. Make sure it is horizontal by using a mason's level. If the board is not horizontal, prop it up with stones until it is. Find the head by measuring downwards on both sides of the bank and taking the difference between the two measurements. |
 |
| Example
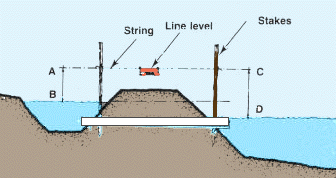
Another way to find the head is to drive a stake into the bank on each side. Put the stakes in the water a little out from the edge of the bank. Using a line level, tie a string between the two stakes in a horizontal position. Find the head by measuring downwards on both sides of the bank and taking the difference between the two measurements. |
|
|
| Example
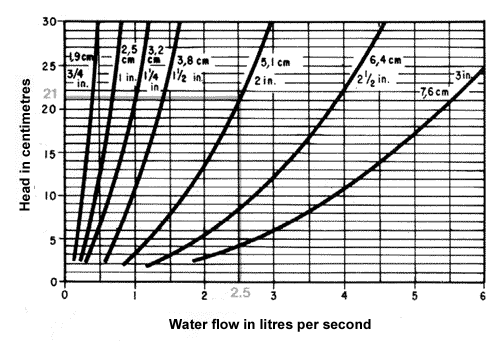
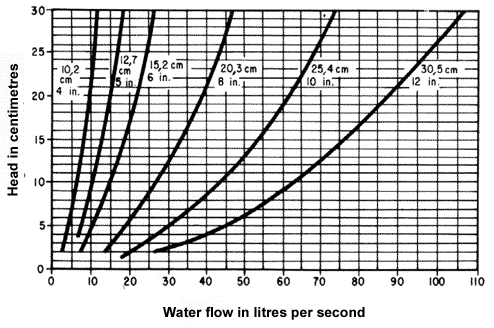
When you have found the head value, find the water flow using Table 7 for pipes with an inside diameter smaller than 9 cm, or Table 8 for pipes with an inside diameter larger than 9 cm. Do this by finding the head value (in cm) on the vertical scale of the table and follow horizontally across until you reach the curve that marks the size of pipe you are using. Now look down to the bottom scale where you can read off the water flow (in l/s). |
Examples
|
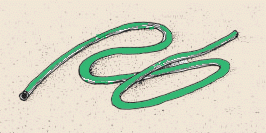
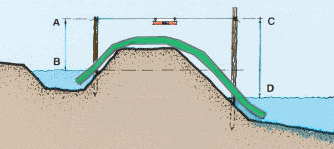
How to make a siphonA siphon can be made from a length of rubber or plastic tube that is long enough and pliable enough to reach over the bank from the upper water level to the lower water level.
|
|
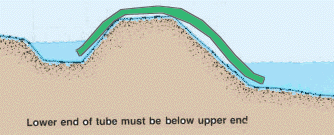
How a siphon functionsA siphon will function only when there is a difference in the two water levels and the end of the tube at the lower level is below the end of the tube immersed in the water at the upper level.
|
|
|
| Measure the head, the difference between the surface of the water on the upper level and the surface of the water on the lower level, by using a mason's level and a straight board, or a line level and a string tied between two stakes, as shown in the previous section. |
|
|
|
Example When you have found the head value, find the water flow using Table 9 for siphons with an inside diameter smaller than 9 cm, or Table 10 for siphons with an inside diameter larger than 9 cm. Do this by finding the head value (in cm) on the vertical scale of the table and follow horizontally across until you reach the curve that marks the correct size of siphon. Now look down to the bottom scale where you can read off the water flow (in l/s). |
Example |
![]()