6. MEASURING HEIGHT DIFFERENCES - PART 2
6.0 Introduction:contour levelling methods
|
| 1. In the previous chapter, you learned how to make several
types of simple levels. You also learned how to use them in the field
for levelling. |
|
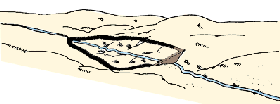
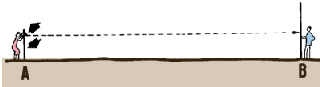
Contour lines
|
| |
|
|
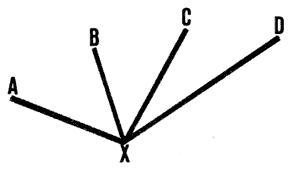
| 2. These levels can also be used for finding and marking
on the ground all points at the same height, such as the points along
the centre-line of a future water supply canal. In this case, the height
differences between the various points of the line would be made equal
to zero. These points make up a contour line. This particular type of
level survey is called contouring. There are some simple levels which
can be used for contouring. These will be described in the following Sections
6.1-6.5. How to use other levels and slope measuring devices for contouring
will be explained in Sections 6.6-6.8. |
|
|
| |
|
|
| 3. In this chapter you will also learn how to use the levelling
devices already described to set lines of slope with a gradient (see Section
6.9). |
|
|
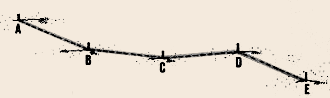
4. There are several good ways of laying out contour lines. Each of these
methods is fully explained in the next sections. Table 8 will also help you choose the method best
suited to your needs. Later, in Section 8.3, you will learn how
to lay out contours in the field, and in Section 9.4, you will learn how to map the results of your field survey.
|
TABLE 8
Contour levelling methods
CONTOURING LEVELS
|
Section1
|
Method 2
|
Distance, m
|
Accuracy
|
Remarks
|
People, equipment
|
| 6.2* |
A-frame
|
4
|
Medium
|
Awkward to transport
|
1 or 2 people, mason's level
|
| 6.3* |
A-frame, plumb line
|
4
|
Medium to high
|
Fast to use
|
1 or 2 people, plumb line
|
| 6.4* |
H-frame water level
|
2.5
|
Medium to high
|
Awkward but quick
Avoid water loss
|
2 people
|
| 6.5* |
Semi-circular water level
|
100
|
Medium
|
Faster for longer distance
Avoid water loss
|
2 people, target levelling staff
|
NON-SIGHTING LEVELS (see
also Table 7)
| 6.6* |
Straight-edge level
|
2.5 to 3
|
Medium to high
|
Easy transport
Fast
|
1 person, mason's level
|
| 6.6** |
Line level
|
20
|
Medium
|
Very easy to transport Quick to operate Useful
on rough ground
|
3 people, mason's level 2 measuring scales
|
| 6.6* |
Flexible tube water level
|
10 to 15
|
High to very high
|
Awkward to transport Very quick
Avoid water loss
|
2 people, 2 measuring scales
|
SIGHTING LEVELS (see
also Table 7)
| 6.7** |
Bamboo level
|
15 to 20
|
Low to medium
|
Greatly affected by wind
|
2 people, 1 levelling staff
|
| 6.7* |
Hand level
|
10 to 15
|
Low
|
Rough, fast
|
2 people, 1 levelling staff
|
| 6.7*** |
Surveyor's level
|
more than 100
|
Very high
|
Expensive, delicate
|
2 people, 1 levelling staff
|
SLOPE MEASURING DEVICES (see also Table 6)
| 6.8** |
Clinometer, clisimeter
|
10 to 15
|
Low to high
|
|
2 people, levelling staff
|
1 *simple **more difficult *** most difficult
2 In italics, equipment you can make yourself
|
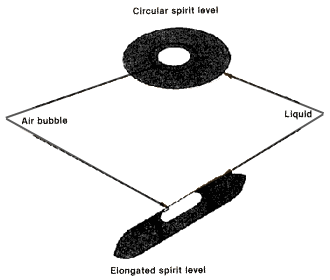
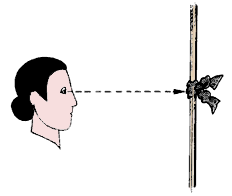
| 5. In nearly all levelling instruments,
horizontality is shown by a spirit level. This is a small level, usually
made of an elongated or circular glass tube; the tube is nearly filled
with a liquid (usually spirit), leaving enough space to form an air bubble.
In the elongated spirit level, a point near the middle of the tube is
selected as the zero-point, and clearly marked. Graduations may be added
on either side of this point. In the circular spirit level, the zero-
point lines up with the centre of the level, and is clearly marked by
a small circle. When the air bubble is at the zero-point, the level is
horizontal. |
|
|
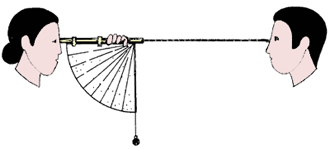
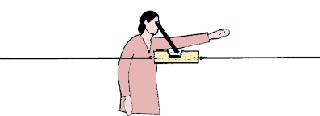
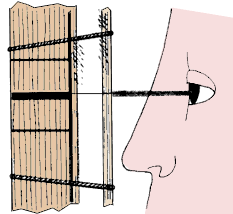
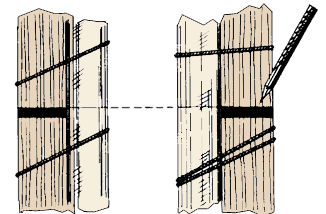
6.1 How to use the mason's level
The mason's level is a simple tool often used during building operations.
You have learned how to use the mason's level to set out horizontal lines
when you measure short distances on sloping ground (see Section 2.1) and when
you determine height differences (see Sections 5.1-5.2).
What is a mason's level?
|
|
1. Usually a mason's level consists of a rectangular wooden casing
with a small spirit level mounted in one of its narrow faces.
The mason's level can also be made of metal. Glass spirit levels are
highly breakable, and should be handled very carefully.
2. The casing varies in length. As the length increases, the accuracy
improves. The cheapest mason's levels are relatively short, about 25
cm long. They are generally available from hardware stores.
|
|
Mason's level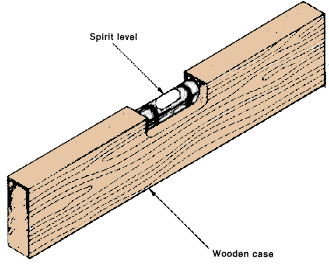
|
|
Using a mason's level to check horizontality
|
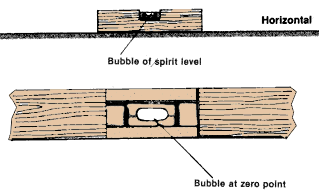
| 3. When a mason's level is horizontal, the bubble of the
spirit level lies exactly at its zero-point. |
|
|
| |
|
|
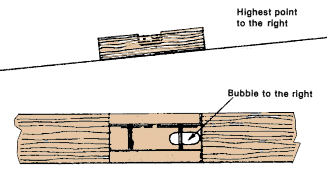
| 4. When the air bubble moves away from the zero-point, it
shows that the level is no longer horizontal. There is either an uphill
or a downhill slope. |
|
|
| |
|
|
| Note: the direction in which the bubble moves
always indicates the direction of the highest point on the slope. |
|
|
| |
|
|
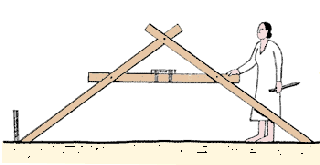
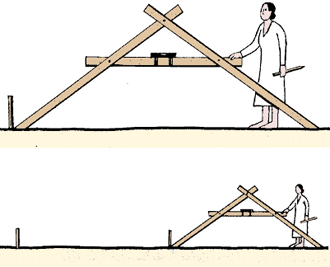
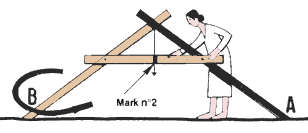
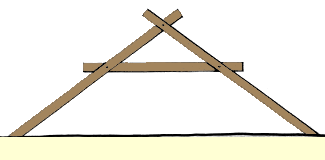
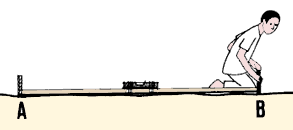
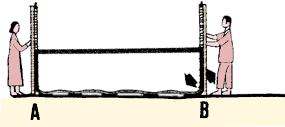
6.2 How to use the A-frame level
|
| A simple device for contouring can be made from three pieces
of wood and a mason's level. This device works on the same principle as
the straight-edge level (see Section 5.1), but it is easier and faster
to use. |
|
|
Making your own A-frame level
|
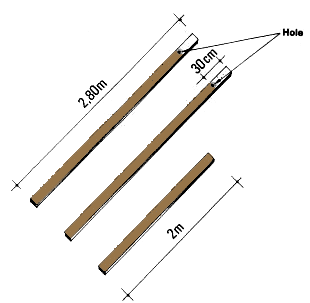
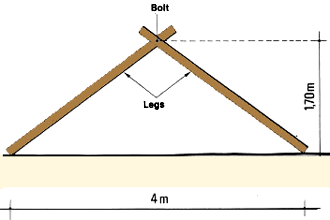
| 1 . Get three pieces of soft wood, all at least 2 x 6 cm
thick; two of the three pieces should be about 2.80 m long, and the other
about 2 m long. The A-frame made of these will be about 1.70 m high by
4 m long -- small enough to handle easily. |
|
|
| |
|
|
| 2. Attach the two 2.80 long leg-pieces about 30 cm down
from their tops by drilling a hole through the centre of each piece and
bolting them loosely together. Adjust the legs until they are 4 m apart
at the bottom. |
|
|
| |
|
|
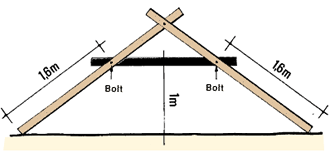
| 3. Measure up 1.60 m from the bottom of each leg and loosely
attach the 2 m cross-piece by drilling and bolting it to the legs. The
cross-piece should be about 1 m above the ground.
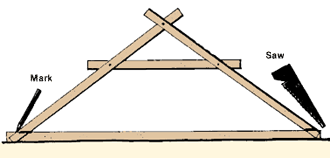
4. Cut the bottom of the legs level, so that they rest evenly on the
ground when the A-frame is upright. To do this, stand the A-frame upright
on its legs and place a long straight piece of wood so that it touches
both legs at the base. Make a mark along the legs, level with the top
of this piece of wood, and cut the legs at the mark.
|
|
|
| |
|
|
| |
|
|
|
Adjusting the A-frame level
|
| 5. Place the A-frame upright, resting the legs on two points
which are at exactly the same level. Put the mason's
level (see Section 6.1) on the middle part of the cross-piece and check
to see if it is on the middle part of the cross-piece and check to see if
it is horizontal. If it is not, adjust it by moving the cross-piece slightly,
or by cutting a little more off one of the legs. When the cross-piece is
horizontal, tighten all the bolts on the A-frame. |
|
Check the level
|
| |
|
|
| 6. To check the horizontality, turn the A-frame around and,
with the mason's level, check to see that the cross-piece is still horizontal. |
|
Then reverse and check again 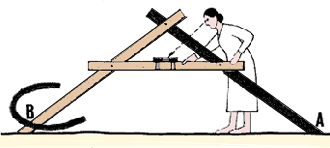
|
| |
|
|
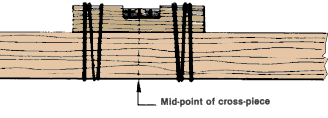
| 7. Using light string, lash the mason's level securely to
the cross-piece at its mid-point. |
|
|
|
Using the A-frame for contouring
|
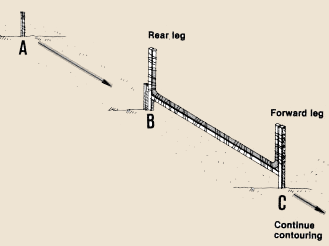
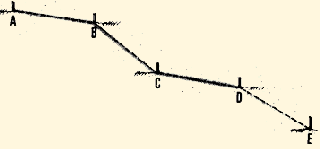
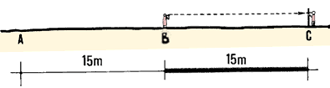
| 8. With a marking pin, mark point A where you will begin contouring.
Place one leg of the A-frame at this point. Move the other leg uphill or
downhill until the mason's level shows a horizontal position. At this point
place another marking pin B. |
|
Adjust the forward leg until the level is horizontal
|
| |
|
|
| 9. Move the A-frame up to the second point B. Find the next
horizontal point C and mark it. |
|
Repeat at each station
|
| |
|
|
| 10. Repeat this process until you have plotted the length
of the contour line AE |
|
Contour line AE
|
6.3 How to use the A-frame and plumb-line level
The A-frame and plumb-line level is a simple device very similar to the A-frame,
except that the mason's level is replaced by a plumb-line. The device is used
in the same way as the standard A-frame for contouring (see Section 6.2).
|
Making your A-frame and plumb-line level
|
| 1. Construct an A-frame as described above (see
Section 6.2, steps 1-4) |
|
A-frame
|
| |
|
|
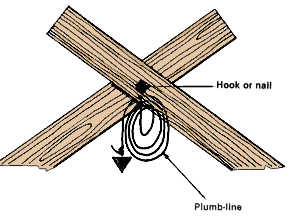
| 2. Screw a small hook, or drive a nail, into the frame near
its summit. |
|
|
| |
|
|
| 3. Attach a plumb-line (see Section 4.8) to the hook or
nail. The plumb-line should be long enough for the plumb to reach below
the cross-piece of the frame.
Note: the taller the frame is, the more sensitive the level
will be to differences in height. The dimensions given in Section 6.2
provide a good average accuracy, usually better than 32 cm over 100 m.
|
|
|
Adjusting your A-frame and plumb-line level
|
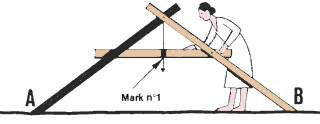
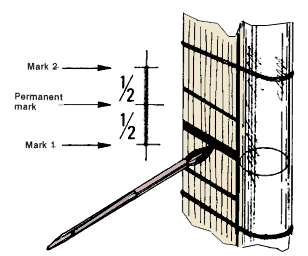
| 4. Place the A-frame upright with its legs resting on two
points which are at exactly the same level.
5. When the plumb-line comes to rest, lightly mark the position of
its string on the top side of the cross-piece of the A-frame.
|
|
|
| |
|
|
| 6. Place the A-frame the other way around, so that its legs
are reversed on the same horizontal points. When the plumb-line comes
to a stop, lightly mark the position of the string on the cross-piece. |
|
|
| |
|
|
| 7. Make a permanent mark on the front side of the cross-piece
at the precise mid-point between the two marks. This shows where the legs
of the A-frame are exactly level.
Note: to improve measurements in windy weather, slow the
movement of the plumb-line letting it rub slightly against the cross-piece
of the A-frame.
|
|
Cross-piece 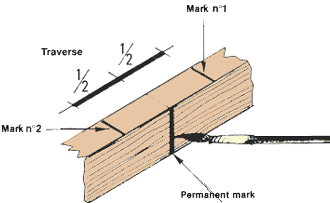
|
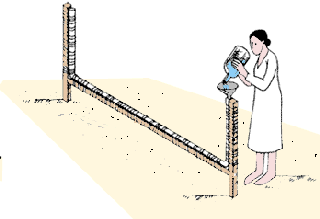
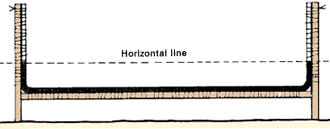
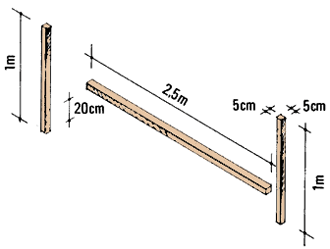
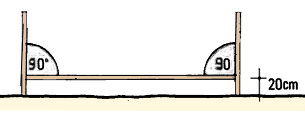
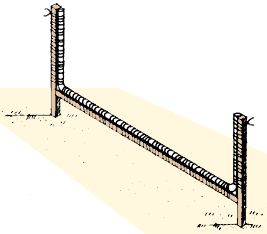
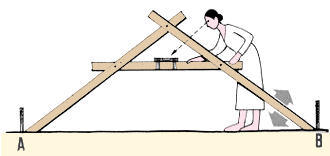
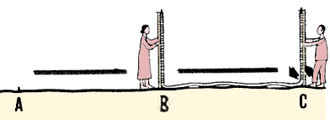
6.4 How to use the H-frame water level
The H-frame water level is a simple device made of a light wooden frame and
some clear plastic piping, which is partly filled with water. Like the flexible-tube
water level (see Section 5.3), it is based on the principle that, under atmospheric
pressure, the free surfaces of interconnected water columns will reach equal
heights, which follow a horizontal line.
Making your H-frame water level
|
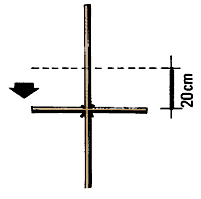
| 1. Get two 5 x 5 cm thick pieces of soft wood 1 m long, and
one 5 x 5 cm piece 2.5 m long. Join the three pieces of wood together to
form an "H" shape, using strong nails or bolts. The horizontal
piece of the frame should be about 20 cm above ground level. The two upright
legs should make 90º angles with the horizontal piece. Check this. |
|
|
| |
|
|
| 2. Get 3.90 m of clear, non-reinforced plastic tubing with
an inside diameter of about 1.2 cm. Using soft wire or string, secure it
to the upper face of the horizontal piece and to the inside faces of the
two vertical pieces. Tie or bind the plastic tube tightly to the wooden
pieces, but be careful not to pinch the tube |
|
|
| |
|
|
| Note: if you do not have enough clear plastic tubing,
use about 1.90 m of dark rubber or plastic piping or metal water piping,
and two 1 m lengths of clear plastic tubing. Connect one length of clear
tubing to each end of the dark piping with a hose clip. Then tie the dark
piping to the horizontal piece of the H-frame, and the clear lengths of
tube to the two vertical pieces. |
|
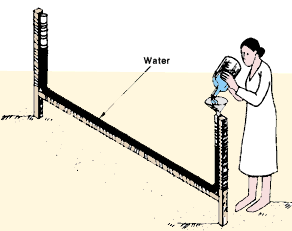
|
3. Pour water into the tubing until the level reaches about halfway up each
vertical section, making sure to get rid of any air bubbles. Put a cork stopper
in each tube-end to prevent water losses during transportation.
Adjusting your H-frame water level
|
|
4. With the help of an assistant, place the H-frame upright, with its
legs resting on two points which are at exactly the same level.
5. Remove the two stoppers from the tube ends and look at the water level
in each tube from the side. You and your assistant should then make a
light mark on each vertical leg, level with the water level in the tubes.
|
|
Mark at the water level
|
| |
|
|
|
6. Turn the H-frame around and place its legs, reversed, on the same
points.
7. Again, lightly mark the water level on each vertical leg.
|
|
Then turn the frame and mark again

|
| |
|
|
|
8. Make a permanent mark on each leg at the precise mid-point between
the two previous marks. When the water is at this level in the tubes,
it indicates horizontality.
9. Replace the stoppersfor transportation.
Note: it is best to check this adjustment before each contouring
survey. If any water has been spilled from the tubing, you should adjust
the device by adding water as necessary.
|
|
|
|
Using your H-frame water level for contouring
|
| 10. Place the rear leg of the H-frame at the starting point
A.
11. Remove the stoppers frorn the tube ends.
|
|
Remove the stoppers
|
| |
|
|
| 12. Move the forward leg uphill or downhill until the top
water level reaches the permanent mark you have made on the leg. |
|
Adjust the forward leg
|
| |
|
|
| |
|
Read the water level
|
| 13. Mark the position of the forward leg at B with a peg and
replace the stoppers in the tube ends. |
|
|
| |
|
|
|
14. Move the frame forward, place the rear leg at the marked point B,
and repeat the previous procedure. Continue in this way until you reach
the end of the contour line AE.
Note: it is easier to work with an assistant, who can move
the forward leg until he or she finds the horizontal level. Then you can
check that the water level on the rear leg also lies opposite the permanent
mark.
|
|
Contour line AE
|
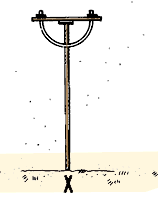
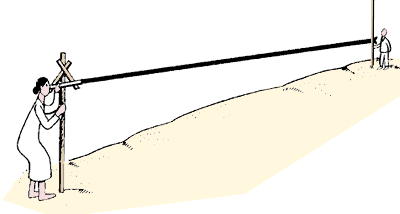
6.5 How to use the semi-circular water
level
The semi-circular water level is a simple device based on the same principle
as the H-frame water level. Its main advantage is that you can use it on longer
distances without moving it. You need only several small pieces of wood and
a short piece of clear plastic tubing to make it, but it is a little more difficult
to build than the H-frame.
Making your semi-circular water level
|
|
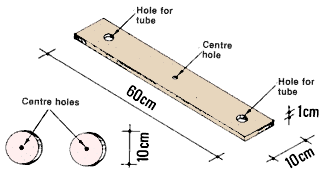
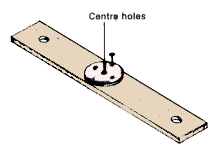
1. Get a 1 x 10 cm piece of wood 60 cm long and drill a hole through
each end of it from the 10 x 60 cm face. These holes should be just wide
enough to hold the plastic tube (see step 5).
2. Drill a small hole in the centre of the piece of wood.
3. Prepare two wooden discs with a diameter of 10 cm, and drill small
holes in their centres.
|
|
|
| |
|
|
| 4. Nail or screw one of these discs under the centre of the
piece of wood, aligning the hole in the centre of this piece with the hole
in the disc. Do not block the hole. |
|
|
| |
|
|
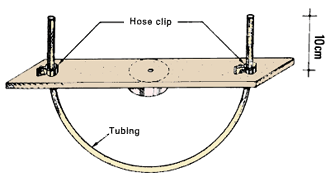
| 5. Get a piece of clear plastic tube about 80 cm long and
1 to 1.5 cm in diameter. Pass the ends of the tube from below through the
holes in the ends of the piece of wood so that the tube forms a semi-circle
on the side where the disc is. The two ends of the tube should extend above
the piece of wood by about 10 cm. Keep the tubing in place by putting a
hose clip just at the point where the tubing passes through the hole in
the board. Tighten the clip so that the tube does not slip, but be careful
not to pinch the tube. The hose clip will keep the tube in place, since
it is bigger than the hole. |
|
|
|
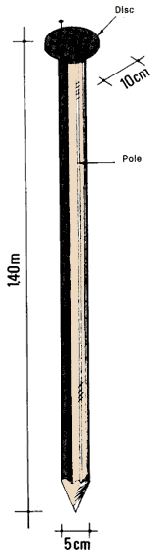
6. Now make the supporting leg. Get a pole 5 cm in diameter and 1.40
m long. Find the centre point of one end. Then take the second disc you
prepared, and loosely nail it to the pole so that its centre hole is over
the centre of the pole.
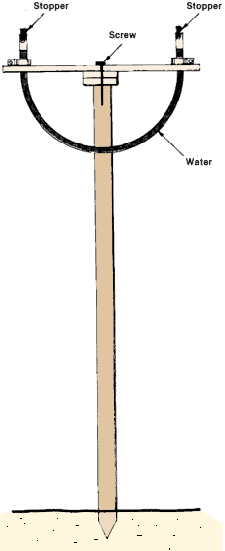
7. Attach the semi-circular level you made in step 5 to the supporting
leg. Use a strong screw, and align the central holes of the wooden discs
carefully. Do not tighten the screw too much. You must be able to turn
the semi-circular level around. The flexible tube will be off to one side
of the pole.
8. Place the device upright on its support and fill the plastic tube
with water. The level of the water should reach about 4 to 5 cm from each
end of the tube. Place a stopper in each end of the tube to prevent water
loss during transportation.
|
|
|
|
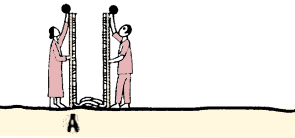
Using your semi-circular water level for contouring
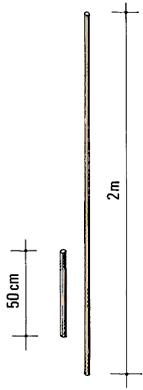
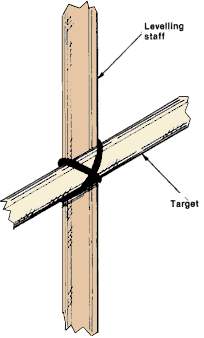
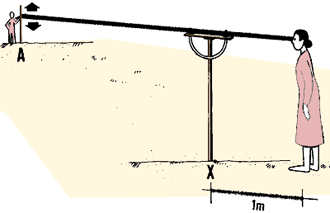
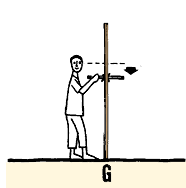
9. At the starting point A of the contour you need to level, ask
your assistant to place a levelling staff in a vertical position. Since you
are contouring with a sighting level which does not include a telescope, you
should use a target levelling staff.
You can easily make one. Get a straight wooden stick, a piece
of bamboo, or a maize stalk 2 m long. Get another pole or stick 50 cm long,
and attach it to the first one with string, to form a cross. The location of
the point where you attach the 50 cm pole, called the target, depends on the
contour you are levelling.
| 10. To station the semi-circular water level, drive its support
vertically into the ground at a central point from which you will be able
to survey about 100 m of the contour line. Remove the stoppers from the
ends of the plastic tube. |
|
|
| |
|
|
| |
|
|
| |
|
|
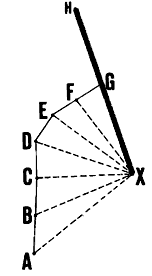
| 11. Standing about 1 m behind the semi-circular water level,
rotate its upper part and sight along a line which joins the two water-surface
levels in the plastic tube to the levelling staff. Signal to your assistant
to adjust the target of the levelling staff up or down until it is exactly
on the sighting line. Then, ask your assistant to tie the target firmly
at that height. |
|
Adjust height of target
|
| 12. Your assistant will then mark the starting point A with
a stake, and walk about 10 m away, where he will place the levelling staff
in a vertical position.
13. Rotate the upper part of the water level until you can sight again
at the cross on the staff. Signal to your assistant to move the levelling
staff uphill or downhill until the fixed target lines up with the sighting
line. He or she will then mark this point B with a stake.
|
|
|
| |
|
|
Swivel the level to sight at point B
|
|
Move the staff until the target is in the line
of sight
|
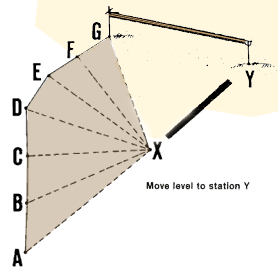
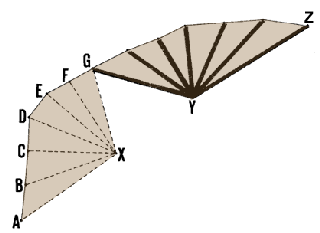
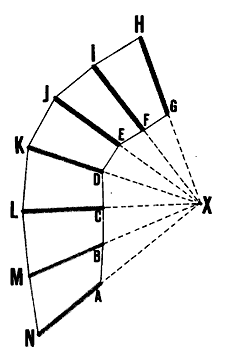
14. You may keep on levelling points on the same contour AG from one central
station X for about 100 m. To continue the same contour line, leave the target
levelling staff at point G, and move the level to a new central station Y. Adjust
the height of the target and go on levelling contour GZ from station Y.
Adjust target without moving staff
|
|
Continue levelling
|
Note: you may also want to find contours with a fixed height difference,
for example, every 0.20 m. To do this, you will keep working from the same station,
but change the height of the target on the levelling staff. When you reach point
G, have your assistant lower the target by 20 cm. He then walks up the hill
along line XGH until the target is level with your line of sight, marking point
H on the next contour. Continue the second contour line HN by finding point
I on line XFI, point J on line EXJ, and so on. If the distance is short enough
for you to see clearly, you may lower the target again to set a third contour
line from the same station.
Lower the target
|
|
|
| |
|
|
Find point H
|
|
Continue the contour
|
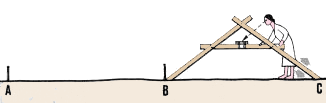
6.6 How to contour with non-sighting
levels
1 . In Sections 5.1 to 5.3, you learned how to use non-sighting levels to
measure differences in height. These devices can also be used for contouring.
Using the straight-edge level for contouring
|
| In Section 5.1, you learned about the
straight-edge level. For contouring, use it in the following way (steps
2 to 7). |
|
Make the level horizontal
|
| |
|
|
| 2. Mark the point A where you will begin contouring with
a stake. Place one end of the straight-edge at this point, and move the
other end uphill or downhill until the mason's level shows horizontality.
Mark this point B with another stake. |
|
Mark point B
|
| |
|
|
|
3. Move the straight-edge up to point B. Find the next horizontal point
C as shown above and mark it with a stake.
4. Continue this process until you have marked the length of the contour
line.
|
|
Continue the contour line
|
| 5. Mark the route of the contour line you have found by
leaving a stake about every 10 m. If the contour curves, you may need
to use more stakes. |
|
Mark the contour with stakes

|
| |
|
|
| 6. If the surface of the ground is somewhat rough (i.e.
covered with lumps of earth, stones or grass), it may help to use two
bricks or wooden blocks of the same height to support the ends of the
straight-edge while you are levelling. |
|
|
| |
|
|
| 7. If the surface of the ground is very rough or covered
with dense grass, you can use two stakes under the ends of the straight-edge
to lift it above ground level. Be sure that both stakes are the same length,
and that you drive them into the ground to the same level. This way you
can transfer the horizontal you find, which lines up with the top level
of the stakes, to ground level without error. |
|
Use bricks...

|
| |
|
|
| |
|
...or stakes to lift the level above obstacles
|
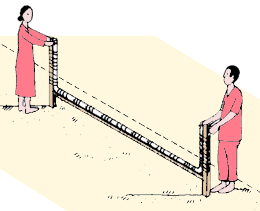
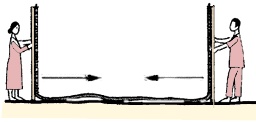
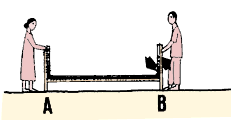
Using the line level for contouring
|
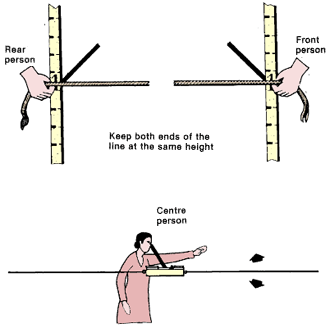
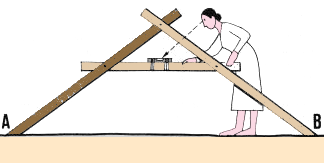
| In Section 5.2, you learned
how to make a line level. The line level is very efficient for contouring
because it allows you to progress quickly, even on rough grass, and it
is reasonably accurate (the maximum error is less than 6 cm per 20 m distance).
Remember that you need three people to use the line level. |
|
|
| |
|
|
|
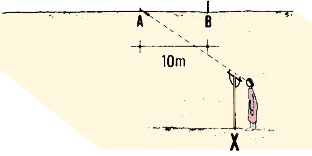
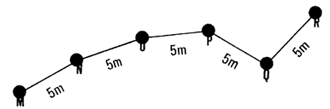
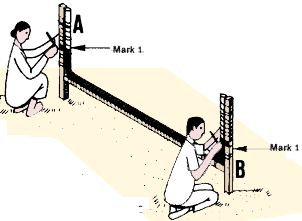
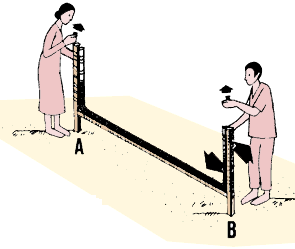
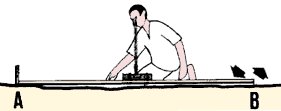
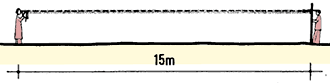
8. The rear person places one end-staff on the marked starting point
A and keeps the cord on the 1 m graduation, for example. The front person,
also keeping the cord on the same graduation, moves the second end-
staff up or down the slope until the centre person signals that the
mason's level is horizontal. The front person then marks the point B
where the staff touches the ground.
9. The rear person walks to this marked point B while the other two
people walk ahead until the cords are well stretched. The entire procedure
is repeated and another point C of the contour line is marked.
|
|
|
| |
|
|
| 10. This process is continued until you have marked the
length of the contour line. |
|
|
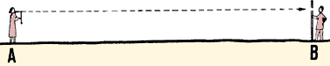
Using the flexible-tube water level for contouring
|
| In Section 5.3, you learned
how to make the flexible-tube water level. You can contour quite quickly
with this device even on rough ground, and it will give very good accuracy
(the maximum error is about 1 cm per 10 m distance). You should be very
careful not to lose water during the procedure. You will need an assistant
for this method. |
|
|
| |
|
|
| 11. Bring the two stand pipes together at the starting point
A of the contour line, remove the stoppers, and mark the height of the
water levels on each measuring scale. These heights should be the same.
|
|
Put both stand pipes at point A and remove the
stoppers
|
| |
|
|
| 12. Replace the stoppers in the tube ends. |
|
Mark the water level on both scales
|
| |
|
|
| 13. Place your measuring scale at the starting point A of
the contour line. Have your assistant walk ahead until the end of the
hose is reached. Both of you remove the stoppers, and your assistant moves
the scale up or down the slope until the water level is at the marked
height. Check that the water level is at the marked height at your end,
too. When it is, signal to your assistant to mark the location B of that
scale with a stake. Replace both the stoppers. |
|
When the water level is at the mark on the standpipe,
you have found point B
|
| |
|
|
| 14. Both of you then move forward until you are standing
at the point B where your assistant was standing, as marked with the stake.
Have your assistant walk ahead until the end of the hose is reached. Repeat
the procedure in step 13, and continue in the same way to the end of the
contour line. |
|
 Begin
the next measurement at point B Begin
the next measurement at point B |
6.7 How to contour with sighting levels
1. In Sections 5.6 to 5.9, you learned how to use sighting levels to measure
differences in heights. These devices can also be used for contouring.
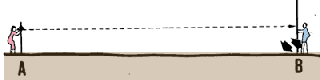
Using the bamboo sighting level for contouring
2. You learned how to make and adjust a bamboo sighting
level in Section 5.6. You and an assistant can use this level for contouring,
as follows.
3. Place the bamboo sighting level next to a levelling staff and read the
height on the scale by sighting through the tube.
4. Mark this height on the scale. You can use paint, or tie a piece of cord
or a coloured rag at that height. You can also use the
target levelling staff described in Section 6.5, and attach the target
at that height.
|
Mark your sighting level on a pole
|
|
|
|
|
| |
|
|
| 5. Place the bamboo level in a vertical position at A, the
beginning of the contour line you want to plot. |
|
Send your assistant ahead

|
| |
|
|
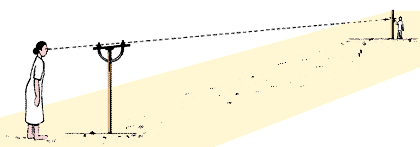
| 6. Have your assistant, holding the levelling staff, walk
15 to 20 m ahead along an approximate horizontal line and place the staff
vertically. Have him move it up or down the slope until you signal that
the mark is lined up with the sighting line seen through the bamboo tube. |
|
Have him move until you sight the mark
|
| |
|
|
|
7. You will have to turn the bamboo level from left to right to see
the mark on the measuring scale. Check frequently to make sure that
the bamboo tube remains horizontal.
8. When you signal that you have sighted the mark, your assistant should
mark the position B of the levelling staff with a stake.
|
|
You may have to turn the level to see him
|
| |
|
|
|
9. Now move up to this stake B and place the bamboo level on that point
in a vertical position.
10. Have your assistant walk another 15 to 20 m ahead with the levelling
staff, and repeat steps 7-9.
11. Repeat this process until you have marked the entire length of
the contour line.
|
|
Proceed from point B

|
Using the hand level for contouring
|
| 12. You can survey a contour line quickly by using
a hand level (see Section 5.7), although this will not give the most
accurate results. The method you use with the hand level is the same as
that just described for the bamboo level, except that you should make
the mark on the levelling staff at the height of the sighting line. The
sighting line's height will either be at your eye-level, or at the height
of the pole supporting the hand level (which is used to improve accuracy).
The distance from one point to the next should not exceed 15 m. |
|
Use the hand level alone...
|
| |
|
|
|
|
|
...or with a support staff
|
Using the surveyor's level or the theodolite for
contouring
|
| 13. You can very quickly and accurately determine contour
lines with a surveyor's level or a theodolite
and a precisely graduated levelling staff (see Section 5.8). |
|
Use the theodolite with a graduated levelling
staff
|
| |
|
|
| 14. Since the range of the telescope on either of these
devices is several hundred metres, you can reduce the number of stations.
As you did with the semi-circular water level (see Section 6.5), you can
survey several points from a single station. In open country, it is possible
to use this method over long distances. In areas with forests, you might
need to measure over shorter distances and to clear sighting lines. |
|
You can survey several points from a single station
|
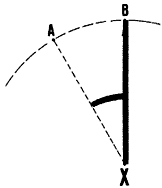
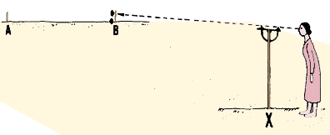
6.8 How to contour with slope-measuring devices
1 . In Sections 4.1 to 4.6, you learned how to use various types of clinometers
to measure slopes. These devices can also be used for contouring because a
contour line is defined as a line along which the slope gradient equals zero,
see Section 8.3.
2. When you contour with slope measuring devices, it
is best to use a target levelling staff, such as the cross- shaped one
described in Section 6.5. If you use such a staff, the target should be tightly
fixed at eye level.
Sight at a target levelling staff...
|
|
... or at your assistant
|
Note: if you do not have a levelling staff, you can use the height
of your assistant as a reference level* instead.
| 3. Your assistant, holding the levelling staff vertically,
should stand about 10 to 15 m away from the starting point A of the contour
line you want to plot. From this starting point, use the clinometer to
sight at the levelling staff. Signal to your assistant to move the staff
up or down the slope, until its target lines up with the zero-graduation
of your clinometer. Have your assistant mark this ground point B and repeat
the same procedure from it |
|
Have him move until you sight the mark

|
| |
|
|
| Note: if you are
using a clisimeter, remember that you should use the left scale and
make the sight of the levelling staff line up with its zero line (see
Section 4.5). |
|
Proceed from point B
|
6.9
How to set graded lines of slope
|
|
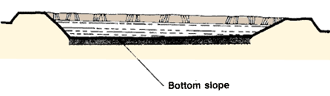
1. Graded lines of slope are often used in fish-farms to assist gravity*
in moving water. Water-supply canals and pipelines, as well as drainage
canals, are built with a graded slope. Fish ponds should be built with
an adequate bottom slope so that you will be able to drain them completely.
Knowing how to set graded lines of slope is therefore very important when
you are building a fish-farm.
2. You can set graded lines of slope in several ways, using three series
of methods with the devices described in Chapters 4, 5 and 6.
|
|
|
Using slope-measuring devices for setting lines of slope
|
| 3. You can use any one of the slope measuring devices described
in Sections 4.1 to 4.6 to set graded lines of slope. The
clisimeter, in particular (see Section 4.5) , is commonly used for
this purpose, but any other clinometer can be used instead.
4. It is best to use a target levelling
staff such as the one described in Section 6.5; its target should
be tightly attached at your eye level. Remember that you can use the
height of your assistant as a reference level instead.
|
|
Use the target levelling staff
|
| |
|
|
| 5. From the starting point A of the line of slope, sight
the target levelling staff; the graduation of the clinometer should correspond
to the slope you have chosen. Signal to your assistant to move the levelling
staff up or down the slope, until the sighting line of the clinometer
lines up with the reference mark on the levelling staff. Mark the ground
point B with a stake and repeat the procedure from that point. |
|
Sight with the clinometer at the desired graduation

|
|
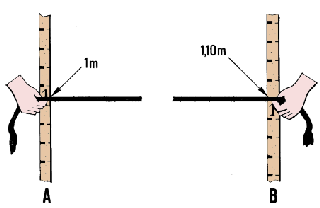
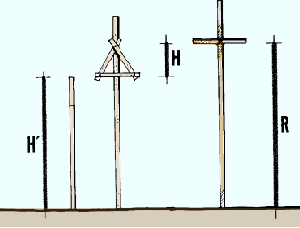
8. On the highest point A of the slope to beset, station your levelling
device and measure the height of its sighting line (H') above the ground.
Add this value to H (calculated in step 7) to obtain the height to be
read (R) at the next point on the levelling staff as:
|
|
Set your target levelling staff to show
the proper height difference
|
| |
|
|
|
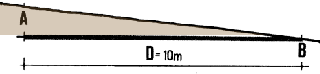
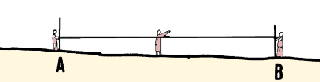
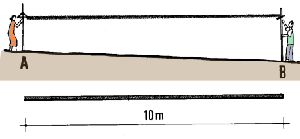
9. Measure a horizontal distance of 10 m from the starting point, following
the contour line as closely as possible. Place a levelling staff vertically
at that point.
Note: for this part of the procedure, you can use:
|
|
Place the levelling staff 10 m from the level
|
| |
|
|
| 10. Sight with the levelling device at the levelling staff.
Signal to your assistant to move the staff up or down the slope until
the sighting line lines up with the mark R on the staff. At this point
B, have your assistant drive a marking stake into the ground. Point B
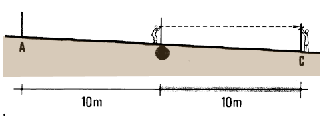
will be 10 cm lower than point A. |
|
Move the levelling staff until the target
comes into the line of sight

|
| |
|
|
| 11. Station the levelling device on this marked point B
while your assistant walks ahead another 10 m with the levelling staff.
Repeat the procedure. |
|
Proceed from point B
|
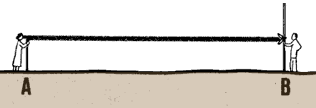
Using non-sighting levels for setting lines of slope
12. Non-sighting levels are much more accurate than simple sighting levels
for setting lines of slope with gradients smaller than 1 percent. Generally,
non-sighting levels can be used to set lines of slope with gradients as small
as 0.3 percent. The flexible-tube water level is even reliable for slopes as
small as 0.1 percent.
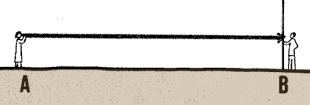
13. In Sections 6.2 to 6.4 and Section 6.6, you
learned how to use various non-sighting levels for contouring, that is, setting
lines of slope with a zero gradient.
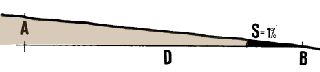
14. To set lines of slope with a different gradient (S%), you can use the same
procedure described for contouring; the only difference is that you have to
keep the forward end of the levelling device above the ground at the height
H (calculated as shown above in step 7) for a fixed horizontal distance D metres,
as in:
|
Distance D varies according to the kind of levelling
device you use.
 |
| Note: it is best to level going downhill, as
suggested above. If you must level going uphill, you should make the rear
end of the levelling device higher by H metres. |
|
|
| |
|
|
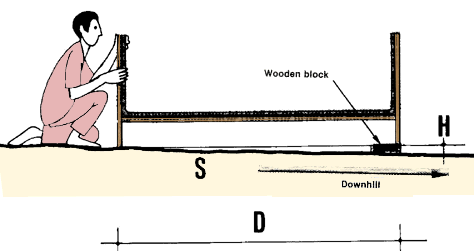
| 15. The best way to do this is to prepare a piece of wood
with a thickness equal to H. While levelling, place (or, better, nail)
this piece of wood under the forward end of the level if you are levelling
downhill. |
|
|
| |
|
|
|
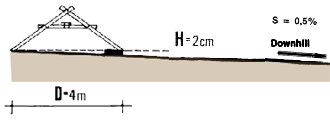
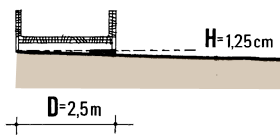
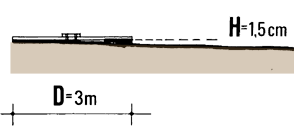
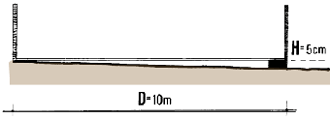
Example
If S = 0.5 percent and you are levelling downhill:
- using an A-frame level for setting the line of slope: D =
4m; H = 2 cm
- using an H-frame level: D = 2.5 m; H = 1.25 cm
- using a straight-edge level: D = 3 m; H = 1.5 cm
- using a flexible-tube water level: D = 10 m; H = 5 cm
|
|
|
| |
|
|
| |
|
The size of the wooden block depends
on the slope and type of level
|
| 16. When using the line level, you can add the height H
to the cord height which will be maintained by the front person, instead
of placing a piece of wood under the forward measuring staff. |
|
|
| |
|
|
|
Example
If S = 0.5 percent and you are levelling downhill with a line
level:
D = 20 m and H= 10 cm.
Keep the forward end
of the cord at a height 10 cm higher than the rear end of the cord.
|
|
|
| |
|
|
| |
|
|