![]()
![]()
![]()
Chapter 7. Antigen detection
Chapter 8. Antibody detection
Chapter 9. Virus isolation and identification
Chapter 10. Histopathology and immunohistology
Chapter 11. Differential diagnosis
Agar-gel immunodiffusion (AGID)
Counterimmunoelectrophoresis (CIEP)
Passive haemagglutination (PHA)
Immunofluorescence (IF)
Immunoperoxidase staining (IPS)
Immunocapture ELISA
Electron microscopy (EM)
Polymerase chain reaction (PCR)
The most important factor when confirming a presumptive field diagnosis of rinderpest is speed. This is most easily achieved by serological detection of specific antigens in the tissues taken from affected animals. The key to success is hyperimmune rinderpest antiserum collected from rabbits infected and boosted with lapinized rinderpest virus. The application of monoclonal antibodies (MAb) in antigen detection tests grows more popular every year, but caution is required. The selection of the antigen form, for example, prematuration determinants, postmaturation determinants or epitopes independent of maturation events, and the MAb specificity that permits the detection of the relevant epitopes are essential (Obi and McCullough, 1993).
Of the eight techniques available, five - electron microscopy (EM) (W.P. Taylor and Smale, personal communication), immunofluorescence (IF) (Rossiter and Jessett, 1982), immuno-peroxidase staining (IPS) (Selvakumar, Padmanaban and Balaprakasam, 1981; Wohlsein et al., 1993), polymerase chain reaction (Barren et al., 1993a; Forsyth and Barrett, 1995) and immunocapture ELISA (Anderson, 1984) -require laboratory facilities. The other three techniques - agar-gel immunodiffusion (AGID) (Scott and Brown, 1961), counterimmuno-electrophoresis (CIEP) (Ali and Lees, 1979) and passive haemagglutination (PHA) (Singh et al., 1972) - can be modified to run in the field. EM gives results in minutes and serological confirmation in less than 90 minutes, CIEP within one hour, PHA in one to two hours, IF in two to three hours, IPS in two to six hours and AGID in two to 24 hours. It must be emphasized that negative results in antigen detection tests do not negate the provisional diagnosis.
Techniques have been developed to detect the nucleic acid rather than the proteins of the virus. In recent years, specialist laboratories, equipped to handle radioisotopes, have used [32P]-labelled cDNA probes derived from the N-genes of rinderpest and PPR viruses to differentiate the two viruses by nucleic acid hybridization (Diallo et al., 1989). The later use of biotinylated cDNA probes has obviated the need to handle radioisotopes, allowing rapid and specific differentiation between rinderpest and PPR viruses (Pandey, Baron and Barrett, 1992). However, hybridization techniques have been rapidly superseded by the more sensitive technique of reverse transcription/polymerase chain reaction (RT-PCR) amplification. In addition to increased sensitivity, RT-PCR amplification has the advantage that the resulting DNA product can be sequenced, either directly or after cloning in a suitable plasmid vector. The relationship of the virus to other isolates can then be determined, which greatly facilitates the study of the epidemiology of rinderpest and PPR. Using this technique it has been shown that the current rinderpest strains can be divided into distinct lineages - an Asian and two African lineages (see Figure 2).
Agar-gel immunodiffusion (AGID) is a variant of the classical serological reaction in which a soluble antigen in a clear medium is precipitated by the addition of the specific antibody. The fluid medium of the classical technique is replaced by an agar gel, however, through which the suspect antigen and the known antibody diffuse from wells cut in the agar. When avid reactants meet, the reaction is manifested by the development of a visible line of precipitate at the interface. The specificity of the reaction is readily controlled by running a known antigen simultaneously against the same positive antiserum such that the control precipitation line links with the test line if the latter is specific, that is, if there is a line of identity. The technique was first applied to rinderpest by White (1958).
Treatment of suspect field specimens with polyethylene glycol 6000 (PEG) precipitates and concentrates any precipitins present that would otherwise not be detected (Debnath and Chottopadhyay, 1992).
The original technique was a single diffusion method run in tubes, but, today, most AGID tests are double diffusion methods run in Petri dishes or scaled down to run on standard microscope slides coated with agar. Immunodiffusion kits are available commercially (see Figure 15).
Equipment
Templates. Although available commercially, templates are readily constructed in a laboratory workshop from strips of clear acrylic plastic .The preferred pattern consists of a ring of six peripheral wells around a central well. The wells of the template used to stamp a pattern in the gels in Petri dishes are 5 mm in diameter and are placed, edge to edge, 5 mm apart.
The template used with agar-coated microscope slides stamps wells that are either 4 mm in diameter and 3 mm apart or 3 mm in diameter and 2 mm apart.
Gel cutters. Available commercially in 5-, 4- and 3-mm diameter sizes. Substitutes are readily available in most laboratories. They are used in conjunction with a suction pump.
Suction pump. A water-jet filter/vacuum pump run off a water tap.
Humidity box. A humidity box is essential if the ambient relative humidity is low. A clear polystyrene box with lid (174 × 115 × 60 mm) suffices when a moist paper towel is used to line the floor of the box.
Glassware. Glassware includes a 500-ml conical flask, 30-ml screw-capped bottles, 5- or 10-cm diameter Petri dishes, standard microscope slides and Pasteur pipettes.
Reagents
Agar. A high grade of agar is essential, such as Agarose, Ion Agar No. 2 or Special Agar Noble.
Bacteriostat. Thiomersal or sodium azide.
Anti-rinderpest serum. Hyperimmune anti-rinderpest serum prepared in rabbits.
Standard rinderpest antigen. Prepared from the lymph nodes of cattle infected with a virulent bovine strain of the virus, the lymph nodes of goats infected with a caprinized strain or the lymph nodes of rabbits infected with a lapinized strain. A safe and readily available preparation is freeze-dried rinderpest cell culture-adapted vaccine virus. Safe antigens are also prepared directly from calf kidney or Vero cell cultures infected with cell culture-adapted virus.
FIGURE 15. Miles immunodiffusion kit

Suspect antigen. Many tissues collected from rinderpest-infected animals killed in the erosive-mucosa phase of the disease contain precipitating antigens. Antigens in less appreciable amounts are usually detectable in the lymph nodes of the majority of cattle that die within 12 days of the onset of illness but not in the lymph nodes or other tissues of the 10 to 15 percent of cattle that die after the twelfth day (see Figure 16). The state of the carcass influences the probability of obtaining a positive result; carcasses in an advanced stage of decomposition yield significantly fewer positives than fresh carcasses. Success is more likely in animals exhibiting severe clinical signs.
The tissues recommended for collection from live animals are lymph node biopsies, gum debris and tears. Selected donor animals should be febrile, have mucosal lesions and not yet exhibit profuse diarrhoea.
Preparation of reagents
Agar gels. One percent agar gels in pure water are prepared as follows:
1. Add 4 g agar to 400 ml pure water in a 500-ml conical flask immersed in a boiling water bath. The agar usually takes one to two hours to dissolve.2. Add 0.2 g thiomersal or 0.5 g sodium azide and shake until the bacteriostat has dissolved.
3. Filter through gauze to remove lumps and other gross particles.
4. Pour into 30-ml screw-capped bottles and store at room temperature.
5. Twenty-four hours before use, melt the stored gel either by immersing the screw-capped bottles in boiling water or by autoclaving the gel at 110°C for ten minutes.
6. Number the floors of the Petri dishes by writing on them with a waterproof marking pen before adding the gel.
7. Pour the molten agar into the open Petri dishes, using 8 ml agar for a 5-cm dish and 25 ml for a 10-cm one. Coat standard microscope slides to a depth of 1 to 2 mm, pouring 3 to 5 ml of the molten agar over the slides. The task is easier if the slides are held in a plastic mould on a levelling table.
8. Disperse bubbles in the agar by flaming the surface.
9. Solidify by holding the plates and slides at 8° to 10°C, preferably at least overnight. Do not freeze.
FIGURE 16. Precipitinogen titres of the lymph nodes of dead cattle

Reaction arena. The appropriate template is used to outline the well pattern in the solidified gel and the cores of the wells are removed by suction or with a dissecting needle. It is not essential to seal the floors of the wells with molten agar. Gels are best stamped immediately prior to use.
Anti-rinderpest serum. Each batch of hyperimmune anti-rinderpest rabbit serum should be assayed by diffusing serial twofold dilutions in PBSA against the standard positive rinderpest antigen.
Standard rinderpest antigen. Lymph nodes are harvested from infected cattle, goats or rabbits killed shortly after the onset of fever. The fat and capsule are trimmed off the tissue, which is then minced with scissors and ground up with sand in a mortar and pestle or in a tissue grinder. The resulting slurry is centrifuged at 1 500 g for 15 minutes. The small volume of supernatant fluid is aspirated and constitutes the antigen preparation.
If freeze-dried rinderpest vaccine is used as the standard antigen, it should be reconstituted in a minimal volume of PBS. Reconstitution is essential because the dried virus is hygroscopic. If used unhydrated, it will rapidly absorb water from the gel, swell and overflow the well.
Safe antigens can also be prepared singly from cells that remain after the routine production of attenuated cell culture-adapted rinderpest virus vaccine (Rossiter and Mushi, 1980). The cells are removed mechanically from the glass, washed twice in PBS and finally resuspended in PBS to 1 percent of the original volume of tissue culture fluid. The cell harvest is either ultrasonicated on ice at 20 kHz for three cycles of ten seconds or subjected to three rapid cycles of freezing and thawing. The disrupted cells are sedimented at 800 g for five to ten minutes and discarded. The supernatant fluid stored in 0.2-ml aliquots at -20°C is used as the antigen.
Suspect antigen. Samples of peripheral lymph nodes are collected by aspiration biopsy using a wide-bore needle attached to a 10- or 20-ml syringe previously heparinized. The plug of tissue is ejected into a small Ten-Broeck tissue grinder, squeezed and placed into a suspect antigen well. Plugs of tissue may also be ejected directly into a suspect well.
Gum debris is collected on a spatula or finger rubbed across the eroded gums and then packed, unprocessed, into suspect antigen wells.
Tears are absorbed on to cotton swabs inserted into the conjunctival sac behind the lower eyelid. The antigen is extracted by placing the swab in the barrel of a sterile 2-ml syringe, adding 150 m l PBS and then squeezing out drops of fluid into the suspect antigen wells.
Lymph nodes from carcasses are kept on ice until processed as described for the preparation of standard rinderpest antigen. If no fluid is evident in the lymph node slurry after centrifugation, the slurry is rehomogenized and recentrifuged after a minimal volume of PBS is added.
Method
1. Stamp the standard well pattern into a firm gel and remove the plugs of agar.2. Place the dish or slide so as to give a centre row of three wells bounded on each side by a row of two wells (see Figure 17). Mark the position of the top well on the bottom of the Petri dish or slide.
3. Dispense the standard control antigen with a Pasteur pipette into the centre well, taking care to ensure that the fluid antigen does not overrun on to the surface of the agar.
4. Dispense the suspect antigen into the upper right and left lateral wells and the bottom well of the central row, using a fresh Pasteur pipette.
5. Dispense undiluted hyperimmune anti-rinderpest rabbit serum on to the top well of the centre row and into the lower right and left lateral wells, using a fresh pipette.
6. Transfer the plates and slides to the humidity box. If the Petri dishes are to be closed, line the inside of the lid with filter-paper first; lids, however, are not necessary.
7. Keep the humidity box at room temperature, provided the ambient temperature is below 40°C. If it is higher, the humidity box should be stored in the refrigerator at 8° to 10°C.
8. Remove the suspect antigen preparation 15 to 30 minutes after the wells have been charged. This is said to accentuate the speed, specificity and quality of reactions.
9. Examine the plates and slides after two, 12, 24 and 36 hours. Readings are facilitated by oblique lighting (see Figure 18).
Assessment of results
First, examine the two reaction arenas between the well containing the standard antiserum and the central well containing the standard control antigen. Straight white lines of precipitate should be clearly visible; if not, delay reading the test. If the suspect antigen is rinderpest, similar lines should form between the wells containing the suspect antigen and the antiserum wells and they should merge with the line of the control precipitate (see Figure 19). Occasionally, more than one line of precipitate develops, but the only significant line is the one merging with the control line.
Failure to demonstrate a positive reaction between the suspect sample and the hyperimmune anti-rinderpest serum does not invalidate the presumptive field diagnosis of rinderpest. Only positive results are meaningful.
Counterimmunoelectrophoresis (CIEP) is a marriage of AGID and electrophoresis. The technique exploits the electrophoretic flow of most antigen preparations through a gel towards the anode (+) and the counterelectroendosmotic flow of antibody towards the cathode (-) when an electric current is applied across the gel. The current thus speeds up the basic movement of the reagents in AGID to give quicker results. Two groups working independently adapted the method to the diagnosis of rinderpest: Ali and Lees (1979) used a run time of 80 minutes, whereas Rossiter and Mushi (1980) detected positive reactions within 40 minutes .The technique is more sensitive than AGID and yields results at ambient temperatures up to 50°C. Although originally developed for use in the field (using petrol-driven generators or batteries), it has been used mainly in the laboratory.
Equipment
Levelling table. Not essential, but it enables level coating of the slides.
Moulds. Plastic moulds to hold standard microscope slides for coating. They are not essential but they ease the task.
Template. A clear plastic template with rows of holes 3, 4 and 5 mm in diameter positioned 3, 4 and 5 mm apart. The templates are available commercially but are easy to make in the laboratory workshop. Even simpler is to place the slide over 1-mm-squared graph paper.
Gel cutter. Available commercially in 3-, 4- and 5-mm diameter sizes.
FIGURE 17. Well pattern for immunodiffusion

FIGURE 18. Reading an AGID plate
FIGURE 19. Positive and negative or non-specific immunodiffusion reactions

Suction pump. A water-jet filter/vacuum pump run off a water tap.
Glassware. Includes 500-ml conical flask, 30-ml screw-capped bottles, standard microscope slides and Pasteur pipettes.
Wicks. Two 50- to 75-mm-long strips are cut from a reel of fast flow-rate chromatography paper. Alternatively, wicks are made from one or more layers of Whatman No. 1 filter-paper.
Immunoelectrophoresis apparatus. A flat-bed unit designed for electrophoresis and consisting of a base fitted with removable buffer trays, wire electrodes and a safety lid. It is used in conjunction with a high-output electrophoresis power pack designed to operate at a constant voltage between 5 and 500 volts off a mains supply of electricity. The commercially available immunoelectrophoresis apparatus is expensive but very efficient if the electricity supply is stable. If the mains electricity supply is liable to fluctuate, use a petrol-driven electricity generator.
Field kit. CIEP has been run in the field using the standard immunoelectrophoresis equipment run off a portable electricity generator (Rossiter, 1984). The test can also be performed using a direct current (d.c.) - to-alternating current (a.c.) converter to step up the current from a 12-volt car battery to the 110 to 240 volts necessary to operate an immunoelectrophoresis power pack; the car engine must be kept running to recharge the battery (Rossiter, 1984).
A cheaper, less cumbersome alternative was devised by Injairu (1984). He replaced the flatbed unit with a clear-lidded polystyrene box (174 × 115 × 60 mm), containing two smaller polystyrene boxes (72 × 41 × 20 mm) as buffer trays, and used a block of plastic (25 mm high) as the microscope slide bed (see Figure 20). Power was supplied by six 9-volt alkaline batteries or seven rechargeable nickel cadmium 8.4-volt batteries, linked in series by battery clips. The system is designed to give an electric field strength of 7 volts per centimetre of gel. The electrodes in the buffer trays are platinum wires connected to the positive and negative terminals at the opposite ends of the row of batteries by appropriately colour-coded electric wire. The test slide is linked to the circuit by paper wicks.
Reagents
Agar. A high-grade agar, such as Ion Agar No. 2 or Agarose formulated for high electro-osmosis.
Anti-rinderpest serum. Hyperimmune anti-rinderpest serum prepared in rabbits
Standard rinderpest antigen. Lymph nodes from cattle, goats or rabbits infected respectively with virulent bovine, caprinized or lapinized rinderpest viruses and cell culture-adapted rinderpest virus vaccine.
Standard negative antigen. Prepared from uninfected calf kidney cells.
Suspect antigens. The preferred tissues from live animals are gum debris, lymph node biopsies and tears. The preferred tissues from dead or killed animals are mesenteric lymph nodes if the carcasses are fresh or, otherwise, carcass lymph nodes.
Preparation of reagents
Agar gels. Standard microscope slides are coated to a depth of 1.5 to 2 mm as follows:
1. Prepare 2 percent agar gels in 25 mM veronal-acetate buffer (pH 8.6) by dissolving 1 g agar in 200 ml buffer. Heat gently in a boiling water bath with frequent agitation. Bring the solution to boil for five minutes only to ensure that the agar dissolves completely. Alternatively, if available, a microwave oven can be used to melt the agar.2. Add 0.1 g thiomersal or 0.2 g sodium azide and shake until the bacteriostat has dissolved.
3. Keep the agar solution fluid by holding the flask at 56°C in a water bath or by storing it in 30-ml screw-capped bottles at room temperature. The stored gel can be liquefied repeatedly either by immersing the screw- capped bottle in boiling water or by autoclaving the bottle at 110°C for ten minutes.
4. Position the standard microscope slides in the plastic moulds on a levelling table and seal the gaps between the slides with molten agar. When the seals have set, cover the surface of the slides with molten agar using approximately 3 to 5 ml of agar solution per slide. Disperse bubbles in the agar by flaming the surf ace. Allow 20 minutes for the gel coats to solidify.
Reaction arenas. Using a template, stamp into the agar-gel coat a pattern of the requisite number of pairs of reagent wells using one, two or three parallel rows as necessary. Remove the agar plugs by suction. A standard microscope slide can carry nine pairs of wells in three parallel rows of three pairs, which allows the testing of seven suspect samples together with negative and positive controls (see Figure 21).
Anti-rinderpest serum. Each batch of hyper-immune anti-rinderpest rabbit serum should be assayed in block titrations against dilutions of standard rinderpest antigen. Serum dilutions are prepared in veronal-acetate buffer. Most batches have an optimal titre for antigen detection by CIEP of 1 in 8.
Standard rinderpest antigen. Prepared as for AGID. The shelf-life of standard positive control antigen destined for use in the field is enhanced by adding 2 mM of phenylmethyl-sulphonylfluoride, an antiprotease agent.
Standard negative antigen. The standard negative antigen is derived from uninfected calf kidney cells, which are scraped off the walls of the culture vessels and processed in the same way as the standard positive antigen.
Suspect antigen. Suspect antigens should be collected from animals in the early erosive-mucosa phase of the disease. Animals that die late in the disease are emaciated and soiled with fluid faeces, and therefore are not good donors of antigens. Similarly, samples should not be taken from decomposed carcasses.
Gum debris is collected from the animals by running a spatula or finger across the affected gums. Lymph node specimens are collected by aspiration biopsy from live animals. If the donor is dead, mesenteric nodes yield better results than peripheral nodes, but the carcass must be fresh. Tears are absorbed on to cotton swabs inserted into the conjunctival sac behind the lower eyelid.
The gum debris and lymph node biopsies are used unprocessed and, where possible, undiluted. The antigen in tears is eluted by squeezing the swabs in 150 m l PBSA in the barrel of a 2-ml syringe. Lymph nodes from carcasses are kept on ice until processed by trimming off the fat, removing the capsules, mincing the parenchyma with scissors and homogenizing, using a mortar and pestle with sand or a tissue grinder. The resulting slurry is centrifuged at 1 500 g for 15 minutes and the small volume of supernatant fluid is aspirated and constitutes the antigen. If no fluid is evident, the slurry is rehomogenized with a minimal volume of PBS, that is, not more PBS than slurry, and recentrifuged to allow the supernatant fluids to be harvested.
Method
1. Stamp a well pattern appropriate to the number of specimens to be examined, allowing one pair of wells for a control positive reaction and one pair for a control negative reaction. The siting of the control reactions is arbitrary. Remove the agar plugs and transfer the slide to the cold, flat-bed of the immunoelectrophoresis cell.2. Fill the buffer trays with veronal-acetate buffer.
3. Link each end of the coated slide to the electric circuit by paper wicks presoaked in veronal-acetate buffer. One end of the wick is immersed in the veronal-acetate buffer in the appropriate buffer tray and the other is pressed firmly on to the gel at the end of the slide, using an overlap of about 5 mm.
4. Using individual Pasteur pipettes, dispense the suspect antigen preparations first, then the negative antigen preparations and, finally, the known positive antigen preparation into the wells situated on the cathodal side of each pair; antigens flow towards the anode (+). Take care not to overfill the wells.
5. With a Pasteur pipette dispense the known optimal dilution of the standard anti-rinderpest serum into the wells on the anodal side of each pair; antibodies flow towards the cathode (-).
6. Close the lid of the immunoelectrophoresis cell or polystyrene box.
7. Switch on and run for 40 to 60 minutes. Commercial units use a constant 250 volts. The electric field strength produced by batteries in series is 7 volts per centimetre of gel. The reaction does not appear to be affected by high ambient temperatures.
8. Switch off and examine for white lines of precipitate between the pairs of wells. Readings are facilitated by oblique light.
9. Prepare permanent preparations by washing overnight in PBSA and then in running tap-water. Dry the slides by clamping them between glass or plastic plates lined with blotting-paper. When dry, stain the slides with Coomassie brilliant blue R-250 for five to ten minutes, wash them in three changes of a destaining solution containing 45 ml of 96 percent ethyl alcohol, 45 ml glacial acetic acid and 10 ml pure water. Destain to a faint blue background.
10. Destroy the wicks, which will be infected.
FIGURE 20. Plan of a battery-operated counterimmuno-electrophoresis kit (A)

FIGURE 20. Plan of a battery-operated counterimmuno-electrophoresis kit (B)

FIGURE 21 Well pattern for testing seven suspect samples together with positive and negative controls

Assessment of results
First examine the reaction arenas between the control reagents; one to three lines of precipitate should be visible between the control positive antigen well and the antibody well. No precipitation should be visible between the control negative antigen well and the antibody well.
If the suspect antigens are rinderpest antigens, similar lines should be visible between the wells (see Figure 22). Failure to demonstrate a positive reaction between a suspect sample and hyperimmune anti-rinderpest serum does not invalidate the presumptive field diagnosis of rinderpest. Only positive results are meaningful.
Passive or indirect haemagglutination is a classical immunological test in which antigen or antibody is linked chemically to preserved red blood cells (RBC). The labelled cells are then used to detect the appropriate antigen or antibody in a simple agglutination test. The technique is rapid and more sensitive than a precipitation test and deserves to be more widely employed than it is.
Equipment
Centrifuge. Bench-type.
Water bath. To run at 37°C or 56°C.
FIGURE 22. Positive and negative counterimmuno-electrophoresis reactions (A)

FIGURE 22. Positive and negative counterimmuno-electrophoresis reactions (B)

Magnetic stirrer. Complete with followers.
Refrigerator. Domestic type.
Microplates. U-shaped, 96-well microtitre plates.
Diluters and droppers. To dispense 50-m l volumes.
Glassware. Pipettes, centrifuge tubes, bottles and conical flasks.
Reagents
Sheep red blood cells. Blood collected from the jugular vein into an equal volume of Alsever's solution.
Preservative. 40 percent aqueous formaldehyde (handle with care in a well-ventilated area or safety hood).
Salines. Normal saline (0.85 percent) and phosphate-saline buffer (Note: This is not PBS).
Buffer. Borate-succinate buffer, pH 7.5.
Tannic acid
Anti-rinderpest serum. Hyperimmune anti-rinderpest serum prepared in rabbits.
Normal serum. Collected from rabbits before inoculation with rinderpest virus.
Standard rinderpest antigen. Prepared as described for AGID.
Standard negative antigen. Prepared similarly from the lymph nodes of normal cattle, goats and rabbits or from uninfected cell cultures.
Suspect antigen. Prepared as described for AGID.
Preparation of reagents
IgG preparations. Rinderpest IgG and "normal" rabbit IgG are prepared from hyperimmune anti-rinderpest rabbit serum and preinoculation rabbit serum by fractionation as described in the section on immunofluorescence. Serial twofold dilutions of the two preparations in PBS are used to assess the potencies of the two preparations in chessboard PHA tests using known positive rinderpest antigen.
Sheep red blood cells. The cells are tanned and preserved as follows:
1. Centrifuge the harvested cells in Alsever's solution at 1 500 g for 15 minutes and discard the supernatant fluid.2. Wash and centrifuge the cells three times with 40 volumes of normal saline.
3. Resuspend the packed red blood cells in phosphate-saline buffer to give a 4 percent (v/v) suspension.
4. Add 2.5 mg tannic acid to 50 ml phosphate-saline buffer and mix with an equal volume of 4 percent red blood cell suspension.
5. Incubate in a water bath at 37°C for one hour.
6. Centrifuge gently at 100 g for 20 minutes; higher speeds will agglutinate the cells.
7. Divide the sedimented cells into two aliquots and wash each with 50 ml phosphate-saline buffer.
8. Recentrifuge both aliquots at 100 g for 20 minutes.
9. Resuspend one pellet of cells in 100 ml of the known working dilution of the rinderpest IgG preparation in phosphate-saline buffer.
10. Simultaneously resuspend the second pellet of cells in a similar dilution of the "normal" rabbit IgG preparation.
11. Incubate in a water bath at 37°C for 30 minutes.
12. Wash each aliquot in 100 ml borate-succinate buffer, centrifuging at 100 g for 20 minutes.
13. Resuspend both sets of red blood cells in 100 ml borate-succinate buffer.
14. Add 100 ml of 40 percent aqueous formaldehyde, drop by drop, to both cell suspensions, stirring continuously.
15. Leave overnight at 4°C.
16. Add a further 10 ml of 40 percent formaldehyde to both suspensions.
17. Leave to settle for 24 hours at 4°C.
18. Decant the supernatant fluid.
19. Add 500 ml borate-succinate buffer, shake vigorously and leave for one day at 4°C.
20. Decant the supernatant fluid and then wash the cells in borate-succinate buffer.
21. Adjust the cell suspension to 1 percent (v/v) and add 40 percent formaldehyde to give a final concentration of 0.2 percent.
22. Store at 4°C for up to two years.
Method
1. Position the microtitre plates to form eight rows and 12 columns.2. Add 50 m l PBS to all wells in rows 1 through 6.
3. Double dilute 50 m l of the standard rinderpest antigen across the plate up to the eleventh well in rows 1 and 4.
4. Double dilute 50 m l of the standard negative antigen across the plate up to the eleventh well in rows 2 and 5.
5. Double dilute 50 m l of the suspect antigen across the plate up to the eleventh well in rows 3 and 6.
6. Drop 50 m l of the tanned red blood cell suspension labelled with rinderpest IgG into each well in rows 1 through 3.
7. Drop 50 m l of the tanned red blood cell suspension labelled with "normal" rabbit IgG into each well in rows 4 through 6.
8. Carefully shake the plates to mix the reactants.
9. Cover the plates and incubate at ambient temperature for one hour.
10. Read test results (see Figure 23).
Assessment
Agglutinated cells settle as a complete sheet over the bottom of the well whereas non-agglutinated cells settle in a neat button. The degree of agglutination is scored on an ascending scale from zero to four. The test is void if the cell controls in column 12 fail to form buttons. A suspect antigen is deemed positive if its titre in cells labelled with rinderpest IgG is four times higher than its titre in cells labelled with "normal" rabbit IgG.
FIGURE 23. Passive haemagglutination test plate layout
Immunofluorescence (IF) depends on the coupling of intracellular viral antigens with virus-specific antibodies, the reaction being detected by conjugating the immunoglobulins with fluorescein isothiocyanate (FITC) which fluoresces apple green when stimulated by ultraviolet (UV) or blue light.
Earlier attempts to develop useful diagnostic tests based on immunofluorescent microscopy failed, largely owing to the high levels of nonspecific background fluorescence encountered. Improved methods of preparing and purifying specific antiserum have largely overcome these difficulties and immunofluorescence is now firmly placed among the diagnostician's range of tests.
Immunofluorescence offers an alternative to agar-gel immunodiffusion tests for confirming the presence of rinderpest antigens in field material or in infected cell cultures. In the latter, immunofluorescence staining is capable of confirming a diagnosis several days before the development of cytopathic effects. Although subject to cross-reactivity with antigens of PPR, host-range considerations will rule out the need for differential diagnosis in all but exceptional cases. If rinderpest-specific and PPR-specific monoclonal antibodies are available, these should be substituted for the hyperimmune rabbit serum.
Equipment
Microscope. An incident-light fluorescent microscope using a 50- to 200-watt high-pressure mercury vapour bulb as the light source and equipped with the appropriate FITC interference and barrier filters.
Cryostat. Not essential but recommended. Tissues are frozen in liquid nitrogen and cut to give 6-m m-thick sections.
Cytocentrifuge. Not essential, but acytocentrifuge enables the preparation of discrete mono-layer smears of cells from suspensions of lymph nodes collected by aspiration biopsy from live animals.
Refrigerated centrifuge. To run at 4°C.
Chromatography columns. Not essential, but chromatography columns speed the separation of IgG from rabbit serum when packed with an anion-exchange cellulose labelled with Protein A. They also ease the task of desalting immunoglobulin mixtures when packed with a medium-grade gel.
Spectrophotometer. Not essential, but a spectrophotometer makes estimating protein concentrations easier.
Slides and coverslips. Standard microscope slides (75 × 25 × 1 mm) and coverslips cleaned of grease.
Staining rack. Stainless steel.
Incubator. Set at 37°C.
Humidity box. Polystyrene box with lid (174 × 115 × 60 mm). A moist paper towel covers the floor of the box.
Refrigerator. Domestic type with freezer compartment.
Reagents
Fixative. Analytical quality acetone.
Normal saline. 0.85 percent sodium chloride in pure water.
PBS. Sterile phosphate-buffered saline.
Anti-rinderpest serum. Hyperimmune anti-rinderpest serum prepared in rabbits. The serum is conjugated with FITC for use in direct IF.
Protein A sepharose. Commercially available diethylaminoethyl (DEAE) cellulose labelled with Protein A, an IgG-binding reagent extracted from Staphylococcus aureus.
Chromatography gel. Medium-grade gel such as Sephadex G-25.
Fluorescein isothiocyanate (FITC). Isomer 1, available commercially.
FITC-conjugated anti-rabbit serum. Available commercially and used in indirect IF.
FITC-labelled Protein A. Available commercially and used as an alternative to FITC-conjugated anti-rabbit serum.
Mountant. Iris-buffered glycerol, pH 9.0.
Immersion oil. Fluorescence microscopy grade.
Preparation of reagents
Anti-rinderpest IgG. It is essential that the specific immunoglobulins are separated from the whole serum prior to conjugation in order to avoid labelling non-antibody serum proteins, which cause non-specific fluorescence. A simple, practical method is precipitation of the immunoglobulins with saturated ammonium sulphate solution. The steps are as follows:
1. Chill the anti-rinderpest rabbit serum, normal saline and the saturated solution of ammonium sulphate by immersing the containers in a water-ice bath.2. Dilute the cold serum with an equal volume of cold normal saline and add one volume of cold saturated ammonium sulphate to two volumes of the diluted serum.
3. After one hour in the ice bath, centrifuge the mixture at 1 000 g for 30 minutes.
4. Wash the pellet of precipitate vigorously with cold 40 percent (v/v) saturated ammonium sulphate in pure water. Centrifuge and repeat washing.
5. Resuspend the washed precipitate in a volume of normal saline equal to the original volume of diluted serum.
6. Reprecipitate the globulins by mixing two volumes of resuspended precipitate and one volume of saturated ammonium sulphate solution.
7. Stir at room temperature for 30 minutes and then centrifuge at 1 000 g for 15 minutes.
8. Wash the pellet with 40 percent (v/v) saturated ammonium sulphate in pure water
9. Centrifuge and repeat the washing with 40 percent saturated ammonium sulphate.
10. Finally, redissolve the pellet in a minimal volume of PBS.
11. Either dialyse the immunoglobulin preparation against 5 litres of PBS overnight at 4°C or desalt it by passing it through a chromatography column packed with a medium-grade gel such as Sephadex G-25.
12. Assess the immunoglobulin concentration of the immunoglobulin solution using the zinc sulphate turbidity (ZST) test:
Measure into 10-ml Evans Electroselenium Ltd (EEL) colorimeter tubes 6 ml of pure water boiled for 15 minutes as a control and 6 ml of zinc sulphate solution. Add 0.1 ml of the immunoglobulin solution to each, mix the contents gently and incubate at room temperature for 60 minutes. Mix the tubes again to ensure an even distribution of the precipitate and read in the colorimeter using a blue-green filter (Ilford No. 623). The turbidity is obtained by subtracting the reading of the control tube (C) from that of the test-tube (T) and multiplying by 10:
ZST units = (T - C) × 10A turbidity standard equivalent to 20 ZST units can be prepared from barium sulphate.
13. A linear correlation exists between ZST units and immunoglobulin concentrations in mg/ml such that:
IgG (mg/ml) = (0.97) × (ZST unit) - 1.95A working approximation, therefore, is to convert the ZST value into mg/ml by subtracting 2.
14. Adjust IgG concentration with PBS to give 10 mg/ml.
15. Store at 4°C.
Conjugate the immunoglobulin solution as follows:
1. Dispense a known volume of the immunoglobulin solution (10 mg/ml) into a small beaker and chill at 4°C.2. Add an equal volume of 10 percent 0.1 mol/litre carbonate-bicarbonate buffer pH 9.0.
3. Prepare a 1 mg/ml solution of FITC in carbonate-bicarbonate buffer. The amount required is 1 mg FITC per 100 mg protein.
4. Add the calculated volume of the FITC solution, drop by drop, to the immunoglobulin solution at 4°C.
5. Adjust to pH 9.0, if necessary, with 0.1 mol/litre sodium hydroxide.
6. If the volume of immunoglobulin solution to be labelled is less than 20 ml, stir gently at room temperature for two hours; if greater, stir overnight at 4°C.
7. Dialyse the conjugate against several changes of PBS at pH 7.3, or desalt through Sephadex G-25.
8. Add 0.1 percent sodium azide as a preservative and store at 4°C. If long storage is required, divide the conjugated immunoglobulins into small aliquots and store them frozen; avoid repeated freezing and thawing of aliquots.
9. Determine the titre of the conjugated immunoglobulins by testing serial dilutions of an aliquot against known rinderpest-infected cells. The end-point is the highest dilution giving fluorescence scored as 4 on a scale of 0 to 4. The working dilution in routine direct IF tests is:
4 × (1/e)where (1/e) is the end-point dilution.
Method
Preparatory steps
1. Smears and frozen cryostat sections of lymph nodes, liver and kidney are air-dried and fixed in two changes of acetone precooled at -20°C for five minutes each at room temperature.2. Flying coverslips are removed from cell cultures infected with suspect tissue suspensions, washed twice in PBS, once in deionized water, and wet-fixed in two changes of cold acetone for five minutes each at room temperature.
3. Run tests of suspect specimens alongside known positive specimens.
Direct immunofluorescence (see Figure 24).
1. Place the slides on a level surface in the humidity box and flood with the previously assessed working dilution of conjugated anti-rinderpest immunoglobulin in PBS.2. Close the lid of the humidity box and incubate at 37°C for 30 to 60 minutes.
3. Remove the slides and wash in three changes of PBS for 30 seconds each.
4. Air-dry and mount under coverslips in Tris-buffered glycerol.
5. Examine by fluorescence microscopy.
Indirect immunofluorescence (see Figure 25).
1. With the slides on a level surface in the humidity box, flood them with a 1 in 10 dilution of hyperimmune anti-rinderpest rabbit serum in PBS.2. Close the box and incubate at 37°C for 60 minutes.
3. Remove the slides and wash gently in three changes of PBS for ten minutes.
4. Air-dry and return to the humidity box.
5. Flood with the previously assessed working dilution of FITC-conjugated anti-rabbit goat serum or FITC-labelled Protein A solution.
6. Close the box and reincubate at 37°C for 30 minutes.
7. Wash the slides in three changes of PBS.
8. Air-dry and mount under coverslips in Tris-buffered glycerol.
9. Examine by fluorescence microscopy.
Monoclonal antibody-based indirect immunofluorescence. If monoclonal antibody against rinderpest virus is available, this may be substituted for the hyperimmune anti-rinderpest rabbit serum. In this case, FITC-conjugated anti-mouse rabbit serum must be used for the detection of the monoclonal antibody (see Figures 26 and 27).
Assessment of results
The control slides are examined first to confirm that specific intracytoplasmic fluorescence has occurred. Only intracellular fluorescence should be taken into account. The fluorescence is apple-green in colour.
Considerable necrosis with resultant extra-cellular antigen makes definition difficult in lymphoid tissues and areas of epithelial lesion. Clearly defined cells with intracellular antigen are found at the periphery of lesions, around blood vessels and in the kidney and liver. The two latter tissues are particularly useful because there is virtually no staining of surrounding healthy cells.
Immunoperoxidase staining (IPS) is analogous immunofluorescence and localizes viral antigens in cells using enzyme-labelled immunoglobulins. This technique has the advantage of producing permanent stained preparations examinable under a standard light microscope. Direct and indirect techniques of IPS are available (see Figures 28 and 29).
Equipment required
Microscope. Light microscope equipped with 10× and 4× objectives.
Cryostat. Not essential but recommended. Tissues are frozen in liquid nitrogen before being cut into 6-m m-thick sections.
Cytocentrifuge. Not essential but assists in the examination of cells from lymph node biopsies.
Slides and coverslips. Standard microscope slides (75 × 25 × 1 mm) and coverslips cleaned of grease.
FIGURE 24 Principal steps in direct immunofluorescence (A)

FIGURE 24 Principal steps in direct immunofluorescence (B)

FIGURE 24 Principal steps in direct immunofluorescence (C)

Staining rack. Stainless steel.
Humidity box. A clear polystyrene box (174 × 115 × 60 mm) with lid suffices when a moist paper towel is used to line the floor of the box.
Incubator. Set to run at 37°C.
Refrigerator. Domestic type.
Freezer. Temperature at least -20°C, preferably -70°C.
Reagents required
Horse radish peroxidase (HRP). Freeze-dried crystalline with a Reinheitszahl (RZ) = 3.0. It is available commercially.
HRP-labelled anti-rabbit serum. Available commercially and used in indirect immunoperoxidase staining.
Fixative. Analytical quality acetone.
Hydrogen peroxide methanol solution. Required to remove endogenous peroxidase. Prepared by diluting 3 ml of 30 percent hydrogen peroxide with 97 ml methanol.
FIGURE 25. Principal steps in indirect immunofluorescence (A)

FIGURE 25. Principal steps in indirect immunofluorescence (B)

FIGURE 25. Principal steps in indirect immunofluorescence (C)

FIGURE 25. Principal steps in indirect immunofluorescence (D)

PBS. Sterile phosphate-buffered saline.
Anti-rinderpest serum. Hyperimmune anti-rinderpest serum prepared in rabbits. The serum is labelled with horseradish peroxidase when used in direct IPS.
Enzyme substrates. A 0.05 percent solution of 3,3'-diaminobenzidine tetrahydrochloride in the presence of 0.15 percent hydrogen peroxide. Care is required as the preparation is carcinogenic.
Counterstains. Harris' haematoxylin and 1 percent ammonium hydroxide.
Alcohols. 50, 70, 95 and 100 percent concentrations of ethanol.
Clearing agent. Either low sulphur xylene or "Histo-Clear" (National Diagnostics, Somerville, New Jersey 08876, United States).
Mountants. Tris-buffered glycerol pH 9.0 and Kirkpatrick and Lendrum's DPX.
Preparation of reagents
HRP-labelled anti-rinderpest serum. As with IF, it is essential in IPS that the specific immunoglobulins be separated from the whole serum before labelling. The final immunoglobulin solution for IPS-labelling is adjusted to 8 mg per millilitre. Labelling proceeds as follows:
1. Dissolve 4 mg HRP in 1 ml of water.2. Add 0.2 ml of freshly made 0.1 mol/litre sodium periodate.
3. Dialyse the HRP solution overnight at 4°C against the sodium acetate buffer, pH 4.4.
4. Dilute one volume of stock carbonate-bicarbonate buffer in four volumes of pure water.
5. Add 20 m l diluted buffer to the activated HRP solution and at once add 1 ml immunoglobulin preparation (8 mg/ml).
6. Stir for two hours at room temperature.
7. Add 0.1 ml of freshly prepared sodium borohydride solution (4 mg/ml water) and hold at 4°C for two hours.
8. Add an equal volume of saturated ammonium sulphate solution drop by drop, stirring constantly.
9. Centrifuge at 1 000 g for 15 minutes.
10. Discard the supernatant and resuspend the precipitate in half-saturated ammonium sulphate solution.
11. Repeat the centrifugation and washing in half-saturated ammonium sulphate solution.
12. Discard the supernatant and resuspend the washed precipitate in 1.0 ml PBS.
13. Dialyse the suspension against PBS for several days at 4°C or desalt through Sephadex G-25.
14. Add bovine serum albumin to 1 percent and pass the labelled immunoglobulins through a 0.22-m m filter.
15. Store in small aliquots at -20°C.
16. Determine the titre of the labelled immunoglobulins by testing serial dilutions of one aliquot against known rinderpest-infected cells. The end-point dilution is the highest dilution giving a reaction scored as 4 on a scale of 0 to 4. The working dilution in routine direct IPS tests is: 4 × (1/e), where (1/e) is the end-point dilution.
Method
Preparatory steps
1. Run tests of suspect specimens alongside known positive specimens.2. Smears and sections are air-dried and fixed in two changes of acetone, precooled at -20°C for five minutes each at room temperature.
3. Flood the slides with hydrogen peroxide methanol solution for 45 minutes, by which time effervescence should have stopped.
4. Wash the slides in PBS, blot dry except for the specimen area and then place on a level surface in the humidity box.
Direct immunoperoxidase staining
1. Flood slides with the previously assessed working dilution of HRPO-labelled anti-rinderpest immunoglobulins in PBS.2. Close the lid of the humidity box and incubate at 37°C for two hours.
3. Remove the slides and rinse thoroughly with large volumes of PBS.
4. Flood the slides with the benzidine substrate for ten minutes at room temperature and then wash with PBS and rinse in running tap-water until all crystals have disappeared.
5. Counterstain by immersing the slides in Harris' haematoxylin for 90 seconds, blue in 1 percent ammonium hydroxide solution for three to five seconds and then rinse in water.
6. Either mount while wet under a coverslip using Tris-buffered glycerol or dehydrate by immersion for four minutes each in 50, 70, 95 and 100 percent ethanol, clear in xylene or "Histo-Clear" and mount in DPX.
7. Examine by light microscopy.
Indirect immunoperoxidase staining
1. Flood the slides on a level surface in the humidity box with a 1/10 dilution of hyperimmune anti-rinderpest rabbit serum in PBS.2. Close the lid and leave at 37°C for one hour
3. Remove the slides and wash gently in three changes of PBS for ten minutes.
4. Air-dry slides and replace in humidity box.
5. Flood the slides with the previously assessed working dilution of HRP-labelled anti-rabbit goat serum.
6. Close the box and reincubate at 37°C for 30 minutes.
7. Remove the slides and rinse thoroughly in large volumes of PBS.
8. Flood the slides with benzidine substrate for ten minutes at room temperature and then wash with PBS and rinse in running tap-water until all crystals have disappeared.
9. Counterstain in Harris' haematoxylin for 90 seconds, blue in 1 percent ammonium hydroxide for three to five seconds and then rinse in water.
10. Either mount in Tris-buffered glycerol while wet or dehydrate by immersion for four minutes each in 50, 70, 95 and 100 percent ethanol, clear in xylene or "Histo-clear" and mount in DPX.
11. Examine by light microscopy.
Monoclonal antibody-based indirect immunoperoxidase. If monoclonal antibody against rinderpest virus is available, this may be substituted for the hyperimmune anti-rinderpest rabbit serum. In this case, HRPO-conjugated anti-mouse rabbit serum must be used for the detection of the monoclonal antibody.
Assessment of results
The known positive control slides are examined first to confirm that specific staining has occurred in the cytoplasms of infected cells. HRP oxidized by benzidine in the presence of hydrogen peroxide turns dark brown in colour.
The test is a monoclonal antibody-based indirect sandwich ELISA (see Figures 30 and 31). It is also capable of the differential diagnosis of both rinderpest and PPR antigens. Suspect antigen is trapped by an anti-nucleocapsid MAb (cross-reactive with both rinderpest and PPR) and detected by rinderpest-specific and PPR-specific biotinylated anti-nucleocapsid MAbs. Binding of the second MAb is detected using streptavadin-peroxidase conjugate. Rinderpest and PPR virus antigens may be detected in ocular, nasal and buccal secretions and in lymph node, lung and spleen tissue samples .The assay is available in kit form from CIRAD/EMVT, 10 Pierre Curie, 94704 Maisons-Alfort, Paris, France.
Equipment required
Incubator or hot room. Any type of warm wall incubator maintained in the range of 37°C to 39°C.
Orbital shaker
ELISA reader. Multichannel spectrophotometric ELISA plate reader with interference filter of 492 nm.
Multichannel pipettes. Five to 50 m l and 50 to 200 m l volumes.
Single channel pipettes. Five to 50 m l and 50 to 200 m l volumes.
Water purification system. Minimum glass distilled or deionized. Optimum-Millipore, Milli-Q (or equivalent) pyrogen-free water.
Pipette tips. To fit pipettes above. Reagent troughs. For addition of reagents.
Washer. Automatic plate washer of alternatively plastic wash bottles or large reservoir with plastic tap and tubing.
ELISA plates. Flat-bottomed Nunc Maxisorb ELISA plates.
Absorbent paper or towel. Disposable or cloth, lint-free and non-abrasive.
Refrigerator. Any type in the range of 2°C to 6°C.
Freezer. Temperature at least -20°C, preferably -70°C.
Reagents required
Capture antibody. Monoclonal antibody against rinderpest N protein (designated 33-4). Supplied as purified MAb. Store at -20°C.
Detecting antibody. Biotinylated monoclonal antibodies against rinderpest N protein (designated IVB2-4) and the PPR N protein (designated 38-4). Supplied glycerinated. Store at-20°C.
Rinderpest and PPRV reference antigen controls. Culture supernatant from cells infected with RPV or PPRV reference strains.
Negative serum. Freeze-dried rinderpest and PPR-negative lamb serum. Store at 4°C.
Adsorption buffer. Phosphate buffered saline 0.01 M pH 7.4 (PBS).
Blocking buffer. PBS supplemented with 0.05 percent (v/v) Tween-20 (supplied as polyoxyethylene sorbitan monolaurate syrup) and 0.5 percent (v/v) negative lamb serum.
Washing buffer. PBS diluted 1/5 in distilled water supplemented with 0.05 percent (v/v) Tween-20.
Conjugate. Streptavadin conjugated to horseradish peroxidase. Store at -20°C.
Substrate. Urea peroxide tablets. Store at 4°C.
Chromogen. Orthophenylene diamine (OPD) in tablet form (30 mg). Store at 4°C in the dark.
Stopping solution. Sulphuric acid.
Preparation of reagents
Freeze-dried reagents. The freeze-dried reagents should be resuspended in 1 ml of distilled or deionized water and stored at -20°C until used.
Substrate and chromogen. Hydrogen peroxide and orthophenylene diamine (OPD) are supplied in tablet form. Resuspend the hydrogen peroxide tablets in 10 ml of distilled water to give final concentration of 3 percent. Store in dark bottle at 4°C. Resuspend the OPD tablet in 75 ml of distilled water. Immediately before use, add 40 m l to every 10 ml of OPD solution. Unused OPD solution can be stored at -20°C for up to one month.
Sulphuric acid. To prepare 1 M sulphuric acid, slowly add 55 ml of acid to 945 ml of distilled water. Note: Always add acid to water.
FIGURE 30. Immunocapture ELISA
FIGURE 31. Plate layout for immunocapture ELISA
Method
The plate layout for the immunocapture ELISA is shown in Figure 30. Suspect antigen samples should be tested in duplicate against both the anti-rinderpest and the anti-PPR MAbs. Positive RPV and PPRV antigen controls should also be included. Rinderpest and PPR blank controls (eight wells each) must be included, which receive only blocking buffer instead of antigen.
1. Coat ELISA plates with 100 m l of trapping antibody per well at the pre-titrated dilution (see kit recommendations).2. Incubate plates at 37°C on an orbital shaker.
3. To remove unbound antigen, wash plates three times by flooding with washing buffer and emptying. Remove excess fluid by blotting on absorbent paper or towel.
4. Sequencially:
· Add 50 m l of suspect antigen in blocking buffer to duplicate RPV test wells and PPR test wells (sample 1 to A2, A3, A6, A7).· Add 50 m l of RPV (H4, H5, H8, H9) and PPR (H2, H3, H6, H7) reference antigens to quadruplicate control wells.
· Add 50 m l of blocking buffer to the RPV and PPR blank wells (A10 to H10 and A1 to H1).
· Add 25 m l of biotinylated RPV detecting antibody (diluted to kit recommendations) in blocking buffer to duplicate test samples (A6 ,A7, etc.) and the wells of the RPV blank control (A10 to H10).
· Add 25 m l of biotinylated PPR detecting antibody (diluted to kit recommendations) in blocking buffer to duplicate test samples (A2, A3, etc.) and the wells of the PPR blank control (A1 to H1).
· Add 25 m l of streptavadin-peroxidase conjugate (diluted to kit recommendations) in blocking buffer to all wells.
· Incubate plates for 60 minutes at 37°C on an orbital shaker.
5. Wash plates three times in washing buffer to remove unbound reagents. Remove excess fluid by blotting on absorbent paper or towel.
6. Add 100 m l of substrate/chromogen (10 ml OPD + 40 m l H2O2) and allow colour to develop for ten minutes.
7. Stop colour development by adding 100 m l of 1 M sulphuric acid.
8. Read plates on ELISA reader at an absorbance of 492 nm.
Assessment of results
Any samples giving an OD value greater than twice the mean OD value of the blank controls (RPV and PPR, respectively) are considered positive.
Confirmation of a presumptive diagnosis by electron microscopy may be considered at three different levels depending on the skill of the operator.
At the simplest level, electron microscopy outlines virus morphology and, if this is totally distinctive, provides a spot diagnosis. More commonly it only points to a virus family and further tests are required to narrow the choice. This may be done by reacting intact virus particles with specific immune serum and examining the mixtures for virus-antibody complexes. Even here a final answer may not be obtained, since closely related viruses may complex, forming heterologous mixtures. In such instances it may be possible to finalize the diagnosis by comparing the binding rates of homologous and heterologous antisera using immunogold labelling in either a direct or indirect test.
In general, the potential of the electron microscope for rapid rinderpest diagnosis has still to be exploited. For routine purposes it will provide positive results if used to examine the ocular exudates and lymph nodes of infected animals either for intact virus particles or for "herringbone" ribonucleoprotein.
In writing this section it is assumed that a modern electron microscope and the services of a skilled operator are available. There is, at present, no justification for the installation of a specific facility for the diagnosis of rinderpest, and no attempt is made to indicate a preferred model of microscope or preferred techniques.
Equipment required
EM grids. Copper, standard pattern, 200 to 400 mesh.
Forceps. Straight- and curved-tipped stainless-steel tweezers and clamping tweezers.
Electron microscope suite. Complete with a transmission electron microscope capable of 40 000× magnification, supporting preparation laboratory and photographic unit.
Chromatography column. Linked to a fraction collection system.
Centrifuge. Bench-type.
Reagents required
Films. Formvar films coated with carbon.
Negative stains. Phosphotungstic acid.
Filter-paper
Anti-rinderpest serum. Hyperimmune anti-rinderpest serum prepared in rabbits.
Anion-exchange cellulose. DEAE cellulose such as Whatman DE-52.
Preparation of reagents
Phosphotungstic acid. Dissolve in pure water to give a 1 to 2 percent (w/v) solution. The pH is extremely acid and must be adjusted to neutrality by slowly adding drops of 1 M potassium hydroxide.
Anti-rinderpest serum. Centrifuge at 3 000 g for ten minutes to remove any protein precipitate, dilute with buffer and then run through a small column of DE-52 (DEAE cellulose), collecting appropriate fractions. This purified IgG is ready for use in the test.
Methods
Virus in solid tissue.
1. Small pieces of spleen or lymph node, approximately 1 mm3 in size, should be dissected from two or three different areas and ground lightly in one or two drops of water on a glass slide using the end of a glass rod.2. Using a fine-bore pipette or loop, transfer a drop of suspension to a Formvar-coated copper grid and allow to adsorb for ten seconds to several minutes. Alternatively, impression smears may be made by touching the surface of the grid to the freshly cut surface of the tissue. If it is unlikely that the sample will contain a high concentration of virus, it is useful to activate the grid with pentylamine vapour and increase the wettability beforehand by placing the grids in an evacuated chamber to which pentylamine vapour is admitted and a high-voltage glow discharge passed for 20 to 30 seconds.
3. Excess fluid is drained off on to a piece of filter-paper and the grid is washed by adding a drop of phosphate buffer and redraining.
4. Stain by adding a drop of phosphotungstic acid to the grid, leaving it for ten seconds and then draining away the stain with filter-paper. No washing is required and the grid is now ready for examination.
Virus in tears. Ocular secretions have the advantage of being "clean", that is, free of tissue debris.
1. Either transfer a drop to the grid to absorb or float the grid upside down on the surface of the ocular secretion.2. Drain off excess fluid and stain.
Virus in cell culture material. At an appropriate period following the inoculation of virus-infected material on to cell monolayers, virus or ribonucleoprotein may be detected in either the cells or the supernatant fluid. The methods used are those already described. Cell debris is ground and washed as if it were a "dirty" field sample. Supernatant fluid is treated as a clean tissue.
Development of immune complexes. Tests to identify rinderpest virus should be carried out with intact virus particles in the supernatant fluid freshly harvested from infected cell cultures .The sample should be clarified by centrifugation at 3 000 g for five minutes and then mixed in 5 m l volumes with decreasing concentrations of rabbit anti-rinderpest IgG. The mixtures should be incubated for at least one hour at room temperature and then examined by staining on a grid as previously described. In the absence of particle aggregates, further incubation should take place by keeping mixtures overnight at 4°C. Staining is then repeated.
Control mixtures must be included using freshly harvested fluid from uninfected cells mixed and incubated with immune serum.
Assessment of results
Rinderpest-like virus particles or ribonucleoprotein in material from animals with a history of rinderpest-like disease can be regarded as diagnostic. In instances where differentiation is required from PPR, further tests are needed. If mucosal disease is suspected a negative examination for rinderpest is not a conclusive result.
The principle of the polymerase chain reaction (PCR) is the repeated copying of a defined segment of target DNA using specific genome- and anti-genome-sense primers, usually separated by 200 to 400 nucleotides on the genome of interest for diagnostic purposes. With the availability of thermostable DNA polymerases derived from thermophillic bacteria, this repetitive copying of the DNA can be done in a single tube by repeatedly heating the DNA to high temperature (94°C) so as to dissociate the DNA duplex, and then cooling to allow annealing of the primers (37°C to 50°C, depending on the primers used) and finally heating to the optimum temperature (72°C) for the polymerase to copy new DNA. The cycles are repeated 25 to 35 times (25 cycles theoretically increases the concentration of starting DNA 107 times) to produce a DNA product that can be visualized by ethidium bromide staining on an agarose gel. The size of the DNA product is exactly defined by the location of the two primers on the virus genome. Non-specific DNA products, usually of the wrong size, can sometimes be produced and care is needed when interpreting the results.
The genome of all morbilliviruses consists of a single strand of negative sense RNA and therefore cannot be amplified directly by PCR but must first be copied into DNA by reverse transcription in a two-step reaction known as reverse-transcription/polymerase chain reaction (RT-PCR).
Equipment required
RNA preparation
High-speed centrifuge
Low speed centrifuge
Microcentrifuge
UV spectrophotometer
Tissue homogenizer
Suitable centrifuge tubes (preferably disposable)
RT-PCR
Thermocycler
Water baths (2)
Thin-walled 0.75-ml tubes
Agarose gel electrophoresis tank
DC power supply
UV transilluminator
Polaroid camera or electronic camera
Reagents required
RNA extraction
Guanidium thiocyanate
Sarcosyl
Sodium citrate
Sodium acetate
b -2-Mercaptoethanol
Water-saturated phenol (unbuffered)
Buffer-saturated phenol-chloroform
Chloroform
Isoamyl alcohol
Absolute ethanol
Hanks' buffered saline solution (HBSS)
Ficoll (Lymphoprep or Nycoprep, 1.077 density)
Sterile pure water (double glass distilled) or DEPC-treated water
Tris buffer (Tris base)
EDTA
RT-PCR
Reverse transcriptase derived from Moloney Murine Leukaemia Virus (MoMuLV RT)
Taq polymerase (derived from Thermus aquaticus)
Agarose
Hexanucleotide primers
Virus-specific oligonucleotide primers
Tris buffer (Tris base)
HCl
KCl
MgCl2
Boric acid EDTA
Ethidium bromide
BSA (acetylated to inactivate nucleases)
dATP, dGTP, dCTP, dTTP
Preparation of reagents
Tissue disruption solution (solution D). The procedure is that recommended by Chomczyñski and Sacchi (1987) to minimize the hazards of handling the poisonous guanidium thiocyanate. It should be carried out in a chemical safety hood. The following are the amounts required for a 250-g bottle, but the volumes can be adjusted for the other quantities available from the supplier (Fluka). Dissolve the 250 g of guanidium thiocyanate in the manufacturer's bottle in 293 ml sterile distilled water, 17.6 ml 0.75 M sodium citrate, pH 7.0, and 26.4 ml 10 percent sarcosyl. Heat to 65°C in a water bath to dissolve. This stock solution can be kept for several months in the dark at room temperature in a chemical safety cabinet. The final solution D is made by adding 0.36 ml of B-2-Mercaptoethanol to 50 ml of the stock solution. As this solution should not be kept for more than one month, it is best to prepare just enough for a month's needs.
Phenol. To avoid the hazards of preparing pure water-saturated and buffer-saturated phenol for RNA extraction, it is best to buy them ready prepared from a chemical supplier (e.g. Gibco-BRL).
Chloroform/isoamyl alcohol. Mix the two in a ratio of 49 parts chloroform to one part isoamyl alcohol.
2 M sodium acetate. Weigh out the correct amount of acetate and add about half the amount of distilled water needed. Add acetic acid until the pH is 4.2 and make up to the final volume. Autoclave in small aliquots (10 to 20 ml).
Pronase. Pronase is made as a 20 mg/ml solution in 0.01 M Tris-HCl, pH 7.5, 0.01 M NaCl and predigested at 37°C for one hour to eliminate contaminating DNase and RNase. It is stored in small aliquots at -20°C and used at a final concentration of 1 mg per millimetre. 10× reaction buffer stock should be made and stored at room temperature: 0.1 M Tris-HCl, pH 7.8, 0.1 M EDTA, 5 percent SDS.
5 × reverse transcriptase buffer. This is normally supplied by the enzyme manufacturer (note that the concentration may not be 5×) and this should be used. If it is not, mix the necessary sterile stock solutions to give a final concentration of 250 mM Tris-HCl, pH 8.3,15 mM MgCl2, 375 mM KCl. This buffer is suitable for Moloney-Murine leukemia virus (MoMuLV) reverse transcriptase, which is recommended for the procedure as it is much cheaper than reverse transcriptase derived from avian myeloblastosis virus (AMV). The acetylated B S A solution (1 mg/ml) used to stabilize the reverse transcriptase is usually supplied by the manufacturer, and normal BSA must not be used since it contains nucleases.
10 × Taq polymerase buffer. This is normally supplied by the manufacturer and works very efficiently in the PCRs described here .The usual constituents are 200 mM Tris-HCl, pH 8.3, 500 mM KCl, 15 mM MgCl2. Note: Some manufacturers supply the MgCl2 as a 50 mM solution, which must be added separately to give a final concentration of 1.5 mM in the reaction.
Dithiothreitol. This is usually supplied with the enzyme, either in the stock buffer or as a separate solution. If necessary, prepare a 0.1 M stock solution in pure sterile water. Store in small (500 m l) aliquots at -20°C.
dNTP solution. If the individual deoxynucleotides are purchased as solids they must be dissolved in sterile pure water and neutralized or they will not be stable. It is therefore recommended that they are bought as 100 mM stock solutions, which are available from chemical suppliers. These are mixed together and diluted to give a stock solution containing 10 mM each of dATP, dCTP, dGTP and dTTP, i.e. add 10 m l of each 100 mM stock to 60 m l sterile distilled water. Store at -20°C.
10 × Tris-borate buffer (TBE). Weigh out 109 g of Tris base, 55 g of boric acid and 9.3 g of EDTA in a large container. Add distilled water to 1 litre and check that the pH is 8.3.
Agarose gels. For a 50-ml gel weigh out 0.75 to 1.0 g of electrophoresis grade high gelling temperature agarose and add 50 ml of 1× TBE. Melt the agarose (preferably in a microwave oven), cool to 50°C to 60°C, add 10 m l 1.0 mg/ml ethidium bromide solution, mix and pour into the gel former.
Note: Care should be taken when melting and handling molten agarose. Wear protective gloves when handling the flask containing the molten agarose and take care not to come into contact with the ethidium bromide, which is carcinogenic.
5 × agarose gel loading buffer. This can be purchased ready for use or can be made using the following constituents: 20 percent ficoll 400, 25 mM EDTA, 0.05 percent bromophenol blue, 0.03 percent xylene cyanol. For 5 ml, use 1.0 g ficoll, 250 m l 0.5 M EDTA, pH 8.0, 50 m l 5 percent bromophenol blue, 50 m l 3 percent xlyene cyanol.
DNA molecular weight markers. Either 100 or 123 base pair ladders should be used. Dilute 0.5 m l stock (1 m g/m l) in 7 to 10 id agarose gel loading buffer for one well. A ready-to-use diluted stock can be stored at -20°C.
Methods
RNA extraction from tissue samples or PBMCs.
To detect virus-specific RNA in diagnostic specimens, the specimens must be in reasonably good condition since the RNA genome is easily destroyed by heat or enzymes released during putrefaction. Infected tissues will contain large amounts of virus nucleocapsids, i.e. virus genome RNA wrapped up in a protective protein shell. This helps to prevent total degradation of the RNA by the powerful RNases released when cells are damaged and, while viable virus may not be obtained from all infected tissues, molecular techniques can be used to detect the presence of virus-specific RNA even if the virus is non-viable. The method chosen to purify the RNA from the tissue samples should rapidly inactivate the RNase released when the tissues are further damaged by the homogenization procedure. The acid-guanidinium-phenol-chloroform (AGPC) is a rapid and simple method suitable for extracting RNA from any type of tissue sample (Chomczyñski and Sacchi, 1987). Field samples should be handled with gloves and opened and processed in a biological safety hood until step 2.
Solid tissues
1. Finely mince tissue sample (approximately 0.5 to 1 g) using sterile forceps and scissors on a clean Petri dish.2. Place in a 50-ml polypropylene tube and add 4 ml of solution D. Mix well with a probe blender or instead use a hand-held glass homogenizer. Keep on ice as much as possible during handling procedures.
3. Add 1/10 initial volume (0.4 ml) of 2 M sodium acetate, pH 4.2, and mix.
4. Add an equal volume (4 ml) of unbuffered, water-saturated phenol (pure) and mix.
5. Add 1/5 volume (0.8 ml) of chloroform/isoamyl alcohol (49:1), mix vigorously for ten to 20 seconds and leave on ice for approximately 20 minutes.
6. Centrifuge at 10 000 g for 20 minutes in a high-speed centrifuge (e.g. Sorvall centrifuge with an ss34 rotor).
7. Remove upper aqueous phase to a clean centrifuge tube and precipitate for at least two hours at -20°C with 2.5 volumes (10 ml) of absolute ethanol (or at -70°C for one hour). The RNA is then pelleted at 10 000 for ten minutes as in step 6.
8. Wash the pellet in 70 percent ethanol to remove the remaining phenol and pellet the RNA as before (repeat once). Drain and dry the RNA pellet (leave tube standing inverted on a clean tissue in a laminar flow hood for five to ten minutes). Dissolve precipitate in 2 ml of sterile distilled water and determine the RNA concentration and purity by absorption at 260 nm and 280 nm. If purity is satisfactory (260/280 ratio of 1.7 or higher) and the concentration is sufficiently high (0.5 to 1.0 mg/ml) the RNA can be used at this stage for RT/PCR. If the RNA concentration is very low, reprecipitate the RNA by adding sodium acetate (pH 4.2) to 0.1 M and 2.5 volumes of absolute ethanol. Redissolve the RNA pellet at 1 mg/ml and store at-20°C.
Note: If a lot of protein remains, it may be necessary to purify the RNA further by protease digestion. If the virus RNA concentration in the sample is a high positive, results can be obtained with very impure samples, i.e. ratios as low as 1.3, and so it is best to test the RNA at this stage and continue to step 9 if results are negative.
9. Add 2 ml of 2× pronase buffer containing 2 mg/ml pronase to the 2 ml of RNA and digest at 37 °C for one to two hours.10. Add equal volume (4 ml) of buffer-saturated phenol-chloroform, mix vigorously for one to two minutes. Centrifuge at 880 to 900 g for ten minutes to separate the phases .Take the aqeous phase with a pipette and place in afresh tube.
11. Add 2.5 volumes (10 ml) of absolute ethanol and precipitate at -20°C as before and repeat step 8.
This method can also be used to extract RNA from eye and mouth swabs. The swab is collected into a small tube containing 0.5 to 1.0 ml PBS for transport to the laboratory. It is then treated in the same way as the tissue but the volumes of each reagent can be reduced to one-half, i.e. add 2.0 ml of solution D and carry on as above using one-half the volumes of reagent given above at each stage.
Similarly, the pellet from the PBMCs derived from 10 ml of whole blood can be extracted using one-tenth of each reagent, i.e. start by resuspending the pellet in 0.4 ml of solution D and carry on to step 8 using one-tenth the volume of each reagent. It is now necessary to carry out steps 9 through 11 on RNA extracted from either swabs or PBMCs as the RNA is normally of high purity after the first extraction.
Peripheral blood mononuclear cells (PBMCs) preparation from uncoagulated blood.
1. Collect blood in EDTA or heparin and mix gently to prevent partial clotting. If more than 10 ml of blood is to be processed, centrifuge at 2 500 rpm (1 300 g) for ten minutes at room temperature (18°C to 20°C) and collect the buffy coat layer and resuspend in Hanks' buffered saline solution (HBSS) in a final volume of 20 ml in a 50-ml polypropylene tube. If 10 ml or less is to be processed, begin at step 2.2. Collect 5 to 10 ml of whole blood and make up to 20 nil with HBSS. Mix and carefully underlay the blood with 10 ml of ficoll solution (Lymphoprep or Nycoprep) and centrifuge at 2 000 rpm (800 to 900 g) for 30 minutes at room temperature to pellet the red cells.
3. Collect the clear band of PBMCs floating on top of the ficoll layer, transfer to a clean 50-ml tube and resuspend cells in about 8 ml HBSS. Make up to 40 to 45 ml with HBSS. Centrifuge at 1 500 rpm (500 g for ten minutes).
6. Wash pelleted PBMC with HBSS (twice) by resuspending in 8 to 10 ml HBSS and mixing with another 30 to 40 ml HBSS and pellet cells by centrifugation as in step 5 for five minutes (repeat once more).
7. Count cells. Dilute 10 m l aliquot 1:10 with Trypan blue to check viability if it is required to store viable cells at -70°C or in liquid nitrogen for subsequent virus isolation. Note: If field virus isolation is to be attempted, it is best to try it at this stage. Mix PBMCs with susceptible cells at a ratio of 1:5 (106:5.0 × 10⁶). Vero or primary bovine kidney cells are usually used, but transformed lymphocyte lines are much more susceptible to rinderpest infection and should be used if routine isolations are being carried out, for example, Theileria-transformed bovine lymphocytes or transformed marmoset lymphoid cells (B95a). The PBMCs can also be stored frozen in viable form (see below).
Part or all of the cells can be used for RT-PCR diagnosis of rinderpest or PPR. Cells from a minimum volume of 5 ml of whole blood should be used. Resuspend washed cell pellet in 1.0 ml HBSS and transfer to clean sterile 1.5-ml Eppendorf microtubes. Centrifuge briefly (20 to 30 seconds) to pellet cells. Remove supernatant, and, if necessary, cells can be stored frozen at -20°C or -70°C at this stage. To isolate RNA add 0.4 ml of solution D and proceed as for tissue samples using 1/10 volumes of each reagent. There is too little RNA in these samples to determine the concentration by absorbance at 260 nm and the pellet should be dissolved in 20 to 50 m l sterile double-distilled or DEPC-treated water.
Procedure for freezing PBMCs
1. Resuspend pelleted cells at 2 × 10⁷ cells/ml in FCS containing 10 percent DMSO (tissue culture grade).2. Place 0.5 ml in labelled, precooled freezer vials and leave on ice for ten minutes.
3. Wrap the tubes in cotton wool and place at -20°C in a polystyrene box for 30 minutes.
4. Transfer the box to -70°C for at least 24 hours (can be left at -70°C for several months if necessary).
5. Transfer to liquid nitrogen (gas phase) for indefinite storage.
RT-PCR protocol. The first step in RT-PCR is to make copy DNA, and this is best synthesized using random hexanucleotide primers rather than virus-specific ones. This increases sensitivity and enables the same copy DNA product to be amplified by PCR using several specially designed primer sets .The amplification primers must fulfil two criteria for differential diagnosis: first, they must be from a conserved region of the genome so that all strains of the virus can be detected and, second, they must be serotype-specific to enable differential diagnosis to be made between different morbilliviruses.
Fortunately, each morbillivirus has a quite distinctive sequence, and it is easy to identify regions of the genome where sequence is highly conserved within each virus strain but different enough from the other morbilliviruses to be specific. It is also desirable to have a "universal" printer set to enable the identification of unknown morbilliviruses that could confuse the serological diagnosis. For the first category a fairly conserved region of the F gene has been chosen to produce virus-specific primers. For the second category a gene that is highly conserved across the genus should be chosen. The ideal would be the L gene, but sufficient sequence data are not available. The P gene has some short, highly conserved regions where overlapping reading frames are used to encode the non-structural proteins, and these sequences can be used to produce the "universal" primers (Barrett et al., 1993b). For RPV/PPRV differential diagnosis, the following three sets of primers have been designed to amplify the copy DNA product (Forsyth and Barrett, 1995):
Set 1. A "universal" primer set based on sequences in the phosphoprotein (P) gene that are highly conserved across the morbillivirus genus and that should amplify copy DNA from all known morbilliviruses.
UPP1 5' ATGTTTATGATCACAGCGGT
UPP2 5' ATGGGTTGCACCACTTGCT
Set 2. A RPV-specific set based on a region of the virus fusion protein (F) gene that is well conserved in each virus but differs considerably between different morbilliviruses.
RPVF3 5' GGGACAGTGCTTCAGCCTATTAAGG
RPVF4 5' CAGCCCTAGCTTCTGACCCACGATA
Set 3. A PPR-specific set based on the equivalent region of the PPRV F gene sequence.
PPRF1 5' ATCACAGTGTTAAAGCCTGTAGAGG
PPRF2 5' GAGACTGAGTTTGTGACCTACAAGC
In addition, "nested sets" of primers have been designed and can be used to confirm the identity of the DNA. These are based on sequences inside the amplified F gene fragment and should be used, if sequencing facilities are not available, to confirm the identity of any presumed positive DNA product.
Nested set for RPV:
RPVF3a 5' GCTCTGAACGCTATTACTAAG
RPVF4a 5' CTGCTTGTCGTATTTCCTCAA
This set should amplify a 235 base pair fragment. Nested set for PPRV:
PPRF1a 5' ATGCTCTGTCAGTGATAACC
PPRF2a 5' TTATGGACAGAAGGGACAAG
This set should amplify a 309 base pair fragment.
Reverse transcription. For this procedure dissolve extracted tissue RNA pellet in RNase-free pure water at 1 mg/ml. In the case of RNA derived from PBMCs, use one-quarter to one-tenth of the RNA extracted from 10 ml of whole blood. Use sterile thin-walled 0.75-ml microcentrifuge tubes specially manufactured for use in thermocyclers.
1. Prepare RNA for reverse transcription:
· 5 m l of RNA solution (approximately = 5 m g)
· 2 m l of random hexanucleotide primers (50 ng/m l)
· 3 m l of pure water
· 10 m l total
Incubate for five minutes at 70°C to disrupt any RNA secondary structure and cool at room temperature for ten minutes to allow primer annealing. Centrifuge briefly (10 to 20 seconds) before opening to ensure all of the sample is at the bottom of the tube.
2. Prepare RT buffer mix:
|
|
Final concentrations |
|
4 m l 5× RT buffer |
50 mM Tris-HCl pH 8.3 |
|
3 mM MgCl2 |
|
|
15 mM KCl |
|
|
2 m l DTT (0.1 M) |
10 mM DTT |
|
2 m l BSA (acetylated) |
0.1 mg/ml |
|
1 m l MoMuLV reverse transcriptase |
200 units |
|
1 m l dNTPs (10 mM each) |
0.5 mM each dNTP |
Make enough mix for one extra tube and add 10 m l of this mix to each RNA sample. Mix gently and centrifuge briefly(10 to 20 seconds) to ensure all reagents are at the bottom of the tube. Incubate at room temperature for five minutes and then at 37°C for 30 minutes. If necessary the RT product can be stored at -20°C until used for PCR.
3. PCR procedure. Take 5 m l of the RT product and add:
· 5.0 m l 10× PCR buffer
· 36.5 m l pure water
· 0.5 m l Taq polymerase (5 u/m l)
· 1 m l dNTPs (10 mM each)
· 1 m l of the forward primer depending on virus to be identified.
· 1 m l of the reverse primer depending on virus to be identified
The above reagents can be made as a master mix if many samples are to be assayed and 45 m l added to 5 m l of the copy DNA product.
Note: If different primer sets are to be used these must be added separately and not included in the mix. Briefly (10 to 20 seconds) centrifuge the mixture to mix the reagents and overlay with 50 m l of mineral oil.Note: Newer PCR machines have heated lids to prevent evaporation, and, when using such machines, a mineral oil overlay is not required. Place tubes in PCR machine and select the appropriate cycling programme.
4. Setting up the PCR machine. Any make of thermocycler or even a series of water baths at different temperatures can be used for the heating/cooling cycles.
The results may vary with different types of machine, and different time settings can be tried to get the optimum results. However, the cycles have been found to work satisfactorily on several different types of commercial thermocycler (see Table).
Each analysis should always include both negative (to check for reagent contamination) and positive (to check for enzyme or machine failure) controls. Water should be used in place of RNA as the negative control. Although an alternative suggested in some manuals is to use the RNA but omit the reverse transcriptase so as to prevent copy DNA production, some batches of Taq polymerase are known to have reverse transcriptase activity and this can lead to a false positive result where there is no contamination of the reagents. As a positive control, RNA from a virus that is not expected to be present in the sample is routinely used; for example, PPRV RNA as a positive control for cattle samples and RV RNA for caprine and ovine samples. Measles virus RNA is also a suitable positive control that can be used with all animal tissues analysed for morbillivirus infections.
TABLE - Programming the PCR machine
|
|
Temperature |
Time (minutes) |
|
Step 1 |
94-C |
5 |
|
Step 2 |
50°C |
1 |
|
Step 3 |
72°C |
2 |
|
Step 4 |
94°C |
1 |
|
Step 5 |
Go to step 2 30 times |
|
|
Step 6 |
50°C |
1 |
|
Step 7 |
72°C |
10 |
|
Step 8 |
4°C |
Hold |
Note: Step 8 is optional since some machines are not designed to remain at 4°C for long periods and can be damaged if this is done.
5. Analysis of RT-PCR products. An aliquot of each reaction (usually 8 m l) is taken from beneath the mineral oil overlay, mixed with 2 m l of 5× gel loading buffer and loaded on a 1.5 percent agarose/TBE gel. Suitable markers, either 123 or 100 base pair ladders, should always be used. The positive control sample should also act as a specific size marker.
Many types of gel apparatus can be made in a good laboratory workshop from perspex or can be bought from many laboratory suppliers. Small 10 × 10 cm gels can be used, which can accommodate up to 16 (10 m l) samples. Gibco-BRL and Pharmacia make suitable small horizontal gel apparatus, and low-voltage (delivering 200 volts) power packs are suitable for these types of gel. For this size gel (10 × 10 cm), 50 ml solution of agarose is required. The agarose melting is best done in a 100-ml flask in a microwave oven inside a plastic beaker in case of breakages.
When the gel is cooled to approximately 50°C to 60°C, 10 m l of a 1 mg/ml solution of the stain (ethidium bromide) is added to the gel and mixed before it is poured into the gel tray. When set (approximately 30 minutes), place the gel in the tank and just cover with 1× TBE buffer, load the samples, connect the leads to the power pack and run the gel at 70 to 100 volts until the dark blue dye (bromophenol blue) is about three-quarters the way down the gel (approximately one hour).
The size of the expected products is determined by the distance between the primer sequences on the primary sequence of the nucleic acid being analysed. In the case of the universal primer set 1, this is 429 nucleotides and 372 in the case of the F-specific gene primer sets. The position of the correct-size product can be determined by reference to the positive controls in the reactions and confirmed by the DNA marker ladder (see Figure 32). (Note: Extreme caution should be taken to avoid cross-contamination of samples.)
6. Precautions to avoid cross-contamination. One of the most dangerous aspects of inexperience in this technique is the possibility of obtaining false positives through the careless handling of materials and reagents. Ideally, two separate rooms and two separate sets of pipettes should be used to set up the RT-PCR and to analyse the amplified DNA. The tubes containing the amplified DNAs should never be opened in the same place where the reactions are set up since aerosols of DNA that can contaminate the atmosphere may be produced. DNA is very stable in the environment and minute amounts can be amplified using a sensitive technique such as the PCR. The same pipettes should never be used to set up the RT-PCR and to sample the resulting product. To minimize the possibility of aerosol contamination, special aerosol resistant tips (ART tips) should always be used to set up the RT-PCR reactions or, alternatively, special positive displacement pipettes can be used.
7. Optimizing the reactions. Factors such as the Mg2+ concentration and the annealing temperature can greatly affect the efficiency of the PCR reaction and the production of non-specific DNA products. The conditions have been optimized for both the Mg2+ and the primer annealing temperature. Figure 33 illustrates the effects of changing both these parameters on the efficiency of the reaction.
8. Interpretation of results. In most cases, particularly with RNA derived from infected lymphatic tissue, there is usually only one band of the expected size. However, in some diagnostic samples derived from PBMCs where there may be a low concentration of virus-specific RNA (rinderpest and PPR induce a severe leucopenia), the reactions can contain non-specific amplification products close to the expected size for the specific DNA product (see Figure 34). In such cases, if there is no other tissue sample, it is necessary to confirm the specificity of the DNA product either by hybridization analysis or by using a nested primer set that will only amplify a specific DNA product and not the non-specific one. To do this, 1 m l of the PCR product is amplified using the required nested primer set and amplified as in a 50 m l PCR reaction as before. This usually gives a clear result and it can also be further confirmed by hybridization probe analysis. For comparisons with other viruses in circulation, it is recommended that the DNA product be sequenced. This is particularly important when the virus is found in a non-endemic area and the likely source of infection needs to be traced. This can be done in a suitably equipped molecular biology laboratory in the country concerned or the sample can be sent to the Institute of Animal Health, Pirbright Laboratory, United Kingdom, for this analysis.
Development of antibodies
Diagnostic role of antibody detection
Virus neutralization
Enzyme-linked immunosorbent assay (ELISA)
Animals infected with rinderpest virus produce a high-titre antibody response against the mass of virus antigens that are present in the lymphoid tissues during the infection. The response is essentially the same in all species of susceptible animals and in infections with virulent and a virulent (vaccine) strains of the virus. These antibodies are a major component of active immunity against infection and play an important role in recovery; their appearance during disease corresponds closely with the disappearance of viraemia and virus antigen in the tissues (see Figure 35).
Antibodies start to develop between two and five days after the onset of clinical disease in virulent infections and six to ten days after infection with a virulent strains, although with lower infectious doses a delay of up to 17 days may occur. The litres continue to rise throughout the remaining disease course until death or until three to four weeks after infection, at which stage the animal is usually well advanced in its convalescence. During this early part of the primary humoral response, a variety of antibodies with different biological properties are produced, such as virus-neutralizing (VN), immuno-precipitating (IP), complement-fixing (CF) and measles virus haemagglutination-inhibiting (MHI), as well as antibodies assayed in antigen-binding assays, including the enzyme-linked immunosorbent assay (ELISA) and indirect immunofluorescence (IIP). Some of these antibodies, such as CF and IP, decline rapidly in titre following infection while others, including VN and ELISA, remain at high levels for periods of up to many years .There is considerable variation in the degree of the response of individual infected animals, with high responders producing VN titres one log unit or more than low responders. The majority of animals will maintain high levels of humoral antibody throughout their lives (see Figure 36). There have been some reports of animals losing serologically detectable (VN) antibodies to the virus within one to three years, but this has not been reported using ELISA.
Although the immunoglobulin classes of antibodies against rinderpest virus have received only limited study, it seems that the humoral response is conventional with initial production of high-titre, short-lived IgM antibodies being rapidly superseded by persistent high titres of IgG and IgA antibodies.
Current outbreaks
The demonstration of a rising antibody titre or the presence of antibodies associated with the primary immune response are indicators of recent infection. Therefore, serological techniques designed to demonstrate these phenomena may be used to confirm a diagnosis of rinderpest.
Paired sera. The basis of this test is one of the oldest in the history of infectious diseases. Two serum samples are collected from an infected animal, one during the acute phase of the disease and the other during convalescence, usually after about two weeks. These sera are titrated by a suitable technique and their litres are compared. If the later serum has a significantly higher (fourfold or greater) titre than the acute-phase serum, this is taken as evidence of a developing antibody response and confirms the identity of the agent responsible. Although the concept is simple and the results accurate, the main drawback is the necessity for two sampling visits and the delay this incurs, together with the accurate identification of the animals and samples. An outline of how to carry out a paired serum test is:
1. After recording an accurate history of the outbreak, clinically examine the animals and take serum from ten to 15 animals with clinical signs such as pyrexia, mouth lesions and diarrhoea.2. Separate the sera and store them, accurately labelled and dated, at -20°C.
3. Collect samples from those surviving among the same animals one to three weeks later. Separate the sera and freeze to -20°C to ensure comparable losses in titre through freezing.
4. Titrate the paired sera against rinderpest virus by the VN, MHI or ELISA test depending on how swiftly the results are needed.
5. When the results are compared, a fourfold rise in titre of just one convalescent serum is sufficient to confirm the disease. However, bearing in mind sample and laboratory handling errors, significant increases in titre should be seen in at least half, if not all, of the animals sampled for absolute confirmation.
FIGURE 35. Development of rinderpest antibodies

FIGURE 36. Persistence of rinderpest antibodies

Early antibodies. This term has two meanings in virology. It refers to antibodies to certain virus antigens, usually non-structural, which are associated with the early stages of virus replication in infected cells. These antibodies are associated with periods of virus proliferation and tend to decline rapidly once the immune response has controlled the infection. In contrast, late antibodies to certain virus structural antigens, such as VN antibodies, which appear later in the virus replication cycle, tend to persist for long periods. Demonstration of antibodies to these early antigens has proved a useful diagnostic technique with several viruses. Such antigens have not yet been defined with rinderpest virus, although some of the responses described below may also include this type of antibody.
Early antibodies can also mean antibodies of a certain class or biological property, for example IgM or IP antibodies, which decline rapidly in titre after the primary infection, despite recognizing antigens that also induce persistent antibodies of different classes and biological properties, such as IgG or VN antibodies. Since the Ig class often determines the biological properties of an antibody, these two are frequently closely linked.
To date, the detection of early antibodies of either type has not generally been used as a method for rinderpest confirmation, but positive results with any of the procedures outlined below should be considered sufficient evidence for diagnosis.
Tests for IgM/19S antibodies. Only one acute serum is needed from each animal .The following method outlines a simple procedure for this type of diagnosis:
1. After taking an accurate history, collect sera from up to ten animals with early clinical signs of rinderpest, preferably those with pyrexia and mouth lesions but not those that are moribund or have had diarrhoea for several days.2. Inactivate one aliquot of each serum at 56°C for 30 minutes and another at 65°C for 30 minutes. Alternatively, aliquots of sera can be treated with 2-mercaptoethanol (2ME) or filtered through Sephadex G200 to separate out the 19S and 7S antibodies.
3. Titrate the pairs of treated or fractionated sera by a suitable test such as VN or MHI.
4. If significant titres of IgM antibody are present then the 65°C- and 2ME-treated sera will be about 0.8 to 1.3 log10 VN50 lower than the 56°C- and 2ME-untreated aliquots. This will signify recent infection. If there is little or no reduction in titre, there is no confirmation of recent infection with rinderpest virus.
The ELISA and indirect-immunochemical techniques using fluorescein or horseradish peroxidase can be used to detect specific IgM in whole serum if specific anti-IgM reagents are used.
Past outbreaks
Under certain circumstances it is impossible to collect acute-phase sera from an outbreak. Nevertheless, serology can still provide reliable circumstantial evidence to confirm the disease, even years after an outbreak.
The basis for this approach is that rinderpest virus is not excreted by recovered animals, and, therefore, in the absence of reinfection, the virus disappears in communities too small to provide a continuous supply of susceptible animals in which it can cycle. Consequently, young animals born after a suspected outbreak will not develop active immunity to the virus. In the absence of maternal immunity, these animals should have no antibodies to the virus whereas survivors should. The following routine can provide valuable confirmatory evidence:
1. Visit the animals or herd in question and compile as accurate a history of the disease outbreak as possible. In particular, try to assess the date at which the outbreak appeared to end and, if dealing with cattle, whether there was any previous or subsequent rinderpest vaccination. Although rinderpest branding and ear-notching are still practised in many countries, it is best not to regard unbranded or unnotched cattle as unvaccinated.2. Collect serum samples from six to ten animals that survived the outbreak and were unlikely to have been protected by maternal antibodies but are not so old as to have been infected in previous outbreaks.
This may be determined by the following formula:
Number of months since outbreak finished, plus 11 months (maximum decay time for maternal antibodies), plus zero to 12 months (a time span short enough to exclude most previously infected animals, although a shorter interval could be used if necessary). For example, if the outbreak finished 14 months ago, then samples from cattle 25- to 37-months-old should be collected.3. Collect serum samples from six to ten animals that have lost their maternal immunity and were born after the outbreak, i.e. 11-to 13 -months-old as determined from the example above.
4. Screen the sera for antibodies to rinderpest virus by VN or ELISA.
Interpretation. All or most of the survivors should be antibody-positive and all of the young animals negative. If the results are clear-cut, it is confirmed that rinderpest virus infected the sample population 14 to 27 months ago and was probably responsible for the reported outbreak.
The system can be refined by reducing the amount of time allowed for maternal antibodies to wane to, say, six months. If positives then appear among the young animals, antibody titrations should show that their group mean titres are 1 to 2 log10 units lower than those of the survivors. Similar tactics have to be used if the outbreak has occurred within six to 11 months. Alternatively, a "reverse" paired serum test can be used to demonstrate falling antibody titres in passively immunized animals.
Retrospective diagnosis such as this is important for gaining information for epizootiological studies and will be vital in any control campaigns aimed at eradicating the disease. It could be efficiently combined with regular examination of sera of susceptible sentinel animals in key locations.
The basis of this test is that some antibodies react with an infectious virus to render it non-infectious or neutralized. Virus-neutralizing (VN) antibodies are thought to work mainly through steric hindrance of virus adsorption to cell surface receptors, but other factors such as aggregation of infectious units and lysis of virus envelopes also play a role. VN antibodies are probably the most widely studied type of antibody in virology because of their persistence and their direct relevance to in vivo immunity.
The standard test is carried out in tubes using bovine kidney (BK) cell cultures as the indicator system for infectivity and a constant virus dose/variable serum dilution technique (Plowright and Fen-is ,1961). The obvious drawback with the VN test is the need for cell culture facilities and for the use of live virus.
Although widely used in the past, the virus neutralization test has been replaced in most laboratories by the competitive ELISA. The competitive ELISA is the recommended test for large-scale serological surveys. If confirmation is required, as may be the case during sero-surveillance, the virus neutralization test can be used to screen cattle sera, but problems of toxicity make it unsuitable for the examination of sera from small ruminants. Only the virus neutralization test in tubes is recommended for confirmatory diagnosis.
Equipment for virus neutralization in test-tubes
Test-tubes. Sterile, cell culture-prepared, 15 × 150 mm.
Test-tube bungs. Sterile non-toxic rubber.
Test-tube racks. Sloping.
Roller apparatus. Complete with roller drums.
Incubator. Set to run at 37°C.
Microscope. Inverted with slope adaptor for tubes.
Freezer. Temperature at least -20°C, preferably -70°C.
Water bath. Set to run at 56°C.
Glassware. Pipettes, 8- and 30-ml screw-capped bottles.
Reagents required
Cells. Bovine kidney or Vero cells.
Cell culture medium. Eagle's minimal essential medium supplemented with rinderpest-antibody-free serum and antibiotics.
Trypsin
Virus stocks. Freeze-dried attenuated cell culture-adapted rinderpest bovine "O" Kabete (RBOK) virus vaccine stored at -20°C and frozen stocks of the same strain stored at -70°C.
Diluting fluid. Culture medium or PBS supplemented with bovine serum albumin.
Standard sera. Known positive and negative sera.
Suspect sera
Method
1. Dilute the test sera in 0.5 log10 dilution intervals (1 unit of volume +2.2 units = 0.5 log10).2. Prepare challenge virus by diluting virus of known titre to 3.0 log10 TCID50/ml.
3. Add 1.0 ml of serum and 1.0 ml of challenge virus to an 8-ml bottle, mix and incubate at 4°C overnight.
4. Add 0.2 ml of each serum dilution/virus mixture to each of five test-tubes so that each tube has 0.1 ml serum dilution plus the equivalent of 100 TCID50 of virus in 0.1 ml.
5. Add 1.0 ml of a trypsin-dispersed suspension of cells at 1 to 2 × 10⁵ cells/ml in growth medium to each tube.
6. Incubate the tubes, correctly labelled, at 37°C, stationary and sloped.
7. On day three or four, examine the tubes microscopically for the typical cytopathic effects (CPE) of syncytia, cell rounding and intercellular strand formation. Discard all tubes showing CPE and change the medium on the remaining tubes, either to maintenance medium or growth medium if the monolayer is not well formed.
8. Repeat step 7 on days seven and ten and take a final reading from day 12 to 14.
9. Controls: make a titration of the challenge virus, a titration of the known positive serum, screen the known negative serum undiluted or 1/10 only and include five cell control tubes.
10. Determine the virus dose and VN antibody titres using a 50 percent end-point method.
Assessment
The virus dose is satisfactory if between 101.8 and 102.8 log10, TCID50/tube, and VN titres from different tests with virus doses within this range may theoretically be compared. However, paired sera for diagnosis should always be compared in the same test. The negative control serum should have no protective effect and the positive control serum should neutralize to high titre with relatively little variation between tests. In tubes, any titre is considered to be a positive indication of antibody, therefore low titres - < 1.0 log10 VN50 - are significant.
The enzyme-linked immunosorbent assay (ELISA) has a number of advantages over the virus neutralization test. The test is rapid, with results being obtained within three hours .There is no need for the maintenance of tissue culture facilities or live virus, since the test can be obtained as a kit from the FAO World Reference Laboratory for Rinderpest (WRLRP). Large numbers of samples can be tested with relative ease, and linking the ELISA reader to a computer allows rapid data analysis and storage An indirect ELISA for detecting antibodies to rinderpest virus (Anderson and Rowe, 1982) was adopted for use in the Pan-African Rinderpest Campaign in 1985. This has since been replaced by a monoclonal antibody (MAb)-based competitive ELISA. Owing to the specificity of the MAb (directed against the rinderpest H protein), the test is rinderpest-specific, giving no cross-reactions with antibodies against PPR virus (Anderson, McKay and Butcher, 1991; Anderson and McKay, 1994). Competitive ELISA kits are available through the FAO WRLRP. (Note: PPR-specific competitive ELISA are also available.)
The principle of the test is the interruption of the reaction between rinderpest virus antigen and a monoclonal antibody (MAb) against rinderpest virus (RPV) by the addition of test serum samples. The presence of antibodies to rinderpest in the test serum sample will block the reactivity of the monoclonal antibody resulting in a reduction in the expected colour, following the addition of enzyme-labelled anti-mouse antibody and substrate (see Figure 37). Sera can be tested at a single dilution of 1/5 or may be titrated to give dilution end-points.
Equipment required
ELISA plates. Flat-bottomed Nunc Maxisorb ELISA plates.
Incubator. Incubator or hot room maintained at 37°C.
Refrigerator. In range of 2°C to 6°C.
Freezer. In the range of -15°C to -20°C.
Multichannel pipettes. 5 to 50 m l variable volume with suitable tips.
Single-channel pipettes. 5 to 50 and 50 to 200 m l variable volume pipettes with suitable tips.
Orbital shaker
ELISA reader. Multichannel spectrophotometric ELISA plate reader with an interference filter of 492 nm.
Reagent troughs
Glassware/plasticware. Selection of beakers (20 to 400 ml), flasks (50 to 1 000 ml), graduated cylinders (50 to 1 000 ml) and graduated pipettes (1 to 10 ml). Storage bottles with caps (5 ml, 25 ml, 100 ml).
Plate washer. A large reservoir with a tap and tubing is adequate for washing plates. Alternatively, plastic wash bottles or automated plate washers may be used.
Absorbent towels. Disposable or cloth, lint-free and non-abrasive.
Water supply. Minimum: glass distilled or deionized water; optimum Milli-Q or equivalent type 1,18 megohm, pyrogen-free water.
Reagents required
Phosphate buffered saline. PBS pH 7.4, supplied as sachets.
Rinderpest ELISA antigen. Freeze-dried sonicated extract of MDBK cells infected with the attenuated cell culture-adapted RBOK vaccine strain of rinderpest. Store at 4°C.
Tween-20. Supplied as polyoxyethylene sorbitan monolaurate syrup.
Control sera. Freeze-dried strong positive (++), weak positive (+) and rinderpest negative cattle sera (-). Store at 4°C.
Monoclonal antibody. Freeze-dried monoclonal antibody directed against rinderpest haemagglutinin, supplied as hybridoma culture supernatant. Store at 4°C.
Rabbit anti-mouse conjugate. Freeze-dried rabbit anti-mouse immunoglobulins conjugated to horseradish peroxidase. Subdivide into aliquots and store at 4°C.
Substrate. Hydrogen peroxide, available as urea peroxide tablets.
Chromogen. Orthophenylene diamine (OPD), available in tablet form. Store at 4°C.
Sulphuric acid. 1 M.
Sterile distilled or deionized water
Preparation of reagents
The kit reagents - antigen, MAb and control antisera - are supplied freeze-dried and should be resuspended in exactly 1 ml of sterile distilled or deionized water (supplied with the kit). Agitate gently until completely dissolved. Once reconstituted, store at -20°C.
Blocking buffer. PBS supplemented with 0.1 percent (v/v) Tween-20 and 0.3 percent (v/v) normal bovine serum (kit negative control serum). Prepare fresh each day.
Washing buffer. PBS diluted 1/5.
Substrate/chromogen. Resuspend one urea peroxide tablet in 10 ml of distilled water to give 3 percent solution. Store at 4°C in dark bottle. Resuspend 1 OPD tablet (30 mg) in 75 ml of distilled water to give 3.7 mM solution. (Note: OPD is a carcinogen, handle with care!) This solution should be colourless with a pH between 5 and 6. If coloured, discard. (Note: If solution is coloured it may indicate poor water quality.) Ideally OPD solution should be prepared immediately before use in the test. Add H2O2 to OPD solution at a ratio of 4 m l H2O2:1 ml OPD (this results in a solution containing 3.7 mM OPD and 3.5 mM H2O2).
1 M sulphuric acid. Add 26.6 ml of acid to 473.4 ml of distilled water. (Note: Always add acid to water.)
FIGURE 38. Plate layout for competitive ELISA

Test format
The plate layout is shown in Figure 38.
Conjugate control. Wells A1 and A2 are the conjugate controls consisting of RPV antigen and conjugate.
Monoclonal antibody control. Wells F1, F2, G1 and G2 are the MAb controls and consist of RPV antigen, monoclonal antibody and conjugate .This should give the optimal OD readings in the absence of competing antiserum.
The mean of the optical density readings from this control represents the 0 percent inhibition value.
Strong positive control. Wells B1, B2, C1 and C2 are the positive controls. These consist of RPV antigen, RPV positive antiserum, MAb and conjugate. This is included as a quality control and similar levels of inhibition should be obtained from test to test.
Weak positive control. Wells Dl, D2, E1 and E2 are the weak positive controls. These consist of rinderpest antigen, weak positive serum, MAb and conjugate.
Negative serum control. Wells H1 and H2 are the negative serum controls. These consist of rinderpest antigen, negative serum, MAb and conjugate.
Test sera. The remaining wells of the plate can be used to test 40 sera in duplicate at a single dilution of 1/5 .Alternatively sera can be titrated across the plate to give serum dilution end-points.
Test protocol
1. Dilute the RPV antigen to pretitrated concentration (usually 1/100) in PBS. Add 50 m l of rinderpest antigen, diluted in PBS, to all wells of the plate. Tap plates to spread the antigen. Incubate for one hour at 37°C on an orbital shaker (if no shaker is available, shake the plates by hand every 15 minutes).2. Wash plates three times by flooding and emptying the wells with PBS washing buffer and blot dry on absorbent paper.
3. Add 40 m l of blocking buffer to all wells of the plate.
Add a further 10 m l to the monoclonal control wells (F1, F2, G1, G2). Add a further 60 m l to the conjugate control wells (A1, A2).
Add 10 m l of test serum to test wells (vertical duplicates).
Add 10 m l of strong positive control serum to controls (B1, B2, C1, C2).
Add 10 m l of weak positive control serum to the controls (D1, D2, E1, E2).
Add 10 m l of negative control serum to the controls (H1, H2).
Add 50 m l of monoclonal antibody, diluted in blocking buffer to a predetermined concentration (1/100), to all wells of the plate except the conjugate control (A1 A2). Incubate for one hour at 37°C on orbital shaker.
4. Wash the plates three times and blot dry.
5. Add 50 m l of anti-mouse conjugate in blocking buffer to all wells of the plate .The conjugate should be titrated, but can normally be used at 1/1 000 dilution. Incubate for one hour at 37°C as before.
6. Wash plates three times and blot dry.
7. Prepare OPD solution and, immediately before use, add hydrogen peroxide solution. Add 50 m l of substrate/chromogen to all wells, leave for ten minutes for colour development. Stop the reaction by the addition 50 m l of 1 M sulphuric acid. Read on ELISA reader at 492 nm.
Interpretation of results
Calculate the mean of the four monoclonal control wells. Percentage inhibition (PI) is calculated as:
PI = 100 - [(Mean OD of test wells/Mean OD of Cm wells) × 100]
Inhibition values greater than 50 percent are considered RPV positive. (Note: A computer programme for data analysis is available from the Animal Health and Production Section, Joint Division FAO/IAEA, Vienna, Austria.)
Internal quality control values
Upper and lower acceptance values for all the controls are supplied with the kit. In the interests of interest and interlaboratory standardization, these must be adhered to. The expected range of control values is shown below. If the values fall below or above these limits it is usually the result of poor water quality in the laboratory. Prepare fresh distilled or deionized water and repeat the test.
|
Strong positive: |
80 to 100 percent |
|
Weak positive: |
51 to 81 |
|
Negative: |
-25 to + 25 |
|
MAb control: |
-19 to + 20 |
|
Conjugate: |
95 to 105 |
MAb control OD values must be between 0.4 and 1.0.
Isolation in cell cultures
Virus identification
Isolation in buffaloes and cattle
With the newly available molecular techniques, virus isolation and identification may not always be necessary. However, for the maintenance of a reference library of rinderpest strains and to enable further study of pathogenesis, virus isolation is still desirable. Moreover, a number of other circumstances may warrant virus isolation in cell cultures; for example, a field strain may be so unusually mild that the only convincing evidence of its presence is virus isolation. More and more attention is being focused on strain markers, and laboratories are collecting representative viruses from different geographical areas for evaluation of virulence and other markers in the hope that differences will be found. This requires regular isolation attempts by reference laboratories and may eventually distinguish between strains from different regions. In time, these efforts, combined with molecular analysis, may help to pinpoint the source of future breakdowns in zoosanitary control.
In itself, isolation cannot be regarded as a definitive identification of the virus, and, certainly as far as cell culture isolation is concerned, it is merely a preliminary step prior to cross-neutralization tests.
Before attempting isolation work, thought should be given to the area within the laboratory where this work will be undertaken. Few laboratories are built especially for isolation work, and it will usually be necessary to integrate this activity into a general laboratory routine. For this reason it is advisable to allocate a cubicle or small room for the handling of incoming field specimens and equip it with its own set of minor equipment. On no account should virus isolation be attempted in laboratories or with staff simultaneously engaged in vaccine production. Although equipment and reagents required for virus isolation are specified, it is necessary to assume operator familiarity with various techniques such as membrane filtration of media, washing glassware to cell culture standards and producing highly pure water. It has also been assumed that any media or reagents formulated locally will be made only with analytical-grade reagents.
Major equipment
Laminar-flow biological safety cabinet, class II.
Cabinets of this type offer such advantages, in terms of both operator safety and the ability to perform clean work, that the acquisition of one is strongly recommended. The cabinet should be designed to recycle air through a high-efficiency particle air filter (HEPA), blowing a curtain of sterile air downwards across the work surface, with a second HEPA cleaning the exhaust air that is pushed back into the workroom.
Plain glass-fronted hoods. Laboratories unable to invest in laminar-flow cabinets can achieve a considerable improvement on open-bench work by installing a simple plywood hood with a glass front above the work post. The creation of a physical barrier between the operators and their work greatly reduces the risk of contamination in either direction.
Hot room/laboratory incubator. Cell cultures are maintained at 37°C in a well-insulated hot room. Internal shelving should be slatted and there must be a vigorous mixing of the air to prevent the creation of local "hot spots". In the absence of a hot room, a good bench-top laboratory incubator can be used for culturing cells but it cannot be used for roller cultures.
Centrifuge. It is essential to have a refrigerated centrifuge, equipped with a range of heads and buckets, capable of spinning volumes from 10 to 400 ml. It is advantageous to select a model with a sealed autoclavable rotor that is easy to clean and that can be sterilized periodically.
Autoclaves. Large floor-mounted autoclaves are present in many laboratories and should be used for the safe disposal of infected cell cultures and contaminated materials .They can also be used for sterilizing certain cell culture media and large pieces of equipment. Small, portable laboratory autoclaves are extremely useful for sterilizing small pieces of equipment such as scissors, forceps and automatic pipettes.
Freezers. Portions of tissue from field specimens must be stored at ultra-low temperatures so that reisolation can be attempted if the initial attempt fails or if time is required to prepare an appropriate set of cell cultures. Rinderpest virus is damaged by slow freezing and should not be stored (unless freeze-dried) at -20°C. Instead, it should be held in an electrically operated freezer capable of maintaining temperatures around -70°C. Alternatively, insulated cabinets containing dry ice are equally suitable although they are laborious to maintain. Under these circumstances samples should be held in airtight containers as the constant presence of CO2 will cause high acidification.
Filtration equipment. Most of the recommended cell culture media cannot withstand autoclaving and must be sterilized by filtration. Although it is still possible to perform filtration through EKS-grade asbestos sheets, laboratories not possessing this traditional equipment should opt for membrane filtration techniques.
Microscope. An inverted microscope allows the examination of the cell sheet without exposing it apart from the media, but this is not strictly necessary. An upright model will serve the same purpose.
Digital balance. A top-loading balance of high precision and with digital read-out is required for the preparation of cell culture media.
Roller apparatus. Rinderpest virus maybe isolated in static cell cultures but often roller tubes are preferred. The tubes in which cell cultures have formed are placed in circular drums, drilled out to accept a large number of such tubes. The drum is then placed on a special roller apparatus that turns the drum at about eight revolutions per hour and maintains the tubes at a 5° angle to keep the fluid media at the base of the tube where the cells are situated. The apparatus is driven by an electric motor and, being large, is usually kept in the hot room.
Minor equipment required
Tube racks. Made from lightweight anodized aluminium and designed so that, when placed sideways, they maintain tubes at an angle of 5 ° to the horizontal. When seeded with cells in suspension, a cell monolayer will form in a wedge-shaped area at the base of the tube.
Tissue culture tubes. Purchased with a screw-capped closure. Alternatively, rimless test-tubes 16 × 125 mm may be used. They are closed with a size 13 neoprene bung.
Magnetic stirrer/followers. The stirrer should have a variable speed control and a clamp stand to ensure against spillage. Followers (placed inside a flask) should be coated with Teflon and should be purchased in various sizes.
Glass trypsinizing flask. A 500-ml conical flask with four vertical indentations about 15 mm deep set into the sides at the points of a quadrant .When the liquid-filled flask is placed on a magnetic stirrer with a follower rotating on its bottom, the folds will impede the liquid, producing a series of vortices.
Ground-glass tissue grinders. May be used in lieu of mortars and pestles.
Glassware. Beakers, Petri dishes, wide-mouthed pipettes, 30-ml screw-capped bottles, glass centrifuge tubes (10-ml plain, 100-ml plain, 20-ml graduated) and flat-sided glass bottles (300- to 500-ml capacity) or cell culture-grade disposable plastic flasks of similar size.
Surgical instruments. Several sets of stainless-steel, blunt-ended scissors and serrated forceps are required, together with at least two scalpel handles. Scalpel blades are obtained separately in sterile packs.
Stainless-steel strainer. 30-gauge wire, 20 mesh per inch.
Sterilization bags/parchment paper. Sterilization bags can be obtained in various sizes and are used to wrap small items of equipment such as scissors, forceps and automatic syringes for autoclaving. Large items, such as filtration equipment, must be individually wrapped in parchment paper.
3 M autoclave tape No. 1222 series. Adhesive tape used to seal the wrapping of various items for sterilization. It develops a black diagonal line on exposure in the normal steam autoclave sterilization process.
Ambidextrous latex medical procedure gloves (non-sterile). In various sizes. They should be worn during all laboratory manipulations and discarded at the end of work sessions.
Counting chamber. For estimating cell counts.
Reagents required
TPB. Tryptose phosphate broth.
PBS. Phosphate-buffered saline.
PBSA. Phosphate-buffered saline (Dulbecco's solution A). It is free of calcium and magnesium ions.
VT. Versene-trypsin.
Medium 199 with Hanks' salts. Commercially available.
RPMI medium. For lymphoblastoid cell lines.
HSLS. High-sugar, low-amino acid supplemented medium.
Ox serum (OS). Ox serum is used to supplement both growth and maintenance media used for culturing cells during virus isolation. Calf serum is considered superior to adult ox serum in this respect, although it is harder to obtain and more expensive to purchase. Obviously, in attempting to isolate rinderpest from field samples, it is important to use serum that is free of neutralizing antibodies. For laboratories situated in enzootic areas this can present difficulties, since vaccination will be widely practised and abattoir serum will be of limited value .This problem can be overcome in one of two ways. Either the laboratory can purchase calf or ox serum from a commercial supplier, or designated rinderpest-susceptible animals can be maintained within a laboratory herd and used as serum donors. If serum is to be purchased, the country of origin of the serum should be ascertained, since this need not be the same as the country from which the supplier will dispatch the product. Within a laboratory herd it may sometimes be possible to exsanguinate surplus male calves, but more often a small group of adult animals are left unvaccinated and are bled every few months.
Preparation of equipment
Filtration equipment. After use, filtration equipment should be dismantled and thoroughly cleaned, and used pads or membranes discarded. Prior to reassembly, all parts should be rinsed thoroughly in deionized or distilled water, and the unit wrapped in parchment paper and sterilized by autoclaving at not more than 120°C.
Cell culture tubes and closures. These should be autoclaved after use, cleaned with a brush, rinsed thoroughly in tap-water and deionized water, packed and sterilized by dry heat (tubes) or by autoclaving (bungs and screw caps).
Glassware. All glassware items specified should be cleaned and rinsed before sterilizing by autoclaving. Individual items can be wrapped in bags and sealed with 3M tape or wrapped in parchment paper and similarly sealed. Flasks and beakers require sealing only at the neck. Aluminium foil can be used as an alternative to parchment for beakers, flasks and centrifuge tubes. Large glass bottles are autoclaved with their screw-cap tops in place and pipettes are sterilized in canisters.
Surgical instruments. These are washed and rinsed as glassware and sterilized in autoclave bags.
Followers. These are cleaned and sterilized by autoclaving in universal glass bottles.
Preparation of reagents
GMEM. This medium is a modification of Eagle's basal medium originally recommended for the cultivation of baby hamster kidney cells. It must be sterilized by membrane filtration and stored at 4°C in convenient amounts. It is supplied in sterile liquid form but, because of instability above -10°C, L-glutamine is omitted from the formulation. L-glutamine must be purchased separately, either as a powder to be dissolved and stored at -20°C or as a deep-frozen liquid. GMEM is also available in powdered form for sterilization by filtration or by autoclaving; bicarbonate is not included in the powdered form and must be added separately as a sterile solution.
Medium 199 with Hanks' or Earle's salts. Either formulation can be obtained as a 1× liquid requiring the addition of L-glutamine only, as a 10× liquid requiring the addition of sodium bicarbonate, L-glutamine and water and as powder without L-glutamine or sodium bicarbonate.
RPMI medium. This can be obtained as Ix solutions from many suppliers.
OS. Serum is sterilized by filtration, bottled in 100 ml amounts and stored at -20°C or 4°C. Donor serum should be examined for the presence of non-specific rinderpest inhibitors. Using the RBOK vaccine strain of rinderpest, a master tenfold virus dilution series is prepared using tryptose phosphate broth (TPB) as the diluent. According to the number of sera to be tested, subdivisions of this series are made and to each dilution is added an equal volume of a particular donor serum. The virus-serum mixtures are held overnight at 4°C and then inoculated into ten roller-tube cultures followed by 1 ml of a suspension containing 105 cells in growth medium. The subsequent management of these cells is described below. Virus titres are estimated 11 days later and are based on the number of tubes in which virus-specific CPEs have been observed microscopically; calculations are made by the Spearman-Kärber method. Virus titres are compared and any serum reducing the virus titre by more than 90 percent should be discarded. The remaining pools may now be combined.
Preparation of cell cultures
Calf kidney cells. Primary calf kidney (BK) cells provide a convenient and sensitive substrate in which to isolate rinderpest virus. Kidneys may be obtained either from an abattoir or from an animal killed at the laboratory, but in either case they should be collected only from calves of normal conformation and in good health. The donor calf should be not more than two weeks old. It should be killed painlessly, exsanguinated and eviscerated in a clean, hygienic environment. One or both of the kidneys should be carefully removed from the abdominal cavity using sterile instruments and placed in a large glass beaker. The specimen can also be collected in a clean new polyethelene bag that is tied off and placed in any clean (but not necessarily sterile) metal or glass container. Care must be taken to preserve the renal capsule intact because damage at this stage, may introduce contamination that can be carried through to the final cell cultures. Since the kidneys must be processed in the laboratory on the day of collection, it is advisable to collect them early in the day Kidneys deteriorate rapidly at high ambient temperatures. If a journey of more than 33 minutes with ambient temperatures greater than 15°C is contemplated, they should be placed in a domestic cool box and transported with a small amount of ice. Supercooled ice must be avoided; cell death will occur if the kidneys are frozen.
Foetal calf kidneys are an alternative, and sometimes more easily obtained, source of cells. They should only be collected from well-developed foetuses over six months old and of normal appearance. Some laboratories meet their requirements for calf kidneys by purchasing unwanted calves from neighbouring herds or by using animals from their own herds. This latter solution is ideal because the health status of the donor herd can be carefully monitored and the supply of calves regulated to meet requirements. In all cases, the kidneys should be collected and handled as above.
In the laboratory, processing of the kidney should take place in a well-lit laminar-flow biological safety cabinet designed to produce a vertical curtain of sterile air. Cabinets with a horizontal air flow should be avoided as they are hazardous to the operator. They also place the operator above the material being handled, leading to frequent bacterial contamination. Where no safety cabinet is available, a simple glass-fronted cabinet may be used with considerable success.
The main object is to create a physical barrier between the operator and the material being handled.
Before proceeding with the dissection, the operator should put on a pair of plastic disposable gloves to remove the risk of contamination by skin bacteria. To begin, the kidney should be placed in the bottom half of a sterile 150-mm glass Petri dish and, using sterile scissors and forceps, any surrounding fatty tissue should be dissected away and discarded. Next, the kidney is arranged in the centre of the dish, one flat side downwards, and a scalpel incision is made along a line dividing the kidney into upper and lower halves. The capsule on the upper half is now peeled away, while that on the lower half is retained. Using either scissors or a scalpel, pieces of the renal cortex are sliced off and transferred to a second 150-mm Petri dish. This process is continued until all of the easily available cortical tissue has been removed. The kidney is then turned over, the second section of the capsule removed and the remainder of the cortex sliced free. If necessary, a second kidney may be used, but it should be borne in mind that one kidney will probably yield sufficient primary cells to coat one side of 20 to 30 large flat-sided bottles.
The pieces of cortex are finely chopped by repeated cutting with a pair of crossed scalpels. The aim is to produce small cubes of cortex with sides roughly 2 to 3 mm long; the more thoroughly this step is performed, the more successful will be the subsequent trypsinization process. It is important to use a large Petri dish for this step because the cortex slices are difficult to control until they have been reduced in size, and they must be kept sterile.
The minced cortex is now transferred to a 500-ml conical trypsinizing flask and washed with several changes of cold PBS, each of which is discarded. Washing should continue until a more or less clear supernatant results, at which stage the PBS is removed and replaced with 100 ml of trypsin solution. A Teflon-coated follower of a size that will rotate in the bottom of the flask without touching the vertical indentations should be added. The flask is closed with a rubber bung or a foil closure, removed from the hood and transferred to a magnetic stirrer for 15 minutes at room temperature. The stirrer should be adjusted until the magnet rotates fast enough to bring the fragments into suspension and to produce a slow rolling motion; rotation should not be sufficient to cause frothing. The objective is to start an enzymatic detachment of cells from the portions of cortex in order to remove cells injured during the mincing process.
At the end of this period, the flask is returned to the cabinet and the fragments allowed to settle. The cloudy supernatant is now poured off and replaced by 400 ml of cold fresh trypsin solution. The flask is resealed and transferred either to a domestic refrigerator or to a cold room. The stirrer should again be set to ensure a slow tumbling action within the flask and left overnight. About 16 hours of trypsinization is usually quite adequate and, if the kidney is collected early in the morning, it is usually possible to complete these preliminary steps towards the end of the working day.
The following morning, the cell suspension is removed from the cold and examined. Apart from a few strands of connective tissue, no large fragments should remain. Instead, a turbid suspension of separated cells should have been produced. Under the cabinet, further enzyme action is now halted by the addition of 20 ml of normal OS. The cells are then filtered through a stainless-steel mesh to remove any large clumps, collected in a flask or beaker and dispensed for centrifugation. The centrifuge should be pre- cooled to between 4°C and 8°C and loaded with four 100-ml tubes. The cells are deposited at approximately 200 g for ten minutes and the supernatant fluid is discarded. The cells are then gently resuspended in cold PBS with an added 5 percent (v/v) normal OS and recentrifuged as above. Then, using a wide-mouthed pipette, the supernatant is discarded and the cells are transferred to a graduated centrifuge tube. After a further spin at 200 g for ten minutes, the small amount of supernatant is pipetted off and the packed cell volume (PCV) measured. An equal volume of growth media is added and, again with a wide-mouthed pipette, the cells are gently aspirated up and down until they are evenly resuspended. According to the number of final containers required, the suspension is now further diluted 100 times in growth media (1/200 from the original PCV) and dispensed. The cells that grow from this suspension are termed primary cells.
The growth medium suggested for primary BK cells is made from 80 parts GMEM, 14 parts TPB and six parts unheated adult OS; neomycin sulphate is included at the rate of 200 IU/ml but fungicides are usually omitted unless fungal infection is a known problem. The cells will now attach to the glass or plastic as either single cells or clumps of various sizes. Outgrowths of dividing cells will spread across the surface. The cells should be examined three or four days after seeding and, if satisfactory outgrowths are visible, the old growth medium should be discarded and a maintenance medium added. A pH change should also be noticeable since cell growth produces CO2 which brings about a gradual acidification of the medium and a red-to-yellow colour change in the phenol red indicator incorporated in the medium. Maintenance medium consists of GMEM supplemented by the addition of unheated adult
OS at the rate of 5 percent (v/v) and including neomycin sulphate as before.
The choice of final container for the BK cells will depend largely on circumstance. The method of cell preparation so far described assumes that the diagnostic laboratory engages in cell production only when a suspect field specimen has been received, in which case it will be necessary to prepare a set of roller-tube cultures in which to attempt virus isolation. The virus appears to grow best in young, actively dividing cells, which can be most conveniently provided in tubes of this type. Using an automatic syringe, tubes are seeded with 1 ml of cell suspension and placed in tube racks laid at an angle of 5° to the horizontal in order to allow the cells to attach to the side of the tube. After three or four days, when the cells are well established, the tubes are removed from the racks and transferred to roller drums. The slow rotary action of the drum alternately bathes and exposes the cells as they dip in and out of the maintenance medium and encourages the cells to divide. When new cells completely cover a particular surface, growth often stops as a result of a phenomenon known as contact inhibition. In the case of roller tubes, where a large surface area remains cell-free at the time of attachment, the cells on the edge of the monolayer can continue to grow outwards without being inhibited. In contrast, cells seeded into bottles or flasks continue to multiply only until such time as a confluent monolayer has formed.
Some laboratories routinely produce primary BK cells for use in rinderpest vaccine production and may therefore find it possible to produce roller-tube cultures in anticipation of an incoming field specimen. An alternative procedure that may prove useful is to seed a proportion of the primary cell yield in large culture bottles and to store these for future use. The bottles may be made of either glass or disposable plastic, provided they have a large flat surface and can be closed to form a gas-tight seal (failure to do so results in the loss of CO2, excessive alkalinity and cell death). They are seeded with 50 ml of trypsinized cells in growth medium and placed horizontally, flat side down, at 37°C. After three or four days, the growth medium is replaced by maintenance medium (as above) and further changes of maintenance medium are carried out every two to three days until a confluent cell sheet results. After a further change of maintenance medium, the bottles are removed from the incubator and placed at room temperature (approximately 20°C), where, without attention, they may be kept for up to four weeks.
Secondary BK cells are grown by removing primary cells from the glass surface and redistributing them in growth medium in fresh culture vessels. With stored cells it is necessary to return the primary cells to 37°C for 24 hours prior to subdivision. The old maintenance medium is then removed and replaced with 25 ml of pre-warmed (37°C) calcium- and magnesium-free saline (CMFS); this is used to wash the monolayer and is then discarded. The monolayer is then immersed in 15 ml of pre-warmed VT solution and placed at 37°C for five to ten minutes. During this time the cells lose their adherent properties, round up and detach from the flat surface. The cells can be damaged to some extent by the action of trypsin, so this stage must be halted as soon as the cells detach. The detachment process may be hastened by gently washing the VT solution up and down the flask.
The addition of VT to the cell sheet produces a slight opacity and the monolayer is easily seen; likewise, the detachment of cells into the solution can be observed with the naked eye. The cells should now be transferred to a centrifuge tube containing a small amount (5 ml) of fresh growth medium and spun at 200 g for five minutes. The growth medium halts the action of the VT and facilitates the subsequent distribution of cells. The supernatant is now discarded and the cells resuspended in growth medium at the rate of 50 ml per flask of primary cells. (If necessary, the cells from several flasks can be pooled at this stage.) The cells should now be counted and the final count adjusted to 2 × 10⁵ per millilitre by the addition of more growth medium. These cells can now be seeded into roller-tube cultures as secondary BK cells for virus isolation. Under these conditions cell attachment and growth will be more rapid and tubes may be used one or two days later for virus isolation work.
Another routine that may be successfully employed is to continue to passage the cells in stock flasks kept at 37°C and periodically changed with fresh maintenance medium. These cells should be subcultured every two weeks using the detachment and reseeding method described above. Eventually the cells will show a reduced growth potential; thus, it is suggested that primary BK cells not be passaged more than nine times. At each subdivision, roller-tube cultures may be initiated. If this system is to be adopted it is recommended that HSLS medium with 5 percent OS be used for primary cell growth and all passages.
A monkey cell line (Vero) has also been used to isolate rinderpest and PPR, but up to three blind passages may be necessary before CPE is detected.
Lymphoblast cell lines. Kobune and his colleagues (1991) showed that the Nakamura strain of lapinized rinderpest virus, which previously had resisted attempts at culture in cells, would grow in a marmoset lymphoblastoid cell line, B95a. Typical CPE begins at 24 hours and consists of syncytia and balloon cells. These cells do not appear to be suitable for PPR isolations as established laboratory strains do not show clear CPE when used to infect them. For virus isolation, mix PBMCs from a suspect infected animal with lymphoblastoid cells at a ratio of 1:5 (106:5.0 × 10⁶) in a 25-cm2 flask.
Similarly, bovine T lymphoblast cells transformed by the protozoan Theileria parva support the growth of rinderpest virus and have proved to be more sensitive and recover a wider range of rinderpest virus strains than either BK or Vero cells (Rossiter, Herniman and Wamwayi, 1992). Moreover, the CPE develops within 24 hours [these cells can be obtained from the International Livestock Research Institute (ILRI), Nairobi, Kenya]. The potential of lymphoblastoid cell lines in diagnosis is promising but they have not yet been widely adopted as a means of culturing virus in diagnostic laboratories.
Preparation of field specimens
Blood. The desired samples are blood in heparin. Rinderpest virus is closely associated with the leucocyte fraction of the blood and an attempt must be made to separate this fraction in the form of a buffy coat. It is therefore important that the blood cells are not disrupted by freezing during transit. When the cells arrive in the laboratory, the first task is to inspect the sample for haemolysis.
PBMCs can be prepared as described in the section "Polymerase chain reaction" (p. 69) using Ficoll to separate the red blood cells. An alternative, in the absence of ficoll, is as follows: approximately 10 ml of uncoagulated whole blood is transferred to a round-bottomed glass centrifuge tube, which is covered with sterile foil, and the sample is centrifuged for 15 minutes at 2 000 g at 4°C. If the blood was collected and submitted in evacuated bleeding tubes of 7- to 10-ml capacity, these can often be placed directly into the centrifuge without having to be transferred to centrifuge tubes. After centrifugation, the plasma is discarded and replaced by a similar volume of chilled 0.85 percent saline. The cells are vigorously aspirated to resuspend and wash them, and then they are recentrifuged as above. The washing process is necessary because early antibody may well be present in the plasma and may inhibit virus growth in cell cultures. The washing process is repeated two more times and at the end of the third wash the buffy coat is pipetted off and transferred to a screw-capped bottle containing 10 ml of culture maintenance medium. After thorough mixing, the buffy coat cell suspension is ready for counting and inoculation into roller-tube cell cultures. Apart from the centrifugation step, all manipulations should be carried out in the laminar-flow biological safety cabinet.
Solid tissue. The spleen, lymph nodes and haemolymph nodes are the tissues of choice for virus isolation. Using a scalpel and forceps, and working under the safety cabinet, a cube of tissue weighing approximately 1.5 g is dissected from the samples provided. Where possible, lymph nodes with an intact capsule should be cleared of surrounding tissue and then incised to obtain the requisite sample. If a piece of spleen has been supplied, an attempt should be made to exclude material taken from the previously cut surface. If possible, capsular or trabecular tissue should also be avoided. Haemolymph nodes are small and are usually dissected out as intact nodes. The tissue should be placed in a previously weighed Petri dish, which is reweighed to ascertain the amount of sample. The tissue is then lightly chopped before transferring it to a glass tissue grinder. The tissue is placed at the bottom of the sleeve and forced upwards in the form of a fine pulp by downward pressure on the plunger. This action is aided by the addition of a small amount of culture maintenance medium along with the tissue. The ground suspension collects in a reservoir on the sleeve and may be transferred to a screw-capped bottle and topped up with maintenance medium to give a 10 percent (w/v) suspension ready for inoculation into roller-tube cultures.
Alternatively, a tissue suspension may be obtained by grinding the sample in a mortar and pestle using medium-grade sterile sand as the abrasive. Here, too, a small amount of maintenance medium should be added as a suspending agent. At the end of the grinding process, the balance of the maintenance medium (to give a 10 percent w/v suspension) is added to the mortar and mixed thoroughly. The cell suspension is then transferred to a centrifuge tube and clarified by spinning at 1 000 g for five minutes at 4°C.
The two methods used to grind up tissue differ slightly in their mode of action. In the glass-sleeve method, a cell suspension is formed and many viable cells will be included in the inoculum. If these cells are infected, they may liberate virus that can be adsorbed into the BK cell monolayer or they may infect the indicator cells by direct fusion. In the case of sand-ground tissue, the cells are removed by centrifugation and infection is only possible if virus has been released into the maintenance medium from disrupted cells. Both methods are effective and the choice depends on the availability of equipment within a given laboratory.
Before inoculating roller-tube cultures, it is advisable to make a further fivefold dilution, adding 2 ml of the cell suspension/clarified supernatant from the first dilution to 8 ml of fresh maintenance medium. While it is possible that the initial dilution may be cytotoxic for the BK cells, a final dilution of 1/50 should prove innocuous.
Inoculation of cell cultures
Ten tubes with well-established monolayers are taken, labelled according to the inoculum and opened to discard the old medium. Each tube is then inoculated with 1 ml of the test medium, closed and placed on a roller drum .The following day, the fluid in each tube is completely discarded and each tube washed three times with 2 ml of prewarmed (37°C) PBS using an automatic syringe. Finally, half of the tubes are refed with 1 ml of maintenance medium containing normal OS and the other half with maintenance medium containing 5 percent (v/v) rinderpest immune serum. The tubes are then returned to the roller drum and incubated at 37°C. Inoculations should be carried out in the safety cabinet but, as long as care is taken to avoid cross-contamination, washing and refeeding operations can be undertaken on the open bench.
Further changes of medium, with and without serum, are carried out every two days until day 14, when, if no virus growth has appeared in any of the tubes, the cultures are usually blind passaged, i.e. cells are removed from the glass and distributed in fresh growth medium into unseeded tubes. Up to three blind passages may be needed before CPE is detected, especially when Vero cells are used.
Daily microscopic observations should be made, paying particular attention to the cell sheet at the edge of the monolayer where rinderpest-specific CPE may develop at any time after the third day after inoculation (see Figure 39). This usually takes the form of small foci of rounded retractile cells mixed among cells with long cytoplasmic processes and small multinucleate syncytia with irregular shapes and indeterminate outlines.
With further incubation, the CPE generalizes to involve large areas of the cell sheet and, by the ninth or tenth day after inoculation, a heavily infected tube will show large areas of glass that have become exposed because of cell loss, while densely granular syncytia predominate among the affected cells still attached (see Figure 40). At times these syncytia may become highly vacuolated. There should be no CPE development in tubes containing immune serum.
FIGURE 39 Early cytopathic changes induced by rinderpest virus in cell cultures
FIGURE 40 Rinderpest-Induced syncytia in cell cultures
While additional tests are required before a final answer can be given, the detection of syncytia in B K cultures clearly indicates a strong likelihood that rinderpest virus is replicating in the cultures without immune serum and that the virus has been isolated. The virus is then harvested in a safety cabinet and the isolate stored at -70°C pending further investigations. Provided a reasonable number of cells remain attached, daily harvests of fluid may be obtained from an infected culture. Harvested fluid must be replaced with fresh maintenance medium. A final harvest should be obtained by freezing the tube and the medium inside it at -70°C for an hour, thawing it rapidly in cold tap-water, centrifuging the medium and cell debris at 2 000 g for five minutes at 4°C and harvesting the supernatant. This should be placed in small screw-capped bottles and stored at -70°C. At least one harvest should be used to infect a recently established bottle of BK cells. The selected flask is drained of medium, inoculated with 1 to 2 ml of the infected fluid harvest and held stationary for 30 minutes at 37°C. The culture is then refed with maintenance medium and placed at 37°C on a roller drum. This bottle must be viewed daily for the development of the same CPE, which starts as small scattered foci and diffuses throughout the bottle in about seven to ten days. The contents of the bottle can then be harvested to obtain a passage 2-level virus isolate.
Assessment of results
Once a virus has been isolated that exhibits a cytopathic effect typical of rinderpest and that is inhibited by rinderpest immune serum, a preliminary diagnosis of rinderpest can be made. It is known that the inoculation of PPR virus on to BK cells can produce a similar result, and PPR has been misdiagnosed as rinderpest on several previous occasions. It is therefore essential to undertake definitive serological or animal inoculation tests before finalizing the diagnosis.
If available, immunocapture ELISA or molecular techniques can also be employed, which will give a more rapid confirmation. Although it may take some time, the isolation of a cytopathic agent inhibited by rinderpest immune serum provides grounds for the immediate implementation of full zoosanitary measures (quarantine, slaughter, vaccination and back-tracing) if these are not already in effect.
Method
Pre- and postinoculation sera are obtained from a rinderpest-susceptible ox before and after vaccination with rinderpest virus; they are inactivated at 56°C for 30 minutes. A known strain of rinderpest (for example, RBOK/BK90-100) is titrated in the presence of each sample using the method outlined for the detection of inhibitors in serum. By comparison with the pre-inoculation sample, the postinoculation serum should reduce the virus litre by more than 106 TCID50. These sera can be used to neutralize unknown samples and should be stored at -20°C in 5-ml volumes.
The unknown virus harvested from cell cultures above is diluted in TPB over a range of 101 to 10-5 in tenfold steps. Equal volumes of known rinderpest-negative and rinderpest-positive sera are added to each dilution, incubated overnight and inoculated into roller-tube cultures. Based on the appearance of CPE, virus titres are calculated 11 days later.
Assessment
If the unknown virus registers a titre of between 103 and 105 TCID50 in the presence of rinderpest-negative serum and is completely neutralized by the rinderpest-positive serum, the diagnosis of rinderpest is confirmed.
In many ways, rinderpest virus is more easily isolated in buffaloes and cattle than in cell cultures, and with equally convincing results. There are two main drawbacks to this method, however. First, buffaloes and cattle have to be purchased and fed, which adds considerable expense to the laboratory budget. Second, it is extremely dangerous, in terms of the possibility of further virus spread, to handle infected animals within the confines of a research station. Work of this nature must not be undertaken unless animal isolation facilities are available.
On the other hand, there are circumstances where animal inoculation is essential if virus isolation is to be achieved. If, for instance, a field specimen has been received at a laboratory with no cell culture facilities whatsoever, the only way the virus can be isolated is to inoculate material into buffaloes or cattle. Similarly, the laboratory receiving the specimen may be able to attempt cell culture isolation only after preparing cells and media and be unable to store the specimen in the meantime. Animal inoculation represents a way of gaining time. Animal inoculation can also be used to eliminate bacterial contamination from cell culture material suspected to contain virus but heavily contaminated with bacteria.
Equipment
Major equipment. It is assumed that all the major items of equipment specified earlier will be available, particularly a laminar-flow biological safety cabinet, a refrigerated centrifuge and an ultra-cold freezer. In addition to these, a small laboratory freeze-drier is a useful piece of equipment, together with vials and closures.
Minor equipment. Graduated, disposable 5-ml syringes and needles and sterile evacuated blood collection tubes (10-ml draw), together with needles and holder.
Reagents
Normal saline. 0.85 percent sodium chloride in pure water, bottled and sterilized by autoclaving in 100-ml amounts.
PBS. Phosphate-buffered saline.
Rinderpest virus strains. One vial of freeze-dried cell culture-adapted rinderpest virus and one vial of freeze-dried goat-adapted rinderpest virus.
Buffaloes/cattle. Animals of the least resistant breed available should be chosen; they must be totally susceptible to rinderpest at the outset and should be drawn either from an unvaccinated group of laboratory animals or from an area where routine vaccination is not carried out. In any event, serum samples must be collected from the animals and tested by either the virus neutralization test or competitive ELISA to demonstrate that the animals are rinderpest seronegative and are therefore fully susceptible.
It is usual to inoculate field material into equal numbers of rinderpest-immune and rinderpest-susceptible animals (two of each). Immune animals are prepared by reconstituting the contents of a vial of rinderpest cell culture vaccine with 10-ml normal saline and inoculating 5 ml subcutaneously into the lower neck of each animal. After three weeks, a second serum sample is collected. If this now contains rinderpest neutralizing antibody, the animal is considered to be immune. It is advisable to prepare immune animals ahead of the receipt of field specimens.
Method
Antibodies present in uncoagulated blood samples are unlikely to interfere with virus isolation in vivo. These may therefore be inoculated directly into experimental animals, dividing the material submitted equally between the test animals. If several blood samples have been obtained from different animals in the same outbreak, they can be pooled.
Solid tissues should be ground with PBS to give a 10 percent suspension which should be clarified before inoculation. Tissue suspensions may be pooled prior to inoculation. If necessary, large volumes of tissue suspension (20 to 30 ml) may be inoculated subcutaneously without harming the animal.
Rectal temperatures are recorded each morning and the animals are examined daily by a veterinarian for two weeks. Care should be taken to inspect the eyes, nostrils and mouth, looking for evidence of necrosis and erosion. To confirm a clinical diagnosis of rinderpest, pyrexia, anorexia and characteristic mouth lesions should develop only in the rinderpest-susceptible animals.
As soon as rinderpest-like clinical signs are noted, one of the reacting animals should be slaughtered and the spleen harvested together with a small portion of mesenteric lymph node. From 5 to 10 g of spleen pulp should be ground with PBS to give a 10 percent (w/v) suspension. This represents the actual isolation of rinderpest virus and is a source to which the operator can return in the future for further infectious material. After clarification, this fluid should be frozen at -70°C in small aliquots or freeze-dried and stored at -20°C. The lymph node should be tested for rinderpest antigen in an agar-gel immunodiffusion test.
Assessment
If a clinical reaction with rinderpest-like signs appeared in the two rinderpest-susceptible animals but not in the two rinderpest-immune animals, and if rinderpest antigen was demonstrated in either of these animals, a rinderpest diagnosis may be given.
In this respect, animal inoculation is superior to isolation in cell culture, where further confirmatory work would be required. It should be borne in mind that a field isolate from animals may eventually require adaptation to cell cultures for further laboratory characterization.
Rinderpest virus induces characteristic microscopic changes in affected animals, but, like the clinical signs and gross pathology, they are not pathognomonic. Indirect immuno-peroxidase staining, however, is a valuable diagnostic histological procedure that specifically identifies cells infected by rinderpest virus in vivo.
Equipment
Tissue processors. Several models of automated tissue processors are available commercially. They are not essential, but they are efficient and give consistent results.
Paraffin wax dispenser. Not essential, but it allows storage of wax and ensures a supply of filtered wax.
Embedding oven. Complete with embedding trays and set at 60°C.
Microtome. Rocking type.
Microtome knives. Wedge profile with handles and back. They may be sharpened on small Carborundum stones or in an automated sharpening machine.
Cryostat. Essential for cutting sections of unfixed tissue for histological or immunohistological examination.
Water bath. Thermostatically controlled.
Drying oven. Thermostatically controlled.
Instruments. Fine-pointed stainless-steel forceps, stainless-steel seekers, scalpels and fine-hair brushes.
Slides. Standard microscope slides, coverslips and slide rack.
Microscope. Light microscope equipped with × 10 and × 40 objectives for immunoperoxidase. A specialist microscope is required for immunofluorescence.
Reagents
Fixatives. Formol saline, analytical quality acetone and solvent methanol.
Alcohols. 50, 70, 95 and 100 percent concentrations of ethanol and 1 percent acid alcohol (1 percent hydrochloric acid in 70 percent ethanol).
Clearing agent. Either low-sulphur xylene or "Histo-Clear".
Paraffin wax. Wax with a melting point between 54°C and 58°C. Available commercially in 100-g tablets.
Paraffin wax additives. Not essential, but many commercially available waxes contain additives.
Section adhesive. Not essential but useful, as there is a tendency for the tissues to detach themselves from the slides. Mayor's glycerol albumen or a 1 percent solution of methyl cellulose are satisfactory.
Stains. Ehrlich's, Harris' and Mayer's haematoxylins, ripened before sale and ready for use, water-soluble eosin Y, lithium carbonate and Giemsa.
Mountant. Kirkpatrick and Lendrum's DPX.
Methods
Impression preparations. Rinderpest virus stimulates the formation of multinucleated giant cells (syncytia), containing intranuclear and intracytoplasmic inclusion bodies in affected epithelial and lymphoid tissues. Thiery (1956), therefore, advocated the examination in the field of impression preparations of freshly cut tissue surfaces. He favoured touch preparations of the epithelium lining the tonsillar crypts. Other lymphoid organs and affected portions of the alimentary tract mucosae are also suitable.
1. Remove part of the selected organ from the carcass.2. Cut and place a portion on a board with the cut surface facing up.
3. Touch the cut surface with a clean microscope slide and press gently downwards to spread the exposed surface of the tissue against the slide.
4. Air-dry.
5. Fix in methanol for three minutes.
6. Flood with Giemsa stain diluted 1/5 with water (pH 7.0) for ten to 15 minutes.
7. Rinse in water.
8. Blot dry.
Paraffin wax sections. Tissues from suspect cases of rinderpest should be removed and fixed in formol saline as soon as possible after death, the volume of the fixative being at least ten times that of the tissue. The tissues should be immersed in the fixative for 24 to 48 hours .The recommended specimens are slices of lymph nodes, spleen, tonsils and eroded mucosae. Each piece should be less than 1 cm thick, if larger pieces are received, smaller blocks should be cut out for further fixation before processing.
1. Dehydrate the fixed blocks of tissue by immersion and gentle agitation in baths of 50 percent, 70 percent and three changes of 95 percent ethanol, allowing 90 minutes each. The fluid volume should be at least 50 times that of the tissue.2. Transfer the blocks to isopropanol and hold overnight.
3. Clear in two 90-minute washes of xylene or "Histo-Clear".
4. Dispense molten paraffin wax into an embedding mould to a depth that covers the tissue block adequately. When a thin film of semi-solid wax has formed, introduce the tissue block using pre-warmed forceps.
5. Allow the wax to solidify. Remove the mould and trim the tissue surface that faced the mould base with a scalpel to expose the tissue. The opposite face is trimmed flat and parallel to the first. The remaining sides of the block are trimmed, leaving 2 to 3 mm of wax over the tissue.
6. Impregnate the surface of a hardwood block with wax and attach the face of the wax block opposite the exposed tissue surface to the wood by heating both with a warmed spatula and then pressing them together. If available, more modem metallic embedding moulds for forming paraffin blocks may be used.
7. Using a wedge knife mounted in a rocking microtome, cut sections 4 to 6 m m thick from the paraffin wax block and float off the ribbon of sections on water heated to 45°C in a water bath. The shiny surface should be towards the water surface. In the tropics it is advantageous to pre-cool the paraffin blocks in ice before cutting.
8. Split the ribbon of sections floating on the water with forceps and seekers. Pick up a single section by immersing a microscope slide, pre-smeared with adhesive, vertically into the water for most of its length, manoeuvring a section into contact with the slide and then lifting the slide vertically from the water; the section flattens out on the slide.
9. Drain in a vertical position for several minutes or blot lightly with moist blotting-paper.
10. Transfer the mounted section to a drying oven set at 45°C and dry for several hours.
11. To stain the section, first dewax in xylene and hydrate through isopropanol (or 100 percent ethanol), 95, 70 and 50 percent ethanol to water. Immerse the slide for four minutes at each step.
12. Flood with Ehrlich's haematoxylin for at least 20 minutes.
13. Wash in running tap-water for a few minutes until the section is blue.
14. Immerse the slide for five to ten seconds in 1 percent acid alcohol.
15. Wash thoroughly in tap-water until the sections are again blue.
16. Counterstain in 1 percent eosin Y in pure water for ten minutes.
17. Wash in running tap-water for five minutes.
18. Dehydrate through 50, 70, 95 and 100 percent ethanol (or isopropanol), clear in xylene or "Histo-Clear" and mount in DPX.
Cryostat sections. The cryostat is a refrigerated cabinet housing a rotary microtome. The temperature of the cabinet is adjustable between -5°C and -30°C, the usual operating temperature being -20°C .The technique is designed to process sections quickly; it is used in conjunction with rapid staining methods. Cryostats are now widely used to prepare tissue sections for examination by immunofluorescence or immunoperoxidase staining.
1. Tissue for processing must be fresh and should be frozen on to a cryostat chuck as quickly as possible. Use a drop of water as the bond. Then, immerse the chuck and tissue in liquid nitrogen or in shreds of solid carbon dioxide. Aerosol sprays containing di-fliuorodiphenyl are available commercially and will freeze small pieces of tissue at -50°C.2. Warm the piece of tissue frozen on to the chuck to the operating temperature of the cryostat, trim it and cut it to give sections 6 m m thick. Sections are picked up on microscope slides pre-smeared with adhesive.
3. Fix the section in cooled acetone for 20 seconds.
4. Wash in running tap-water.
5. Flood with Harris' haematoxylin for 90 seconds.
6. Rinse in saturated lithium carbonate solution (2 g/100 ml cold water).
7. Wash in running tap-water.
8. Counterstain in 1 percent eosin Y in pure water for ten seconds.
9. Wash in running tap-water.
10. Dehydrate through 50, 70, 95 and 100 percent ethanol, immersing the slide for two minutes at each step, clear in xylene or "Histo-Clear" and mount in DPX.
Assessment of results
Impression preparations. Scan the stained tissue impression using a low-power objective to find multinucleated giant cells, which are then examined with a higher-power objective. The nuclei stain dark blue to violet, while cytoplasms and viral inclusions stain pale blue. Considerable skill and experience are required to interpret the results in the absence of clearly differentiated giant cells. Failure to detect the giant cells does not invalidate the presumptive field diagnosis.
Sections. In tissue sections stained with haematoxylin and eosin, the nuclei are blue-black and the cytoplasms and viral inclusions are pink. The significant histopathological changes in rinderpest infections are the development of the characteristic multinucleated giant cells containing eosinophil intranuclear and intracytoplasmic inclusion bodies and the necrosis of lymphocytes and mucosal epithelium.
Lymph nodes. The first changes in the lymph nodes of rinderpest-infected animals are hyperplasia of the reticuloendothelial elements followed by necrosis of the reticular cells. Simultaneously, multinucleated giant cells containing eosinophil inclusions appear in the non-follicular region of the lymph nodes (Khera, 1958). Large cells with foamy cytoplasms are often present around the giant cells. Thereafter, necrosis of lymphocytes proceeds by fragmentation of the nuclei in the germinal centres, followed by the virtual disappearance of most of the mature lymphocytes (Maurer et al., 1956).
The lymphoid follicles are denuded, leaving behind an eosinophilic fibrillar, acellular matrix.
Spleen. A similar sequence of events occurs in the spleen. The early giant-cell formation is followed by necrosis of lymphocytes in the peri-arterial region.
Mucosal epithelium. The earliest change in stratified squamous epithelium is ballooning of cells with eosinophil intracytoplasmic inclusions that fuse to form multinucleated giant cells above the basal layer. Necrosis of epithelial cells follows. The necrotic foci enlarge and extend towards the mucosal surface, producing oatmeal-like protrusions that are quickly abraded off to produce irregular, sharply demarcated erosions. The basal layer of the squamous epithelium is seldom penetrated. The underlying capillaries are severely congested.
The changes in columnar epithelium are similar but the loss of the single layer of columnar cells leaves exposed the underlying lamina propria, which contains a congested capillary bed (Maurer et al., 1956).
Tonsils. The microscopic lymphocytotropic and epitheliotropic manifestations of rinderpest virus multiplication are seen together in sections of tonsillar tissue that include part of a tonsillar crypt. The crypts themselves tend to be plugged with necrotic debris.
Two relevant techniques have been published; in one, the presence of rabbit hyperimmune anti-rinderpest serum is identified by a peroxidase-labelled anti-rabbit serum produced in pigs (Gathumbi, 1990), and, in the other, a murine monoclonal antibody characterized for its reactivity with morbillivirus nucleoprotein that is detected with a peroxidase-labelled anti-mouse immunoglobulin antibody is used (Wohlsein et al., 1993).
Because rabbit hyperimmune anti-rinderpest serum is the more readily available in countries where rinderpest is a problem, this technique is described.
Reagents
Formalin fixed, paraffin wax sections
Xylene
Alcohols. Isopropanol, methanol, 96, 70 and 50 percent concentration of ethanol.
Hydrogen peroxide. 30 percent solution.
Tris-buffered saline (TBS), pH 7.6
PBS, pH 7.6
Pronase E (Merck Co., Darmstadt, Germany).
Normal caprine serum. Collected from rinderpest-negative goats. Inactivate 30 minutes (to remove complement components). Use at a dilution of 1/5 in PBS.
Rabbit hyperimmune anti-rinderpest serum. Use at a dilution of 1/500 in PBS.
Biotinylated goat anti-rabbit serum (Vector, Burlingame, United States). Absorb with 10 percent inactivated normal serum of the species under test. Use at a dilution of 1/150 in PBS.
Avidin-biotin-peroxidase complex (Vector, Burlingame, United States). Mix 30 minutes before use: 25 m l solution A in 1 ml PBS (mix thoroughly) + 25 m l solution B (mix thoroughly).
Substrate/chromogen mixture. 100 mg of 3,3' - diaminobenzidine-tetrahydrochloride (DAB) in 200 ml of TBS with 2 ml 3 percent hydrogen peroxide.
Counterstain. Mayor's haematoxylin.
Mountant. DPX or Corbitbalsam.
Method
1. Deparaffinate wax sections:
|
Xylene 1 |
ten minutes |
|
Xylene 2 |
ten minutes |
|
Isopropanol |
2.5 minutes |
|
96 percent ethanol |
2.5 minutes |
|
70 percent ethanol |
2.5 minutes |
|
50 percent ethanol |
2.5 minutes |
2. Wash three times for five minutes each in TBS with continuous stirring.
3. Inhibit endogenous peroxidase by incubation with 0.5 percent hydrogen peroxide in methanol for 30 minutes (197 ml methanol + 3 ml 30 percent hydrogen peroxide). Alternatively, instead of methanol, 85 percent ethanol may be used.
4. Wash three times for five minutes each in TBS.
5. Incubate sections in 0.05 percent Pronase E in pre-warmed PBS with 0.1 percent CaCl2, pH 7.3 (adjust pH with diluted NaOH) for 20 minutes at 37°C.
6. Wash three times for five minutes each with TBS.
7. Add normal caprine serum diluted 1/5 in PBS (inactivated at 56°C for inactivation of complement components). Incubate for 15 minutes.
8. Add rabbit anti-rinderpest hyperimmune serum (for AGID/VNT) at a dilution of 1/500 in PBS. Incubate for 45 minutes at 37°C in a moist chamber.
9. Wash three times for five minutes each in TBS.
10. Add biotinylated goat anti-rabbit antibody diluted 1/150 in PBS (absorbed with 10 percent inactivated normal serum of species under test). Incubate for 30 minutes at 37°C.
11. Wash three times for five minutes each in TBS.
12. Add avidin-biotin-peroxidase complex (prepared 30 minutes before use) and incubate for one hour at ambient temperature.
13. Wash three times for five minutes each in TBS.
14. Add the substrate/chromogen and stir for five minutes.
15. Wash under running tap-water for ten minutes.
16. Counterstain with Mayer's haematoxylin for one to three minutes.
17. Wash under running tap-water for ten minutes.
18. Dehydration:
|
50 percent ethanol |
two minutes |
|
70 percent ethanol |
two minutes |
|
96 percent ethanol |
two minutes |
|
Isopropanol |
two minutes |
|
Xylene 2 |
five minutes |
|
Xylene 1 |
five minutes |
19. Mount with Corbitbalsam or DPX.
Controls
1. Negative control. Tissue sections of corresponding organs from a non-infected, seronegative animal and the substitution of the first detecting antibody by an antiserum of the same species with a different specificity (for example, rabbit anti-foot-and-mouth disease virus).2. Positive control. Tissue sections from cattle experimentally infected with rinderpest.
Assessment
Specific peroxidase staining of rinderpest viral antigen occurs in the cytoplasms of epithelial cells of the digestive, respiratory and urinary tracts, in the cells of endocrine and exocrine glands, in epithelial cells of small bile ducts in periportal areas of the liver, in infiltrating lymphocytes and in lymphoid organs. Tissues of the central nervous system are not affected in the case of rinderpest infection.
The recommended specimens for confirming a diagnosis of rinderpest by immunohistology are oral mucosa, abomasum, small and large intestine, mesenteric lymph node, spleen and conjunctiva (Wohlsein et al., 1993).
Peste des petits ruminants (PPR)
Bovine virus diarrhoea (BVD)
Mucosal disease
Malignant catarrhal fever (MCF)
Bluetongue
Foot-and-mouth disease (FMD)
In reaching a presumptive diagnosis of rinderpest, field officers must bear in mind all other conditions they might possibly encounter that could affect their judgement. They should have an up-to-date awareness of all conditions previously found in their region or country, together with a knowledge of seasonal fluctuations in disease prevalence and any recent outbreaks. This state of affairs exists only where there is rapid dissemination of information throughout the veterinary service and where field staff training is constantly updated. Field officers should also be familiar with the varying epizootiological patterns shown by different agents, to narrow the range of possible conditions. In practice, however, there will be instances where a diagnosis is impossible without laboratory assistance.
Often a diagnosis will become clearer as the pattern of contagion, morbidity and mortality gradually emerges. Therefore, although not always possible, disease outbreaks should be revisited; this also allows further samples to be collected. In submitting specimens for the differential diagnosis, it will be necessary to include other specimens besides those collected for the confirmation of rinderpest. It is also extremely important to supply the diagnostic laboratory with an accurate clinical description of the initial findings and of subsequent changes.
Peste des petits ruminants (PPR) is a rinderpest-related morbillivirus causing severe disease in sheep and goats in Africa, the Near East and southern India .The viruses share common antigens demonstrable in complement fixation, fluorescent antibody and agar-gel immunodiffusion tests; they also show a degree of cross-neutralization. However, in spite of these relationships, the two viruses pursue separate epizootiological cycles and in nature each exists in its own right.
The production of specific monoclonal antibodies to the nucleoproteins of rinderpest and PPR viruses by Libeau and Lefevre (1990) and the engineering of virus-specific cDNA probes from the N genes of the two viruses (Pandey, Baron and Barrett, 1992) has enabled the development of techniques that clearly differentiate the two viruses. More recently, a differential RT/PCR assay has been developed to differentiate the two viruses (Forsyth and Barrett, 1995, see the section "Polymerase chain reaction" for a description of the method).
Clinical aspects
In cattle. Cattle act as "dead-end" hosts and are unlikely to play a role in the epizootiology of PPR. Naturally infected cattle show no clinical signs: they do not show a temperature response, their appetite remains normal and no lesions appear. Nevertheless, they develop a humoral antibody response against PPR virus that protects them against natural or experimental challenge with virulent rinderpest virus (Dardiri, Deboer and Hamdy, 1977). Although PPR need not be considered in the differential diagnosis of rinderpest in cattle, PPR serology must be included in rinderpest seromonitoring programmes to assess more accurately national herd immunities (Anderson and McKay, 1994).
In goats and sheep. The disease usually runs an acute or subacute course. After an incubation period of five to seven days, a severe pyrexia develops with peak temperatures of 40.5°C to 41.5°C on the second or third day. The whole febrile episode lasts between five and seven days, during which time the animals are increasingly depressed, listless and anorexic until death or recovery. In addition to general malaise, a series of pathognomonic signs develop during this episode.
Most cases show a serous nasal discharge that rapidly becomes profuse and catarrhal and is associated with sneezing. In the later stages of a severe case, this discharge dries into a thick crust around the nostrils. Prior to this, small areas of erosion may be visible on the mucous membrane of the nostrils. The conjunctiva is frequently congested and a profuse catarrhal conjunctivitis may develop, resulting in an eventual matting of the eyelids. In the oral cavity a necrotic stomatitis is frequently observed, commencing within two or three days of the onset of pyrexia as small roughened areas on the surface of the lower gum. In most cases the necrosis increases in extent and may involve the dental pad and upper gum, the hard palate, the cheeks and cheek papillae and the tongue. The breath is fetid with a smell similar to that of acute bovine rinderpest. Nearly all animals develop diarrhoea and a secondary bronchopneumonia with cough is a frequent complication. Morbidity and mortality rates can exceed 70 percent. On post-mortem examination, engorgement and blackening are seen in the abomasum and large intestine.
In Africa and the Near East, sheep are usually less severely affected than goats, although they transmit the virus and can be seen from serological data to be commonly infected. In contrast, overt disease is more common in sheep than in goats in southern India. There is no clear evidence of seasonal factors influencing the disease incidence, although kidding and lambing patterns may produce large numbers of susceptible animals at particular times of the year.
Specimens for diagnosis
The specimens required to confirm a provisional diagnosis of PPR are newly dead carcasses as well as blood in ethylenediamine tetra-acetic acid (EDTA) or heparin and samples of lymph nodes, tonsils and red lung consolidation from animals killed early in the course of the illness. The diagnostic techniques are the same as those for rinderpest.
Bovine virus diarrhoea (BVD) virus is a member of the Pestivirus genus within the family Togaviridae. It is antigenically related to Border disease in sheep and hog cholera in pigs. BVD virus infection cattle causes two very different syndromes depending on the circumstances of the infection. Susceptible cattle may suffer an acute infection and recover completely, but they may also transmit the virus vertically, producing immunologically compromised carrier offspring that develop mucosal disease later in life.
Clinical aspects
BVD is used to describe the syndrome caused by a primary infection with BVD virus. Because of the ubiquitous nature of BVD virus, and because recovery from infection confers resistance to reinfection, primary BVD infections are generally confined to groups of young cattle, although older animals may be involved. Infection is contagious and is characterized by high morbidity and, generally, low mortality. There is no seasonality, but intercurrent seasonal stress factors may increase the severity of the clinical syndrome.
Transmission occurs readily through contact with congenitally infected carrier animals and possibly through contact with other infected animals or fomites. In the severe form, the incubation period varies between one and three weeks and is followed by the development of pyrexia accompanied by anorexia and depression. At the same time, animals show a nasal and ocular discharge, serous initially, but becoming muco-purulent and either free flowing or tenacious. There is usually some reddening of the nasal mucosa. Shortly after the onset of pyrexia, a profuse watery diarrhoea develops, which is foul smelling and may contain blood. Oral lesions also occur, beginning as pinpoint flecks of mucosal necrosis and enlarging to shallow epithelial erosions of up to 2 cm in size. These lesions are indistinguishable from those caused by rinderpest and involve the same anatomical sites, namely, gums, tongue, hard palate and oral commissures. Lameness resulting from laminitis has been reported. The course of an attack may vary from a few days up to two or three weeks, and some deaths may occur.
Frequently, BVD is a much milder infection with little more than a transient pyrexia and some softening of the faeces, but in most instances the infection is completely subclinical.
At post-mortem examination, lesions are principally those of the alimentary tract. Shallow erosions are present on the muzzle, in the mouth and pharynx and in the oesophagus, rumen, omasum and abomasum. In the small intestine, lesions are less common but at times a severe catarrhal enteritis may be found; the Peyer's patches are prominent, haemorrhagic and necrotic. In the large intestine, there is engorgement of the vessels of the submucosa leading to a blackening of the folds. Obviously in most respects this picture could equally well occur in an animal that had died of rinderpest. Although erosions of the oesophagus, rumen and omasum are not common with rinderpest, they do occur; in particular, some current strains give a very severe oesophageal necrosis.
Veterinary officers in countries that are rinderpest-free might well ponder how quickly they would detect the introduction of a mild strain of rinderpest that was clinically indistinguishable from BVD. Perhaps the best indicators under these circumstances would be that rinderpest would affect animals of all ages and that it would continue to spread until it became obvious that a change in disease pattern had occurred.
Specimens for diagnosis
Confirmation of a provisional diagnosis of BVD is most readily obtained by demonstrating a rising antibody titre in paired serum samples, one collected during the acute phase of the illness and the second three weeks later.
Mucosal disease is the name reserved for the late-onset syndrome initially occasioned by a congenital infection of the pre-immunocompetent bovine foetus with BVD virus. In pregnant cattle undergoing a primary infection with BVD virus, passage of the virus across the placenta usually results. If infection occurs in the first 125 days of gestation, before the foetus has matured sufficiently to mount an immune response, many calves will be born with congenital infection. A proportion of these will die shortly after birth but others may appear normal and will be retained in the herd; some of those retained may later show signs of poor health. Such cattle are virus carriers and characteristically show no specific serological response.
At any time between six months and two years, but generally between 12 and 18 months, many of these animals break down and develop mucosal disease, which is invariably fatal. The onset is believed to be the result of the emergence of a closely related mutant virus within the carrier population. With such a distinctive aetiology, mucosal disease is restricted in occurrence and has a low overall morbidity and a high case mortality. Carrier animals shed virus in all body secretions and throughout their entire lives and are therefore highly infectious. They can only give rise to BVD-type infections, however, and then only if they are mixed with susceptible animals. The mucosal disease syndrome itself is non-contagious. Carrier animals may be detected prior to the onset of mucosal disease by virtue of a persistent viraemia and negative serology; they can then be culled.
In some instances mucosal disease fails to develop and carrier females can reach sexual maturity and beyond. Such animals invariably transfer BVD virus across the placenta, producing a further generation of infected carrier animals.
Mucosal disease resembles BVD and is characterized by variable degrees of pyrexia, anorexia and depression and the development of a nasal and ocular discharge and oral erosions. The nasal discharge usually becomes thick and adherent, while the oral erosions may be very severe and affected animals may slobber profusely. The breath is fetid. There is a conjunctivitis and, in some cases, clouding of the cornea. Diarrhoea commences shortly after the onset of mouth lesions and changes from being watery at first to include considerable blood and mucus. At times, mucosal disease cases can be present with no pyrexia or a chronic form can occur with diarrhoea lasting several months. However, the usual disease course lasts only one to three weeks.
At post-mortem examination, lesions are similar to those described for BVD virus, although they are usually more severe. Affected animals almost always show some evidence of a secondary bronchopneumonia.
Specimens for diagnosis
The specimens required to confirm a provisional diagnosis of mucosal disease in cattle are coagulated blood, blood in heparin and samples of lymph nodes and spleen. The specimens required from freshly aborted foetuses are samples from the thyroid, salivary gland and spleen. Newborn calves should be bled for serum before they suckle colostrum.
Malignant catarrhal fever (MCF) is an acute disease of cattle with clinical signs bearing sufficient resemblance to rinderpest to warrant consideration as a differential diagnosis. MCF is caused by a herpes virus that, in parts of Africa, is maintained as a silent infection in wildebeest (Connochaetes spp.). Wildebeest calves excrete virus nasally, contaminating the pasture and water for a short period after birth. Only cattle grazing the contaminated pastures or drinking-water in this limited period develop MCF. The occurrence of wildebeest-associated MCF is highly seasonal, therefore, and a history of possible contact between cattle and calving wildebeest is very relevant diagnostically.
Sheep-associated MCF has been seen in Ethiopia and Nigeria and, although case reports are sparse, is probably widely distributed.
Clinical aspects
Clinically, MCF is characterized by pyrexia, anorexia and marked depression. It usually runs a course of one to two weeks from the onset of pyrexia. During this period, a bilateral nasal discharge develops, serous at first but quickly becoming mucoid and then mucopurulent. Late in the disease the nostrils become encrusted and completely blocked by this discharge, which results in heavy, laboured breathing.
In the eye, there is a purulent conjunctivitis accompanying a highly characteristic corneal opacity. This commences around the periphery and gradually progresses to occlude more and more of the cornea until blindness results. This sign is usually bilateral and is often associated with photophobia.
In the mouth, there is diffuse superficial necrosis of the gums, cheeks, cheek papillae, tongue and hard palate. The animals usually develop a terminal diarrhoea and nervous signs may occasionally be seen. There is a low morbidity and a high mortality and the condition is not contagious between cattle. This syndrome is termed the head-and-eye form and differs only slightly from a more acute form in which eye lesions do not develop.
At post-mortem examination, the abomasal mucosa is hyperaemic and in the large intestine "zebra stripes" may be seen. Superficial lymph nodes are greatly enlarged and oedematous, and foci of lymphocytic infiltration may be seen on the cut surface of the kidney.
Specimens for diagnosis
The presumptive diagnosis of MCF is based on the history, clinical signs and post-mortem lesions. A history of contact with parturient wildebeest or sheep is essential. Confirmation is most commonly sought by histopathology for which slices of affected tissues in 10 percent formol saline are required. In addition, samples of heparinized blood, lymph nodes and spleen are required for virus isolation.
Bluetongue is an insect-transmitted virus infecting cattle, sheep and goats. It is frequently listed among the conditions that require differentiation before arriving at a diagnosis of rinderpest.
Clinical aspects
In cattle, pyrexia together with erosions or ulcers of the tongue and muzzle have been described, although it is so uncommon to find lesions of any kind in this species that bluetongue does not warrant serious consideration, at least in African cattle. Nevertheless, bluetongue is an extremely common virus and large numbers of cattle are infected subclinically. Sheep and goats are also involved in the epizootiology of bluetongue in Africa, but, again, native animals rarely show signs. In contrast, frank clinical disease is common in imported sheep and may produce pyrexia, muzzle oedema, oral hyperaemia, nasal hyperaemia accompanied by a serous nasal discharge becoming mucopurulent, an encrusted muzzle, frothy saliva and coronitis. At times, oedema may extend on to the neck and ears, while occasionally there is necrosis of the tongue and dental pad and, very rarely, cyanosis of the tongue. Depression is a pronounced feature of ovine bluetongue.
In Africa, acute bluetongue with facial oedema, lameness and mortality in imported sheep should present no problem for clinical differentiation. In India, acute bluetongue has been seen in recent years in native sheep and should be more seriously considered when making a differential diagnosis. In sheep, moreover, bluetongue and rinderpest may be difficult to differentiate in their milder forms, when little more than a pyrexia is observed. Here a laboratory serological test is useful.
Specimens for diagnosis
The specimens required to confirm a provisional diagnosis of bluetongue in a live animal are coagulated blood and non-coagulated blood in heparin. Those required from dead animals are samples of spleen and mesenteric lymph nodes. Spleen samples should also be collected from aborted and deformed foetuses.
Foot-and-mouth disease (FMD) should present little difficulty in differentiation from rinderpest, but at times irregular erosive lesions can be seen in the mouth instead of the classic fluid-filled vesicles. Sometimes animals may be found with heavy secondary infection in the nose and mouth, obscuring the character of the original lesions.
Here, examination of other animals, with particular attention to the possibility of foot and teat lesions, should suffice to differentiate FMD from rinderpest. In addition, FMD is much more infectious than rinderpest and has a much shorter incubation period.
Specimens for diagnosis
The specimens required to confirm a suspected case of FMD are samples of fresh vesicle fluid and epithelium fragments from ruptured and unruptured vesicles.
The samples should be forwarded to the laboratory in 50 percent glycerol-saline (unlike rinderpest, FMD virus is not inactivated by glycerol) in a Dewar flask containing cold chill-packs but not wet ice. If vesicular fluid or epithelium are not available, collect an oesophageal-pharyngeal sample using a sputum cup on the end of a probang.
![]()
![]()
![]()
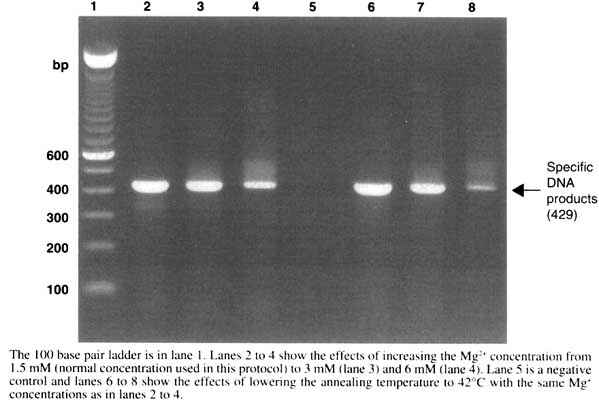