8. TOPOGRAPHICAL SURVEYS - DIRECT LEVELLING
8.0 Introduction
|
| 1. In Chapters 5 and 6, you learned about various devices
for measuring height differences. You also learned how to use these devices
to solve three types of
problems in measuring height differences, which you may face when you
plan and develop a fish-farm (see Section 5.0). Now, you will learn how
to plan surveys to solve these problems, how to record
the measurements you make in your field-book, and how to find
the information you need from these measurements. |
|
|
| |
|
|
What are elevation and altitude?
|
|
2. You have learned what the height of a ground point is. Now, however,
you will need to know a more accurate definition of this term.
- When the height of a point is its vertical distance above or
below the surface of a reference plane* you have selected,
it is called the elevation* of that point.
- When the height of a point is its vertical distance above or
below mean sea level (as the reference plane), it is called the
altitude* of the point.
|
Example
|
|
Elevation of a point above a selected ground
mark A
Altitude of the same point above mean sea level (amsl) |
1.83 m
345 m
|
3. The vertical distance between two points is called the difference
in elevation , which is similar to what you have learned
as the difference in height (see Section 5.0). The process of measuring
differences in elevation is called levelling , and
is a basic operation in topographical surveys.
|
|
|
| |
|
|
|
What are the main levelling methods?
|
|
4. You can level by using different methods, such as:
- direct levelling, where you measure differences
in elevation directly. This is the most commonly used method;
- indirect levelling, where you calculate differences in
elevation from measured slopes and horizontal distances.
|
|
Direct levelling
|
| |
|
|
|
You have already learned about indirect levelling in Section 5.0, when
you learned to calculate differences in elevation
from slopes or from vertical angles.
Now you will learn about direct levelling.

|
|
Indirect levelling
|
What are the kinds of direct levelling?
5. By direct levelling, you can measure both the elevation of points and the
differences in elevation between points, using a level and a levelling
staff (see Chapter 5). There are two kinds of direct levelling:
- differential levelling; and
- profile levelling.
6. In differential levelling , you find the difference in elevation
of points which are some distance apart (see Section 8.1). In the simplest kind
of direct levelling, you would survey only two points A and B from one central
station LS. But you may need to find the difference in elevation between:
- either several points A, B, ... E, surveyed from a single levelling station
LS; or
- several points A ... F, surveyed from a series of levelling stations LS1
... LS6, for example:
7. In profile levelling , you find the elevations of
points placed at short measured intervals along a known line, such as the centre-line
of a water supply canal or the lengthwise axis of a valley. You find elevations
for cross-sections with a similar kind of survey (see Section 8.2).
8. You can also use direct levelling to determine elevations for contour
surveying (see Section 8.3), and for setting
graded lines of slope(see Section 6.9), where you need to combine both differential
levelling and profile levelling.
|
Differential levelling
|
|
Profile levelling
|
9. There are several simple ways to determine the elevations of ground points
and the differences in elevation between ground points. You will use a level and
a levelling staff with these methods. In the following sections, each method is
fully described to help you choose between them. Table
10 will also help you to compare the various methods and to select the one
best suited to your needs in each type of situation you may encounter.
|
TABLE
10
Direct levelling methods
|
Section
|
Type
|
Method
|
Suitability
|
Remarks
|
|
|
Differential levelling
|
Open traverse
|
Long, narrow stretch of land
|
Check for closing error
|
|
|
Differential levelling
|
Closed traverse
|
Perimeter of land area and base line for radiation
|
Check for closing error.
Combine with radiating
|
|
|
Differential levelling
|
Square-grid
|
Small area with little vegetation
|
Squares 10 to 20 m and 30 to 50 m
|
|
|
Differential levelling
|
Radiating
|
Large area with visibility
|
Combined with closed traverse
|
|
|
Longitudinal profile levelling
|
Open traverse
|
Non-sighting and sighting level
|
Check for closing error
|
|
|
Cross-section profile levelling
|
Radiating
|
Sighting level with visibility
|
|
|
|
Contouring
|
Direct
|
Detailed mapping of small area with a sighting
or a non-sighting level and target levelling staff
|
Slow and accurate.
Progress uphill
|
|
|
Contouring
|
Square-grid
|
Small area with little vegetation Especially
if perimeter has been surveyed. Small to medium scale mapping
|
Terrain, scale and accuracy depend on contour
interval.
Progress uphill.
Suitable for plane-tabling
|
|
|
Contouring
|
Radiating
|
Small to medium scale mapping of large area
|
Fast and fairly inaccurate. Progress uphill.
Suitable for plane-tabling
|
|
|
Contouring
|
Cross-sections
|
Preliminary survey of a long and narrow stretch
of land
|
Fast, fairly inaccurate. Progress uphill.
Suitable for plane-tabling
|
|
8.1 How to level by differential
|
What is differential levelling?
|
|
1. You can best understand differential levelling by first considering
only two points, A and B , both of which
you can see from one central levelling station, LS .
- Sight with a level from LS at the levelling staff on point A. The
point where the line of sight meets the levelling staff is point X.
Measure AX. This is called a backsight (BS).
|
|
Find AX with a backsight

|
| |
|
|
- Turn around and sight from LS at the levelling staff on point B. The
point where the line of sight meets the levelling staff is point Y.
Measure BY. This is called a foresight (FS).
|
|
Find BY with a foresight
|
| |
|
|
- The difference in elevation between point A and point B
equals BC or (AX- BY) or (backsight BS - foresight FS).
|
|
The difference in elevation between
points A and B equals AX minus BY
|
| |
|
|
|
- If you know the elevation of A, called E(A), you can calculate
the elevation of B, called E(B), as BS -FS + E(A).
- But BS + E(A) = HI, the height of the instrument or
the elevation of the line of sight directed from the level.
|
|
|
| |
|
|
(the elevation at point B being equal to the height of the levelling
instrument, minus the foresight).
|
|
|
What are backsights and foresights?
|
|
It is important for you to understand exactly what "backsight"
and "foresight" are in direct levelling.
2. A backsight (BS) is a sight taken with
the level to a point X of known elevation E(X), so that the
height of the instrument HI can be found. A backsight in direct levelling
is usually taken in a backward direction, but not always. Backsights are
also called plus sights (+ S), because you must always add
them to a known elevation to find HI.
|
|
|
| |
|
|
|
3. A foresight FS is also a sight taken
with the level, but it can be on any point Y of the sight line
where you have to determine the elevation E(Y). You will usually take
it in a forward direction, but not always. Foresights are also called
minus sights (-S) , because they are always subtracted
from HI to obtain the elevation E of the point. Remember:
|
|
|
| |
|
|
Surveying two points with one turning point
|
| 4. Often you will not be able to see at the same time the
two points you are surveying, or they might be far apart. In such cases,
you will need to do a series of differential levellings
. These are similar to the type explained above, except that you will
use intermediate temporary points called turning points (TP).
|
|
|
| |
|
|
| 5. You know the elevation of point A, E(A) = 100 m, and you
want to find the elevation of point B, E(B), which is not visible from a
central levelling station. Choose a turning point C about halfway
between A and B. Then, set up the level at LS1, about halfway between A
and C. |
|
|
| |
|
|
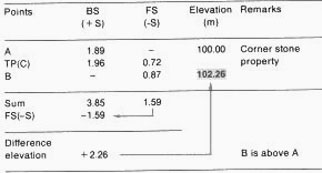
| 6. Measure a backsight on A (for example, BS = 1.89 m). Measure
on C a foresight FS = 0.72 m. Calculate HI = BS + E(A) = 1.89
m + 100 m = 101.89 m. Find the elevation of turning point C as E(C)
= HI-FS = 101.89 m - 0.72 m = 101.17 m. |
|
|
| |
|
|
| |
|
|
|
7. Move to a second levelling station, LS2, about halfway between C and
B. Set up the level and measure BS = 1.96 m, and then FS = 0.87 m. Calculate
HI = BS + E(C) = 1.96 m + 101.17 m = 103.13 m. 0btain E(B)
= HI- FS = 103.13 m - 0.87 m = 102.26 m.
8. You can make the calculations more easily if you record the field
measurements in a table , as shown in the example. You
will not make any intermediate calculations. All BS's and all FS's must
be added separately. The sum FS is subtracted from the sum BS to find
the difference in elevation from point A to point B.
- A positive difference means that B is at a higher elevation
than A.
- A negative difference means that B is at a lower elevation
than A.
|
|
|
| |
|
|
|
Knowing the elevation of A, you can now easily calculate the elevation
of B. In this case, E(B) = 100 m + 2.26 m = 102.26 m; this is the same
as the result in step 7, which required more complicated calculations.
This kind of calculation is called an arithmetic check.
Example
Table form for differential levelling with one turning point.
|
|
|
Surveying two points using several turning points
9. Often you will need to use more than one turning point between a point of
known elevation and another point of unknown elevation. To do this, you can
use the procedure you have just learned, but you will need to record
the field measurements in a table to make calculating the results
easier.
10. Knowing the elevation of point A, you need to find the elevation
of B. To do this, you need for example five turning points
, TP1 ... TP5, and six levelling stations, LS1 ... LS6.
Note : the turning points and the levelling stations
do not have to be on a straight line, but try to place each levelling
station about halfway between the two points you need to survey from
it.
11. From each levelling station, measure a backsight (BS)
and a foresight (FS) , except:
- at starting point A, where you have only a backsight
measurement.
- at ending point B, where you have only a foresight
measurement.
|

|
| |
|
Example
Table form for differential levelling with several turning points.
|
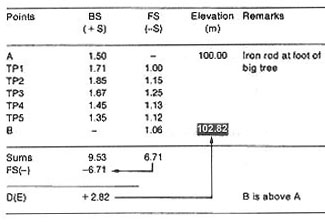
Using step 8 as a guideline, enter all measurements in a table and calculate
the results as shown in the example below. You will find that point B is 2.82
m higher than point A and, therefore, that its elevation is E(B) = 100 m + 2.82
m = 102.82 m.
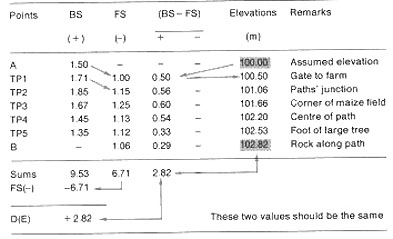
12. Even if you are careful, you may still make mistakes when you make your
arithmetic calculations from the table. To reduce this kind of error, add two
additional columns to your table that will make checking your calculations
easy. In these columns, enter the difference (BS- FS), either positive (+ )
or negative (-), between the measurements you took at each levelling station.
For example, from LS1 you measure BS (A) = 1.50 m and FS (TP1) = 1.00 m. The
difference 1.50 m- 1.00 m = 0.50 m is positive, and you enter it in the (+)
column on the TP1 line.
The arithmetic sum of these differences should be equal to the calculated
difference in elevation D(E) = +2.82 m. These columns will also help you to
calculate the elevation of each turning point , and to check
on the elevation of point B more carefully.
|
Example
Differential levelling with several turning points
|
|
Making topographical surveys by straight open traverses
|
|
13. By now, you have learned enough to make a topographical survey of
two distant points by measuring the horizontal distance between them and
the difference in their elevation.
When you survey a future fish-farm site, you will use a very similar
method. You can then prepare a topographic map of the site (see Chapter
9), which will become a useful guide for designing the fish-farm.
14. This is a survey method using straight open traverses
, that is, several intermediate stations along one straight line.
You know for example the elevation of starting point A, E(A) = 63.55 m.
You want to know the distance of point B from point A, and its elevation.
Because of the type of terrain on which you are surveying, you cannot
see point B from point A, and you need two turning points
, TP1 and TP2 , for levelling. Measure horizontal distances
as you move forward with the level, from point A toward point B; try to
progress along a straight line. If you cannot, you will need to use the
broken open traverse survey method, which involves measuring the
azimuths of the traverse sections as you move forward and change direction
(see step 17).
|
|
|
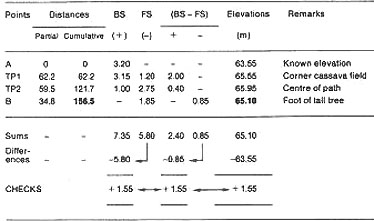
15. Set out a table like the one in step 12, and add two columns
to it for horizontal distances. Enter all your distance and height measurements
in the main part of the table. Then, in the first additional column, record
each partial distance you measure from one point to the next one.
In the second column, note the cumulated distance , which is the
distance calculated from the starting point A to the point where you are measuring.
The last number in the second column will be total distance AB.
|
Example
Topographical survey of a straight open traverse by differential
levelling
|
16. Conclusions . Point B is 1.55 m higher than A and its elevation
is 65.10 m. It is 156.5 m distant from point A. The arithmetic check from the
(BS- FS) differences agrees with the calculated difference in elevation.
Making topographical surveys by broken open traverses
|
| 17. Remember, that if you survey by broken open traverses
(or zigzags), you will also have to measure the azimuth of each traverse section as you
proceed, in addition to distances and elevations. |
|
|
| |
|
|
|
18. You need for example to survey open traverse ABCDE from known point
A. You require four turning points, TP1, TP2, TP3 and TP4. You want to
know:
- the elevations of points B, C, D and E;
- the horizontal distances between these points;
- the position of each point in relation to the others, which will help
you in mapping them.
|
|
|
| |
|
|
|
|
| Proceed with the differential levelling as described earlier,
measuring foresights and backsights from each levelling
station. Measure azimuths and horizontal distances as you progress from
the known point A toward the end point E. All the azimuths of the turning
points of a single line should be the same. This will help you check your
work. |
|
|
| |
|
|
| 19. Make a table similar to the one shown in step
15, and add three extra columns to it for recording
and checking the azimuth values. Enter all your measurements
in this table. At the bottom of the table, make all the checks on the elevation
calculations, as you have learned to do them in the preceding steps. |
|
|
| |
|
|
|
Example
Topographical survey of a broken open traverse by
differential levelling

|
Checking on levelling errors
|
| 20. Checking on the arithmetic calculations does not tell
you how accurate your survey has been. To fully check on your accuracy,
level in the opposite direction , from the final point to the
starting point, using the same procedure as before. You will probably find
that the elevation of point A you obtain from this second levelling differs
from the known elevation. This difference is the closing error
. |
|
|
| |
|
|
|
Example
From point A of a known elevation, survey by traversing through
five turning points, TP1 ... TP5, and find the elevation of point B. To
check on the levelling error, survey by traversing BA through four other
turning points, TP6 ... TP9; then calculate the elevation of A. If the
known elevation of starting point A is 153 m, and the calculated elevation
of A at the end of the survey is 153.2 m, the closing error is 153.2 m
- 153 m = 0.2 m.
|
|
|
| |
|
|
| |
|
|
21. The closing error must be less than the permissible error, which is the
limit of error you can have in a survey for it to be considered accurate. The
size of the permissible error depends on the type of survey (reconnaissance,
preliminary, detailed, etc.) and on the total distance travelled
during the survey. To help you find out how accurate your survey has been, calculate
the maximum permissible error (MPE) expressed in
centimetres , as follows: