2. MEASURING HORIZONTAL DISTANCES
2.0 Introduction
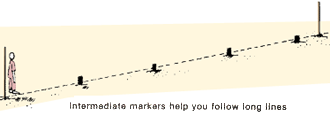
|
Measuring distances along straight lines
|
| 1. In topographical surveys, you measure distances along
straight lines. These lines either join two fixed points
or run in one direction starting from one fixed point. They are plotted
in the field with pegs, pillars or ranging poles. |
|
|
Expressing distances as horizontal measurements
|
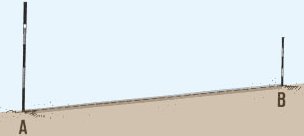
| 2. You should always measure
distances as horizontal distances. You may have to measure
on ground which has no slope, or only a very small slope
that is less than or equal to 5 percent (see Section 4.0). The distance
measured on this type of ground will be equal to or very close to the horizontal
distance. When the slope of the terrain is greater than 5 percent,
however, you will have to find the horizontal distance. To do this, you
must either correct any measurements you made along the ground
(see Section 4.0) or use another method of measurement (see following sections).
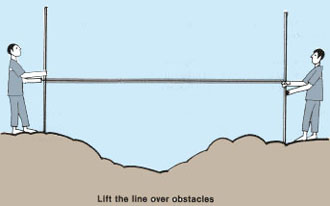
Unlevelled ground also requires particular methods of measurement. |
|
|
| |
|
| |
|
| |
|
| |
|
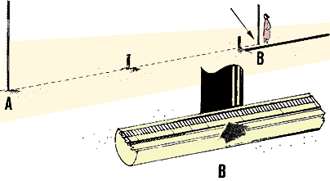
Measuring distances along lines that run through obstacles
|
| 3. Usually, you will be able to reach all the points of the
straight line you want to measure. But in some cases an obstacle such as
a lake, a river or a cultivated field will be in the way, and you will have
to take indirect measurements. This means that you will calculate
horizontal distances along the original straight line (see Section 2.9).
|
|
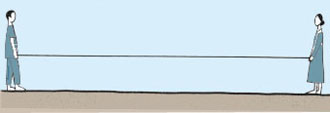
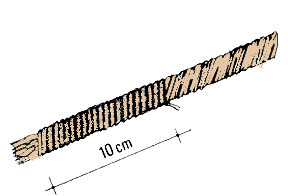
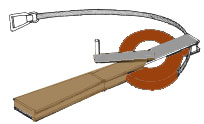
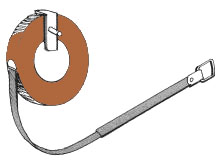
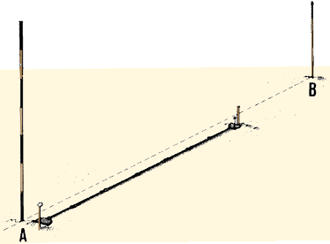
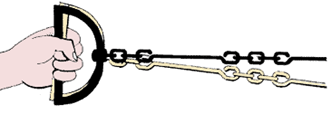
 Chaining with a rope Chaining with a rope |
Choosing the most suitable method
4. There are many good ways to
measure distances. The method of measurement you use will depend on several factors:
- the accuracy of the result
needed;
- the equipment you have available,
to use;
- the type of terrain you need to
measure.
In the following sections, you will learn how to use the various methods of
measurement. Table 1 will also help you to compare these
methods and to select the one best suited to your needs.
|
TABLE
1
Distance measurement methods
| Section1 |
Method
|
Distance
|
Error2 per 100 m2
|
Remarks
|
Equipment3
|
| 22* |
Pace count
|
Medium to long
|
1 to 2 m or more
|
For quick, rough estimates
|
None
|
| 22* |
Pacing with a passometer or podometer
|
Long
|
1 to 2 m or more
|
For quick, rough estimates
|
Passometer or podometer
|
| 21* |
Ruler
|
Short
|
0.05 to 0.10 m
|
Especially useful for sloping ground
|
Ruler (mason's level, plumb line)
|
| 23** |
Chaining using a rope
|
Medium to long
|
0.5 to 1 m
|
Cheap
|
Liana or rope, string, marking line
|
| 24** |
Chaining using a band or tape
|
Medium to long
|
less than 0.05 m
|
Best results with steel lines
|
Steel band, measuring tape
|
| 25** |
Chaining using a chain
|
Medium to long
|
0.02 to 0.10 m
|
Stronger quality
|
Surveying chain
|
| 27*** |
Clisimeter
|
Medium
|
1 to 2 m
|
For quick and rough estimates
|
Clisimeter (lyra-)
(2 m stadia staff)
|
| 28*** |
Stadia
|
Medium to long
|
0.1 to 0.4 m
|
For quick and accurate measures
|
Telescope with stadia hairs, levelling staff
|
1 * Simple ** More difficult *** Most difficult.
2 Error increases as the terrain becomes more difficult (slope,
vegetation, obstacles).
3 In addition to ranging poles (setting out the line), marking
pegs (intermediate points), and notebook/pencil. In italics, equipment
you can build yourself, as explained in text.
|
Calculating perimeter lengths
|
|
5. The perimeter of an area is its outer boundary. The length of the
perimeter of regular geometrical figures can be calculated from
the mathematical formulas given in Annex
1, at the end of this manual.
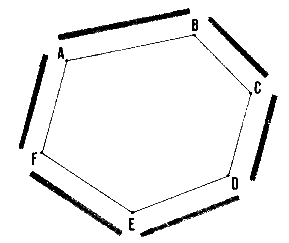
AB + BC + CD + DE + EF + FA = Perimeter
ABCDEFA
|
|
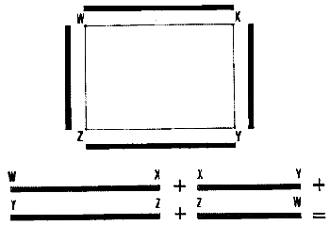 Perimeter WXYZW
 |
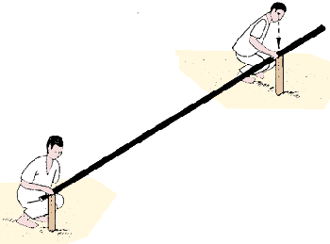
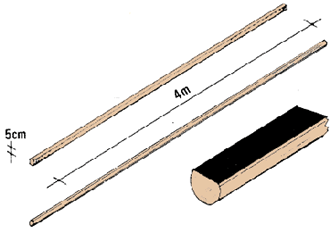
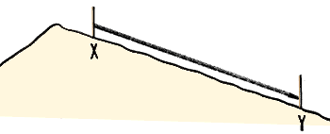
2.1 How to measure short distances with a ruler
1. To measure short distances,
use a measuring stick called a ruler, 4 to 5 m long. You can make your own by following
the steps below. A ruler is particularly useful for measuring horizontal distances on
sloping ground.
Making your own ruler
2. Get a piece of wood which is
straight and flat. It should be about 5 cm wide, and a little more than 4 m long. You can
also use a shorter length, if the distance you are going to measure is shorter.
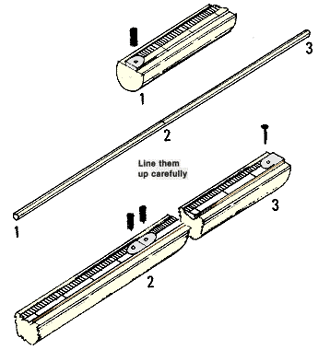
3. It is best to use a planed piece of wood, but if you cannot get one you
may use a straight wooden pole. If you use a pole, you should plane at least
one of its surfaces.
Measuring with a ruler
|
|
A planed piece of wood is best...
 ... but you can also plane one side of a pole
|
4. You should now add graduations to it. Graduations are marks which show
exact measurements, in centimetres, decimetres, metres, etc. To do this, you need to get
two ready-made measuring
tapes, such as the 2 m
ribbon tapes that tailors use. Glue one of these measuring tapes onto the planed face of
your piece of wood. Take care to align the zero mark of this tape with one of the ends of
the piece of wood. Glue the second tape next to the end of the first tape; this should
reach near the end of the piece of wood. Drive several small nails through the tapes to
secure them better.
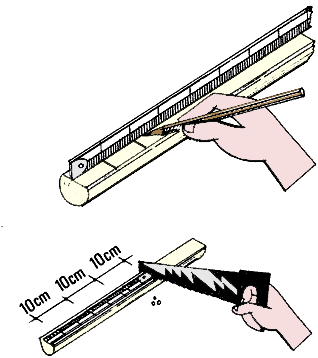
5. You can also make the graduations yourself. Using a measuring
ruler or tape, mark the graduations on the piece of wood with a pencil. With
a knife or saw, make a straight, shallow cut every 10 cm. A carpenter, with
his tools, can help you to do this more accurately. Identify the graduations
with numbers (for example, every 0.5 m) using paint or ink; or
you can use a piece of hot wire to burn the graduations and their numbers into
the wood.
 Use glue and nails to secure the tapes
 |
|
 Mark your ruler accurately
 |
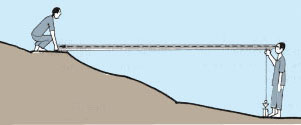
Measuring short distances with your ruler
|
| 6. When you have to measure a short distance on horizontal
terrain, mark each end of the distance with ranging poles. Place your
ruler on the ground with its end at the first ranging pole, making sure
the ruler follows the straight line. Put a marking peg at the other end
of the ruler. Then take the ruler and place its first end at this marking
peg. Continue in this way until you reach near the end of the line, keeping
an accurate count of the number of ruler lengths. You will usually need
to use only part of the ruler's length to measure the last part of the
line. Take care then to read the graduations on the ruler correctly. |
|
|
| |
|
|
| |
|
 Read the graduations carefully
 |
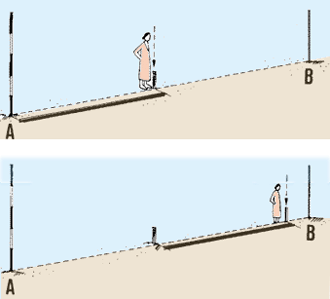
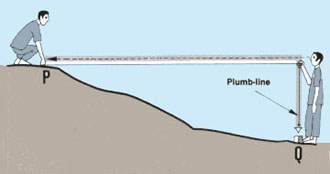
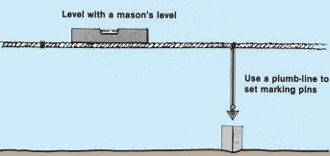
7. When you need to measure a distance on sloping
terrain, your ruler will be very useful for finding horizontal
distances. You proceed downhill, and for each measurement:
- make sure that the ruler is horizontal, using
a mason's level (see Section 6.1);
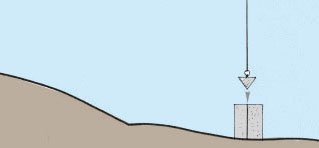
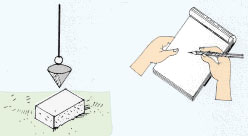
- determine the point where you need to place the marking peg, using
a plumb-line at the end of the ruler (see Section
4.8).
|
|
 A mason's level A mason's level |
| |
|
|
| Note: when you measure a distance
on sloping ground, remember that you should proceed downhill.
|
|
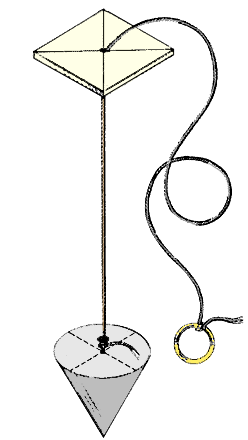 A plumb-line
 |
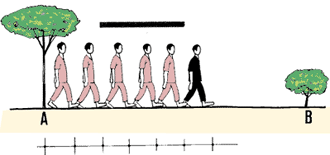
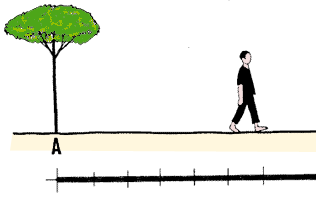
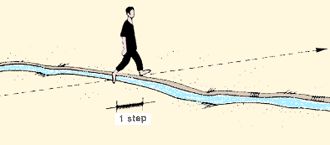
2.2 How to measure distances by pacing
1. You may measure distances roughly by pacing. This means
you count the number of normal steps which will cover the distance between
two points along a straight line. Pacing is particularly useful
in reconnaissance surveys, for contouring using the grid method (see Section
8.3) and for quickly checking chaining measurements (see Sections 2.3 to 2.5).
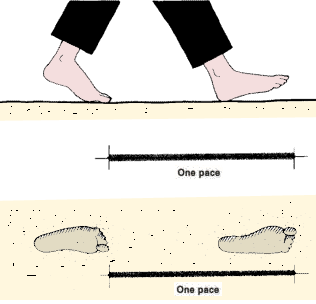
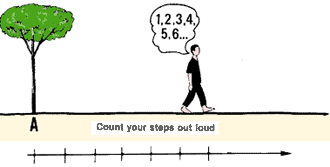
2. To be accurate, you should know the average length of your step when you
walk normally. This length is called your normal pace. Always measure your pace
from the toes of the foot behind to the toes of the foot in front.
 Count your steps as you walk
 |
|
|
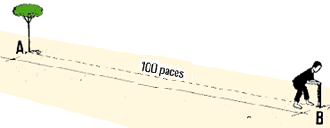
Finding your own pace factor
3. To measure the average length of your normal pace
(the pace factor, or PF):
- take 100 normal steps on horizontal ground, starting with the toes of your
back foot from a well-marked point, A, and walking along a straight line.
- mark the end of your last step with peg B, at the toes of your front foot.
- measure the distance AB (in metres) with, for example, a tape and calculate
your pace factor PF (in metres) as follows:
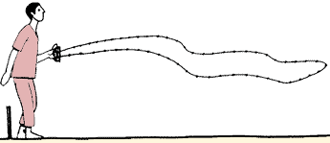
 Walk 100 paces
 |
|
|
| |
|
|
| Example
If for 100 paces, you measure a distance of 76 m, then your pace
factor is calculated like this: PF = 76 m ÷ 100 = 0.76 m.
|
|
 Mark the distance
 |
|
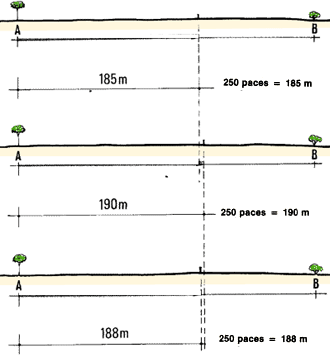
Note: to determine a more accurate pace factor:
- walk over a longer distance (at least 250 paces);
- repeat the measurements at least three times and calculate
the average PF.
Example
For 250 paces, you measure successively 185 m, 190 m and 188 m;
in total, for 3 x 250 = 750 paces, you have walked 185 + 190 + 188 m =
563 m; your average pace factor, PF = 563 m ÷ 750 = 0.75 m.
|
|
|
| |
|
|
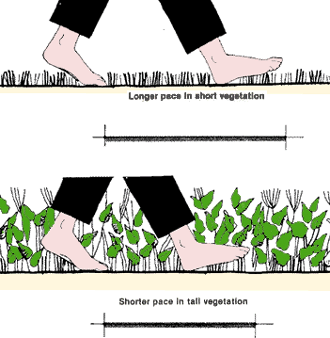
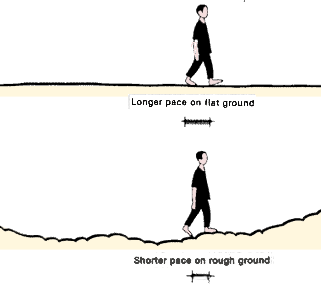
4.Your pace factor will vary, depending on the type of
terrain you are measuring. Remember that:
- your pace will be shorter in tall vegetation than in short vegetation;
- your pace will be shorter walking uphill than walking downhill;
- your pace will be shorter walking on sloping ground than on flat ground;
- your pace will be shorter walking on soft ground than on hard ground.
|
|
|
| |
|
|
| To get the best results, you should first make your paces
as nearly the same length as possible. To do this, walk over known
distances, both on level ground and on uneven or sloping ground. Adjust
your pace so that it is as regular as possible. |
|
|
Measuring horizontal distances by pacing
|
|
5. Clearly plot the straight lines you have to measure, using wooden
pegs or ranging poles. If necessary, remove any high vegetation standing
in the way.
6. Walk along the straight lines, carefully counting your steps.
7. Multiply the number of steps N by your pace factor PF (in metres)
to get a rough estimate of the distance in metres, as follows:
|
|
 Plot the lines you want to measure
 |
| |
|
|
| |
|
|
| |
|
|
|
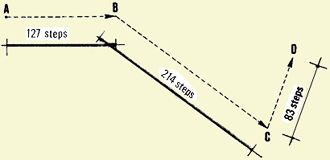
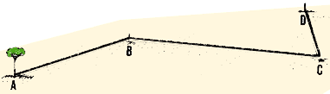
Example
To measure ABCD, pace distances AB = 127 steps; BC = 214 steps;
and CD = 83 steps. ABCD = 127 + 214 + 83 = 424 steps.
If PF = 0.75 m, ABCD = 424 x 0.75 m = 318 m
|
|
|
| |
|
|
| |
|
|
| |
|
|
|
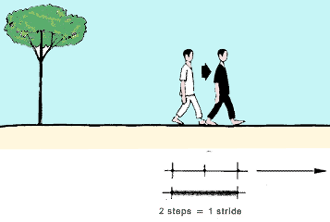
Note: to avoid errors when counting your steps:
- count only double steps or strides, and multiply the total
count by 2;
- take count of the hundreds with your fingers (using one
finger for each hundred steps);
- take count of the thousands by ticking them off on paper;
- when crossing obstacles such as fences and small streams,
estimate the number of steps, strides or half-steps it would take to
cross them.
|
|
 Estimate the size of obstacles
 |
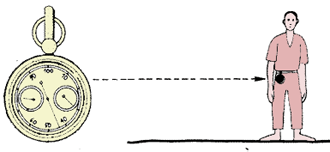
Pacing with a passometer or a pedometer
|
| 8. You can register your paces mechanically by using a simple
device called a passometer. The passometer is about the size
of a watch. You should wear it on a point near the centre of your body,
attached to a belt or waistband for example. At each pace you take, the
jolt of your step makes a pointer in the passometer turn. This pointer shows
the number of paces. |
|
 The passometer counts your steps
 |
| |
|
|
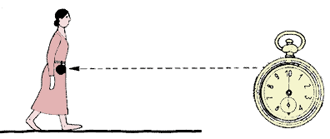
| 9. The pedometer is a similar device, but it registers
distance. This is usually expressed in kilometres and fractions of kilometres.
10. You should check these two devices for accuracy before you use them.
To check a passometer, walk a few hundred paces, counting them carefully.
Then compare your total count of paces with the number of registered paces,
and adjust the device as necessary. To check a pedometer, walk at a normal
pace along a straight line over a known distance. Compare this distance
with the registered distance, and adjust the device as necessary.
|
|
 The pedometer measures distances
 |
|
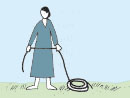
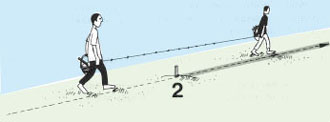
2.3 How to chain with a rope
|
|
1. For greater accuracy in measurement, especially over difficult terrain,
you can use a measuring line made from rope. Depending on the
distances you need to measure, you can make a measuring rope 10, 20 or
30 m long.
|
|
|
Making your own measuring rope
|
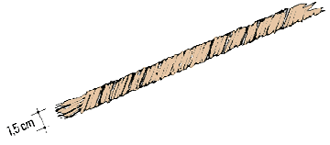
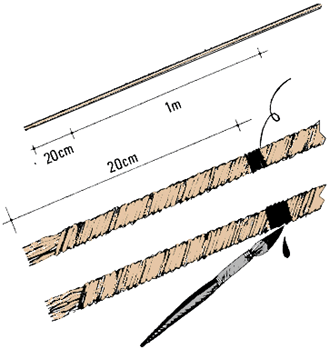
2. Get a rope 1 to 1.5 cm thick, made of natural fibres.
Ropes of man-made fibres, such as nylon, may change over time, but natural
materials, such as jute, will shrink or stretch very little. A piece of
used sisal rope is better to use than a new one. You can also use a piece
of supple liana, which you can easily find in the forest.
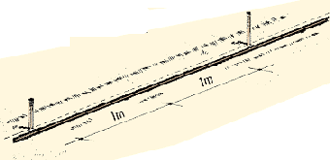
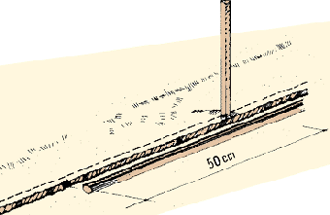
3. Put the first mark- the zero mark- about 20 cm from one end
of the rope. From this point, accurately measure the length you need one
metre at a time. Leave about 20 cm at the other end of the rope. Mark each
metre point with durable waterproof paint, dye, ink or coloured wax. Keep
these metre marks as thin as possible to avoid inaccurate measurements.
You can use thin string for the marks instead, threading the string through
the rope so that it does not shift position.
4. Reinforce the two ends of your measuring rope. To do this,
tightly wind some light string around the last 10 cm of each end of the
rope. |
|
Choose the right size rope
|
| |
|
|
 Make each mark easy to read
 |
|
 Reinforce the ends with string
 |
Measuring horizontal distances with a rope
|
|
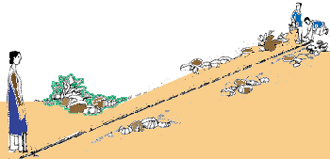
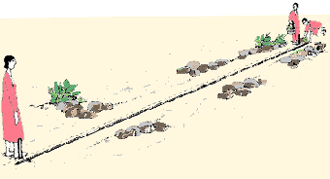
5. Clearly plot the straight lines you want to measure, using wooden
pegs, for example. On either side of each of these lines, clear a narrow
strip of ground completely, removing vegetation and large stones.
6. If the distances are shorter than your rope, or about the same length,
you can take their measurements directly. To do this, carefully stretch
the rope from one peg to the next. If a distance fails between the metre
marks on your rope, measure this shorter length with a ruler or a tape
graduated in centimetres.
|
|
 Clear the ground where you are working
 |
| |
|
|
| 7. If the distances are longer than your rope, you will need to use
one of the chaining methods described later (see Section 2.6). These
methods can be used with all measuring lines, including ropes, bands, tapes
or chains. |
|
 Stretch the rope straight
 |
| |
|
|
| |
|
 Measure the difference with a ruler
 |
2.4 How to chain with bands or
tapes
|
| 1. You can buy bands and tapes in stores. A measuring
band is made of a strip of steel, usually 6 mm wide and 30 or 50
m long. Metres, decimetres and centimetres are clearly marked on the band.
Bands are wound onto an open frame, with a spindle and handle for rewinding.
|
|
 A measuring band
 |
| |
|
|
| 2. Measuring tapes are made of steel, metallic
cloth or fibreglass material. They come in lengths of 10 to 30 m or more.
They are usually marked at 1 m intervals, with the first and last metres
graduated in decimetres and centimetres. They are wound into a case, with
a handle for rewinding. Tapes can present some problems. Steel tapes can
easily become twisted and break. Cloth tapes are less precise than the
others, since they often vary slightly in length. |
|
 A measuring tape
 |
| |
|
|
| |
|
|
Measuring horizontal distances with a steel band or a tape
3. Plot the straight lines you need to measure. If the lines are the same length
as your measuring band or tape or shorter, you can measure the distances directly.
To do this, stretch the band or tape from one peg to the next one.
4. If the lines are longer than your band or tape, use one of
the methods described later (see Section 2.6).
Note: you should pull bands and tapes tight, so that they do not
sag, especially when you are measuring long distances. But, you should avoid
over-stretching them (especially fibreglass tapes), since this could lead to
errors.
 Keep the band or tape straight and tight
 |
|
 Read the measurement at the peg
 |
2.5 How to chain with a surveyor's chain
|
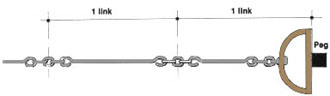
| 1. Surveyor's chains are also sold in stores. They
are made of a series of steel links; each link is the same length, usually
20 cm. The links are attached to each other by steel rings. The length
of one link includes its straight portion, its two rounded ends, and
the two half-rings that connect it to the links on either side. Each metre
of the chain is usually marked by a brass ring. At each end of
the chain, there is a metal handle which you should include in
the measurements. The total length of the chain is usually 10 or 20 m. Chains
are less accurate than bands and tapes, but they are much stronger. |
|
 Measuring with a surveyor's chain
 |
| |
|
|
| |
|
|
| |
|
|
|
2. When you use a surveyor's chain, you should be careful of the following:
- make sure that the rounded end of one length does not remain on top
of the one next to it. This can make the chain shorter. At the start
of each survey, check for this by sliding the entire length of the chain
through your hand and straightening all the links;
- avoid leaving the chain in the sun since the heat may cause the chain
to become longer;
- pull the chain tight enough for accurate measurement.
|
|

Make sure the links are straight
Measure the length of each link with a ruler
Check the length of the chain
|
| 3. When using a chain for the first time, you should carefully
measure the length of each link, using a ruler. Remember that
this length includes the straight part and its two rounded ends, as well
as the two connecting half- rings. At each end of the chain, the handle,
one shorter link, and half the connecting ring make up the length of a link.
After measuring the length of the links, check that 1 m of chain equals
the expected number of links. |
|
Example
If each link is 0.20 m long, there should be five links per metre
of chain.
|
| 4. You should always fold the surveyor's chain as follows:
|
- take the two handles together in your left hand, doubling the chain;
|
|
- collect two links at a time with your right hand, putting them slantwise.
|
 Take both handles in your left hand
 |
|
Collect the links two at a time
|
| |
|
|
| 5. To unfold a surveyor's chain, hold the two handles in your
left hand and throw the chain in the direction of the measurement you want
to make. |
|
 Throw the chain in the direction of the measurement
 |
Measuring horizontal distances with a chain
6. The chain is used for measuring the lengths of straight lines, which should
be marked at each end with a ranging pole. You will need an assistant to help
you. The method of chaining you use depends on the type of terrain
you are measuring (see Section 2.6).
 When you measure with a chain,
you will need an assistant |
|
 Hold the chain tight against the marker
 |
2.6 How to measure distances by chaining
1. As you have learned, measuring lines can be ropes, bands,
tapes or surveyor's chains. When you measure long distances, the way you use
the measuring line will depend on the slope of the terrain. When the terrain
is flat or nearly flat (that is, with a slope
of 5 percent or less - see Section 4.0), you can measure the horizontal
distances by following the ground surface. This method is usually used in measuring
fish culture sites, where steeper slopes must be avoided. When the slope of the terrain is steeper than 5 percent,
you should be especially careful when you measure the horizontal distances because
in this case the surface measurement is always greater than the horizontal measurement.

On flat ground, measure directly
The horizontal distance is the true measurement...
|
|
 ... the surface measurement is longer
 |
Chaining over horizontal
ground
|
|
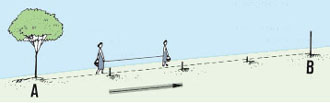
2. Mark each straight line you need to measure with a ranging pole at
each end. On lines longer than 50 m, place intermediate markers at regular
intervals,
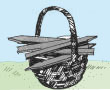
3. To measure long distances accurately, you will need marking pins.
You can use thin wooden stakes about 25 cm long, which you can easily
carry in a small basket. These marking pins will be driven vertically
into the ground as you proceed with the chaining.
|
|
|
| |
|
|
| |
|
|
| |
|
|
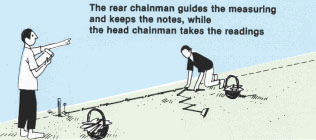
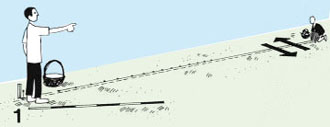
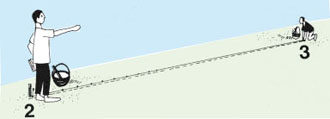
| 4. Chaining is carried out by two persons, a rear chainman
and a head chainman. The rear chainman is responsible
for the measurements. He notes the results. He also guides the head
chainman to make sure that the consecutive measurements are made exactly
along straight lines between the marked ground points. |
|
|
| |
|
|
|
5. Start the measurements at one end of the straight line. Remove the
ranging pole and drive the first marking pin into the ground
at exactly the same point.
6. The rear chainman places his end of the measuring line against this
marking pin. The head chainman, taking with him a number of marking
pins, walks away along the straight line with the other end of the
measuring line.
|
|

The rear chainman stays at the first point...
|
| |
|
|
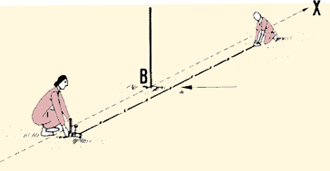
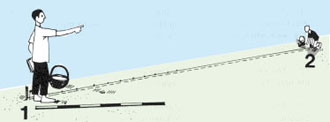
| 7. The head chainman stops when the measuring line is stretched
out tightly to its full length on the ground. He then looks towards the
rear chainman. If the measuring line is not placed exactly along the straight
line, the rear chainman then tells the head chainman how to correct
the position of the measuring line. |
|
 ... and helps the head chainman find the second point
 |
|
8. When the measuring line is correctly placed, the rear chainman signals
to the head chainman to place a second marking pin at the end
of the measuring line.
9. The rear chainman immediately notes down this measurement.
10. The rear chainman then removes the first marking pin, putting it
in his basket, and replaces the ranging pole at the starting
point.
|
|
 When the second pin is placed...
 |
| |
|
|
 ... the rear chainman notes the measurement
 |
|
 ... and puts the first pin in his basket...
 |
| |
|
|
|
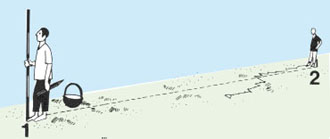
11. Still holding their ends of the measuring line, both chainmen move
forward along the straight line, always keeping the measuring line
well stretched. This is particularly important when using a surveyor's
chain.
12. The rear chainman stops at the second marking pin and
places his end of the measuring line against it.
13. The head chainman tightens the measuring line along the
ground, corrects its position following any directions from the rear chainman,
and places a third marking pin at the end of the measuring
line when signalled to do so.
|
|
 Both chainman move forward...
 |
| |
|
|
| |
|
 ... to measure the distance between
the second and third pins |
| |
|
|
|
14. The rear chainman notes down this measurement. Then he
puts the second marking pin in his basket before moving on.
15. The process in steps 10 to 14 should be repeated along each section
of the straight line until the end is reached.
|
|
 The head chainman notes each distance
 |
| Note 1: when the end of the line is reached,
the number of marking pins in the basket of the rear chainman shows
the number of complete measuring-line lengths measured. You
can use this to check on the measurements noted down. |
|
|
| |
|
|
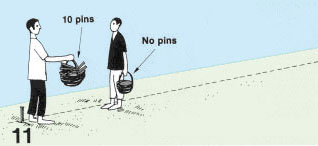
| Note 2: using a set of 11 marking pins
makes it easier to keep track of the number of measurements completed.
When the rear chainman has ten pins in his basket, ten complete measuring-line
lengths have been measured. He notes this down and gives the
ten pins back to the head chainman, leaving the eleventh pin in the
ground; this is the starting point of a new series of measurements.
|
|
 The number of pins in the basket helps
you keep count |
| |
|
|
| |
|
 10 chain lengths have been measured
 |
| |
|
|
|
Example
Using a chain 10 m long, the rear chainman has marked 4 x 10 pins
in his notebook. He has 6 marking pins in his basket. At the marking
pin still in the ground, he has measured a distance of (4 x 10) + 6
= 46 chain lengths or 46 x 10 m = 460 m.
|
|
|
Chaining over sloping ground
|
|
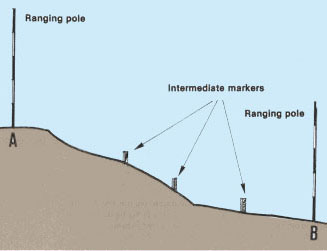
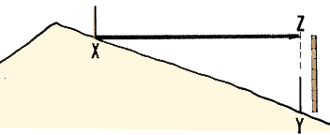
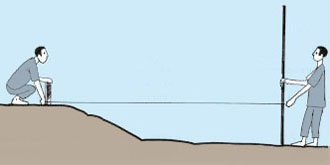
16. When you are measuring on ground with a slope greater than 5 percent
(see Section 4.0), you will need to use the measuring line differently
to find the horizontal distances.
17. Proceed as described in the previous section. Mark the straight
lines with ranging poles at each end and intermediate pegs. Remember
to work downhill for greater accuracy.
18. The head chainman should hold the measuring line horizontal, above
the ground, in this case.
|
|
|
| |
|
|
|
19. When the measuring line is in the right place and is fully stretched,
the head chainman finds the exact point on which to place the marking
pin, using a plumb-line (see
Section 4.8).
20. Keep proceeding in this way along the slope.
Note: on steep slopes, use a shorter measuring
line (such as 5 m, rather than 10 m).
|
|
|
21. As you measure on sloping ground, remember these important requirements:
Chaining over irregular ground
|
|
22. You may need to measure distances over irregular ground that has
ridges, mounds, rocks, trenches or streams in the way. In such cases,
you need to lift the measuring line above the obstacle. Make
sure that you do the following:
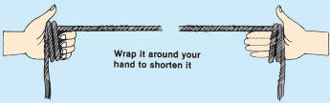
- keep the measuring line well stretched. The head chainman may shorten
it by looping it in his hand if necessary;
|
|
|
| |
|
|
| |
|
|
| |
|
|
|
|
|
|
| 23. Instead of using a plumb-line, you can use longer
marking pins, such as ranging poles, set vertically in the ground.
|
|
 Ranging poles are taller than marking pegs
|
| |
|
|
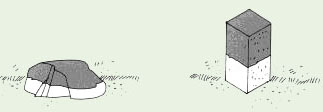
| 24. In very hard or rocky soils, you will not be
able to use marking pins. In such cases, mark t he points with objects you
can see easily, such as painted rocks or blocks of wood. Make sure that
your markers will not blow or roll away. Or, you can make a mark on the
ground with a stick, or make a mark on a rock with chalk. |
|
Painted rock or block

|
Improving the accuracy of your chaining
|
|
25. To make your chaining more accurate, you should repeat the measurements
at least once; start measuring at the point where you finished,
and continue back along the line. This second measurement should not differ
too much from the first one (see Chart below).
26. If the two measurements agree, you can calculate their
average value. The average value is taken as the true measured
distance.
|
|
 Measure twice for accuracy
 |
| |
|
|
| |
|
|
| |
|
|
 AB + BA
= Average
AB + BA
= Average
2 |
|
Maximum permissible difference between two consecutive
distance measurements, per 100 m
Steel band or tape |
0.1 m
|
Other tape |
0.2 m
|
Surveyor's chain |
0.2 m
|
Home-made rope |
1.0 m
|
|
|
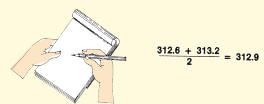
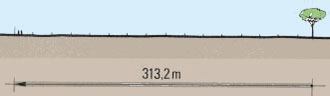
Example
Using a surveyor's chain, you take the following measurements:
- first measurement: 312.6 m;
- second measurement: 313.2 m;
- real difference: 313.2 m - 312.6 m = 0.6 m;
- acceptable difference: 0.2 m x (312.6 m ÷ 100)
= 0.2 m x 3.12 m = 0.62 m
which is larger than the real difference and therefore agrees;
- average distance: (312.6 m + 313.2 m) ÷ 2 = 312.9 m
|
|
 First measurement
 |
| |
|
|
| |
|
 Second measurement
 |
| |
|
|
| |
|
|
| 27. If the two measurements differ by too much, you should
take a third measurement. Compare this with the first two measurements.
Then calculate the average value from the two most similar values, as shown
above. |
|
 First measurement
|
| |
|
|
|
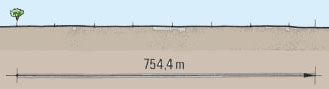
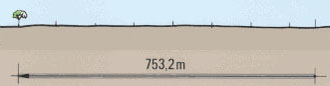
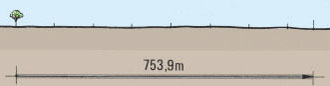
Example
Chaining with a steel tape, you take the following measurements:
- first measurement: 754.4 m;
- second measurement: 753.2 m;
- real difference: 754.4 m - 753.2 m = 1.2 m;
- acceptable difference: 0.1 m x 7.54 m = 0.75 m, which is smaller
than the real difference and therefore does not agree;
- third measurement: 753.9 m;
- difference 754.4 - 753.9 m = 0.5 m which is acceptable, being
smaller than 0.75 m;
- average distance: (754.4 m + 753.9 m) ÷ 2 = 754.15 m.
|
|
 Second measurement
 |
| |
|
| |
 Third measurement
 |
2.7 How to measure distances with
a clisimeter
|
| 1. The lyra clisimeter is a simple instrument which
can be used for measuring distances. It is also used
for measuring ground slope (see Section 4.5). The clisimeter is not
as accurate as a measuring line, but you can get a quick estimate
of distances from it without having to walk the length of the line. The
longer the distance you measure with it, however, the less accurate the
measurement will be. For good estimates, do not exceed 30 m distances.
For rough estimates, you may measure distances up to 150 m. |
|
 A folded clisimeter
 |
| |
|
|
| 2. The lyra clisimeter consists of a sighting device,
a hanging ring, and a bottom weight to keep
the instrument in a stable vertical position. The clisimeter folds into
this weight so that it can be easily carried. |
|
 Sighting with a clisimeter
 |
| |
|
|
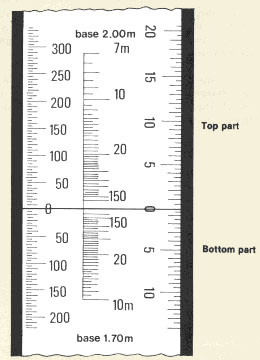
3. When you look through the sighting device, you will see
three vertical scales. A scale is a series of marks along a line
at regular intervals. You will use the central scale, the stadimetric
scale, for measuring horizontal distances. Note that this central
scale is made up of two parts:
- The top part, marked 150, 100 ... 7 m;
- The bottom part, marked 150, 100 ... 10 m.
4. To measure a distance with the clisimeter, you need an assistant
to help you, and a reference height (called the base).
The method you use with the clisimeter will depend on the kind of base
you choose.
- You may use a 2 m base, clearly marked on a wooden stake
called a stadia staff. In this case, you will use the top
part of the distance scale, marked BASE 2.00 m.
- Or you may take the height of your assistant as the base;
in this case, you will use the bottom part of the distance
scale, marked BASE 1.70 m.
|
|
The scale inside a clisimeter
|
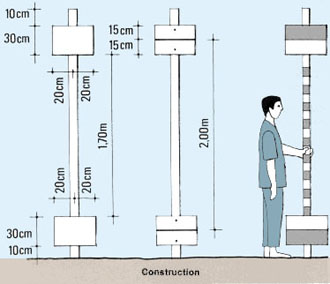
Making your own stadia staff
|
|
5. Get a straight piece of wood 2.50 m long. A rectangular stake with
a cross-section of 8 x 4 cm is best, but you can use a round pole with
a cross-section of 6 to 8 cm instead.
6. Get two wooden boards measuring 30 x 40 cm each.
7. Nail these boards along their centre lines 10 cm from each end of
the stake, as shown in the figure.
|
|
 Materials
 |
| |
|
|
|
8. Draw a horizontal line across the middle of one of these boards.
This is called the median line.
9. From this line, measure exactly 2 m along the stake.
You should reach a point near the middle of the second board. At this
point draw a horizontal line across the board.
10. Using a pencil and ruler, divide the length of the stake between
the two boards, which should be 1.70 m, into 10 cm sections.
11. Paint the two sections of the boards lying outside
the 2 m length in bright red. Then paint, in red, the first 10
cm section next to each board and each alternate section in between.
12. Paint all the other sections of the boards and stake in white,
including the 10 cm end sections of the stake. Your stadia staff is
now ready to use for measuring distances.
Note: for short distances, you can use a simpler staff;
get a pole or staff exactly 2 m long and paint it alternately in red
and white, as described above.
|
|
|
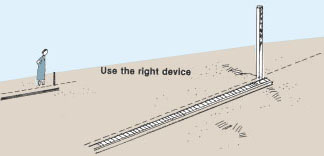
Measuring distances with a stadia staff
|
|
13. Send your assistant, carrying the stadia staff, out to the first
point along the line you want to measure. There he places the staff
as nearly vertical as possible and the painted side of the
staff should face you.
14. Holding the clisimeter in one hand, look through its sighting device
at the stadia staff. Align the zero line of the central scale
with the median line of the bottom board.
15. Look at the top part of the central scale (BASE 2.00
m) of your clisimeter, and read the distance in metres at the graduation
which lines up with the median line of the top board.
16. Carefully note this reading in a field-book.
17. Signal to your assistant to remove the stadia staff and replace
it with a marking pin. He should then move on to the next point to be
measured.
18. Move up to the marking pin left by your assistant, and repeat
the procedure until you reach the end of the line.
Note: remember that for fairly accurate measurements, each
distance you measure along the straight line should not exceed 30 m
|
|
 Sighting at the stadia staff using the upper scale
 |
Measuring distances without a stadia staff
|
|
19. If you do not have a stadia staff, you can use the height of your
assistant as a reference instead. The height you need for this method
is 1.70 m. Measure your assistant's height. If this differs much from
1.70 m, do one of the following:
- if your assistant is taller than 1.70 m, measure the height of his
eyes or mouth from the ground and choose the height nearest 1.70 m;
- if your assistant is shorter than 1.70 m, ask him to place an object
on his head (such as a can, a bottle or a block of wood) which will
increase his height up-to 1.70 m.
|
|
 Find a reference point 1.70 m high
 |
| |
|
|
| 20. Send your assistant out along the line you want to measure
and, at the selected point, ask him to stand as straight as possible, facing
you.
21. Holding the clisimeter in one hand, look through the sighting device
at your assistant. Align the zero line of the central scale with the 1.70
m mark you have chosen, such as the top of his head, his eyes or the top
of a bottle carried on his head.
22. Look at the bottom part of the central scale (BASE 1.70 m), and read
the distance in metres at the graduation which lines up with the ground
level under his feet.
23. Carefully note this reading in your field-book.
24. Signal to your assistant to drive a marking pin into the ground at
the point where he was standing, and to move onto the next point to be
measured.
25. Move up to the marking pin and repeat the procedure as many times
as necessary. For the greatest accuracy, each distance you measure along
the line should not exceed 30 m.
|
|
 Sighting at your assistant using the lower scale
 |
Measuring distances on sloping ground
26. If you are taking a measurement on a slope greater than 5 percent,
you must correct the clisimeter reading to get the true horizontal distance.
To do this, you need to use a mathematical formula,
as explained in Section 4.0.
2.8 How to measure distances by the stadia method
|
|
The stadia method is rapid and accurate for measuring long distances,
but to apply this method, you need to get expensive surveying equipment
and learn how to use it. Therefore, only a brief description of the method
is given here so that you can understand its basic principles.
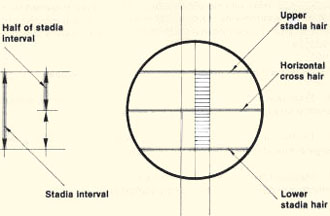
1. The equipment used with this method includes a highly technical sighting
device called a telescope. To use it, you must sight through
two crossed hairs; there are also two extra horizontal hairs called stadia
hairs. Most surveyor's levels (see
Section 5.8) have these stadia hairs at an equal distance above and below
the horizontal cross-hair.
2. To measure a distance, you will also need a levelling staff
which is clearly graduated in centimetres (see Section 5.0).
3. Set up the surveyor's level at the point from which you will measure
the distance. Signal to your assistant to place the levelling staff vertically
at the next point of the line. The distance between you and the staff
may be several hundred metres.
4. Look through the telescope and read the graduations (in metres) on
the levelling staff that line up with the upper stadia hair
and the lower stadia hair. Note these measurements down in
your field-book.
5. Subtract the smaller reading from the larger reading. This represents
the interval between the two hairs, called the stadia interval.
6. To find the distance (in metres), multiply the stadia interval by
a fixed value called the stadia factor. It is given for each
telescope, but on most instruments this factor equals 100.
Note: if you are working on sloping ground, you must correct this figure to find the true horizontal
distance (see Section 4.0).
|
|
 Sighting at a levelling staff with the telescope
 |
| |
|
| |
 The scale inside a surveyor's telescope
 |
| |
|
| |
Example
- Upper stadia hair reading: 1.62 m;
- Lower stadia hair reading: 0.52 m;
- Stadia interval = 1.62 m - 0.52 m = 1.10 m;
- Stadia factor = 100;
- Distance AB = 1.10 m x 100 = 110 m.
|
2.9 How to measure distances that run through obstacles
|
|
1. To use the preceding methods, you must be able to walkover the whole
length of each straight line and take direct measurements. Sometimes,
however, there is an obstacle on the line that makes measuring the distance
directly impossible. Such a line could be across a body of water such
as a lake, a lagoon or a river, or across agricultural fields with standing
crops. In these cases, you must take indirect measurements
of a segment of the line. You will use some of the
methods you learned in Section 1.6 for setting out a line across
an obstacle.
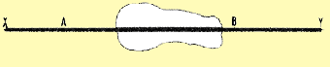
Measuring a distance across a lake or an agricultural field
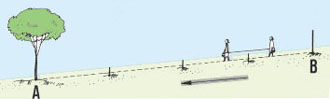
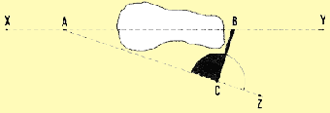
2. From point A on the line XY running through the obstacle, set out
another straight line AZ, avoiding the obstacle.
3. On this new line, layout a perpendicular line CB joining
the original line at point B behind the obstacle (see Section 3.6).
4. Measure the two new line sections AC and CB and calculate the unknown
distance AB from a mathematical formula as follows:
|
|
 Line XY crosses a lake
 |
| |
|
| |
 Set out line AZ
 |
| |
|
| |
 Lay out perpendicular CB
 |
| |
|
| |
|
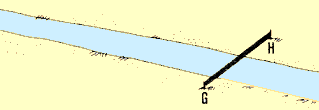
Measuring a distance across a river
|
|
5. Here, the obstacle (a river) cannot be avoided, but you can see
the points you need to measure from both sides of the river. There are
several methods, based on geometry, which can be used. Two simple ones
are described here.
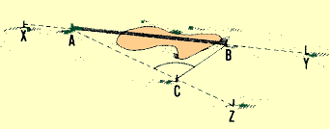
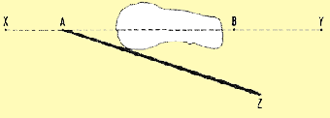
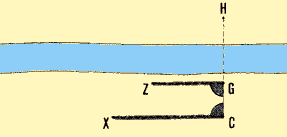
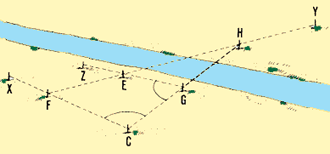
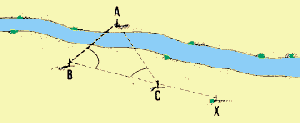
6. Method 1. You need to measure distance GH across a river. Using
ranging poles, prolong line GH back to point C. At G and C, lay out
perpendiculars GZ and CX. On each of these lines, set out a point, E
and F, so that they lie on a straight line FY passing through H,
on the opposite bank. Measure accessible distances GE, GC and CF. Calculate
the inaccessible distance GH as:
|
GH = (GE x GC) ÷(CF - GE)
|
|
|
 GH crosses a river
 |
| |
|
| |
 You can see point H from point G
 |
| |
|
|
 Prolong the line back to point C
 |
|
 Lay out perpendiculars GZ and CX
 |
| |
|
|
 Find points E and F on line FEHY
 |
|
 Calculate distance GH
 |
| |
|
|
| Example
You wish to measure GH, across a river:
- prolong line GH back to C;
- lay out perpendiculars GZ and CX;
- select points F and E on line FEH;
- measure distances GE = 34 m; GC = 36 m; CF = 54 m;
- calculate GH = (34 m x 36 m) ÷ (54 m - 34 m);
GH = 1 224 m ÷ 20 m = 61.2 m.
|
|
|
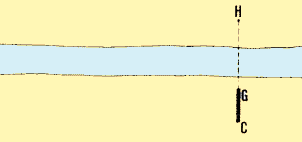
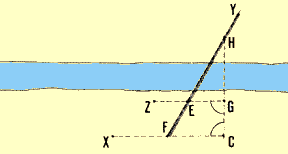
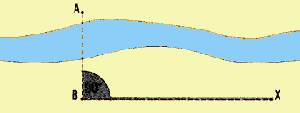
| 7. Method 2. You need to measure distance AB
across a river. Layout line BX perpendicular to AB on one river bank.
Determine the point C of this perpendicular from which you will be able
to sight point A across the river, using
a 45-degree angle (see, for example, Section 3.6, step 63).
Measure distance CB, which is equal to inaccessible distance AB. |
|
 Line AB crosses a river
 |
| |
|
| |
 Lay out perpendicular BX
 |
| |
|
|
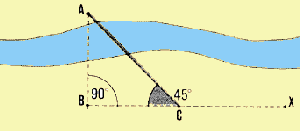
Layout 45° angle BCA
Calculate distance AB
|
|
Example
You need to measure distance AB:
- from B, lay out perpendicular BX;
- determine C, so that angle BCA = 45 degrees;
- measure BC = 67 m;
- distance AB = BC = 67 m.
|