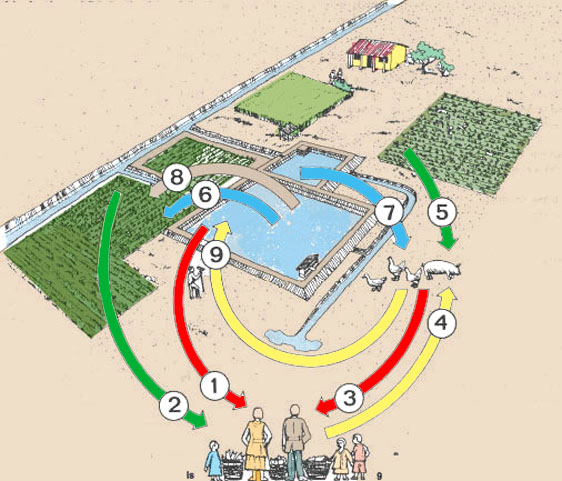
2. Vegetables for family
3. Meat and eggs for family
4. Food scraps for the animals
5. Waste vegetables for your animals
6. Water for the garden
7. Water for your animals
8. Fertilizer for the garden
9. Animal manure for the ponds
1. In the last chapter you have already learned a great deal about animal manures as organic fertilizers (see Section 6.2) and about their advantages for fish production. In this chapter you will learn more about the animals themselves and how best to integrate their production with fish farming.
2. If you are already raising some livestock on your farm, and have suitable conditions for ponds, you may be able to combine animal husbandry with fish production. This can help you to increase your income at little extra cost and, at the same time, provide a valuable solution to the problems of manure disposal. But if you farm fish and are not yet familiar with animal husbandry, you should be aware that starting such an activity, and integrating it with fish production, can be quite difficult and may need some time to work properly.
3. As a fish farmer, if you want to raise livestock, you will need a number of additional inputs to integrate animal husbandry and fish farming. Some of these are:
4. However, because of the fluctuations in quality and quantity of the manures available, pond management may become more difficult. Water quality will have to be closely and more frequently monitored, particularly if the animals are manuring the ponds directly.
5. At the beginning, do not be too ambitious. Start in a small way, with one or two ponds and a few animals.
6. Concentrate on the fattening of young animals bought from other farmers. Later, you may decide to breed your own animals.
7. If you need advice ask more experienced people who already have integrated animal production with fish farming or perhaps your extension agent can help you.
8. Take very good care of your animals. They are an important and costly investment.
9. Ensure that an adequate supply of good water is always available, both for your animals and your fish.
10. Confine your animals close to the ponds, at least at night.
11. Buy locally available construction materials and feeding ingredients at reasonable prices. Make full use of available land to produce protein-rich plant material for feed, erosion control (see Section 4.1) and fencing (see Section 4.5).
12. Closely check the water quality of your ponds and in particular its dissolved oxygen content (see Section 2.5). Manage the water supply accordingly.
13. Adapt the feeding of your fish to the amount of manure distributed (see Chapter 10).
| 1. Fresh fish to eat 2. Vegetables for family 3. Meat and eggs for family 4. Food scraps for the animals 5. Waste vegetables for your animals 6. Water for the garden 7. Water for your animals 8. Fertilizer for the garden 9. Animal manure for the ponds |
|
14. A number of animals, such as pigs, ducks, chickens, rabbits, sheep, goats and cows, can be associated with fish farming. The first three are the most popular.
15. Earlier you learned (see Section 6.2) that the maximum amount of manure which may be safely distributed to a pond should be limited, according to pond size, local climate and fish species. Use the following chart to estimate how many animals you will be able to integrate with farm fishing. However, remember that:
|
Number of animals to be raised per 100 m2
of pond
|
||||||||||||||||||||||||||
16. When selecting a particular animal to be integrated with fish farming, local conditions should receive priority, particularly concerning marketing potential and availability of feeding ingredients. The duration of each production cycle may also be important.
|
Duration of production cycle
|
17. In the rest of this chapter, you will learn more about the three most popular kinds of animals to be integrated with fish farming: pigs (Section 7.1), chickens (Section 7.2 and ducks (Section 7.3). Other animals, such as sheep, goats and cows, can also contribute to pond fertilization more easily if you build sheds, corrals, paddocks or feedlots close to the ponds. Remember to protect your dikes well against animal erosion (see Sections 4.4 and 4.5).
1. A simple approach is to buy 15- to 20-kg piglets and to raise them for five to eight months, until they reach market size, which is usually when they weigh from 60 to 100 kg. Under tropical conditions, particularly in humid climates, every effort should -be made to keep the ambient air temperature as cool as possible, especially when raising pigs larger than 70 kg. Select a breed well adapted to local conditions of climate and management.
European pig breeds useful for the tropics are the Large White and Duroc Jersey. Thermal limitations are as follows:
(a) Average annual air temperature up to 25°C.
(b) Periods when air temperature is well above 30°C should be limited.
(c) Comfort zone and optimum ambient temperature:
2. It is important to house your pigs in an area which offers at least the following:
3. Basically, pig manures may be distributed to fish ponds in one of two ways:
(a) Direct transfer, either immediately or through cleaning.
(b) Indirect transfer from a storage pit built next to the pig sty. Calculate the required storage volume according to the planned duration of storage as:
4. Although the indirect method results in a better-regulated distribution of the manure to a series of fish ponds, the direct method is often preferred by small farmers to avoid having to store and handle the manure. In this case, the pig sty can be built in one of three ways:
(a) Completely or partly over the pond water: The pig sty is usually built cheaply of local materials with a latticed floor to allow manure and uneaten feed to fall directly into the pond. However, the latticed floor may cause leg injuries, and high humidity from living above water may cause respiratory diseases. Pig and fish production cycles need to be matched well.
(b) Partly on one of the pond dikes: Built about 0.20 m above maximum water level, the pig sty gives access to a bathing area within the pond and the pigs will often defecate in the bathing area thus fertilizing the pond. The rest of the manure and uneaten feed are regularly washed into the pond while cleaning the pig sty. If waste materials are not needed for the pond, they must be moved elsewhere, possibly to another pond.
(c) On top of one of the pond dikes: The pig sty floor slopes either to a manure-collecting channel or directly to the pond. A manure alley is included in the pig sty to encourage the animals to defecate next to the collector or pond. Regular washing directs the manure into one or several ponds. With this system you can easily direct the available manure through a series of channels to the particular pond or ponds that require fertilizing.
5. A well-designed pig sty should remain relatively cool even in warm weather.
(a) It should provide maximum shade for the animals. Allow good ventilation space inside, but keep the roof edges low. Increase roof overhangs. A two-slope roof is preferable. Orient the pig sty if possible in an east- west direction and plant shading vegetation which does not affect ventilation.
(b) It should be well ventilated, particularly at ground level. Keep the construction open and avoid using solid walls. Orient it as much as possible across the direction of prevailing winds.
Note: if there are cold spells, remember that your pigs may then need to be protected from cold draughts by closing some of the existing openings. Simple flap or clip-on shutters can be useful.
6. Design your pig sty to make its management easier, in particular allowing for a regular distribution of feed and for cleaning with plenty of water.
7. Additional hints for good pig sty design are given here.
(a) In warm climates provide more floor space:
(b) The normal practical size of pens is 15 to 20 m2 for most pond-side units. The area should be roughly square.
(c) Do not use more than six individual pens in a single row. It you build more, use a double-line design with a 1.5-m central alley. This layout is much more expensive, however, especially for roofing.
(d) A simple way to separate pens from each other is to use 20-cm boards nailed to strong vertical posts. You may also use horizontal wooden poles or a 15-cm-thick wall made of bricks or concrete blocks. The total height should be 0.9 m.
(e) For easy access to each pen, build strong, 60-cm-wide doors with 20-mm-thick wood. Use strong hinges and a dropping lock.
(f) Feeding troughs should be fixed in place, easily accessible from outside the pen, easy to clean and designed so as to limit feed losses. A bottom draining hole may be added. Cement is the best material, but simple wooden trays can also be used. The trough should be long enough to allow the pigs to feed without crowding (see the chart below).
|
Suggested trough lengths for feeding pigs
|
(g) You will need from 2 to 7 litres of drinking-water per pig per day, depending on its size. You can provide water in three ways:
(h) The floor of the pen should be designed so that it can be easily scraped with a shovel and washed with a brush and plenty of water. It should be very strong. For easy drainage, build the floor with a 2 to 3 percent slope toward the front of the pig sty, where the manure will be collected. Preferably build it with:
8. Here are some simple designs for a pig sty you can build quite easily using mainly local materials.
(a) To build a pig sty on the pond dike with easy access to a bathing area in the pond itself, you will need: two pens of 2.20 m x 3 m = 6.60 m2 each for four to five small pigs each and one pen of 2.20 m x 3.50 m = 7.70 m2 for seven to eight small pigs. Total floor area is 20.90 m2 . The total capacity is 15 to 18 small pigs or eight large pigs. Provide drinking-water through running-water channels. Bathing areas (30 cm deep) are not covered and are paved with stone and mortar. Provide access with a sloped concrete ramp.
(b) For a simple pig sty built on higher ground with a brick collecting channel feeding the manure to the pond, sited on a lower level, you will need two pens of 3 m x 3 m = 9 m2 each. The total floor area is 18 m2 . A metal roof is supported by wooden poles and six brick pillars, and there is metal mesh all around.
(c) A better pig sty can be built on a pond dike with a manure alley and drain toward either a manure storage pit or to one or several ponds. Build a two-sided thatched roof, shorter in front and above the manure alley. Use wooden poles and boards. Build a concrete pen floor, making each pen 3 m x 2.70 m = 8.10 m2 plus 1.40 m x 2.70 m = 3.78 m2 for a manure alley. Drinking troughs and feeding troughs should be constructed in cement.
9. Pigs have the advantage of being able to accept and make good use of a wide variety of food such as:
10. You will learn more about these various feeds later (see Chapter 10). Make sure to provide your animals daily with plenty of vegetal food in addition to any other types of feed. Dry feedstuffs should be mixed with water.
11. If you are growing an improved breed, such as the Large White, better production will be achieved by using better quality, balanced feeds, made from a mixture of several ingredients as shown below. This feed mixture sometimes includes a special concentrate of vitamins and minerals which is obtained from specialized suppliers. Distribute the following rations daily, in two to three meals, mixed with water, according to the live weight (in kg) of the growing pigs.
|
Daily food rations for growing pigs
|
|
Three possible types of composite feeds for pigs
(in percent fresh weight)
|
||||||||||||||||||||||||||||||||||||||||||||||
12. Distribute the food freely to make sure that there is always food available so that it can be consumed whenever the pigs want it.
13. The food conversion ratio should vary around 8:1 (see Section 10.3).
Remember: at least once a day, clean the pens and the feeding trays well, using plenty of water.
1. A simple and commonly used method for rearing chickens is to obtain one-day-old chicks from a specialized supplier and rear them to:
2. In both cases, the first five-week rearing of the one-day-old chicks is similar (as described in paragraphs 6 to 10 in this section).
3. When rearing chickens with fish, remember the following points:
(a) If you choose to produce batches of broilers, the amount of manure available from each batch will be very low at the beginning of the rearing cycle. It will increase during the growing period until reaching a maximum toward the end. Be careful then not to put too much manure into your ponds. Good planning will also be essential for the replacement of the chicken stock at short regular intervals, every five to seven weeks.
(b) If you choose to raise laying hens for egg production, the supply of manure will be much more constant for a much longer period, between 1 and 1.5 years. The chicken stock will have to be replaced occasionally.
Quantity of manure produced according to live weight of chickens
4. Select the chicken breed among those available locally according to the kind of production you plan.
(a) For the production of broilers you will probably have a choice between local breeds, improved breeds (for example, Sussex or New Hampshire) or their hybrids.
(b) For the production of eggs, improved breeds (for example, Rhode Island or White Leghorn) or their hybrids are usually preferred, although the above breeds can also be used for mixed productions of meat and eggs.
5. If possible, consult local specialists for the final choice.
6. Select a well-drained site on which to build a small brooding house. It should have the following characteristics:
7. Proceed as follows.
(a) Two weeks before each batch of chicks arrives, clean, repair and disinfect the brooding house. Prepare the following for each brooding house:
(b) Ten days before the chicks arrive, prepare the necessary supplies:
(c) One day before arrival, add a good dry litter, such as wood shavings, in the brooding area. Make sure the kerosene lamps are functioning properly.
(d) On arrival day and for the first week:
Note: you should never mix chicks of different age groups.
(e) Second week:
(f) Third week: reduce air temperature to 30°C.
(g) Fourth and fifth weeks: reduce air temperature to 28°C to allow the chicks to slowly adapt to local temperature variations.
(h) Sixth week: transfer the young chickens to an outside rearing house. Do not use the brooding area for another 15 days.
Note: in addition, make sure that there is always food and water available in the brooding area; also, change the litter and clean and disinfect the brooding area once a week.
8. Give your chicks as much dry feed mixture as they can eat.
9. You can buy the mixture as chick feed or first age chicken feed from specialized suppliers. It should contain all the necessary ingredients, including vitamins and minerals, for successful chick rearing.
10. You can mix several ground ingredients yourself (see the following chart). Vitamins and minerals are either included in this mixture or have to be given separately.
|
Three types of mixed feeds (in percent of fresh
weight)
to be used as chick feed
|
|||||||||||||||||||||||||||||||||||||||
11. Chickens grow better at moderately warm temperatures, as their comfort zone ranges from 13 to 24°C. At temperatures above 30°C, production may be reduced, especially when humidity is high. In tropical climates, their environment will therefore have to be kept as cool as possible.
12. Select a site with good ventilation, but protected from strong winds. Design your chicken house with the following features in mind.
(a) Orient it to the extent possible east-west, against direct sunshine.
(b) Orient it to the extent possible at right angles to dominant winds. Limit its width to permit good ventilation across the building.
(c) Use low walls all around to protect at ground level.
(d) Use wire mesh above (18- to 25-mm mesh).
(e) Keep predators, rodents and birds out.
(f) Use corrugated steel sheets or thatch for the roof, with at least 50 cm overhang all around.
(g) Build a tight-fitting door.
(h) Fix reed curtains on the windward side, if necessary.
(i) Allow at least 0.125 m2 floor space per growing chicken.
13. Build your chicken house close to the fish pond in one of two ways.
(a) Over a fish pond: with access via a removable gangway, the house should have a wooden slatted or wire mesh floor, allowing wastes to drop directly into the pond. Limit the total number of animals according to pond size, climate and fish species (see Section 7.0). This design is preferred for rearing laying hens, which supply the pond with a relatively constant quantity of manure (see above).
(b) On one of the pond dikes: the house should have a well-drained floor made of compacted soil, gravel, wood or concrete, Some dry litter may be used, according to the needs of the pond, to collect the droppings. This system is better where variable amounts of waste are produced.
14. Provide the following equipment in the chicken house:
15. To produce broilers successfully, proceed as follows.
(a) When they are five weeks old, transfer a batch of young birds from the brooder house to the chicken house. Never mix together animals of different ages or breeds. Allow a density of eight birds/m2 or less.
(b) Ensure that there is always good drinking-water available.
(c) Feed the broilers well, as follows:
(d) Administer drugs and vaccines as recommended by local specialists.
|
Three possible types of broiler feed mixes (in
percent of total fresh weight)
|
|||||||||||||||||||||||||||||||||||||||||||||||
16. Under favourable conditions of temperature, humidity and feeding, the food conversion rate should remain under 3:1 (see Section 10.3).
17. Broilers are usually culled when they reach about 12 weeks of age. They should then each weigh from 1 kg (subtropical climate) to 1.7 kg (tropical climate). When the chicken house is empty, clean and disinfect it well. Leave it empty for at least 15 days, if possible, to help control diseases.
18. Select the site and design your chicken house as described in paragraph 13 for producing 12-week-old broilers, noting that more floor space will be required for laying hens, at least 0.33 m2 per bird. Limit the width to 2 m.
19. You may build the chicken house either:
20. In the chicken house, provide the following equipment:
21. To rear laying hens and produce eggs successfully, proceed as follows.
(a) When they are five weeks old, transfer a batch of young birds to the chicken house. Never mix together animals of different ages or breeds. Maximum density is eight birds/m2 of floor space.
(b) Ensure that there is always good drinking-water available.
(c) Feed them well early in the morning and, if necessary, early afternoon:
(d) Administer drugs and vaccines as recommended by local specialists.
|
|||||||||||||||||||||||||||||||||||||||||||||||
22. Remember to gradually reduce the birds' density as follows:
23. During the egg-laying period, manage your chicken house properly.
(a) Collect the eggs several times each day:
(b) Change the litter in the nests twice a week.
(c) Clean and refill drinkers every morning or more often if necessary.
(d) Disinfect the house at least once a year.
(e) Keep good records of egg production (see Section 16.6) and discuss them with a local specialist to check if you are doing well. During the first year, the average laying rate should be at least 40 percent (i.e. 40 eggs/100 days) or 140 eggs per hen . During the second year, this laying rate normally decreases by 20 to 25 percent.
24. Usually, laying hens produce eggs for 12 to 18 months, and they should be culled when 18 to 24 months old. As soon as the chicken house is empty, clean and disinfect it thoroughly. It is best to leave it empty for two months to reduce the risk of disease.
1. The simplest method is to purchase two-week-old ducklings from a specialized farm and rear them to:
2. Another simple way is to obtain one-day-old ducklings from a specialized farm and nurse them for two weeks, before integrating them with your fish.
3. As you have learned for poultry earlier (see Section 7.2), the amount of manure available for your fish ponds will vary greatly during the growing period of the ducklings. It will then stabilize as the ducks reach their adult live weight and begin to lay eggs. Take this into account when deciding which kind of duck to raise, how many to each pond and where to keep them (see below). Consider also the difference in length of the duck-rearing cycles and plan well ahead to replace stocks as often as necessary.
4. Select the duck breed among those available locally according to the kind of production you plan:
(a) For the production of table ducks: you will probably have the choice between a domesticated breed, such as the Peking duck, Muscovy or some hybrid.
(b) For the production of eggs: laying breeds such as the Indian Runner, Khaki-Campbell or Bali are usually preferred in rural areas.
5. To have the full benefits of direct fertilization of the pond water by the ducks, it is best to select a breed that likes staying on water for long periods such as the Peking duck. Before the final choice, consult local specialists and other duck farmers.
6. Select a well-drained site on which to build a small brooding unit, which should include:
7. There are two ways to make the brooding area within the brooding house:
(a) The best way is to make a wooden or metal frame with a floor standing about 1 m above the main floor level. Cover it with strong wire mesh (2-mm gauge and 2- to 2.5-cm mesh). You will need an area of 200 to 250 cm2 per duckling (40 to 50 birds/m2) . Fence this area with 30-cm-high wire mesh.
(b) You can also use a brooder similar to the one described earlier for chicks (see Section 7.2). Use dry litter, changed at least every two days. You may use dry grass, maize bran, wood shavings and rice straw cut into 5 to 7-cm pieces, but do not use fine sawdust or dry tree leaves. You will need a fenced area of 400 to 500 cm2 per duckling (20 to 25 birds/m2).
8. The outside pen should be well fenced against predators and preferably have a concrete floor for easy cleaning. Provide access from the brooding area to the pen through a tight-fitting door. You will need an area of 0.2 m2 per duckling (five birds/m2).
9. The outside splashing pool should be at most 15 to 20 cm deep and surrounded by flat slopes. It should be lined either with a plastic sheet or, even better, with concrete. Place it in the middle of the pen. A good size is 1 to 1.5 m2 for 50 ducklings.
10. Equip the brooding area as follows:
(a) For heating use storm lanterns protected by netting and an oil drum cut in half lengthwise if necessary, as described for chicks (see Section 7.2). Young ducklings are very susceptible to cold. Adapt them progressively to ambient air temperature by adopting the following schedule.
|
Progressive adaptation of ducklings to air temperature
|
(b) For lighting at night, always leave at least one lamp on so that the ducklings feel secure and keep eating and drinking at will. Keep a spare lamp readily available.
(c) For drinking, provide water in a trough covered with wide mesh screen. Change the water often, or better still, provide flowing water.
(d) For eating, use an automatic feeder for dry feed mixture or suitable commercial pellets. You may also use a screened trough in which small quantities of feed should be given from five to seven times a day. You will need at least 1 rn of feeding space per 14 birds. Provide minced, fresh vegetal matter such as aquatic plants or vegetable leaves daily.
(e) To aid their digestion, add a tray with 2 to 3 mm gravel.
(f) As a source of calcium, add a tray with limestone* grit.
|
Dry feed mixture for young ducklings
Note: Also add some vitamin/ mineral concentrate |
11. You may also use chick feed (see Section 7.2) or, if necessary, a mix of maize meal, breadcrumbs and minced hard-boiled eggs.
12. Proceed with the nursing in the following way:
(a) During the first week:
(b) During the second week:
13. If your ducklings have been well managed, they should grow quickly and steadily. Peking ducklings should on average weigh 125 to 180 g at the end of the first week and 210 to 380 g by the end of the second week.
14. Older ducklings are much more hardy and easier to raise than chickens. They can also feed to a larger extent on simple feeds such as grasses, legumes, vegetables, brans and grains, which can all be easily produced on your farm (see, for example, Sections 4.1, 4.2 and 4.5).
15. To integrate duck and fish production in a simple way, you have a choice of arrangements:
Note: ducks may eat small fish, so do not raise them on breeding ponds or nursery ponds.
16. If you are using the central platform, make it preferably of plastic coated wire mesh (2 x 2 cm mesh) supported by wooden posts in the pond, 30 to 40 cm above the maximum water level. This provides a protected place for the ducks to rest and feed at will. They can easily reach the platform from each side through inclines made of wire mesh or plank ladders floating at one of their ends. A feed trough stands in the middle of the platform. Base the total platform area on an average six to ten ducks per m2 . Ducks are allowed to roam freely over the whole pond area, which has several advantages:
Such a system, however, has also some disadvantages:
17. A second choice would be to establish a fenced dry run on a pond dike. You will need about 1 to 1.5 m2 per duckling. The dike should be well protected to avoid excessive damage. Provide a simple shelter (1m2 per 15 ducks) against strong sun and wind. Place a feed trough close to the water's edge. Let the ducks roam over the entire pond area to feed on natural food. Protect the rest of the dikes as suggested above. The main disadvantage of this system is the loss of about 40 percent of the manure and of the uneaten feed on the dry run.
18. Alternatively, you may confine the ducklings to part of the pond area, preferably away from the dikes, by building a small fence from split bamboo, plastic or wire mesh, or wooden poles:
19. In this case, it is usual to provide the ducklings with some protection at night against predators and theft. You may choose from one of the following:
(a) A well-protected dry run: Build a good fence around it. Allow about three birds/m2. Provide a simple shelter (1 m2 per 15 birds) and feed trough. Protect the access dike. It may be best to pave it and the dry run, for example, with cobble, brick, concrete or soil cement.
(b) A simple duck house built over the pond: Use a slatted floor (wood or split bamboo at 1-cm intervals) or a mesh floor (1.25-cm mesh of 8-gauge wire) stretched over a strong frame. In the first case, allow three to four birds/m2 . Alternatively, allow about five to seven birds/m2 Use low (40 to 60 cm) walls (for example, wood off-cuts) with wire mesh (maximum 2.5-cm mesh) above. A thatched roof is good. Provide direct access to the pond with an oblique wooden ladder. Either allow free access to the pond at night for drinking or provide ample water in the house for the night. Place a feed trough in the middle of the floor.
(c) A duck house built on a dike: Use 60-cm high walls made of bricks, cement blocks or wood off-cuts. Above, use wire mesh (maximum 2.5-cm mesh). A concrete floor is preferable. You may either use a deep litter (straw, wood shavings, sand) on this floor, allowing three to four birds per m2 or build a mesh floor about 1 m above the dike, allowing about five to seven birds/ m2 . A thatch or corrugated sheet roof can be used and insulated underneath as necessary. Provide easy and direct access to one or two ponds, and allow free access to the pond at night or provide ample water in the duck house. Place a feed trough in the middle of the floor.
20. Feeding your growing ducklings properly is one of the keys to successful production of table ducks.
21. If you use an extensive system, for example by having a low density of three to five ducklings/100 m2 roaming free over the entire pond area, it will be enough to supplement their natural diet with a 10- to 12- percent protein feed mostly made of grasses, legumes, brans and grains produced on the farm.
22. If you use a more intensive system, for example by having a higher density of 15 to 20 ducklings/100 m2 of total pond area or by confining them to only part of the pond, you will need a better feed containing 15 to 18 percent proteins. (Various possibilities are given in the following chart.)
|
Higher-quality duck feeds containing 15 to 18 percent
protein
and suitable for more intensive rearing (in percent of total weight)
|
||||||||||||||||||||||||||||||||||||||||||||||||||||||||||||||||||||||||||||||||||||||||||||||||||||||||||||||||
|
* To be supplemented by a concentrated mix of vitamins and
minerals |
||||||||||||||||||||||||||||||||||||||||||||||||||||||||||||||||||||||||||||||||||||||||||||||||||||||||||||||||
23. Duck feeds may be distributed in different forms:
24. According to the type of feed, there are two ways to distribute feeds:
25. Build your feeders and feed troughs, and decide how many you need for each batch of ducks, on the following basis:
26. Plan your feed requirements for intensive duck rearing as suggested in the chart below (for Peking ducks) or at paragraph 30 (for Muscivy ducks). From six weeks old on, distribute part of the daily food ration early in the morning (60 percent) and part around noon (40 percent). The average food conversion ratio over a period of eight weeks should be about 3.5:1.
|
Feed requirements for intensive rearing of Peking
ducks in fish ponds
|
27. Remember also to provide the following for your ducklings:
28. If you have taken good care of your ducklings, they should grow well. If you are raising Peking ducks, regularly obtain the live weight of a few birds and compare it to the chart below. If you are doing quite well, it should be close to the upper curve. If it is below the lower curve, your ducks are not growing well at all, and you should improve their feed.
Beware: the transfer of young ducklings from the nursing area to the ponds causes great stress and some birds may die. Transfer early in the morning. Be calm and gentle to reduce losses.
29. If a good market is readily available, you might also consider the production of duck eggs instead of, or in addition to, table ducks. You should then choose a locally available egg-laying breed such as Khaki-Campbell.
30. Khaki-Campbell and Muscovy ducks consume less feed than Peking ducks; plan your requirements for their intensive rearing as follows.
|
Food rations for Khaki-Campbell
|
31. The procedure for producing laying ducks is similar to the one described earlier for the production of table ducks using a duck house (see paragraph 19), except for the following.
(a) Plan for more floor space, at least 0.4 m2 /bird on plain floor and 0.3 m2 /bird on mesh floor, not including drinking, feeding and nesting areas.
(b) Continue rearing the ducklings until they reach the point of laying in their fifth or sixth month.
(c) Provide them with nest boxes, at the rate of one per five birds. They should each measure 30 cm wide by 40 cm deep and 30 cm high. Add a 15-cm-high front lip. Build them either on the floor or 30 cm off it, against a side wall or a rear wall of the duck house.
(d) Line the nests with clean grass or straw, to be changed regularly.
(e) From the day they start laying, give the ducks a good layer feed (see chart low), at the rate of 150 to 200 g/day/bird. Split this ration equally over two meals, morning and noon.
|
Three types of feeds for egg-laying ducks
|
|||||||||||||||||||||||||||||||||||||||||||||||||||
(f) Make sure that they have water available whenever they cannot reach the pond.
(g) Feed plenty of fresh vegetal matter daily.
(h) Collect the eggs several times a day, clean them if necessary and store them in a cool place. Keep good records (see Section 16.6).
32. If your ducks are well managed, they should lay a large number of eggs of 50 to 80 g each over a period of about 12 months. On average, this may be as high as 60 to 80 eggs per day per 100 ducks, although there may be large seasonal variations. Then as laying declines, usually when ducks are 18 months old, it is time to cull them and replace them with a new batch.
