4. PROTECTING FARM STRUCTURES AND FISH STOCKS
4.0 Introduction |
||
| 1. Soil erosion has negative effects on water quality and on the fish farm itself. You must protect your farm against erosion and its effects if you wish to maintain good levels of production at a reasonable cost. Soil erosion should be controlled, not only on the farm itself but also in the entire catchment basin upstream from it. This is usually the responsibility of the regional administration. All fish farmers involved should seek action or assistance from them if needed. However, on your own land and maybe even in its immediate neighbourhood, you should practise soil conservation wherever necessary. It is best if local farmers work together to achieve this goal. |
A stream network with six catchment basins
 Soil conservation practices may be just as important on neighbouring lands as on your own land |
|
2. Soil conservation practices include:
- protecting sloping land surrounding your fish ponds against rainfall erosion (see Section 4.1);
- protecting your fish ponds from excessive winds by establishing wind-breaks (see Section 4.2);
- protecting your fish ponds against eroding wave action (see Section 4.3); and
- protecting your pond dikes against damage by rain (see Section 4.4) and uncontrolled livestock traffic (see Section 4.5).
3. Needless to say, you should also be concerned to control erosion and its effects downstream of your farm.
4. Pest control in fish ponds applies both to harmful animals that may feed on your fish and to plants that may harbour minute organisms responsible for diseases and infections. Animals may compete with your fish for food, and both plants and animals may reduce the production potential of your ponds.
5. For best results, animal pests should be controlled in fish ponds:
- after each total fish harvest and before restocking: for ponds that are completely drained (see Section 4.6), and for ponds that are not completely drained (see Section 4.7); and
- during the fish production cycle (see Section 4.8).
6. Vegetation control can be carried out concurrently (see Section 4.9).
4.1 Soil conservation
Introduction
1. You have already learned in a previous manual in this series (see Water, 4), that whenever the ground is not perfectly horizontal, rainwater partly infiltrates it and partly runs off over its surface. As water runs down a slope, it transports particles of the surface soil. The more water passes and the faster it runs, the bigger the particles that can be washed down the slope. This process is called erosion, and it can cause:
- serious degradation of the slope itself and of the soil properties, reducing fertility;
- an inflow of turbid water at the bottom of the slope and problems of soil settling elsewhere.
2. If your fish farm is situated at the bottom of a valley or even if your main water feeder canal runs across sloping ground, you should try to control soil erosion on the slopes as much as possible to prevent turbid water from running into your ponds. This practice, called soil conservation, can result in great benefits:
- better soils on the slopes and greater production of various products such as wood, fruits, fodder or food for you and your family;
- better water quality in your fish ponds and greater fish production.
| Note: if you cannot control soil erosion in your farm watershed, you can use a protection canal to collect and divert turbid water. For example around a barrage pond or a sunken pond fed by runoff (see Section 11.5, Pond construction, 20). You can also improve the quality of your water supply by using a settling basin (see Section 11.6, Pond construction, 20). Pond construction, 20). |
Runoff water from unprotected slopes
may increase pond turbidity 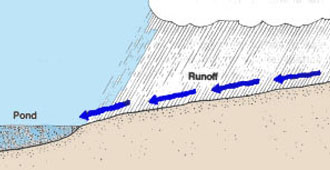 |
|
|
A slope protected by vegetation increases
infiltration
and helps prevent pond turbidity  |
A protection canal above a pond
diverts turbid water away  |
Kinds of erosion
3. The erosion of soil by rain takes place in successive phases.
4. At the beginning, the rain hits the soil surface, causing soil particles to break off and burst upwards, while water progressively humidifies the soil surface and infiltrates deeper. This is called splash erosion. It loosens soil but does not move it much.
|
Splash erosion
Falling raindrops batter the ground's surface  |
Raindrops splash and burst upwards
carrying soil particles with them  |
5. On flat land, as soon as the upper layer soil becomes saturated and infiltration decreases, a water layer forms over the soil surface and splash erosion stops; if the ground is not horizontal, water starts to run off the slope, transporting fine soil particles with it. This is called sheet erosion.
|
Sheet erosion
 |
Sheet erosion can be seen when stones, pebbles
or plants are left standing on small columns of soil  |
|
| 6. When sheet erosion remains uncontrolled, runoff cuts into the topsoil layers forming small channels. This is called rill erosion. | 7. If heavy runoff occurs, larger flows of a water-soil mixture can gouge out deeper and deeper channels. This is called gully erosion. | |
|
Rill erosion
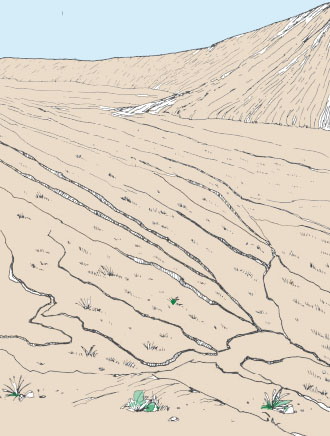 Small channels or rills caused by runoff water ... |
Gully erosion
 ... can soon become large channels or gullies.. |


(b) The ground slope: as slope increases, susceptibility to erosion increases:
- flat to very gentle slope (0 to 4 percent) means little susceptibility to erosion;
- gentle slope (4 to 12 percent) means susceptibility to erosion increases rapidly;
- moderate slope (12 to 20 percent) means susceptibility is high and erosion should be controlled, especially if the slope is under cultivation;
- steep slope (over 20 percent) means that in the presence of cultivation, erosion control requires special techniques.
|
As ground slope increases susceptibility
to erosion increases
 |
Remember: the steeper the slope, the more important and the more difficult it is to protect it against erosion.
(c) The vegetation present: its cover protects the soil against splash erosion. Its roots help stabilize the soil particles and increase permeability to lower soil layers. The organic matter it brings into the soil, such as humus, increases resistance to erosion and slows down runoff. It may also help soil particles to settle down
|
Trees, bushes, plants and grasses cover and
protect the soil against erosion
 Vegetation brings organic matter to the soil which helps increase resistance to erosion |
9. To control soil erosion, you will have to use soil conservation practices which modify and optimize these factors. There are several ways, including:
- management of natural vegetation;
- controlled cultivation practices;
- use of physical controls.
10. You will briefly learn about these various methods in the following paragraphs. If you plan to use any of them, it is best to ask for detailed advice from the local extension agent responsible for soil conservation.
11. By using soil conservation from the beginning, you will prevent the formation of gullies. Prevention is much easier than dealing with gullies once they are formed. It is most important to stabilize any incipient gully as soon as possible to keep it from becoming longer, larger and deeper. Otherwise it might become, if not impossible, at least extremely difficult and expensive to control. Possible methods for the stabilization of gullies are described in the FAO Conservation Guide, 13/2, FAO watershed management field manual, Gully control, 1986.
Managing natural vegetation to conserve soil
12. By managing natural vegetation on sloping ground, it is possible to ensure that the soil has a greater resistance to erosion.
(a) In forested areas, maintain the soil cover as completely as possible by managing the exploitation of the trees and protecting the forest against overgrazing and fires. Woodlands with good undergrowth, widespread root systems and good leaf cover give the best conditions.
(b) In savannah areas, control the use of fire for the regeneration of pastures and give preference to early fires to ensure sufficient new growth before rains start. Avoid overgrazing, especially with sheep and goats. As far as possible, plan for rotational grazing.
|
Maintain forest cover by managing exploitation
and
protect against overgrazing and fires  |
|
Control the use of fire to ensure new growth
before rains start; protect against overgrazing
 |
Cultivating soil to conserve it
13. When soil is placed under cultivation, conservation practices may include the following.
(a) Avoid repeating the cultivation of the same crop by rotating crops and keeping the soil covered as long as possible, especially at the beginning of the rainy season.
(b) Improve the soil cover by increasing fertilization and crop density. Plan sowing and harvesting so as to have the soil covered during the heaviest rains.
(c) Associate several crops together to maximize soil protection.
(d) Between two culture cycles, cover the soil with a mulch* made, for example, from the residues of the last harvested crops.
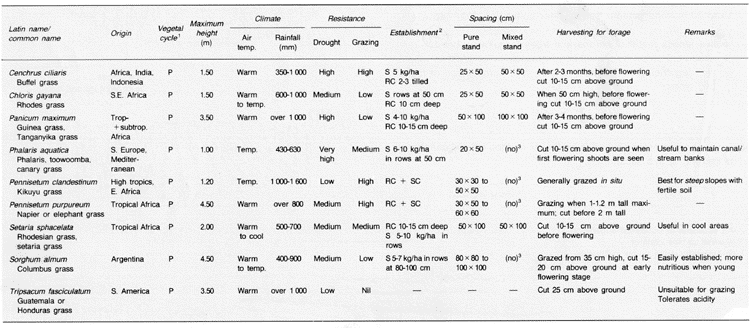
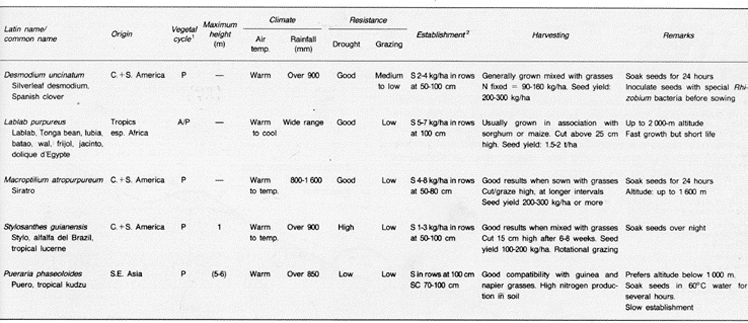
(e) Plant cover crops, usually legumes and grasses. Grasses are more effective and are either used alone or mixed with legumes (see Tables 5 and 6). They provide excellent forage for farmed livestock and even for some plant-eating fish such as the Chinese grass carp.
|
Examples of three-year crop rotations

|
 |
|
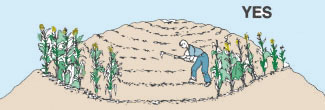
Plant several crops together
 |
(f) Contour plough the soil following contour lines (see Topography, 16). This step is most effective by itself if the soil is sufficiently pervious and if the slope does not exceed 3.5 percent.
(g) Contour farm following contour lines*, instead of across or straight up and down the slopes. The steeper the slope, the more important it is to undertake all crop-raising activities along contour lines.
(h) Establish perennial* vegetation strips 3 to 8 m wide to separate 15 to 30 m wide contour strips under cultivation. You can use:
- live fences made of shrubs and trees (see Table 7);
- absorbent strips made either of grasses or of grasses mixed with legumes (see Tables 5 and 6);
- or a combination of these two types.
Note: you will learn more about this particular method for soil conservation at the end of this section.
|
An example of perennial vegetation planted
on the contour to separate strips under cultivation
 |
|
Plough and farm sloping land on the contour
...
 |
... not across or straight up and down
 |
| 1 P = perennial 2 S = seeds, RC = root cuttings, SC =stem cuttings 3 (no) - possible under proper management |
|
Using physical controls to conserve soil
14. These controls generally involve extensive earth movements, often difficult to design and costly to realize. If the above practices are not sufficient to control erosion on your ground, especially if you wish to farm a rather steep slope year after year, you should look for specialized advice from your agricultural extension agent.
15. There are several possible physical controls, according to local conditions of slope, soil quality and rainfall characteristics. These are:
- contour berms;
- infiltration ditches;
- contour terraces;
- gulley check dams.
| (a) Contour berms are a series of horizontal or slightly sloping ridges constructed to intercept and temporarily store runoff. The berm foreslopes may be planted with perennial vegetation to improve their resistance to erosion. Contour berms are useful in rather dry areas with considerable runoff after heavy rains, on slopes not steeper than 20 percent. |
Contour berms intercept and temporarily
store surface water runoff  |
|
Profile showing construction of contour berms
 |
| (b) Infiltration ditches are dug to allow surface runoff to accumulate and infiltrate the soil. They can also channel excess water to the sides of the fields where its discharge should be controlled. The downslope rims of ditches can be planted with perennial vegetation to increase their stability. This type of ditch is useful in areas with more than 400 mm annual rainfall where heavily cultivated slopes are steeper than 10 percent and soils are rather impervious. |
Contour infiltration ditches collect surface
water runoff  |
Note: ditches can also be slightly sloping to channel excess water to the sides of the farm fields
|
Profile showing construction of infiltration
ditches
 |
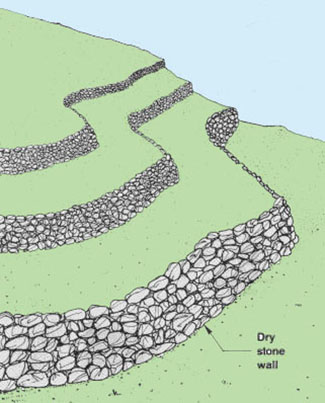
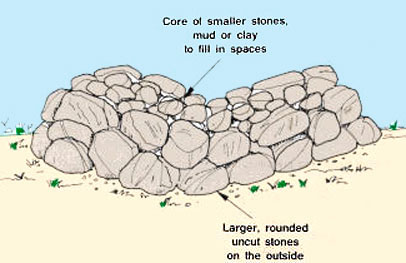
(c) Contour terraces, providing strips of level or near-level farmland, can be built behind steep banks protected by perennial vegetation or, if sufficient stones are available, behind stone retaining walls. Contour terraces are useful on steep slopes and on those with considerable runoff, after medium rains.
|
Contour terraces behind steep banks planted
with grass  |
Contour terraces behind stone walls
 |
(d) Gulley check dams are small dams built across gullies or small stream courses. They hold up runoff, limit downstream erosion and are useful in dry areas with heavy runoff and medium to steep slopes. A gully check dam may be made using a variety of locally available materials such as stone or woven tree branches lashed in place between two rows of wooden poles. It is very important that the top of the check dam be lower than the crest of the gully so that overflowing water remains in the gully.
Note: remove 15 to 30 cm of soil from the gully bottom and sides before placing the check dam and apron.
|
Profile showing position of check dam in
a gully
 |
|
A check dam of woven branches and wooden
poles
 |
|
A check dam of stone
 |
A simple method of soil conservation: the self-made terrace
16. If you plan to produce cash crops on land with a gentle to moderate slope (4 to 20 percent), you may use a simple method to control soil erosion, namely to encourage the progressive build-up of nearly horizontal terraces by controlling sheet erosion itself.
17. Narrow contour strips are planted with perennial vegetation fairly closely together on the slope to be protected. Generally, the steeper the slope, the more vegetation strips you will need. If necessary, a dead filter, made of slightly buried branches and crop residues in front of each vegetation strip, will help to stabilize the vegetation and to accelerate terrace formation. The vegetation slows runoff, resulting in the deposit of transported soil particles, first within the vegetable strips and then further up the slope. The roots of the vegetation become buried deeper and deeper as the downslope bank of the terraces builds up.
Note: as the soil is deposited within the grass, the roots are buried deeper and deeper, which helps to hold the terrace banks

|
Other ways to begin self-made terraces on
the contour
 |
|
Dig a ditch and throw earth uphill
(sometimes called fanya ju) 
Note: all of the systems shown above will form self-made terraces over the years, very much like the terraces formed by grass strips shown. |
Dry stone barrier
 |
Choosing a vegetation strip for a self-made terrace
18. Perennial vegetation strips can be made following the contour lines in several ways.
(a) Spontaneous vegetation can become established if you stop farming narrow strips of land.
(b) Forage grasses in particular and legumes can be planted to provide food for livestock, either under controlled grazing or as cut forage, fed fresh or dried (see Tables 5 and 6 above). Similarly you could use lemon grass, sugar cane or sisal if a market exists for such crops.
(c) One row of shrubs and trees could be added to this forage vegetation to produce timber, firewood, fruit or additional fodder for your livestock. Suggested species, which should be selected according to local conditions of climate and soil, include:
- shrub and tree legumes for fodder (see Table 7);
- other trees for diversified production (see Table 8);
- fruit trees can be planted for the production of mangoes, avocados, pawpaws, bananas and various citrus fruits according to local demand and market potential. If possible use genetically improved varieties.
(d) A live fence can be made of (more densely planted) shrubs and trees (see above for suitable species).
Establishing and maintaining vegetation strips
19. Perennial vegetation strips should be established in several phases.
(a) Determine and mark the contour lines at regular intervals, normally spaced to provide a farmed strip 15 to 30 m wide (see Topography, 16).
(b) Prepare the contour strips just before the rains start.
(c) Establish the vegetation after some good rains have fallen, preferably by planting either seedlings or cuttings to cover the soil as soon as possible.
(d) Seedlings are produced in separate nursery areas and are transplanted to the contour strips after a few weeks. The nursery area should have well-prepared seed-beds. Seeds are sown in rows at about 1.5 to 2 cm deep and covered with well-pressed soil. Seeds can also be planted in small plastic bags containing soil, which help to retain moisture and control weeds.
(e) Cuttings should be healthy, about six months old and with at least two nodes. Small cuttings are planted at a 40° angle with one node in the soil. Long cuttings are buried in the soil about 10 to 15 cm deep.
(f) Protect all seedlings and cuttings well from grazing until the vegetation is well established. For shrubs and trees, this might take as long as three to five years.
(g) Keep weeds under control, especially around the young plants.
(h) Establish the dead filter just uphill of the vegetation by slightly burying wooden branches, crop residues or stipes of banana leaves in the soil.
20. The vegetation strip should be regularly maintained.
(a) Repair and strengthen any breaches through the strip by planting additional vegetation in the fragile zones.
(b) As the terrace builds up, place new dead filters uphill of the buried ones. Repair these filters as needed.
(c) Watch for localized erosion either of the lower lip of the terraces or of their steeper banks; immediately repair, adding vegetation.
Dealing with steep slopes
21. On slopes steeper than 15 to 20 percent, it may not be sufficient to establish perennial vegetation strips to control soil erosion adequately. The area of land suitable for farming will also be much reduced with this method, owing to the reduced spacing between vegetation strips.
22. You should therefore consider the following guidelines:
(a) Avoid farming cash crops.
(b) Limit farming to perennial crops.
(c) Select or encourage shrubs and trees that protect the soil. A natural forest, if well managed and protected from fire, may be the best solution.
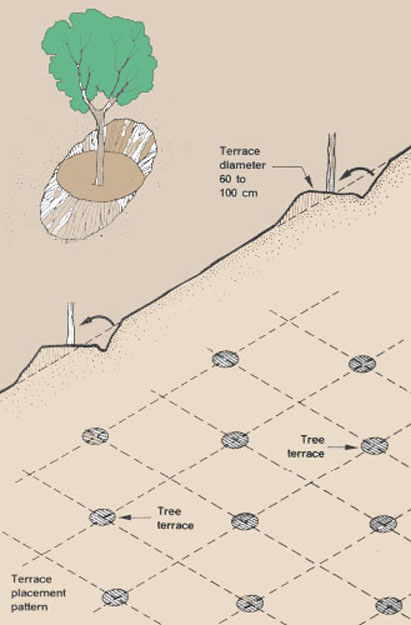
(d) If you choose to plant shrubs and trees, it is best to build individual micro-terraces rather than using more expensive and more elaborate techniques. Protect these terraces from erosion by planting grasses and legumes at their raised edges. Protect your plantations from grazing, fires and uncontrolled cutting.
|
Individual micro-terraces
 |
4.2 Wind protection in fish farms
Protecting fish ponds from wind
1. When a strong wind blows over a fish pond, it affects the environment in several ways.
(a) It increases evaporation at the surface of the pond, especially if the wind is a dry one, resulting in greater water losses.
(b) It sets and keeps water in motion, inducing surface water currents toward the pond dike facing the wind and returning deeper currents in the opposite direction. These currents help the transfer of heat and dissolved oxygen from surface to deeper water.
(c) It may generate waves, which greatly accelerate the oxygenation of surface water (see Section 2.5), although wave action against the downwind dike may damage the latter through erosion.
(d) If relatively cold, it may delay the warming of small ponds intended for fish breeding and nursing early in the warmer season.
2. Although wind has definite advantages for fish farming, mainly keeping the ponds well mixed and oxygenated, there are particular situations in which you may wish to protect at least part of your fish farm:
- to warm up early small breeding ponds and nursery ponds when relatively cold winds are prevalent; and
- to reduce wind velocity and the size of generated waves over larger ponds, for easier control of dike erosion.
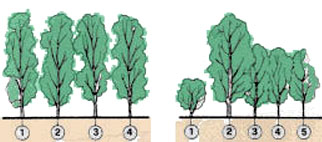
 |

The characteristics of an efficient wind-break
5. An efficient wind-break should have certain characteristics. It should be:
- semi-permeable especially in its lower part, about 40 percent of its total area consisting of small openings regularly distributed (a lower permeability reduces the wind velocity more; turbulence, however, reduces the length of the protected area as only the density of the first row directly exposed to the wind modifies its velocity; an open breach in a wind-break will, on the contrary, increase wind velocity and it should be avoided);
- relatively thin: as the wind-break becomes thicker, its permeability to wind decreases and therefore its efficiency decreases;
- rectangular in cross-section to minimize turbulence in the protected zone;
- as high as possible, because the higher the wind-break, the longer the protected zone behind it;
- long enough to avoid side turbulence in the protected zone (the length of the wind-break should be equal to at least 12 times its maximum height);
- perpendicular to the wind direction.
Note: carefully check on the prevalent direction of the wind against which you seek protection. If this direction is too variable, you may either increase the length of the wind-break or establish several ones in different directions.
|
Diagrams showing comparative protection with
semi-permeable and impermeable wind-breaks
 |
Designing a live wind-break
6. When designing a live wind-break, pay attention to the following points:
- location of the wind-break;
- use of tall trees;
- use of smaller trees, shrubs or tall grasses.
(a) Plant the wind-break at least 3 m outside the centre line of pond dikes and even further if the trees are likely to have long horizontal roots.
(b) Use at least one continuous row of tall trees. If necessary, add one or more rows of smaller trees, shrubs or even tall grasses to complete the semi-permeable screen in its lower part.
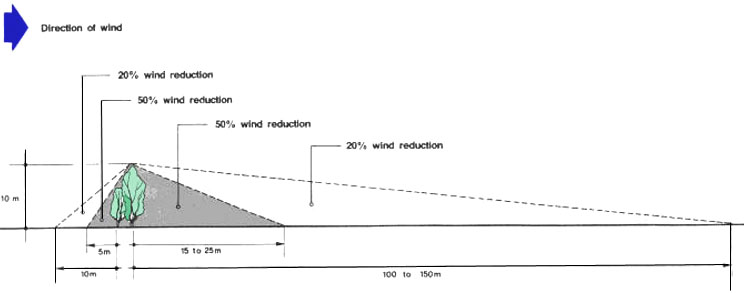
(c) The protected zone will extend slightly in front of the wind-break and much further behind, with the wind velocity being reduced in proportion to the maximum height (H in m) of the wind-break:
- by 20 percent from about 1 x H in front to about 10 to 15 x H behind;
- by 50 percent from about 0.5 x H in front to about 1.5 to 2.5 x H behind.
Example
The maximum height of the wind-break is 10 m. The protected zone will extend at the most from about 10 m in front to 150 m behind the wind-break.
(d) Preferably, plant several rows of trees:
- to avoid breaches forming in the wind-break if, for example, certain trees die from disease;
- to enable the exploitation of mature trees while leaving at least one row offering protection; and
- to improve the survival of young trees, which resist strong winds better when planted on a wider strip.
|
Protection characteristics possible when designing
a wind-break
 |
(e) To protect large areas, you may require a series of wind-breaks parallel to each other. The distance between each wind-break should be about 15 times their maximum height.
(f) Select tree species well adapted to local conditions of climate and soil. Seek advice from your forestry or agriculture extension agent.
(g) Diversify the benefits of your wind-break as much as possible, according to your own needs and those of your community. Adapt the volume of production of each particular product to local demand.
(h) In addition to these last two considerations, give preference to tree species with the following characteristics:
- sufficient height for the area to be protected;
- foliage homogeneous from top to bottom of crown, and evergreen foliage permeable to wind;
- fast growth in height;
- reduced crown volume;
- strong taproot and limited horizontal root system; and
- easy regeneration, either naturally by seeds or by coppicing*.
|
At least four rows of trees for best efficiency
 |
Note: best efficiency has been claimed for wind-breaks made of at least four rows of trees occupying a strip of land 10 to 12 rn wide. |
Choosing vegetation to use in a wind-break
7. Very few tree species have all these desirable characteristics, and therefore it is usually necessary to mix different species to ensure that the wind-break has the desired efficiency and structure.
8. In most cases, you will require tall trees to increase the size of the protected area and to produce various wood products; depending on the local conditions you may use:
- leguminous trees such as Acacia albida, A. auricoliformis, Albizzia lebbek or Tamarindus indica (see Table 7), Cassia siamea, Prosopis chilensis;
- some fast-growing but relatively short-living trees such as Azidarachta indica (neem), Eucalyptus camaldulensis (needs at least three dry months per year), or Casuarina equisetifolia (see Table 8);
- some slower-growing but long-living trees such as Parkia biglobosa (see Table 8) and Cupressus spp.
9. You will also need small trees and shrubs to complete the windbreak below the crown of the tall trees. These species will mainly produce firewood, animal fodder and fruit. Depending on the locai conditions, you may use some small legumes (see Table 7) or fruit-bearing trees (Anacardium occidentale, cashew; Morus spp., mulberry).
10. At the lowest level of the wind-break, you could also plant:
- perennial forage grasses such as Andropogon gayanus (Gamba grass for 600 to 1 100 mm annual rainfall with five to six dry months a year), Chloris gayana (Rhodes grass for 600 to 1200 mm annual rainfall with four to six dry months a year), or others (see Table 5);
- thorny shrubs such as Acacia (A. mellifera, A. senegal) to protect the wind-break from being damaged by wandering animals;
- shrubs unpalatable to livestock such as Euphorbia balsamifera (dry soils) or E. tirucalli (humid soils).
| 1 P = perennial;
D = deciduous 2 S = seeds: SC = stem cuttings; SID = seedlings; ST = stumps |
|

|
1 P = annual rainfall |

Various kinds of wind-breaks
11. Various kinds of wind-breaks can be planted, usually made of two to six rows, determined not only by the kind of additional benefits expected but also by the land available. Common examples of wind-breaks are the following:
(a) Two-row wind-breaks: one fast-growing tree planted with a smaller tree. The smaller tree can be planted either in front of or behind the larger one, according to the resistance to the wind of both kinds of trees.
(b) Three-row wind-breaks: two rows of tall trees, one of which may be fast-growing but relatively short-living (e.g. Eucalyptus spp. or Azidarachta indica) and the other one may be slow-growing but long-living (e.g. Acacia albida or Tamarindus indica); and one row of smaller vegetation producing firewood, fodder, fruit, etc. Major wood production is expected from the exploitation and even removal of the middle row when the wind-break becomes too dense.
 |
(c) Four-row wind-breaks: especially useful for additional benefits such as fodder, poles and firewood. The four rows may be planted with one tree species such as a leguminous tree. In dry locations, consider Cassia siamea and in wet locations, Dalbergia sissoo. Plant these trees in alternate rows, with about 3 m between trees.
(d) Five-row wind-breaks: from front to back row, the following species can be planted: Cajanus sp., Casuarina equisetifolia, Acacia nilotica (or two inside rows of Cassia siamea).
 |
Establishing, maintaining and renewing a wind-break
12. To establish your wind-break, proceed in stages:
(a) Obtain or produce vigorous plants of uniform size for the tree species you have selected.
(b) Prepare the strip of land well for planting by loosening the soil to a depth of 0.6 to 0.8 m and by digging deep holes. Fertilize if the soil is infertile.
(c) After the rains have started, plant the young trees.
(d) Protect them from being damaged by grazing animals and fire.
(e) Replace all dead plants as soon as possible.
(f) Water the plants if necessary, at least until they have developed a deeper root system.
(g) Eliminate the weeds and loosen the soil around the plants regularly.
13. Later, once the wind-break is established and growing fast, it should be maintained regularly, which may also provide wood products.
(a) Remove and if necessary replace trees which are dead, diseased or much slower-growing.
(b) If the permeability of the screen becomes too low or if the tree growth starts declining, reduce tree density.
(c) Pollarding* may also become necessary.
(d) Continue to protect the plants against overgrazing, fire and uncontrolled cutting.
(e) If necessary, improve the wind-break efficiency by adding one or more new rows of vegetation.
14. When the trees of a wind-break reach maturity, their ability to reduce wind velocity decreases greatly. Exploiting and renewing them becomes necessary. The most common practice is to first exploit one half of the wind-break by cutting one or two rows of trees at ground level. This vegetation is then renewed either by coppicing* or by planting, and the other half of the wind-break is cut down a few years later. This system is particularly easy to manage with a four-row plantation, but a similar scheme can be adopted for other types of wind-break.
|
Examples of wind-break exploitation and renewal
|
||
|
Cut two rows of trees, leaving two rows
as wind-break  |
A few years later, when the new trees have
grown,
cut the other two rows 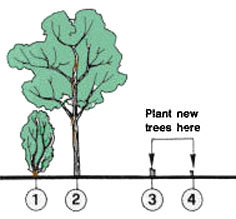 |
|


| (g) A row of end-to-end floating logs, up to 25 cm in diameter, may be anchored about 2 m offshore. This structure is called a log boom. If the pond water level is expected to fluctuate, remember to leave some slack in the anchor lines. |
Floating logs tied end to end and anchored
off shore
 |
|
(h) One of the best and longest lasting
methods of wave action control may be obtained from dense aquatic
vegetation. Usually a strip 2 m wide of strong vertical aquatic
plants, reeds for example, is planted in front of the dike to be protected.
If you plan to use this method, you should design the dike:
|
Fully grown strip of aquatic plants
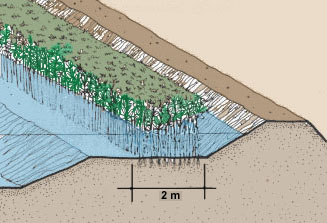
|
|
| (i) To protect young aquatic plants from waves until they are grown, use bundles of reeds, straw or branches anchored in front of the horizontal berm as shown above. When the strip of vegetation is fully grown, you can remove this protection. |
Young aquatic plants protected by bundles
of reeds,
straw or branches  |
4.4 How to protect dikes and canals against erosion
Protecting your dikes
1. You have already learned earlier that you should protect newly built dikes against erosion from rainfall, covering them as soon as possible with a thick grass cover (see Section 6.9, Pond construction, 20) Pond construction, 20). You should maintain this grass cover well, cutting it regularly and fertilizing it if necessary.
2. You have also learned how to protect your fish ponds against wind (see Section 4.2) and the resulting wave action (see Section 4.3).
3. Dikes should also be protected against damage caused by heavy livestock traffic, as you will learn later (see Section 4.5).
4. Dike erosion can also take place at the pond inlet under the action of the inflowing water. Protection may be given either:
- directly to the part of the dike located under the inflowing water (see Section 9.5,Pond construction, 20); or
- indirectly through some of the water filtering devices described earlier (see Section 2.9), which absorb the force of the inflowing water.
Protecting your water canals
5. Water feeder, drainage and diversion canals are subject to erosion, particularly if the water current exceeds the maximum permissible velocity (see Section 8.2, Pond construction, 20). Sheet erosion during rainfall may also take place along the canal side slopes if they are not properly protected.
6. There are different ways of providing additional protection to water canals. You can do this in one of the following simple ways.
(a) First take any steps possible to reduce water flow in affected sections (e.g. by draining ponds carefully) or to reduce sheet erosion (e.g. by diverting water away from the side slopes with small trenches).
(b) You may connect the trenches with gravel filter channels, if you need to conduct the water safely down the canal side. These are strips of gravel 30 to 40 cm wide and 20 to 30 cm deep, which run diagonally down the side of the slope.
(c) Establish and maintain a strong short grass cover on the canal sloping sides, using similar grasses as those recommended for pond dikes (see Section 6.9, Pond construction, 20).
(d) Cover the sides of the canal with lengths of wood or bamboo driven into the canal bottom next to each other.
(e) Tied bundles of sticks or branches can also be used.
7. More expensive ways include:
- lining the canal with bricks, cement blocks or concrete (see Section 8.3, Pond construction, 20);
- lining the side slopes with elongated half-height gabions (see Section 3.7, Pond construction, 20).
Note: any change in the quality of the canal walls will affect the water discharge capacity of the canal (see Section 8.2, Pond construction, 20).
4.5 Traffic control: fencing
1. Fencing is often used on fish farms:
- to protect the growing stocks from theft; and
- to protect dikes, structures and plantations from animals.
2. Fences may also be used as wind-breaks (see Section 4.3), to diversify production (wood, fruit, leaves), to provide privacy and to improve the appearance of your fish farm.
3. There are different types of fences. You should select the right type according to its main purpose and the amount of money you wish to invest. The chart below should assist you.
|
Protection given by various fences
|
||||||||||||||||||||||||||||||||||
Live fences
4. A live fence is made of shrubs and trees planted closely together as a hedge and regularly trimmed to produce a barrier to keep animals out.
5. If planting material is readily available, these fences are quite cheap to install, needing only to be planted. They also have the advantage of providing additional benefits such as the production of wood, fruit and animal fodder as well as acting as low wind-breaks and being an attractive feature in the landscape.
6. However, before considering the use of live fences, you should be aware that:
- they usually grow quickly, requiring labour for regular cutting, sometimes twice a year;
- to be really stock-proof, they may require the addition of some other type of fencing at particular points; and
- hedges require more space than some other types of fence.
| 7. Several different kinds of shrubs and trees can be used to make live fences. If the availability of animal fodder for browsing is one of the major benefits you are interested in, you should use a shrub or tree legume which is fast-growing and resistant to grazing and trimming, such as Cassia siamea (Siamese senna) or Gliricidia sepium (Nicaraguan shad). For protection both from animals and theft, a thorny live fence can be effective. You could also use agave planted in alternate rows for the production of sisal (A. sisalana) or maguey (A. cantala). Cactus plantations are another possibility. |
A live fence to keep animals out of pond
area
 |
Piled fences
8. A piled fence is made of a row of cut vegetal material piled up high enough to keep out animals and sometimes also people. The best way is to use thorny branches, but you could also use any waste from land clearing or tree felling. Tie the material intermittently to vertical posts to give it more strength.
9. Usually, this type of fence can last for some years, although it can also be very susceptible to fires, rot and termites.
Woven fences
10. A simple light fence can be made using woven matting, for example, bamboo, rush or leaf matting, fixed on a framework of wood or bamboo poles, with horizontal support bars at the top and bottom. These fences should be securely braced with angled support to keep them upright.
|
A piled fence of thorny branches or vegetal
material with intermittent vertical posts  |
A fence of bamboo strips with horizontal
and angle supports  |
Post-and-rail fences
11. A post-and-rail fence consists of wooden posts strongly driven into the ground at regular intervals and joined with horizontal wooden rails. It is particularly useful in areas where wood or bamboo is available.
12. This type of fence is easily made as follows:
(a) Prepare strong wooden posts with a diameter of at least 12.5 cm and 1.8 to 2.6 m long. If necessary, treat the wood to increase its resistance to termites and rot (see Section 3.1, Pond construction, 20).
(b) Prepare the wooden rails, usually using either lengths of split bamboo or wooden poles 10 cm in diameter.
(c) Drive the posts vertically into the ground to a depth of 0.5 to 0.8 m, at 2.5- to 4-m intervals. If necessary, add some angled supports to brace the posts.
(d) Fix the rails to the posts, in three to five horizontal rows. Make joints of the rails only at the posts, and not all on the same post.
(e) Install posts for gate openings. You may also want to install passes or stiles for crossing the fence (see below).
|
Placing the posts
 |
|
Example for placing wooden rails
 |
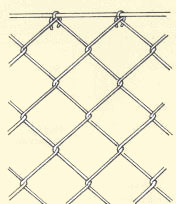
Wire fences
13. A wire fence is made of several wire lines tightly stretched between a series of vertical posts. Wire fencing is expensive and should be limited to areas where it is necessary and where cheaper fences cannot be established. There are two kinds of wire, usually galvanized for protection against corrosion:
- plain wire, which is cheaper but more difficult to place properly;
- barbed wire, which is more difficult to handle, rusts faster and can be a cause of serious injury to animals. It is most useful as a top wire.
|
Plain wire
|
Barbed wire
|
14. Plain wire is defined by its gauge (see the chart below), while barbed wire quality is defined by three numbers defining the gauge, number of barbs (2 or 4) and distance between barbs (8 to 11 cm); for example, "16 x 4 x 11" describes a 16-gauge wire with four barbs every 11 cm.
|
Plain wire gauges
Equivalence of common wire gauges (in mm)
|
|||||||||||||||||||||||||||||||||||||||||||||||||||||||||||||||||||||||||||||||||||||||||||
|
Note: |
|||||||||||||||||||||||||||||||||||||||||||||||||||||||||||||||||||||||||||||||||||||||||||
|
Data for Paris and Birmingham wire gauges
|
||||||||||||||||||||||||||||||||||||||||||||||||||||||||||||||||||||||||||||||||||||||||||||||||||||||||||||||||||||
15. Wooden posts are generally cheaper than concrete posts but less resistant to rot, fire and termites. Select a naturally durable hardwood or treat less durable wood with a preservative (see Section 3.1, Pond construction, 20).
16. There are two types of post in a wire fence:
- strainer posts, at gates, extremities of straight lines, intermediate points on long lines and wherever the ground slope changes; and
- intermediate posts, at regular intervals between strainer posts.
| 17. The stability and efficiency of the wire fence will depend on the strength and stability of the strainer posts. You should therefore select and fix them with particular care. |
Use of strainer posts
 |
18. Instead of standard posts, you can also use live posts consisting either of trees growing on the fence line or of specially planted trees. They are cheap and long-lasting, providing additional benefits such as wood, fruit, animal fodder and shade. Excellent live posts are made of Gliricidia sepium, a tree legume widely used at low altitudes in Latin America, where it is trimmed at 1 to 1.5 m in height to be directly grazed by livestock.
| Note: trees to be used as live posts should be planted well in advance to give them enough time to take root properly. |
Use of trees as live posts
 |
19. To make a simple wire fence, proceed as follows.
(a) Lay out the fence line as straight and unbroken as possible.
(b) Clear the ground area.
(c) Install the strainer posts, about 2 m long, at gates, passes, corners, top and bottom of slopes and at any intermediate point if the straight distance is over 150 to 200 m. They should be at least 15 cm in diameter and set into the ground 80 cm deep. Brace them well according to their position:
- brace corner posts with a stay in the direction of both fencing lines;
- brace end or gate posts in the direction of the fencing line;
- brace intermediate strainer posts at various points along long runs of fencing.
 |
 |
20. Different types of stays can be used according to soil conditions:
- single or double diagonal stays to stabilize the post by pushing against a surface or buried support at a 30° to 40° angle;
- a traditional strainer assembly with a diagonal stay between two posts;
- a strainer assembly with a horizontal stay and a double-twisted wire stretched between two posts.
|
Corner post with double stays
 |
 Note: posts 15 to 20 cm diam. stays 12 to 15 cm diam. |
 |
21. You can either set these posts in dug or bored holes with firmly tamped soil around them, or you can drive pointed posts into the soil, giving them more stability. For this, it may be useful to build a simple hand driver as follows:
(a) Get a steel pipe 20 cm in diameter and 90 cm long.
(b) Close its top end by welding on a steel plate 25 cm x 25 cm.
(c) At the other end, weld two handles.
22. The posts should be held vertically by a helper, while someone standing on a raised platform such as the back of a truck or a mobile wooden bench strikes the post head from above with the hand driver.
|
Build a simple pipe hand driver
 |
|
Various ways to set posts
 |
23. Install the intermediate posts, about 1.6 to 1.8 m long, exactly in line, at 3- to 5-m intervals. Their diameter should be 7.5 to 12.5 cm, and they should be set 40 to 60 cm deep.
24. Install the bottom wire 15 to 40 cm above the ground, securing it first to a strainer post and leading it straight to the next strainer post. It is then tightly stretched using a wooden lever and secured to the post. Make sure that the wire passes on the inside of all the intermediate posts. Make one turn around any corner post and secure the wire by wrapping it around and stapling it to the post. Loosely fasten the wire to the intermediate posts by stapling.
25. Install the other three to five wires from bottom to top, at 20- to 30-cm intervals, as described above. The top wire should be 10 cm below the head of the posts. Then collect all bits of wire, nails and staples left on the ground to keep animals from swallowing them later.
26. When all of the wire has been installed and stretched, it is time to install gates. Points for pond workers to cross fences, such as passes, should also be installed during construction. However, such crossing points as stiles can be placed after the fences are completed. Three kinds of gates, two kinds of passes and a stile are illustrated below.
 |
Note: it is easier to stretch the wire if permanent wire stretchers are installed on it every 20 to 25 m; final stretching is done after the wire has been secured at each end to strainer posts.
 |
|
Installing posts and wire
 |
|
Stretched wire gate
 |
|
Detail of wire loop closure
 |
|
Pivoting gate
 |
 |
|
Reinforced gate
 |
 |

Wire-netting fences
27. Wire-netting fences are primarily used on fish farms to stop intruders and to protect the fish stocks from theft. To be effective, these fences should be high, dense, sturdy and topped with barbed wire. They can be quite expensive and their use should be limited to enclosing particularly valuable stocks such as broodstock and heavily stocked fish kept in storage ponds before being sold.
|
Wire-netting fence
 |
| 28. Strong diamond-mesh netting, about 2 m high and fixed to posts set 3 m apart, is commonly used for this type of security fence. Stays may be used for extra strength and barbed wire added at the top for increased efficiency. If possible, the barbed wire should be angled out to make access more difficult. |
Diamond-mesh netting
 |
Stone fences
29. Whenever stones are plentiful, a cheaper fence may be built by piling stones "dry" into a wall 0.7 to 1.2 m wide at the base. Although construction is labour intensive, maintenance costs are quite low. For extra security, short wooden posts can be built into the wall to carry some additional rows of barbed wire.
|
Stone wall
 |
Providing controlled access for livestock
30. In some integrated farms, livestock should be given access to at least one pond for drinking. It is then best to limit access to a small portion of the pond, which should be well protected against erosion with gravel, concrete or asphalt. You can use fences, as described earlier, to restrict access.
|
Controlled access
  |
4.6 Animal pest control in drained ponds
1. Farmed fish have many enemies and competitors, such as wild fish, frogs, insects and birds, from which they should be protected.
2. Protection is particularly important while the fish are still very small, for example still in nursery ponds. You can protect your fish in various ways.
(a) You can control the pests after each complete harvest and before restocking the ponds, the choice of method depending on whether:
- you can drain your pond completely (see this Section 4.6);
- you cannot drain your pond completely (see Section 4.7).
(b) During each production cycle while your fish are growing in the pond, you should continuously try to control the most dangerous pests (see Section 4.8).
3. Pest control in drained ponds, also called pond disinfection, has several objectives, namely:
- to kill aquatic animal predators, such as carnivorous fish, juvenile frogs and insects left in the water puddles and in the mud, which would survive and feed on the young fish to be stocked;
- to eliminate all non-harvested fish, which later would compete with your new stock for space and food, especially if they reproduce without control;
- to destroy fish parasites and their intermediate hosts, such as snails, and thus help control diseases (see Chapter 15, ).
4. Certain disinfection treatments have additional benefits such as improving water and bottom soil quality (see Section 5.0) or increasing the pond fertility.
|
Pest control in drained ponds
 |
Animal pests and predators
 |
5. Earthen fish ponds are most easily disinfected after their water has been drained as thoroughly as possible, either by gravity for drainable ponds or by pumping for undrainable ponds. If necessary, complete the draining of remaining pools by deepening additional small trenches toward the main draining trench.
6. There are several ways to disinfect a drained pond. These are usually combined to give most reliable results.
(a) Keep the pond dry (preferably in warm, sunny weather). The ultraviolet rays of the sun have a powerful sterilizing effect. Depending on air temperature, keep the pond fully dry from 24 hours (at the minimum) to one month.
|
The ultraviolet rays of the sun help
to sterilize
the pond bottom and sides  |
Duration of dry period according to
air temperature
|
Note: you learned earlier how to keep a pond dry to improve water quality (see Section 2.5). Remember that certain types of pond should not be kept dry for too long.
| (b) Throw or pour a toxic chemical (see below) in water puddles and pools remaining on the pond bottom. Let the chemical react for a few days. Common procedures are summarized in Table 9. |
 |
|
| (c) Spread a toxic chemical uniformly on the wet pond bottom and sides. Let the chemical react for two to three days. Slowly let just enough water flow in to cover the whole pond bottom with a shallow layer. Wait for 15 days. Then drain slowly, taking care not to cause fish to be killed downstream. Before final refilling, it may be necessary to rinse out your pond once. |
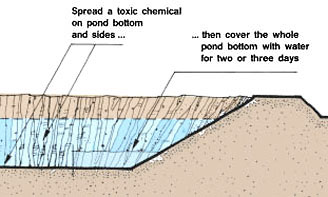 |
Note: for a thorough disinfection, it is best to treat the drained pond twice at eight- to 15-day intervals. Refill the pond ten to 15 days after the second treatment.
7. Three chemicals are commonly used for disinfecting drained earthen ponds (see Table 9):
- quicklime, CaO (calcium oxide), sold in lump or powder form; it is extremely caustic and should be handled with great caution (see below). Because of its lasting toxicity, lumps of quicklime should be well crushed lumps of quicklime should be well crushed before use, but uniform spreading remains difficult. It is better to use lime milk, prepared when needed by mixing one part of quicklime lumps with four parts of water;
- hydrated or slaked lime, Ca(OH)2 (calcium hydroxide), a fine powder also to be used with caution because it contains at least 65 percent CaO (buy and use only if freshly made);
- calcium cyanamide, CaCN2, a powder containing 60 to 70 percent CaO and 18 to 22 percent nitrogen; it is highly toxic for several months after its application. Particular care should be taken when draining the solution from the pond to avoid killing fish downstream. Rinse out the pond well before final refilling.
8. Some agricultural by-products can also be used to disinfect drained ponds cheaply whenever they are locally available, for example rice bran (400 to 1000 kg/ha), crude sugar molasses (400 to 500 kg/ha) and tobacco dust or tobacco shavings (300 kg/ha). Spread the required amount of by-product over the pond bottom. Flood with 5 to 10 cm of water for ten to 15 days. It is best not to drain the pond but to fill it up, so as not to lose the fertilizing effect of the organic disinfectant. Before stocking fish, check carefully on the dissolved oxygen content (see Section 2.5).
Note: before applying tobacco dust or tobacco shavings, it is best to soak the sacks in water overnight. This step will prevent the dust being blown away by wind during spreading on the pond bottom.
Taking precautions when handling dangerous chemicals
9. When using caustic and toxic chemicals, you should be very careful on your own behalf and on that of other people. Take the following precautions.
(a) Whenever possible, choose a day without wind to apply the chemical. If you have to do it on a windy day, progress in the direction of the wind, avoiding chemicals being blown over you or over others.
(b) Fully protect skin and eyes from contact with chemicals by using impermeable clothing, boots, goggles or glasses and a hat.
(c) Avoid inhaling chemicals. Protect mouth and nose with a piece of cloth.
(d) Thoroughly wash your hands before touching any food.
(e) Thoroughly clean all equipment and clothing when you have finished treating the pond.
(f ) Store all chemicals so as not to present any danger to animal or human life, children in particular.
|
When using caustic or toxic chemicals,
try to choose a day without wind but if you must do it on a windy day, move in the direction of the wind  |
4.7 Animal pest control in undrained ponds
1. If the fish pond cannot be completely drained, for example if it is undrainable or if there is no water available to refill it for the next production cycle, pests such as wild fish, frog eggs and tadpoles and snails should be controlled after harvesting the fish by treating the water left in the pond. In nursery ponds, voracious insects and even some zooplankters* should also be destroyed before restocking.
Controlling pests by treating the water
2. After harvesting your fish, proceed as follows to control the pests.
(a) Lower the water level as far as possible, keeping in mind that you will thereafter need water to refill the pond.
(b) Estimate the volume (in m3) of water present in the pond by multiplying its surface area (in m2 ) by its average depth (in m) (see Section 2.0, Water, 4).
(c) Treat the water with one of the products suggested in Table 10, ensuring that it completely mixes with the pond water. It should kill all fish, frog eggs and tadpoles, snails and most insects.
(d) After ten to 12 hours collect the dead fish with nets.
(e) Wait ten to 15 days for the organic poison to break down and disappear.
(f ) Stock a few fish, preferably keeping them in a submerged net or a small cage to be able to watch them carefully.
(g) If these test fish survive well and do not show any abnormal reactions, your pond is ready for stocking.
Note: Similar procedure is also used in addition to netting as a means of harvesting fish from undrainable ponds (see Section 11.1).
|
Pest control in undrained ponds
 |
Applying powdered oilseed cake in an
undrained pond
 |
|
|||||||||||||||||||||||||
| 1 Additional
benefit: liming of water, see Section
5.1 2 Equivalent to I g pure rotenone 3 Makes pond water acid; best if followed by quicklime treatment (15 g) to improve water quality, see Section 5.1 4 Additional benefit: organic fertilization |
|||||||||||||||||||||||||
3. Some of the products listed in Table 10 require processing before being used in the pond:
(a) Derris root: select fresh, small roots. Cut into small pieces. Soak in water overnight. Pound, crush and squeeze to extract rotenone; dilute and mix with water in pond.
(b) Teaseed cake: dry and finely grind the seeds. Let them soak in lukewarm water for 24 hours. Dilute and mix with water in pond.
(c) Rotenone or saponin: mix the total required amount in water. Treat the pond while keeping this solution well mixed.
Controlling insects and zooplankters in nursery ponds
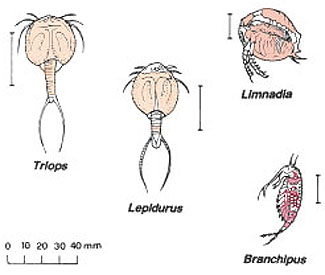
4. Several aquatic insects such as water beetle adults and larvae, dragonfly nymphs and adult water bugs can attack and destroy many fish fry in your nursery ponds. Most aquatic insects are also competing for the food necessary for your small fish to grow. Some of the largest zooplankton species may also harm very young fish fry. You should protect them from these enemies by:
- keeping grassy ditches clean in the farm neighbourhood;
- refilling your nursery pond with water not more than two weeks before stocking, if it has been drained completely;
- treating the water of the nursery pond to eradicate insects and sometimes zooplankters, as described in items 5 and 6 following.
|
Adult dragonfly and nymph
 |
||
|
Adult water insects
 |
Small crustaceans (zooplanklon)
 |

5. To eradicate aquatic insects which have to come to the water surface to breathe air, such as the most harmful Notonecta, Nepa, Ranatra and dysticid species, proceed as follows.
(a) Clear all the vegetation from the pond. Cut the grass short on the wet dike slopes.
(b) Three to four days before stocking, slowly drag a fine-mesh net through the water to capture as many insects as possible and destroy them.
(c) Preferably on a calm, dry day but 12 to 24 hours before stocking, spread a thin layer of an oily substance on the water surface (see Table 11).
(d) Keep this layer undisturbed for at least two hours. If necessary, keep spreading more oily substance so as to keep the layer unbroken over the whole pond surface.
| Note: the more wind there is, the more oily substance you will require and the less effective the treatment might be. |
Dysticid larva and adult breathing at water
surface
 |
1 Detergent or soap powder strengthens the floating layer |
6. To eradicate all aquatic insects together with large zooplankters, you will have to buy special agricultural chemicals. Most of these are organophosphates, commercial insecticides such as Baytex, Dipterex, Dylox, Flibol, Fumadol, Masoten and Sumithion. The last is particularly useful as it is toxic to insects, copepods and cladocerans but is not so toxic to small zooplankters such as rotifers (see Section 10.1), the natural food of very young fish. Proceed as follows.
(a) Calculate the volume (in m3) of the water present in the nursery pond. The pond should preferably be only half full.
(b) Measure the total quantity of insecticide required for treating the water volume. According to the kind of chemical you are using, the amount can vary from 0.25 to 3 g/m3. Check the calculations of water volume carefully.
(c) Dissolve this weight of insecticide into 10 to 20 l of water.
(d) Apply this solution evenly to the pond either directly from the banks if it is small enough, or from a boat if it is larger.
(e) Wait four to five days before stocking the pond with young fry. This will give time for the small-sized zooplankters to develop well again.
4.8 Animal pest control in stocked ponds
1. Once fish have been stocked in ponds, they should be protected as much as possible against predators such as carnivorous fish, frogs, turtles, snakes, birds and mammals. Theft of fish by people may also require preventive measures.
Controlling wild fish |
||
|
2. Once a pond has been treated for the extermination of all unwanted fish (see Sections 4.6 and 4.7), it should be protected from being reinfected through the water supply, through the use of one of the filtering devices described earlier (see Section 2.9). 3. These filtering devices are particularly important for breeding and nursery ponds. |
Water filtering devices
 |
|
Trapping water turtles
4. Build a simple turtle trap as follows:
(a) Assemble a square wooden frame made of four boards. Add four legs. The frame should be high enough so that at least 30 cm of it will be above water level in the shallow part of the pond.
(b) Add a bottom made of wire mesh or chicken wire.
(c) Anchor the trap well in shallow water.
(d) Place a slanting board on the outside of this frame, leading from the pond bottom to its top edge. This will serve as a ramp for turtles.
(e) Fix another board at the end of the slanting board to tip inside the frame when weight is put on it. If you use spring hinges, the tip board will return to the upright position after a turtle has fallen into the trap.
(f) All around the upper edge of the frame, drive in a row of nails fairly close together and bend them slightly down.
5. Bait the trap at its centre with fish or meat. Any turtle climbing up one of the slanting boards and crawling on to the tip board should fall into the trap.
Trapping water snakes
6. A simple cylindrical trap, 25 cm in diameter and 70 cm long, can be made with fine metal netting. The two end openings are closed with funnels, one of which can be easily removed.
7. Install several traps close to the area where the young fish are fed. Half of the trap should be kept under the water surface. Bait the traps with dead fish or frogs and check them every day.
|
Wooden turtle trap
 |
|
| A Wire mesh or chicken wire B Turtle ramp C Tip board D Row of nails E Bait post |
|
|
Wire mesh snake trap
 |
Controlling frogs
8. Frogs are equally harmful in breeding and nursery ponds, where some species such as Xenopus actively feed on young fish; in addition, tadpoles compete for food.
9. Frog control is not easy and seldom completely successful. To reduce the population as much as possible, try the following regularly.
(a) Catch tadpoles, either with a scoop net or a lift net. Use the lift net over a feeding trough where the tadpoles accumulate, or bait the net itself with some food to attract tadpoles. A lift net can be attached to a movable post, which can be taken from place to place around a pond or from pond to pond.
(b) Trap adult frogs, especially Xenopus, in baited wire traps set along the pond banks. This is similar to the wire trap shown for snakes above.
| (c) Fence those ponds that need particular protection using a material over which frogs cannot climb, such as plastic or corrugated metal sheets. Such a protection should be at least 50 cm high. |
Scoop net for catching tadpoles
 |
|
|
Lift net for catching tadpoles
 |
Wire trap for catching adult frogs
 |
Protecting against birds
10. Several kinds of bird are fond of fish, for example kingfishers, herons, fish eagles, pelicans and cormorants. In shallow ponds and wherever fish are concentrated, the damage and losses incurred can be considerable.
11. There are several ways to protect particularly vulnerable areas of the fish farm, such as broodstock, breeding, nursery and storage ponds. Those most commonly used are:
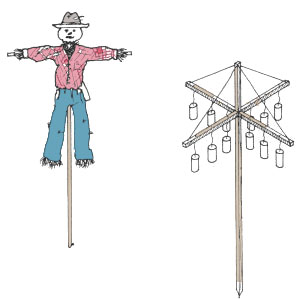
- scaring devices installed next to or inside the ponds, such as scarecrows, bamboo raffles, empty-can rattles, pieces of mirror on string, or flags;
- thin wires or strings stretched across the ponds and
perpendicular to prevalent wind to keep the flying birds from landing
on, sweeping over or diving into the ponds. On small ponds, stretch
wires or strings 50 to 70 cm apart, on larger ponds, up to 8 to
15 m apart; attach streamers to the wires; - fencing the shallower parts of the ponds or stretching thin wires about 50 cm above water level and 50 cm offshore to keep out wading birds;
- covering the ponds with netting material.
12. One of the best deterrents is human activity near the ponds. If you live on your fish farm you will have far fewer problems than if your ponds are completely isolated.
|
Straw scarecrow or empty-can rattles set
in the water
 |
Wire or cord stretched across pond
 |
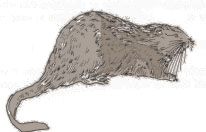
Controlling harmful mammals
13. Aquatic mammals can be harmful in two ways:
- some, like otters, can be active predators;
- others, like muskrats, can seriously damage pond dikes by digging long burrows above water level.
14. Apart from fencing, which might be expensive, the most effective control is obtained by:
- trapping, using specially designed traps; and
- poisoning, using poisoned baits.
15. Action should be taken as soon as it has been discovered that an animal has become active on the farm itself or in the neighbourhood.
|
Otter with fish
 |
Otter trap
 |
|
|
Muskrat
 |
 |
Preventing theft
16. Theft of fish caused by people is unfortunately rather common on fish farms, particularly if the ponds are isolated and far away from housing.
17. As you learned earlier in Section 4.5, a good security fence is expensive. Its use should be limited to the protection of the most valuable fish stocks, such as broodstocks and food fish held ready for marketing.
18. To protect a fattening pond from poaching with nets such as seine or cast nets (see Sections 8.2 and 8.3), you can use one of the following simple ways.
(a) Throw bamboo, stripped of leaves, with plenty of lateral branches into the pond, particularly along its banks.
(b) Take a young tree and cut off all its branches, leaving 10 to 15 cm close to the tree trunk. Cut off the tip of the tree down to where the stem is about 15 cm thick. Cut this end into a point and drive the tree upside-down about 50 cm deep into the pond bottom. Repeat for several trees, placing some at 1.5 to 2 m from the banks and others in the rest of the pond area.
(c) Make some hooks about 60 cm long from iron rods and set them into old metal containers filled with concrete. Sink these devices into your pond at various locations.
(d) Install a series of wooden stakes in the pond bottom. Join them with barbed wire or simply secure a few layers of barbed wire around the head of each stake.
19. It is usually difficult to steal fish by draining a pond, unless it is unguarded for long periods of time. Avoid the risk, and avoid loss of water caused by someone tampering with the outlet structure. Make access to monks and pipes difficult, by removing valve handles and, if necessary, putting locks on monk and sluice boards.
|
Bamboo poles or tree branches
 |
Barbed wire stretched across pond
 |
|
 |
4.9 Aquatic vegetation control in fish ponds
Introduction
1. Aquatic vegetation may exist in various forms and is usually classified as floating, submersed or emersed plants. A small growth may not be harmful but, if it becomes excessive, it may result in adverse effects on fish pond management. Vegetation control then becomes necessary for several reasons:
(a) Vegetation absorbs too many nutrients from water and bottom mud.
(b) It reduces sunlight penetration into the water, reducing photosynthesis (see Section 2.0).
(c) It provides refuge for the enemies and competitors of fish.
(d) It makes the pond bottom too rich in cellulose fibres, slowing down the decomposition of mud.
(e) It may greatly hamper the harvesting of farmed fish.
2. Vegetation should be controlled regularly as part of routine pond management. It is cheaper to weed out vegetation before it becomes excessive. Natural food production and sanitary conditions will be improved as a result.
Remember: a fringe of emersed plants can be useful for protecting dikes exposed to the wind (see Section 4.3).
3. There are three ways to control aquatic vegetation:
- biological methods, using specific animals;
- mechanical methods, by hand or with the help of equipment;
- chemical methods, based on the application of specific chemicals.
4. As far as possible, you should choose biological or mechanical methods. Chemical methods should be restricted to situations where the other methods cannot be applied, for example because of high cost of labour or large farm size.
|
Various kinds of aquatic vegetation
 |
Controlling aquatic vegetation biologically |
||
|
5. Some herbivorous fish can be effectively used to control many kinds of plants, for example:
6. Provided they are not too hard, most submersed, floating and even emersed plants are eaten by these fish. The bigger the fish, the larger and harder the plants they can usually control. 7. Some fish, such as the common carp, can indirectly control vegetation growth by digging the bottom mud for food and increasing the water turbidity. It has been observed that at least ten fish of 250 g or more each are necessary per 100 m2 of water surface. A similar result may be obtained through water fertilization, which will increase plankton turbidity (see Section 6.0). 8. Ducks can also help to control submersed vegetation in the shallower parts of ponds while searching for food (see Section 7.3). They also feed on some floating plants such as duckweed, Lemna sp. |
Some kinds of fish and ducks can help to
control plants
 |
|
Controlling aquatic vegetation mechanically
9. Hand clearing of aquatic vegetation is probably the most common method used. It can be most effective in smaller ponds, especially if carried out in drained ponds just before they are refilled.
10. It is best to pull out rooted plants entirely. With some strong emersed species such as reeds and papyrus, this is not always possible.
11. If the roots of the plant are too strong to pull, cut them as close to the ground as possible when the pond is dry or after the water level has been lowered. The pond should be refilled as soon as possible thereafter
12. In small ponds, filamentous algae and non-rooted floating plants, such as duckweed, can be pulled out using a perforated scoop fixed at the end of a long pole. Loosely rooted vegetation can be removed with hand rakes or a hook attached to a heavy rope.
13. The detached vegetation should always be removed from the pond to prevent further sprouting and to avoid any accumulation of decomposing organic matter which might cause dissolved oxygen deficiency (see Section 2.5). Such plant material can be most usefully Section 2.5). Such plant material can be most usefully recycled into organic fertilizer through composting (see Section 6.4). When this plant material is dry enough, it is sometimes preferable to heap and burn it in the drained pond. The ashes can then be spread over the pond bottom.
|
In drained ponds, cut strong-rooted vegetation
close to the bottom and sides  |
In undrained ponds, scoop out or
rake out aquatic plants 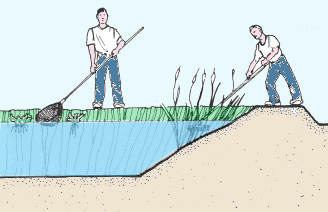 |
Controlling aquatic vegetation chemically
14. Several commercial chemicals are known to control algae (algicides) or higher plants (herbicides), in particular emersed and floating species. The control of submersed species is much more complicated, especially in full and stocked ponds.
15. The control of algae and algal blooms is best done with copper sulphate (CuSO4), a very effective and cheap algicide which can be safely used in stocked ponds if the total alkalinity of the water is sufficiently high. For best results, remember the following points:
(a) Determine the total alkalinity of the water (see Section 5.0). If it is higher than 50 mg CaCO3/l you can treat the pond in the presence of fish. If not, you have to harvest the fish first.
(b) Determine which type of algae are to be controlled:
- for a microscopic unicellular species or a larger colonial species, use an average dose of 0.1 to 0.3 g of copper sulphate per m3 of water;
- for a filamentous or multicellular species such as Spirogyra, Anabaena, Oscillatoria, Chara or Nitella, you will require higher doses of copper sulphates. Proceed according to the chart below.
Note: the bar scales adjacent to all examples of cellular, colonial and filamentous algae shown below are equal to ten micrometres, with the exception of the plant-like filamentous algae where the bar scales are equal to one millimetre.
Remember: 1 micrometre (micron) = 1µm = 0.001 mm or one thousandth of a millimetre.
|
Examples of unicellular algae
 Note: bar scales = 10 µm |
Examples of colonial algae
 Note: bar scales = 10 µm |
|
|
Examples of filamentous algae
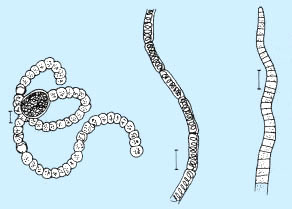 Note: bar scales = 10 µm |
Examples of multicellular algae
 Note: bar scales = 1 mm |
Note: 1 g/m3 = 1 mg/l |
(c) If fish are stocked, it is safer to treat only one-third or one-half of the pond surface at any one time, particularly if the total alkalinity of the water is low or if you are using concentrations higher than 1 g/m3.
(d) It is most important to determine carefully the volume of water to be treated (see Water, 4).
(e) Whenever possible, choose a dry, calm day for the treatment.
(f) It may be necessary to repeat the treatment after a few weeks.
(g) After the treatment and the killing of the algae, carefully watch for any sign of dissolved oxygen deficiency and take appropriate action (see Section 2.5).
(h) Copper sulphate is a poison. Handle and store it with care.
16. If possible, test the dose of copper sulphate you plan to use on some of your fish in two to three plastic or glass containers filled with pond water, before treating the stocked pond. Observe the behaviour of the fish over 24 to 36 hours (see also Section 15.3).
 |
Do not treat ponds on wet days
 |
|
|
Do not treat ponds on windy days
 |
17. Copper sulphate exists in two forms, powder or crystal. To treat the pond, use one of the following methods.
(a) For powder, evenly distribute the required amount over the water surface to be treated.
(b) Alternately, for powder or small crystals, completely dissolve the required amount in 10 to 20 l of lukewarm water and evenly apply this concentrated solution to the water area to be treated. Keep the solution well mixed. Ensure good mixing with the pond water.
(c) For crystals, put the required amount in one or more small bags made of mesh material, such as netting. Attach these bags to a floating support. Distribute the chemical in the pond area to be treated as evenly as possible by moving the float back and forth over this area. You may use:
- in small ponds, one inner-tube;
- in medium-sized ponds, two inner-tubes connected by a wooden support;
- in larger ponds, a boat with the bags attached over the sides.
18. The use of herbicides to control aquatic higher plants is a much more delicate matter. The success of the herbicide depends on the choice of the most suitable chemical mainly in relation to the kind of vegetation, the time of the year, the fish species present, the treatment method to be used and the care with which it is applied. In fish farms, herbicide treatment should only be carried out by competent and skilled personnel.
|
Distributing copper sulphate crystals
 |
 |
|
 |